MITSUBISHI XF-2A SUPPORT FIGHTER
HASEGAWA 1/72
By Drewe Manton
REFERENCE LINKS
349-The best F-16 site on the web!
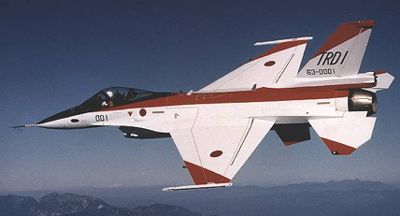
This new tool from Hasegawa represents just about the ultimate development of the 25 year old F-16 design. The F-16 was selected by the JASDF to be the basis for it's next generation support fighter, although the aircraft that eventually took to the air shares little other than a basic layout and engine with the F-16C it was based on. The XF-2A is a bigger beast altogether, with a longer fuselage and bigger radome, more wing and tailplane area and a new three piece canopy with greater bird-strike resistance than the F-16 two piece affair. Their are still doubts as to how many will eventually be built, with decisions having gone from a low of 82 up to 130 or so, tho' however many are built the fact remains that it is a hugely expensive aeroplane, but in the end any other solution than a largely indigenous design and manufacture would probably have been deemed unacceptable to the Japanese
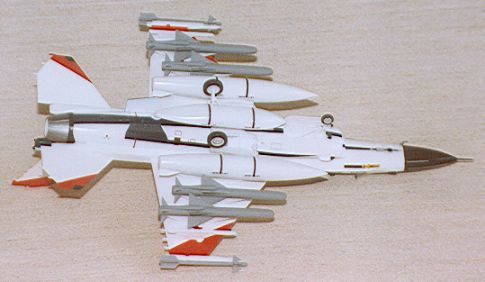
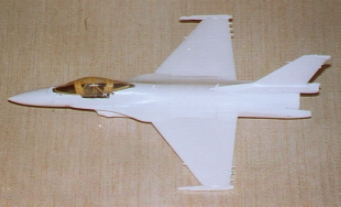
XF-2A No1
The Hasegawa kit represents the single seater (a seperate forward upper fuselage deals with this aspect of the design, to make room for a twin seater later)and comes on 13 white and one clear sprue. Also included are some poly caps to be inserted in the fuselage prior to assembly to allow the tailplanes to be push-fitted and subsequently to move. Overall detail is all engraved and very refined (as we would expect from Hasegawa), though some of the lines on the drop tanks are raised for some reason. . . Stores included are two of the large 600 gallon tanks as seen on Israeli F-16's, one 300 gallon centreline tank, 4 ASM-2 anti-ship missiles and 2 AAM-3 air-to-air missiles. The decal sheet is extemely comprehensive and contains markings for the first two prototypes, including just about every piece of red trim possible for #1 (tho' i would still prefer to mask and spray these areas-but at least you have the choice!
To begin construction i assembled the forward and rear fuselage
pieces (upper) to see how they fit. To do this i brushed some liquid poly
over the mating surfaces and then left it for 30 seconds or so before bringing
the pieces together. This allowed the plastic to be softened but the
glue to largely evaporate, the idea being to prevent glue oozing and
plastic from the joint so that i may obtain a join that looked like a panel
line and needing no other attention. This worked better than i expected
and the join was then reinforced from the inside with zap-a-gap and accelerator.
The cockpit bath has the seat sides moulded in and these will need
to be removed somehow if like me you intend to replace the ejector seat with
an aftermarket item (in my case an ACES-II from Neomega). The kit includes
the twin seat cockpit tub, so i cut the floor from the forward portion of
this, and then removed the floor and seat sides from the single seater tub.
This left me with a cockpit floor and the cockpit consoles/rear bulkhead
minus the seat sides. These parts were joined together to get a complete
cockpit minus seat sides which allowed the Neomega seat to fit with no trimming
at all- a bit of a convoluted method maybe but it worked. Next time i will
try to scrape away the seat sides without removing the floor, though i suspect
this may prove less clean a method (if quicker) than the route i chose.
The cockpit and rear turbine face were glued in place in the relevant
fuselage halves and i was ready to begin the first bit of painting. I
had decided to utilize the decals provided for the instrument panels and
consoles- if done well in this scale the results can be remarkably convincing
from all but the very finest inspections, and due to the use
 of decals
the interior parts were sprayed with Extracolour gloss Dark Gull Grey (FS16251)
and allowed to dry. I had intended to spray the Neomega seat grey as
well but the instructions called out for black. Whilst this seems unusual
on an ACES II seat there are a couple of precedents for black (F-117, F-15E
Strike Eagle) so i decided to trust to the instructions, the seat was superglued
to a piece of sprue for a handle and given a quick blast of Halfords acrylic
matt black from a spray can. The turbine rear face was painted matt
black and drybrushed with steel to bring out the detail, the black was also
carried well into the lower rear fuselage to camoflage the small gap which
allows white to show through. The rest of the exhaust interior was painted
a dirty off white/yellow colour to replicate the ceramic coating of the real
thing.
of decals
the interior parts were sprayed with Extracolour gloss Dark Gull Grey (FS16251)
and allowed to dry. I had intended to spray the Neomega seat grey as
well but the instructions called out for black. Whilst this seems unusual
on an ACES II seat there are a couple of precedents for black (F-117, F-15E
Strike Eagle) so i decided to trust to the instructions, the seat was superglued
to a piece of sprue for a handle and given a quick blast of Halfords acrylic
matt black from a spray can. The turbine rear face was painted matt
black and drybrushed with steel to bring out the detail, the black was also
carried well into the lower rear fuselage to camoflage the small gap which
allows white to show through. The rest of the exhaust interior was painted
a dirty off white/yellow colour to replicate the ceramic coating of the real
thing.
 Once the interior grey was dry i carefuly applied the decals for the
instrument panels and consoles, being sure to cut close to the subjects and
eliminate as much carrier film as possible due to the small area these decals
occupy. With all the decals in place i applied some super-sol to bed
them down , after which all the interior parts were sprayed with Aeromaster
acrylic flat. The MFD's were then touched in with gloss clear to represent
glass- as a short aside the XF-2 is one of the first aircraft to do away
with bulky CRT's for the displays-instead these are state of the art Liquid
Crystal Displays. Whilst in the cockpit the seat was drybrushed with medium
grey to bring the detail out and then details were painted- green oxygen
bottle on the left side, grey seat straps, olive drab cushions with steel
clips etc and yellow/black ejection handles. Once painted i truly believe
the Neomega ACES II to be best example of this seat i've yet seen in 1/72nd,
the detail is astounding and so well defined that painting is a pleasure.
With all the interior parts dealt with i joined the fuselage
halves with fast acting cement (tenax, plastic weld),and in contrast to the
way i dealt with the forward/rear joint the aim this time was to squeeze
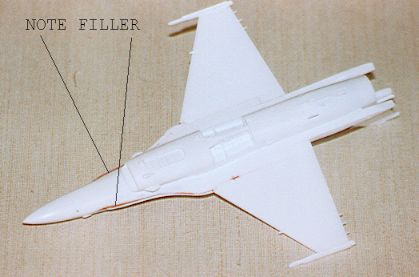
softened plastic out of the joints to minimise filling later. One problem
i had was in the area of the LERX below the cockpit on the underside- there
were some large and quite un Hasegawa-like gaps in this area. In the
end i ran zap-a-gap into the joint, and when that was dry skimmed over with
Dr Microtools putty to fix this, a very quick and easy solution to an otherwise
ugly looking problem. With the fuselage join dealt with i added the
wings and vertical tail surface. No problems here, the pieces were
tacked in place and then liquid glue ran into the joint. A quick swipe
with some scotchbrite when dry and these joints were as good as joints get.
The intake was also assembled, sanded in and attached-again no great
dramas here, all very quick and easy. Finally the windscreen and rear
clear area were attached with plastic weld and the canopy tacked in place
with white glue to act as a mask for the cockpit during spraying.
Once the interior grey was dry i carefuly applied the decals for the
instrument panels and consoles, being sure to cut close to the subjects and
eliminate as much carrier film as possible due to the small area these decals
occupy. With all the decals in place i applied some super-sol to bed
them down , after which all the interior parts were sprayed with Aeromaster
acrylic flat. The MFD's were then touched in with gloss clear to represent
glass- as a short aside the XF-2 is one of the first aircraft to do away
with bulky CRT's for the displays-instead these are state of the art Liquid
Crystal Displays. Whilst in the cockpit the seat was drybrushed with medium
grey to bring the detail out and then details were painted- green oxygen
bottle on the left side, grey seat straps, olive drab cushions with steel
clips etc and yellow/black ejection handles. Once painted i truly believe
the Neomega ACES II to be best example of this seat i've yet seen in 1/72nd,
the detail is astounding and so well defined that painting is a pleasure.
With all the interior parts dealt with i joined the fuselage
halves with fast acting cement (tenax, plastic weld),and in contrast to the
way i dealt with the forward/rear joint the aim this time was to squeeze
softened plastic out of the joints to minimise filling later. One problem
i had was in the area of the LERX below the cockpit on the underside- there
were some large and quite un Hasegawa-like gaps in this area. In the
end i ran zap-a-gap into the joint, and when that was dry skimmed over with
Dr Microtools putty to fix this, a very quick and easy solution to an otherwise
ugly looking problem. With the fuselage join dealt with i added the
wings and vertical tail surface. No problems here, the pieces were
tacked in place and then liquid glue ran into the joint. A quick swipe
with some scotchbrite when dry and these joints were as good as joints get.
The intake was also assembled, sanded in and attached-again no great
dramas here, all very quick and easy. Finally the windscreen and rear
clear area were attached with plastic weld and the canopy tacked in place
with white glue to act as a mask for the cockpit during spraying.
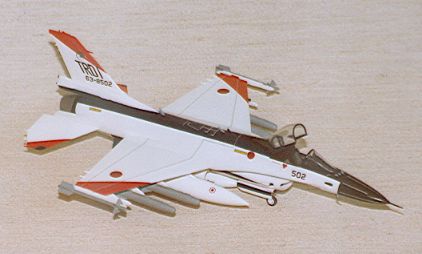
The kit includes options for aircraft No's 1 and 2, whichever you choose the colour is white with various other trimmings-i chose A/C 2 with orange and blue trimming and the black nose radome. The model was first sprayed with Tamiya gloss white-first couple of coats quite thick and then very heavily thinned to give a smooth finish-the trick here is to drop the pressure and literally flow the paint onto the surface without getting runs. With the paint thinned anything up to 95% with alcohol if it looks like the detail is being obscured remember that within a couple of minutes nearly all of what hits the model will evaporate and detail will be preserved along with a very smooth glossy white finish. This paint must now be left for as long as you can to set up before any other painting is done on the main airframe. I used this break to deal with the little bits like wheels and weapons. After a day or two i was ready to commence painting the trimming. When applying bright colours over white i always mask everything that is to remain white-reds, yellows and oranges can find there way onto the white very easily and give it a horrible tint so better safe than sorry- curiously with black or grey onto white this does'nt seem to be a problem. Wing and tail tips were sprayed with Extracolor international orange and the spine was done with Humbrol 15 (midnight blue). This was a trial! i had one of those unlucky spells-the airbrush clogged, lumps were sprayed through it and i ended up knocking an open tin of blue off of the table. When it hit the floor i was treated to a mavellous display of fluid dynamics- the result was one ruined pair of jeans, a midnight blue cheek and blue absolutely everywhere over the floor-took me half an hour to clear up and then i knocked the airbrush colour cup over! This scene would have made Frank Spencer look efficient! In the end however i prevailed and on the blue went, just goes to show- the best laid plans etc.! I had masked out the red decal areas for the belly stripe and cheat line and sprayed them blue as well-seemed easier than trying to mask the areas of the model in this case. With the anti glare panel and radome painted Tamiya gloss black and the various antenna etc. painted black decalling could commence.
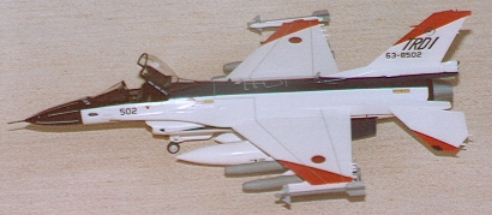 The decals
are superbly printed and whilst a tiny bit thick for my liking actually settled
down beautifully with a little super sol- i think that Hasegaaw's decals
these days are some of the best in the business (are you listening Tamiya?!?!?).
Using plenty of water to slide them into place i experienced few problems,
and my previously dark blue sprayed items went on better than i could have
hoped, with only a little touching up needed. The only items i needed
to add were the conductor strips on the nose radome-this was some superscale
white decal cut as thin as could get it. This was my first use of distilled
rather than tap water for the decals and i think it does make a difference-there
were almost no deposits left on the model of any kind after the decals
had dried-a quick wipe over with a warm damp cloth and i was ready for the
final finsh. Two or three coats of Klear were sprayed on and then the model
was finished with aeromaster acrylic semi-gloss varnish which i think looks
right for the scale. Once this had dried all masking of the canopy
etc. was removed and finishing could commence.
The decals
are superbly printed and whilst a tiny bit thick for my liking actually settled
down beautifully with a little super sol- i think that Hasegaaw's decals
these days are some of the best in the business (are you listening Tamiya?!?!?).
Using plenty of water to slide them into place i experienced few problems,
and my previously dark blue sprayed items went on better than i could have
hoped, with only a little touching up needed. The only items i needed
to add were the conductor strips on the nose radome-this was some superscale
white decal cut as thin as could get it. This was my first use of distilled
rather than tap water for the decals and i think it does make a difference-there
were almost no deposits left on the model of any kind after the decals
had dried-a quick wipe over with a warm damp cloth and i was ready for the
final finsh. Two or three coats of Klear were sprayed on and then the model
was finished with aeromaster acrylic semi-gloss varnish which i think looks
right for the scale. Once this had dried all masking of the canopy
etc. was removed and finishing could commence.
The canopy frame interior was painted matt black and the ejector seat was popped into place with a little white glue, undercarriage and doors went on with zap-a-gap and the stores were added with cyano also. I must admit to wimping out a little- my anti-ship missiles are grey rather than the dayglo candy checked affairs used for testing, i did'nt have the patience to do this scheme once never mind four times- but at least they are on the model! With the canopy in place and some final detail painting (antenna etc.) the model was finished and ready for the shelf.
In conclusion this was a highly enjoyable model to make and added something "the same but a little different" to my F-16 collection. The scheme is striking and certainly catches the eye (although i do look forward to the production scheme!). Recommended for fast jet fans!