|
KIT: |
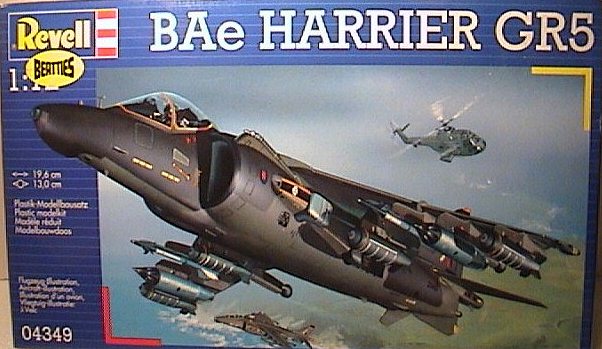
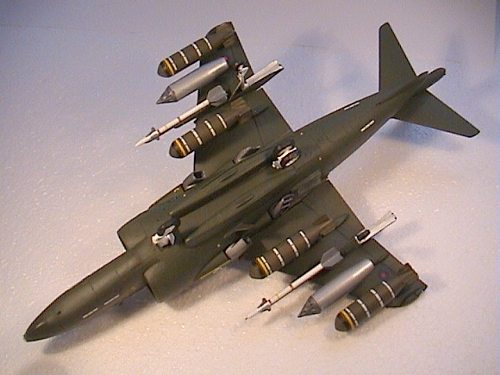
Revell 1/72 Harrier GR.5 |
|
KIT # |
4349 |
|
PRICE: |
£6.99 |
|
DECALS: |
One aircraft |
|
REVIEW & |
Angus McDonald |
|
NOTES: |
A delightful kit with stunning decals |
|
HISTORY |
Developed from the Hawker P1127, the Harrier had a difficult gestation and childhood. Encountering much opposition, derision and indifference, it is amazing it survived. With the canceling of the supersonic Harrier, many thought it incapable of operating in the modern era, until the Harrier came of age in the Falklands conflict, proving its doubters wrong. And still there was no British lead development of this aircraft.
The GR5 is known as the ‘big wing’ Harrier, resulting from the retro fitting of an enlarged wing, along with other major improvements, to the existing GR3 fleet. BAe became a subcontractor to McDonnell Douglas in order to jointly produce the AV-8B Harrier. There are a number of differences between the GR5 and the AV-8B, the most noticeable being the under-nose ‘chisel’ fairing and the extra under wing pylons to carry AIM-9 sidewinders.
Delays in developing various avionics, lead the GR5 being an interim type pending the deliveries of GR7s from 1990. The GR5 provided valuable experience to the RAF in this type, before the arrival of the GR7. Where upon the existing GR5s were upgraded to GR7 standard.
|
THE KIT |
It is slightly baffling why I bought this kit. I cannot say that lines of the Harrier appeal to me in quite the same way as many other aircraft. However, if one was cornered by a rabid rat with a glint in its eye, and with no way of escape except to admit it, I guess I would say I like the later versions of the Harrier, especially when they carry a full complement of under-wing stores.
 I bought this kit of the
Harrier from Beatties, in a moment of weakness; plus it was on sale (so speaks a
true Yorkshireman); and after all, damn it man, one must have an example of such
a fine feat of British engineering in one’s model collection. Though the
considerable contributions of the Americans in the Harrier’s latter development
must be recognised.
I bought this kit of the
Harrier from Beatties, in a moment of weakness; plus it was on sale (so speaks a
true Yorkshireman); and after all, damn it man, one must have an example of such
a fine feat of British engineering in one’s model collection. Though the
considerable contributions of the Americans in the Harrier’s latter development
must be recognised.
The kit comes on two sprues, moulded in grey plastic. Canopy, nose and gun-sight transparencies occupy a third sprue. All are contained in a sealed plastic bag. Instructions are printed on two sheets of paper, each folded in half to yield eight pages, and are typical Revell instructions, as are the paint colour call outs.
Kits parts are crisply moulded, with raised panel lines and details. There’s virtually no flash, and any ejector marks are in reasonably hidden areas. I don’t recall seeing a single sink mark.
As an adjunct, I started and completed this kit in the last two weeks of my marathon, mayhem of construction with Revell’s FG1/FGR2 Phantom.
|
CONSTRUCTION |
The break down of parts allowed for a series of sub-assemblies. So while my construction sequence is described sequentially, a lot took place in parallel.
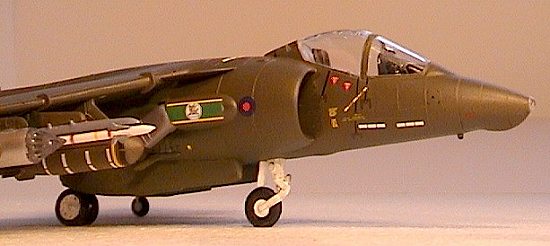
The cockpit: A fairly simple affair. Featureless ejection seat. Painted it grey and black; added harness straps made out of painted paper. Raised detail for instrument panel. Painted it black, then used silver and white to highlight some of the instruments to bring it to life. Glued ‘ejection seat’, instrument panel and joystick to simple cockpit floor; though there are solid rudder pedals and sort of side instrument panels. Painted the cockpit grey.
Note. I’m afraid, when it comes to painting I tend to be a heathen. If I can get an accurate colour call-out which matches an acrylic paint I can purchase, then I’ll use it. If I can’t, I grab whatever I have on my workbench and which looks close enough to colours I see in reference materials. Life’s too short. I stick to the philosophy that in real life, paint batches vary, operational wear and tear affect colours, and then there’s the field applied camouflage; all this without the ‘scaling’ down of the real-life colours to ‘model-scale’ colours.
The fuselage is split vertically. I painted the interior grey. The turbine blades/support blanks were given a coat of Halford’s Chrome. The cockpit, turbine blades/support blank and a pillar (you have to see it to understand) are sandwiched between the two fuselage halves. I wasn’t careful in joining the fuselage halves and ended up with a slight step, which cause unnecessary sanding to remove the join. This is turn caused unnecessary scribing to restore the needlessly obliterated detail. It was at this point, I noticed Revell had kindly supplied a decal for the instrument panel. I calmly placed it in the spare decal box, ‘nuff said.
The wings are split horizontally. The only fit problem occurs at the wing tips. You need to trim off about 1mm to get a perfect fit. You will need a little filler if, like me, you trim off slightly more than you should. I used 3M’s Acryl-Red. Note: A nice fine filler, which is almost impossible to obtain in the UK. After explaining my woes (to 3M’s online support service via e-mail) of ringing 20 distributors in a futile effort to find this substance, a rather wonderful lady at 3M, Bracknell HQ supplied me a tube of Acryl-Red AND Acryl-Green, free!!! I now have a soft spot for 3M.
 If you are careful, fitting
the wings to the fuselage will result in an upper surface join which requires
virtually no sanding. For once I got it right; pass the whisky please. Purists
might argue that the under surface wing/fuselage join is not perfect. I say I
can hardly see the small gap, and anybody who picks up the model and shines a
torch in there deserves to find something.
If you are careful, fitting
the wings to the fuselage will result in an upper surface join which requires
virtually no sanding. For once I got it right; pass the whisky please. Purists
might argue that the under surface wing/fuselage join is not perfect. I say I
can hardly see the small gap, and anybody who picks up the model and shines a
torch in there deserves to find something.
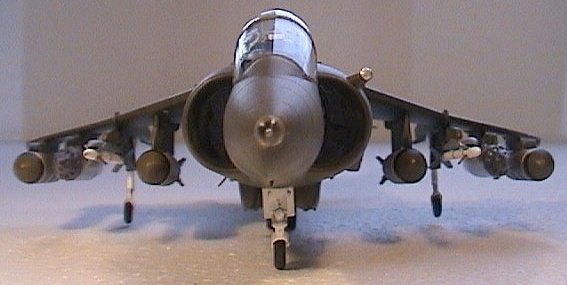
There are no holes to drill to accommodate your selected aircraft version or optional stores. You either glue on all the under-wing pylons or, if your references show otherwise for the version you are building, you fill in the locating holes. I stuck all the pylons into their locating hole. The missile pylons are a simple butt fit to the wings, just forward of the out-rigger undercarriage. I left these off until the end.
The instructions are vague when it comes to the fitting of two small fillets. These fillets butt join against the fuselage and just under the leading edge. I consulted the box art and a couple of web pages to ascertain how they fitted. After a lot of dry fitting, I finally found something that looked about right, and glued them in. They only needed a slight pass with wet’n’dry to clean them up.
Likewise, the positioning of the refuelling probe is vague, requiring a butt join against the fuselage. Eyeballing it using panel lines as a reference helps. If that was vague, it was nothing compared to the refuelling probe tip. The instructions show it fitting one way, while the box art show it fitting the other way.
Bombs and rocket launchers went together with little drama. The exhaust nozzles fitted together reasonably well. You can get away with sanding the join lines and losing some of the raised detail and not bother with scribing them back in. They can be left off the model until after painting, as the pop rather nicely into their locating holes. If you are into that sort of thing, they swivel!!!
Undercarriage bits, what there is of it, were cleaned up. The main central units were held in place with Bluetack, and the whole model carefully, very carefully, placed on a hot iron so as to give the wheels that weighted appearance. The main undercarriage was then removed and sanded smooth. I didn’t do this with the out-riggers. I figured they would not take much weight, so won’t be squashed.
There’s no detail inside the small undercarriage/out-rigger wells. I have no idea if this is correct. I just left them be, and painted them white. The undercarriage doors for the out-riggers need to be cut in half, if you wish to have the undercarriage down.
Moving on to the canopy. A two piece affair, they allow you to pose the model with the canopy open. They really are lovely and clear. All this was let down by the fit of the front transparency. Try as I might, it wouldn’t sit properly without a large gap. Oh, well. After masking off the canopies, I glued them in place and then puttied around the front transparency, then carefully sanded the area as smooth as my skills would allow. Foolishly, I stuck on the fuselage mounted pitot tube. It was a simple butt join.
And there it is. A very easy, relatively uncomplicated kit to construct.
|
PAINT & DECALS |
After a thorough wash of all the bits, first off I applied the evil smelling Halford’s Grey acrylic primer. This goes on really thin to produce a superb surface for acrylics to cling to.
Chucking away the somewhat useless Revell colour call-outs, I did a best match with what Gunze paints I had on my workbench. The underside was sprayed Gunze Khaki green, as were the bombs (I was too lazy and tight fisted to get the ‘bronze-green’ stipulated in the instructions), undercarriage doors, and other underside bits.
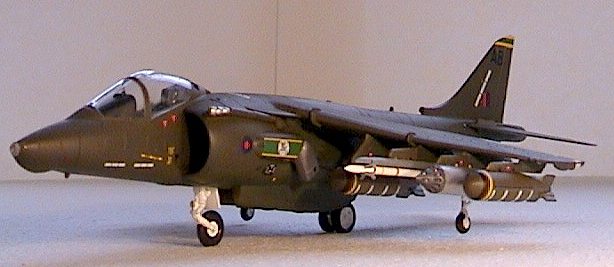
After curing for a couple of days, the masking for the simple camouflage scheme was done with Sellotape’s Stencil Masking tape. Once applied, the top and side surfaces were sprayed with Gunze Olive Drab 1, and left to cure for a couple of days. At some point during painting, I broke off the fuselage mounted pitot tube. I put it in a safe place for later fitting.
 The missiles were sprayed
Halfords appliance white, while the rocket launches hand painted a combination
of Humbrol Metalcote Polished Steel and Polished Aluminium. Exhaust nozzles were
painted aluminium, while the area on the fuselage just aft of the exhaust
nozzles were painted polished aluminium and then Tamiya acrylic smoke.
Undercarriage bits and doors and wells were painted white; apart from tyres,
which were painted black.
The missiles were sprayed
Halfords appliance white, while the rocket launches hand painted a combination
of Humbrol Metalcote Polished Steel and Polished Aluminium. Exhaust nozzles were
painted aluminium, while the area on the fuselage just aft of the exhaust
nozzles were painted polished aluminium and then Tamiya acrylic smoke.
Undercarriage bits and doors and wells were painted white; apart from tyres,
which were painted black.
Removing the masking revealed no lifting or creeping of paint. Halford’s primer and Sellotape’s stencil masking tape do their stuff again! Johnson’s Future was then hand painted on those components to receive decals, except the missiles, as they were already gloss.
Bearing in mind the relatively, diminutive dimensions of the Harrier, the decal sheet is simply stunning. I would estimate there were over a hundred decals to apply. Register was superb, with very little carrier film. It took me a couple of evenings to apply all the stencilling. Shame some of the decals were lost in the camouflage as their colouring was so similar.
Highlights and pitfalls. Decals are supplied for both the black and yellow bands round the front of the bombs. The black band is curved to help conform to the dome shape of the bombs. Even so, the black band is tricky to fit, I broke one and managed to get one not to fit properly. Once on, any bumps were quickly vanquished with Micro Sol.
Unfortunately, the yellow band is just a couple of millimetres too short. I bridged the gap with some I made up from a spare decal, painted Tamiya signal yellow, which sort of matched the yellow of the bomb band. If anyone does notice the hard to spot difference, then my excuse is it represents the harsh operating conditions of the Harrier.
Revell have even provided decals for the missiles. For some reason, they did not want to stick to Halford’s appliance white paint I’d used on the missiles. Very curious. I got them to stick in place with Future Klear, before sealing with a coat of matt varnish. Micro Set and Sol was used throughout, with the decals responding well to them.
One major downfall was the instructions. They were very vague as to the location and orientation of some of the decals. Most frustrating.
Finishing off.
 The model was given a quick
wash to remove any residue Micro Set and Sol. Everything was then given a coat
of Windsor and Newton acrylic varnish.
The model was given a quick
wash to remove any residue Micro Set and Sol. Everything was then given a coat
of Windsor and Newton acrylic varnish.
Undercarriage bits were then stuck in place. Positioning of the out-riggers is definitely vague. I made the mistake of just gluing them in place. Thus, when the model sits on the ground, one of the out-riggers hangs free in the air. What I should have done was stuck the main undercarriage in place, then used polystyrene cement to glue the out-riggers in place, put the model on its wheels and while the cement was still wet, moved the out-riggers until all wheels were touching the ground. Oh, well, a diorama in a rough ploughed field or deep grass beckons.
Bombs are simply butt-joined to their pylons. The missiles are connected to launch rails and then glued to their pylons. It’s a bit fiddly here. Both the missile rails and rocket launcher rails use locating stubs to ‘help’ get a positive fix on to the pylons. The stubs need a bit of trimming to fit the locating gaps in the pylons.
I popped in the exhaust nozzles and stuck back the fuselage mounted pitot tube.
Finally, off came the canopy masking, after running a scalpel blade round the edge to get a sharp edge. There seemed to be a little fogging, even though I used low odour super glue. I can’t decide if this is due to the super glue ( I didn’t dip the canopy in Future) or if I didn’t properly clean off the Auto Glym Super Resin polish I use on canopies. Even so, the canopy is still clear enough to see the somewhat spartan cockpit.
|
CONCLUSIONS |
I could be prejudiced by my torrid experiences with the Revell/Matchbox Phantom FG.1/FGR.2, but this was a delightful little kit to build. Compared to the Phantom, it just seemed to fall together with very little fuss. I have noticed this with kits. Some kits just fall together even though they’re meant to be beast, whilst others drive you to despair even though they’re allegedly shake’n’bake kits. However, in this instance I think it was the kit that did all the hard work.
Apart from the front cockpit transparency, the only filler required was down to my ham fisted trimming of the wing tip.
The decals are phenomenal.
As to its accuracy, who knows. I didn’t even know there was a GR5 until I saw it in Beatties. I’ll leave it to the rivet counters to elucidate on whether its dimensions are within micrometer tolerances of acceptability. To me it looks like a Harrier. I’m quite taken by it. I might be persuaded to tackle the 1/48 or even the 1/24 Airfix kit.
Recommended to all.
If you would like your product reviewed fairly and quickly by a site that has thousands of visits a day, please contact me or see other details in the Note to Contributors.