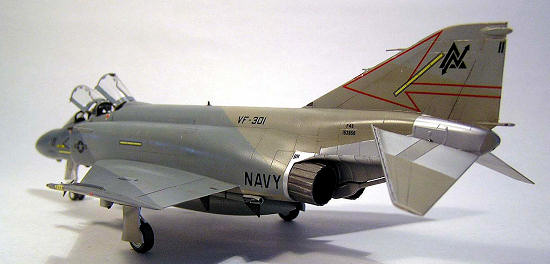
Hasegawa 1/72 F-4J/S 'Ferris Scheme'
| KIT #: | 00911 |
| PRICE: | $22.99 from Lucky Models |
| DECALS: | Two options |
| REVIEWER: | Fernando Rolandelli |
| NOTES: | Big amount of extra parts, interesting decal options, flimsy assembly, no weapons. |
| HISTORY |
Mc Donnell Douglas
F-4S Phantom II, VF-301, NAS
The S
denomination was applied to a number (265 or 248 according to different sources)
of F-4Js upgraded in the mid-‘70s, so that they could extend their life until
the F/A-18 could take over. Just like the Ns, airframes were stripped and
reinforced, and wiring and plumbing changed. Maneuvering slats were added, as
well as smokeless -10B engines. Weapons control suite was the digital AWG-10.
Formation lights were also added. These machines served in the smaller carriers
like the USS Midway and Roosevelt until 1986, and then ashore in the Navy
Reserve squadrons until 1987.
On its part,
Fighter Squadron 301 (VF-301) was an aviation unit of the United States Naval
Reserve in service from 1970 to 1994.
 The
squadron's nickname was Devil's Disciples. It was activated on
The
squadron's nickname was Devil's Disciples. It was activated on
“Ferris” schemes are probably inspired in the early ‘40s Barclay’s experimental designs based in geometric patterns in contrasting colors, thought to offer advantages as “offensive” camouflage by distorting the aircraft’s shape and masking its flying attitude. Best known is the P-51 painted in Black and White triangles, but a Brewster F2A and I think to remember a TBD were also painted in a similar scheme. The scheme was not adopted because of their labour-intensive nature, both to apply and to maintain, and because they were deemed to make no improvement on the usual OD/NG camouflage.
In modern
times, the first objection seems to be easily circumvallated, for the number of
machines is sensibly less and the peacetime activity schedule can accommodate
the frequent cleaning of them, to the crew’s chief delight. The second, however,
seems to stand, and simpler schemes like the TPS seem to be equally effective.
The first scheme offered (a heavily geometrical “splinter” pattern seen
previously on an old Fujimi boxing) does not seem to have been applied to any
other machine, let alone used operationally, but the second one was used by both
VF-301 and 302. There were variations, like a “reversed” fashion (i.e., lightest
color forward), as well as a “handed” fashion (i.e., lightest color to the
left). The one in the kit is the final, standardized variant
| THE KIT |
 This is a relatively
new boxing of the well known 1/72nd
This is a relatively
new boxing of the well known 1/72nd
| CONSTRUCTION |
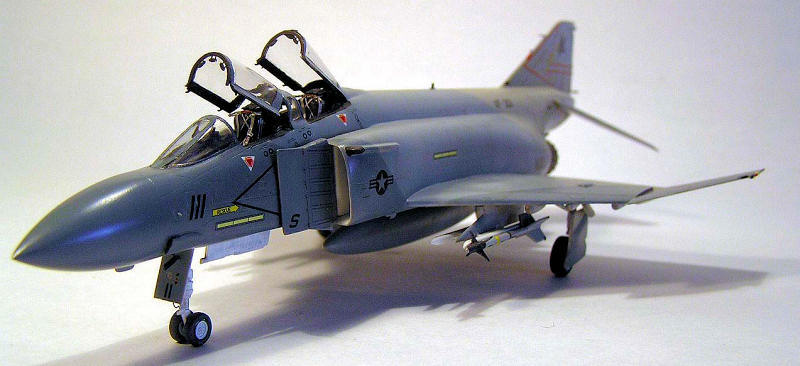
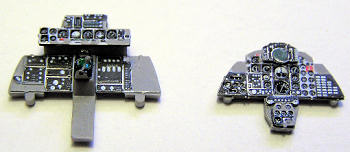 The cockpit built up
uneventfully, receiving the PE instrument panels and HUD, and scratchbuilt
sidewall and floor detail, as well as a representation of the myriad of cables
that go between crew stations. The distinctive head-up panel for the WSO was
scratch built and added to the c
The cockpit built up
uneventfully, receiving the PE instrument panels and HUD, and scratchbuilt
sidewall and floor detail, as well as a representation of the myriad of cables
that go between crew stations. The distinctive head-up panel for the WSO was
scratch built and added to the c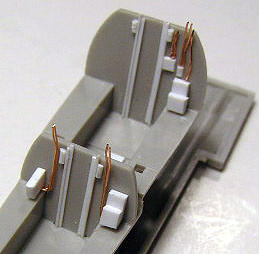 ockpit frame. The whole cockpit was painted FS
36231, using WEMM’s paint. I rather like the look of the kit’s seats, provided
they are detailed with the PE parts from Eduard, and so I did. The windscreen
was tinted with thinned Tamiya Clear Blue hand brushed from the inside.
ockpit frame. The whole cockpit was painted FS
36231, using WEMM’s paint. I rather like the look of the kit’s seats, provided
they are detailed with the PE parts from Eduard, and so I did. The windscreen
was tinted with thinned Tamiya Clear Blue hand brushed from the inside.
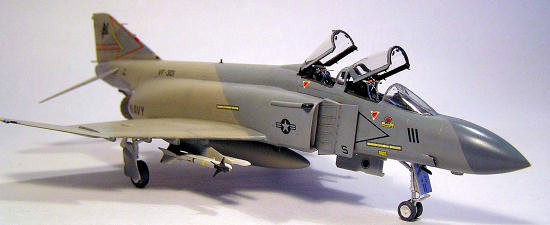
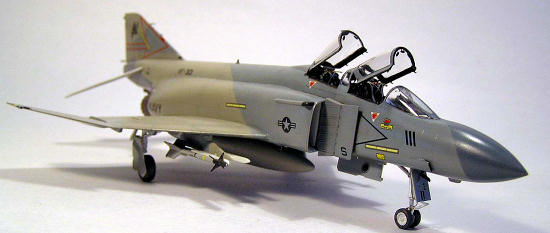
Airframe
construction, as usual with Hase’s Phantoms, proved cumbersome because of the
numerous part breaks. I tried hard to be more careful than usual in the
assembly, and
 succeeded only partially in reducing the amount of “correcting” I
usually need. Having been made aware of the need to erase the reinforcement
triangles in the elevators by some post in this very site (confirmed by
examination of pictures), I sanded them flush and rescribed the panel lines.
They were fixed in the customary angle they adopt when in “neutral” position. I
had intended to use the excellent Aires exhaust cans, but they are (correctly)
very deep and
succeeded only partially in reducing the amount of “correcting” I
usually need. Having been made aware of the need to erase the reinforcement
triangles in the elevators by some post in this very site (confirmed by
examination of pictures), I sanded them flush and rescribed the panel lines.
They were fixed in the customary angle they adopt when in “neutral” position. I
had intended to use the excellent Aires exhaust cans, but they are (correctly)
very deep and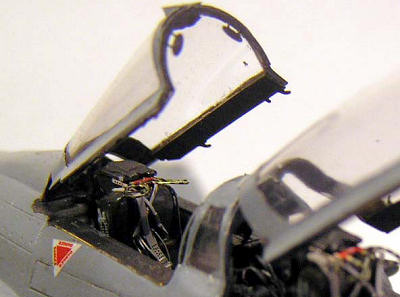 hit against the inner reinforcement plate in the rear fuselage
(which was already assembled), so they were set aside for some future project
and the kit’s cans were used, after receiving the customary “internal petals”
detail made of Tamiya tape.
hit against the inner reinforcement plate in the rear fuselage
(which was already assembled), so they were set aside for some future project
and the kit’s cans were used, after receiving the customary “internal petals”
detail made of Tamiya tape.
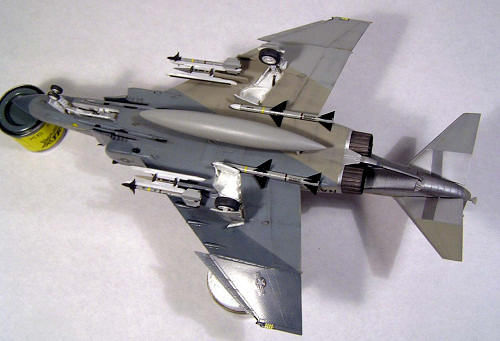
Both undercarriage
legs and bays received the usual detail in the form of wires and pieces of
plastic representing the numerous boxes present there.
Modern aircraft
weapons is an area to be careful; these Reserve machines are seldom seen
carrying “live” rounds, and I have seen a picture of this very machine (though
on static display) carrying a most intriguing load of two Sidewinder training
rounds on the right inner pylon and a Sparrow, presumably also a training round,
on the left, but I could not discern what kind of adaptor rack was being used.
Therefore, I settled for a “light” version of the usual CAP armament of two
Sparrows on the aft bays and four (in this case, two -9L) Sidewinder on the
inner pylons, plus a centerline fuel tank.
| COLORS & MARKINGS |

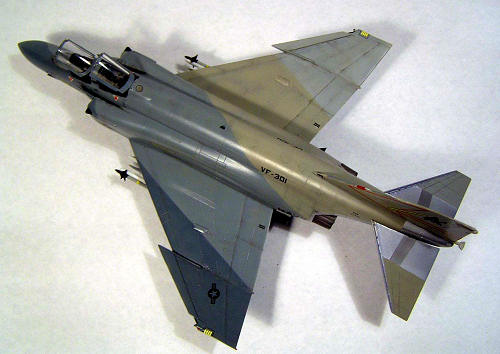
The ventral tank I
painted wholly in 36375, as if taken from a TPS-painted aircraft, instead of
following the camouflage; this provides some contrast and on the other side I
have not seen a picture of such a camouflaged thing. Sidewinder rails were
painted the usual White, and the missiles themselves in 36375.
| CONCLUSIONS |
 As always, the
finished product looks very good, but Hase’s Phantoms are a bit tiresome to
build because of the parts layout, requiring very careful assembling for which I
am ill-prepared, with extensive dry fitting, careful gluing, and lots of priming
and correcting sessions. However, previous research in sources and final
admiration of the finished model being the phases of modeling I like most, they
always bring satisfaction, and for sure I shall build more of them.
Additionally, I like subdued low-viz schemes, and this is really handsome.
As always, the
finished product looks very good, but Hase’s Phantoms are a bit tiresome to
build because of the parts layout, requiring very careful assembling for which I
am ill-prepared, with extensive dry fitting, careful gluing, and lots of priming
and correcting sessions. However, previous research in sources and final
admiration of the finished model being the phases of modeling I like most, they
always bring satisfaction, and for sure I shall build more of them.
Additionally, I like subdued low-viz schemes, and this is really handsome.
| REFERENCES |
- Several websites
(“Google is your friend”) including J. Baugher’s (wonderful historical and
technical stuff)
Several websites
(“Google is your friend”) including J. Baugher’s (wonderful historical and
technical stuff)
- “The F-4 Part 2: US Navy and Marine Corps Variants”, SAMI Publications
October 2010
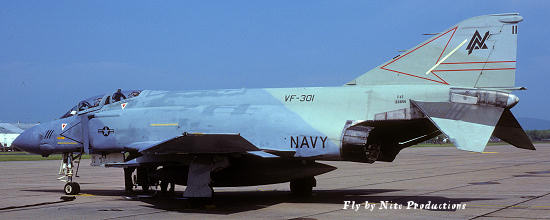
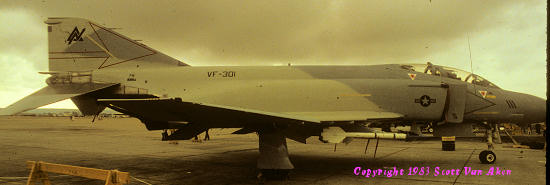
Below are two photos of the actual plane. The crummy on on a typical San Diego summer morning was taken by your editor. Both are from 1983. I hope Fernando doesn't mind my adding these as I always think it is neat to have an actual photo or two of a subject being modeled. You can also see the difference in colors between clear and overcast skies. Ed
If you would like your product reviewed fairly and quickly, please contact me or see other details in the Note to Contributors.
Back to the Main Page Back to the Review Index Page