Hasegawa 1/48 AV-8B Harrier II
| KIT #: | 09538 |
| PRICE: | approx $45.00 |
| DECALS: | Three options |
| REVIEWER: | Scott Lyle |
| NOTES: | Limited reissue |
| HISTORY |
It
has long been recognized that an aircraft that could take off and land
vertically, without the need for a long runway, would have many useful
applications.
Helicopters began to be produced during World War Two, and in the
following years several concepts for V/STOL (Vertical and/or Short Take-Off and
Landing) aircraft were designed.
The first V/STOL aircraft that was truly successful
however was the Hawker Siddeley Harrier, the concept for which first flew in
1961.
In March 1957 the Hawker Siddeley
Corporation in England began work on a radical new V/STOL concept.
The heart of the design was the Bristol Orpheus turbojet
engine, a unique design that could vector 8000 pounds of thrust through four
rotatable nozzles that could in effect create four vertical columns of lift.
As development continued the P.1127 concept was built
around the new engine, now
 called the
Bristol Pegasus I, and that concept would be the forefather of the Harrier
family of aircraft.
called the
Bristol Pegasus I, and that concept would be the forefather of the Harrier
family of aircraft.
Production Harriers first entered
service with the RAF in 1969, followed in the early 1970s by the US Marine
Corps, the Royal Navy, and other navies around the world.
Flexible and reliable, the Harrier was well-liked by the
Marine Corps, but its shortcomings soon became apparent.
Its range was too short and its bomb load was too small,
leading to the basic problem of “it can’t carry enough of what it’s supposed to
carry far enough.”
In 1973 McDonnell Douglas proposed a redesigned,
enhanced Harrier which used the existing fuselage and tail but added a larger
wing and a new, more powerful engine.
Initially called the AV-16, the program was eventually
killed due to costs expected to reach well over $1 billion dollars.
Undaunted, McDonnell Douglas next
proposed to improve the existing airframe while using the existing power plant.
In order to carry more ordnance and increase its range,
the new aircraft would have to have a bigger wing with more fuel capacity and
more hard-points.
But since the engine was not gaining anymore power, the
overall weight of the aircraft would have to stay roughly the same as that of
the AV-8A.
In order to do that, McDonnell Douglas’ engineers realized that
not only would the new wing and fuselage have to be made out of lightweight
materials, but the overall lift qualities of the aircraft would have to be
improved as well.
To this end a new larger wing was designed out of
graphite composite materials - lighter than aluminum but in some ways stronger
than steel.
The intakes were increased and made more efficient, larger flaps
were added to the wings, and large strakes were added to the Aden gun pods on
the bottom of the fuselage to create a better “air cushion” when the aircraft
was taking off or landing.
Mockups of the new design were
presented in August 1975 and two AV-8A airframes were modified with most of the
new features.
The first flight of one of the prototypes occurred late in 1978
and the results were so successful that a program to retrofit many of the new
features into the existing AV-8A fleet was launched; the upgraded aircraft
became known as the AV-8C.
 Four full scale development aircraft, new builds
from the ground up, were authorized and testing continued into the early 1980s.
In 1981 British Aerospace reached an agreement with
McDonnell Douglas to become a subcontractor for the program, bringing the
British government back into the new Harrier program.
Production began in 1983 with McDonnell Douglas building
roughly 60 percent of each aircraft and British Aerospace the remainder.
The AV-8B entered service with the Marines later that
year, while the RAF version, the GR.5, entered service with the RAF later in the
decade.
Four full scale development aircraft, new builds
from the ground up, were authorized and testing continued into the early 1980s.
In 1981 British Aerospace reached an agreement with
McDonnell Douglas to become a subcontractor for the program, bringing the
British government back into the new Harrier program.
Production began in 1983 with McDonnell Douglas building
roughly 60 percent of each aircraft and British Aerospace the remainder.
The AV-8B entered service with the Marines later that
year, while the RAF version, the GR.5, entered service with the RAF later in the
decade.
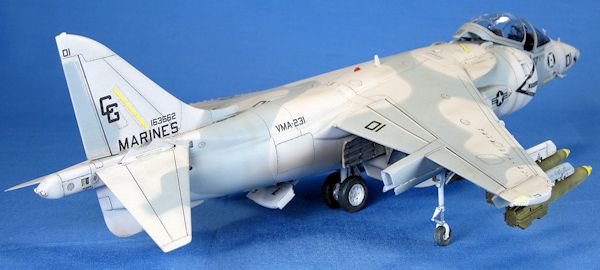
Marine AV-8Bs have gone through major improvements during their lives. A Night Attack variant that featured a Forward-Looking-Infrared (FLIR) system installed in the nose to be used in conjunction with night vision goggles was developed in the late 1980s. 72 were built between 1989 and 1993. Additionally in June 1987 British Aerospace and McDonnell Douglas decided to jointly develop a radar-equipped variant of the Harrier II. A Hughes AN/APG-65 pulse-Doppler radar, very similar to that then in use with the F/A-18 Hornet, was fitted to the nose of an AV-8B Night Attack airframe, giving the Harrier II air-to-air and more advanced air-to-ground capability. The Marines ordered 31 new build “Pluses” with deliveries starting in July 1993. 72 more were converted by 1997, by which time the entire Marine fleet of Harriers consisted of either Plus or Night Attack variants.
| THE KIT |
The
“Desert Harrier” release in Hasegawa’s AV-8B family is an older kit; the box of
my kit is dated 2004 and I haven’t seen it in stores in a while.
It represents the original AV-8B that was commonly
referred to as the “Day Bomber” due to its lack of night or all weather
capability. Hasegawa
has since come out with the Night Attack and Plus variants, not to mention the
variants of the RAF, Royal Navy and other Navies as well.
This kit represents the Harrier II that the Marines took
to the Persian Gulf for Operations Desert Shield and Desert Storm in 1990/1991;
the experience gained during that conflict prompted the upgrades that came later
in the decade.
 Opening the box one is greeted with a rather
typical Hasegawa production.
There are several gray plastic sprues, one sprue of
clear parts, one sheet of decals for three different Harriers, and curiously a
set of poly-caps that allows your Harrier’s nozzles to swivel freely.
As we have come to expect from Hasegawa the parts are
nicely molded with subtle surface detail and crisp, recessed panel lines.
Beware however, there are fit issues hidden in these
sprues – more on that later.
Opening the box one is greeted with a rather
typical Hasegawa production.
There are several gray plastic sprues, one sprue of
clear parts, one sheet of decals for three different Harriers, and curiously a
set of poly-caps that allows your Harrier’s nozzles to swivel freely.
As we have come to expect from Hasegawa the parts are
nicely molded with subtle surface detail and crisp, recessed panel lines.
Beware however, there are fit issues hidden in these
sprues – more on that later.
One bummer is virtually a complete
lack of ordnance.
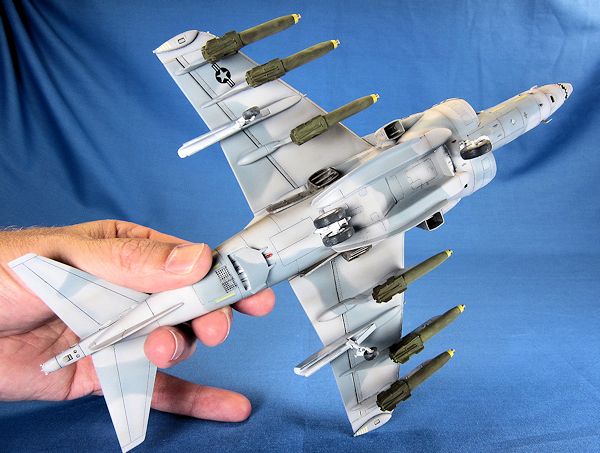
There is a pair of drop tanks and Sidewinder missiles -
which is the load-out the Harriers carried while flying into the Gulf at the
beginning of their deployment - but there are no bombs of any kind.
This is puzzling since the Harrier is a ground attack
aircraft, not a fighter!
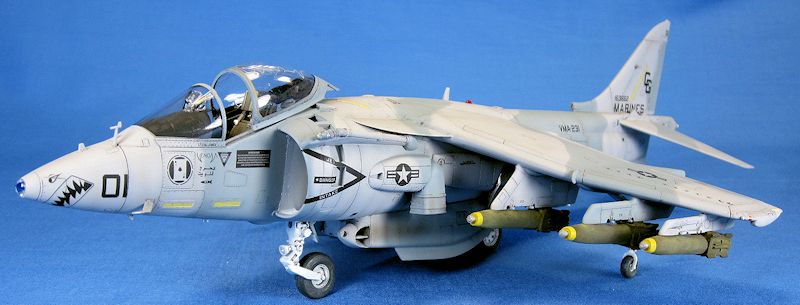
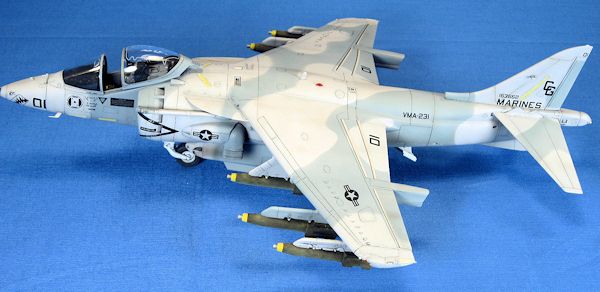
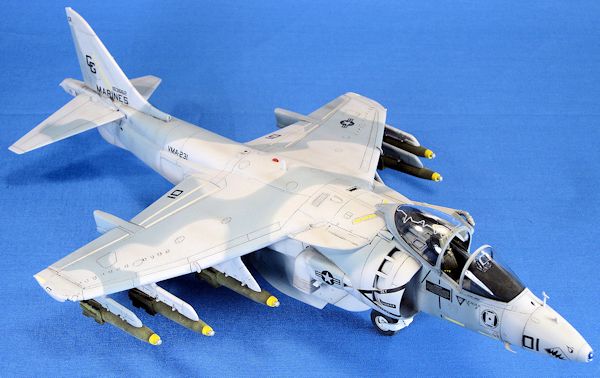
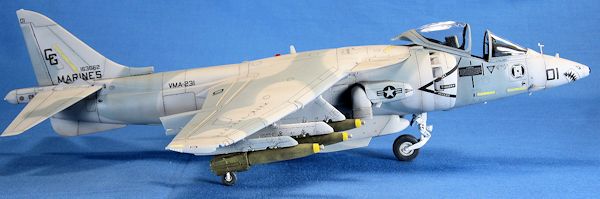
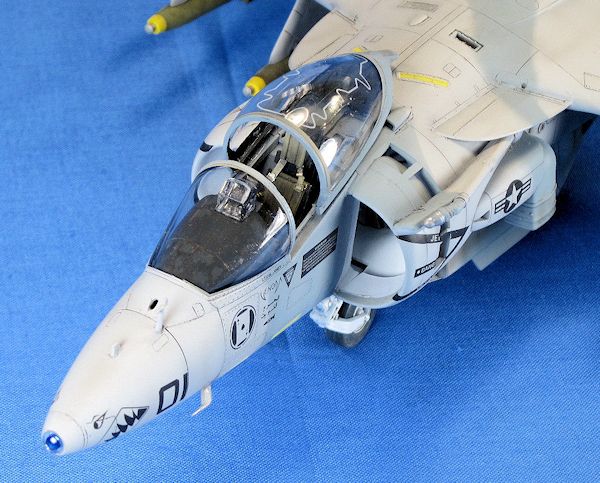
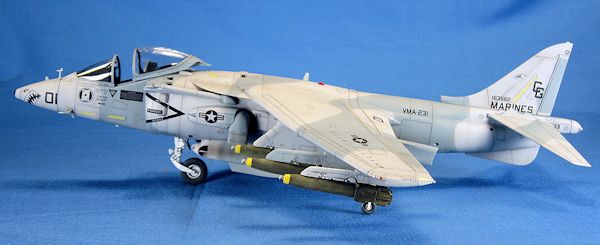
One of the decal options provided in the kit is “Shank 01”, a VMA-231 Harrier flown by the unit’s CO during Desert Storm, Lieutenant Colonel William “Rusty” Jones. I opted to model that aircraft. My Osprey reference mentions that a typical load-out during that conflict consisted of six Mk.82 Snakeye bombs, so I purchased Verlinden’s #2517 “US Bombs 500 lbs Mk 82 – Snakeyes” resin set to give my Harrier some teeth. I also used an Eduard Mask set (#EX021) to mask the canopy.
| CONSTRUCTION |
Construction
started off with the cockpit, and Hasegawa provides a nicely detailed ejection
seat, instrument panel, and control column.
Rudder pedals are molded into a one piece tub, as are
detailed side consoles.
Decals are provided for all of the instrument panel
areas, but as they are molded with raised details I opted not to use them.
I painted the tub and fuselage side walls Testors Dark
Gull Gray FS 36231, and then picked out the instrument areas by hand with black.
I gently dry-brushed the raised details with white, and
then picked out some other features with red and yellow.
The structure of the ejection seat was painted Vallejo
Black Gray, and the seat cushions and headrest were painted Testors Medium
Green, even though the instructions say to paint them “Sandy Yellow”.
I added some photo etch seat belts from my spares box,
and then picked out some more details on the seat with yellow and black.
 With the cockpit set aside to dry I started on the
fuselage, and this is where the pain began.
Initially you glue the two halves together, trapping a
pair of struts in between the four nozzles in the process.
These serve to hold the nozzles’ poly-caps and also
stiffen the whole assembly nicely.
At this point you also glue a long panel onto the belly
and the turbo fan face on to the front of the fuselage halves.
While the fit of the turbo fan piece was fine (make sure
you glue it right side up – there is a small arrow on its back to tell you which
way is up), there were seams everywhere else.
As I started sanding and filling it occurred to me that
some of the seams would be hidden by the items yet to come, like the vertical
fin and the Aden gun pods.
Rather than file away needlessly I jumped ahead in the
instructions and glued the vertical fin halves together and glued it to the
fuselage.
There are also two halves for a small intake at the base of the
fin that I glued together, but the fit of this assembly to the fuselage was
poor.
I had to glue a small piece of scrap plastic underneath it to get it to
sit at the right height.
The base of the whole tail assembly took several
“smears” of Mr. Surfacer 500 (dab the stuff into the seam with a brush and then
smear the excess away with a brush dipped in lacquer thinner) to fill in the
gaps.
With the cockpit set aside to dry I started on the
fuselage, and this is where the pain began.
Initially you glue the two halves together, trapping a
pair of struts in between the four nozzles in the process.
These serve to hold the nozzles’ poly-caps and also
stiffen the whole assembly nicely.
At this point you also glue a long panel onto the belly
and the turbo fan face on to the front of the fuselage halves.
While the fit of the turbo fan piece was fine (make sure
you glue it right side up – there is a small arrow on its back to tell you which
way is up), there were seams everywhere else.
As I started sanding and filling it occurred to me that
some of the seams would be hidden by the items yet to come, like the vertical
fin and the Aden gun pods.
Rather than file away needlessly I jumped ahead in the
instructions and glued the vertical fin halves together and glued it to the
fuselage.
There are also two halves for a small intake at the base of the
fin that I glued together, but the fit of this assembly to the fuselage was
poor.
I had to glue a small piece of scrap plastic underneath it to get it to
sit at the right height.
The base of the whole tail assembly took several
“smears” of Mr. Surfacer 500 (dab the stuff into the seam with a brush and then
smear the excess away with a brush dipped in lacquer thinner) to fill in the
gaps.
Moving to the underside of the
aircraft, that belly panel created seams that needed attention, but the Aden gun
pods hid much of them.
I glued the gun pod halves together and dealt with their
own seams, and then test fit them to the fuselage.
They hide much of the belly panel seams all right, but
their fit wasn’t good, with large gaps all around them.
So it’s going to be like this, is it?
I glued them in place (along with a panel that goes
between them) and then performed several more Mr. Surfacer 500 smears to fill in
those gaps.
Toto, I have a feeling we’re not building a Tamiya kit…
Returning to the instructions, the
next step was to trap the cockpit between the two forward fuselage halves that
contain it.
The fit here was good, with only nominal seams to deal with.
The same applied to the nose halves, which I then glued
to the forward part of the fuselage (the portion with the cockpit).
The next step is to mate the
forward and aft fuselage sections together, but before I did that I painted the
turbo fan and air intake areas.
I assembled the intake sides, which feature four small
blow-in flaps each.
I then sprayed the insides of the intakes and the
turbofan area Tamiya XF-2 White.
The turbofan blades were painted Testors Steel, and then
I gave them a wash of MIG Productions Dark Wash.
Once all was dry I glued the fore and aft fuselage
halves together.
It took a little massaging for them to fit together properly, but
the joint felt quite solid.
 The aforementioned intakes were glued on next, and
as you might expect, the fit was not very good.
They bulged out beyond the fuselage enough to make me
get out my Dremel and carefully grind them down a bit.
More sanding, filling, and rescribing – or should I just
say “SFR” from now on!
The aforementioned intakes were glued on next, and
as you might expect, the fit was not very good.
They bulged out beyond the fuselage enough to make me
get out my Dremel and carefully grind them down a bit.
More sanding, filling, and rescribing – or should I just
say “SFR” from now on!
The assembly of the wing was next.
The lower wing halves were cemented to an upper full
span half with no problems.
That assembly was then mounted to the fuselage and an
upper panel with big problems however.
The seams on the underside needed to be filled with Mr.
Surfacer, but the real issue was the joint on the upper surface between the wing
and the upper panel, part K5.
The contours of the curves were badly off between the
parts, resulting in my trusty Dremel making yet another appearance.
A lot of SFR later and the seam was something I could
live with.
Despite all of the issues to this
point, I was (mercifully) approaching the end of the construction phase.
The horizontal stabilizers fit with no problem; however
the refueling probe housing needed several Mr. Surfacer “smears” to hide the
very noticeable gaps around them.
The common thread with this kit was that anywhere parts
with complex curves and contours mated up, the fit was very poor.
The final construction step was to attach the six ordnance pylons. I debated holding off on this step until after the painting process to make the job of masking the camouflage pattern easier, but after test fitting a few of them I realized they would need the same SFR treatment that virtually every other part in this kit needed, so on they went. After the requisite Mr. Surfacer smears had set, it was time to start painting.
| COLORS & MARKINGS |
The
Harrier II has a beige colored seal between the metal framing and the glass, and
the Eduard mask set gives you two sets of masks that allow you to deal with
this.
You first apply the slightly smaller mask to the canopies, then spray
them the canopy framing interior color (I used Tamiya XF-69 NATO Black) followed
by the beige color (I used a lightened mix of Tamiya XF-59 Desert Yellow).
Once that is dry you put the second, slightly larger
mask on which conceals the beige color, and then spray the colors of the
airframe.
 I airbrushed a coat of Tamiya Surface Primer onto
the whole model, which as usual revealed a few seam areas that needed a little
more attention.
I also started thinking about what the base color should be.
The instructions call out for FS 36375 Light Ghost Gray,
but looking at color photos in the Osprey reference, that color seemed too
bluish for me.
As I compared my primed model to the photos, it occurred to me
that the primer color was a pretty good match!
So I left it as it was and moved on to the next step.
I airbrushed a coat of Tamiya Surface Primer onto
the whole model, which as usual revealed a few seam areas that needed a little
more attention.
I also started thinking about what the base color should be.
The instructions call out for FS 36375 Light Ghost Gray,
but looking at color photos in the Osprey reference, that color seemed too
bluish for me.
As I compared my primed model to the photos, it occurred to me
that the primer color was a pretty good match!
So I left it as it was and moved on to the next step.
I pre-shaded all of the panel
lines using Tamiya XF-69 NATO Black, and then subtly sprayed more Tamiya Surface
Primer onto the model to mostly obscure the pre-shading.
I then used Silly Putty to mask the model in preparation
for the darker gray color.
According to the Osprey reference,
when the Harriers were prepared for the Gulf their Dark Green-Gray camouflages
schemes were completely over-painted with light gray, and then camouflaged with
a darker shade that was made by mixing black into the light gray.
For the darker gray color I used straight Testors Medium
Gray FS 35237.
I let that dry for a night and then airbrushed a coat of Future
over the whole model to create a glossy surface for the decals and the panel
line wash.
After letting the Future cure for
48 hours I applied the kit’s decals, which cooperated very well with the
Walthers Solvaset decal solution I use (and will probably use forever – my
bottle is 15 years old and I’ve barely made a dent in it).
I applied another coat of Future over the decals to seal
them, and then set the model aside for 48 hours to let it cure.
With the Future curing I turned my
attention to the six Verlinden Snakeye bombs.
I cleaned them up, glued them together, and primed them
with a coat of Tamiya Surface Primer.
I then brush-painted the yellow rings on the front of
them and masked those off.
I airbrushed them a 50/50 mix of Tamiya XF-58 Olive
Green and XF-64 Red Brown, and then weathered them with Olive Drab MIG pigments
to make them look worn and dusty.
 Back to the model, I applied a MIG Productions
Dark Wash to all of the recessed panel lines, wiping any excess off with a
lint-free cloth.
Up next I airbrushed a few light coats of Testors Flat Finish
(Lacquer based) over the whole model to remove the gloss finish.
At this point I decided to glue on the remaining items,
so the landing gear were assembled and glued in place, as were the six bombs.
I then made a very dilute mix of 50/50 Tamiya XF-1
Black/XF-64 Red Brown and lightly sprayed it in very subtle lines and streaks
all over the aircraft.
I use this technique artistically, meaning I apply faint
streaks here and there, wherever it breaks up large, plain areas of color and
adds a more interesting, slightly worn look to the aircraft.
I tried to keep the effect very subtle however as the
real aircraft had been repainted at the start of the campaign.
It’s also an effect that can “get away from you” if you
don’t know when to say when.
Back to the model, I applied a MIG Productions
Dark Wash to all of the recessed panel lines, wiping any excess off with a
lint-free cloth.
Up next I airbrushed a few light coats of Testors Flat Finish
(Lacquer based) over the whole model to remove the gloss finish.
At this point I decided to glue on the remaining items,
so the landing gear were assembled and glued in place, as were the six bombs.
I then made a very dilute mix of 50/50 Tamiya XF-1
Black/XF-64 Red Brown and lightly sprayed it in very subtle lines and streaks
all over the aircraft.
I use this technique artistically, meaning I apply faint
streaks here and there, wherever it breaks up large, plain areas of color and
adds a more interesting, slightly worn look to the aircraft.
I tried to keep the effect very subtle however as the
real aircraft had been repainted at the start of the campaign.
It’s also an effect that can “get away from you” if you
don’t know when to say when.
With the painting steps complete I
next removed the masks from the canopy sections and glued them in place.
All that was left was to paint the various lights on the
aircraft.
I first painted the wingtip lights and the bases of the two
fuselage lights (one on top and one below) Testors Chrome Silver.
The fuselage lights were then painted Tamiya Clear Red,
as was the port side wingtip light.
The starboard wingtip light was painted Tamiya Clear
Blue, and I put a dab of Clear Blue in the clear lens that attaches to the tip
of the nose.
The final step was to apply a dusting of sand-colored MIG
Pigments to the wheels and the model was complete.
| CONCLUSIONS |
 I can see where the Harrier would be a difficult
model to engineer, with its myriad complex curves and surfaces.
In the end I don’t think Hasegawa’s approach was wrong,
just their execution.
It’s a shame Tamiya never took a crack at the Harrier II
as their excellent engineering would have resulted in a much better kit.
I can see where the Harrier would be a difficult
model to engineer, with its myriad complex curves and surfaces.
In the end I don’t think Hasegawa’s approach was wrong,
just their execution.
It’s a shame Tamiya never took a crack at the Harrier II
as their excellent engineering would have resulted in a much better kit.
Nonetheless I’m proud of this model and very much like the way it came out. The Harrier is very “cool” looking jet, with a sort of menacing, bug-like stance. While I’ll stop short of recommending the kit as a general statement, if you like Harriers and aren’t afraid of using your modeling skills, this could be the one for you.
| REFERENCES |
-
Osprey Publications, Combat Aircraft #90, “AV-8B
Harrier II Units of Operations Desert Shield and Desert Storm”
-
Squadron/Signal Publications, Aircraft in Action
#209, “AV-8 Harrier in Action”
- Wikipedia, the Online Encyclopedia
September 2013
If you would like your product reviewed fairly and fairly quickly, please contact the editor or see other details in the Note to Contributors.