Academy 1/32 F-18C Hornet
|
KIT #: |
2191 |
|
PRICE: |
$199.00 SRP |
|
DECALS: |
Two options |
|
REVIEWER: |
Lee Kolosna |
|
NOTES: |
Cutting Edge seat, Rhino Models
intakes and wheels. 2bobs decals |
Much to the irritation of modelers around the world, the
McDonnell Douglas (now Boeing) F/A-18 Hornet has gradually replaced all of
their US Navy favorites: the F-4 Phantom, the A-4 Skyhawk, the A-6 Intruder,
the A-7 Corsair II, and most begrudgingly the F-14 Tomcat as the primary
fixed wing aircraft deployed on carriers. Over the twenty years it is has
been in service, the Hornet has demonstrated capable performance in all the
roles it has been assigned: fleet defense, combat air patrol, aerial
refuelin g, close air support, reconnaissance, electronic countermeasures,
and suppression of enemy air defenses. Modelers and armchair aviation
enthusiasts dismiss the “Bug” as a Jack-of-all-Trades but Master-of-None,
which really undermines the critical role it plays in force projection for
the United States. The aircraft has an excellent service record with a very
high readiness rate, can be turned around with less maintenance hours
required than all the aircraft it replaced, and has become a relative
bargain for the Navy due to common parts and a simplified supply
chain. The A/B/C/D models of the F/A-18 are now referred to as “Legacy
Hornets” and are being phased out by the larger F/A-18 E/F/G models as they
reach the end of their operational service lives. Export versions of the
legacy F/A-18s are in use by Canada, Australia, Spain, Finland, Malaysia,
Kuwait, and Switzerland.
g, close air support, reconnaissance, electronic countermeasures,
and suppression of enemy air defenses. Modelers and armchair aviation
enthusiasts dismiss the “Bug” as a Jack-of-all-Trades but Master-of-None,
which really undermines the critical role it plays in force projection for
the United States. The aircraft has an excellent service record with a very
high readiness rate, can be turned around with less maintenance hours
required than all the aircraft it replaced, and has become a relative
bargain for the Navy due to common parts and a simplified supply
chain. The A/B/C/D models of the F/A-18 are now referred to as “Legacy
Hornets” and are being phased out by the larger F/A-18 E/F/G models as they
reach the end of their operational service lives. Export versions of the
legacy F/A-18s are in use by Canada, Australia, Spain, Finland, Malaysia,
Kuwait, and Switzerland.
When issued in 2003, this magnificent kit from Academy
instantly earned the title of “Finest Jet Model Kit Ever Made”. A decade
later, it still is an amazing achievement and remains competitive with newer
offerings from other manufacturers. Containing a staggering 900 parts (a
lot of them are for the extensive ordnance selections), there are also four
figures included with optional poses. The nicely detailed landing gear are
assembled around metal supports for strength and rubber tires are
provided. The cockpit is sufficiently detailed with separate clear parts
representing the Multi-function displays (MFDs) on the instrument
panel. The ejection seat is a decent representation of the mid-period
 SJU-5/A model but modelers might want to consider using an aftermarket
replacement due to the limitations of injection molding replicating
something as complex and three-dimensional as a modern ejection seat.
SJU-5/A model but modelers might want to consider using an aftermarket
replacement due to the limitations of injection molding replicating
something as complex and three-dimensional as a modern ejection seat.
Options abound. The wings can be posed folded or
extended, the flaps have actuators that allow four different positions, the
speed brake can be posed open or closed, and the stabilators can be adjusted
in any angle desired. The rudders and ailerons are separate pieces. The
canopy has the proper hemispherical profile which requires a faint mold seam
to be removed. Two complete General Electric F404 turbofan engines are
provided with intake trunks and two sets of nozzles for open (powered up)
and closed (powered down) positions. There is a boarding ladder that
attaches to underside of the wing leading edge extension (LERX) and there is
a radar unit and dish inside the nose.
And then there is the ordnance – a stunning selection of
accurately done targeting pods, launchers, dumb bombs, smart bombs, rockets,
missiles, and fuel tanks. One small note – the GBU-32 JDAM bombs are an Air
Force variant so the nose will need to be sanded to a more blunt profile for
the Navy version. It truly is an awesome set of sprues that will provide
extra things to hang under other modern 1/32 scale models that you might
want to build in the future.
The only weak part of the kit is the Academy decals,
according to reports from many modelers who have tried to use them. The
artwork is excellent with dozens of stencils not only for the aircraft
itself but for all of the ordnance as well. Unfortunately the decals
themselves don’t adhere very well or conform to compound surfaces. The
strong advice is to obtain one of the many aftermarket decal sheets still
readily available for this model.
 I obtained this kit as a gift in 2004 and it sat in my
stash for nine years. Frankly, I was intimidated by the sheer number of
parts and undecided as to how I was going to configure the ordnance
load. Over the years I did purchase a Twobobs decal sheet, a Cutting Edge
early period SJU-17 ejection seat, and Rhino Modelworks seamless air intakes
and resin wheels. The latter set isn’t necessary, but it does make a nice
addition to the model and prevents one from dealing with the seams inside
the intakes. An added bonus is that the intakes are cast in white resin,
making painting easier as well.
I obtained this kit as a gift in 2004 and it sat in my
stash for nine years. Frankly, I was intimidated by the sheer number of
parts and undecided as to how I was going to configure the ordnance
load. Over the years I did purchase a Twobobs decal sheet, a Cutting Edge
early period SJU-17 ejection seat, and Rhino Modelworks seamless air intakes
and resin wheels. The latter set isn’t necessary, but it does make a nice
addition to the model and prevents one from dealing with the seams inside
the intakes. An added bonus is that the intakes are cast in white resin,
making painting easier as well.
A good modeling buddy of mine discussed our trepidation
about the kit (he also had one festering away in his stash) and after a
couple of beers decided that we would both confront our fears and just go
ahead and take the plunge. 2014 was declared “The Year of the Hornet” and
we committed ourselves to clearing our modeling desks of all other projects
in order to tackle this beast.
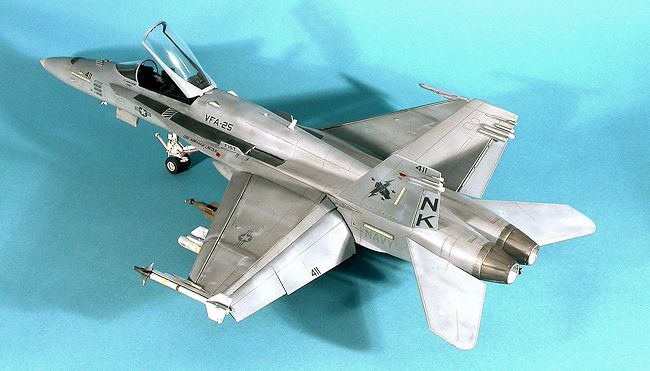
Before any parts were removed from the sprues, I put
together a plan on how I wanted to configure the model. After looking at
hundreds of photos of Hornets from the 2003/4 Iraqi Freedom period, I
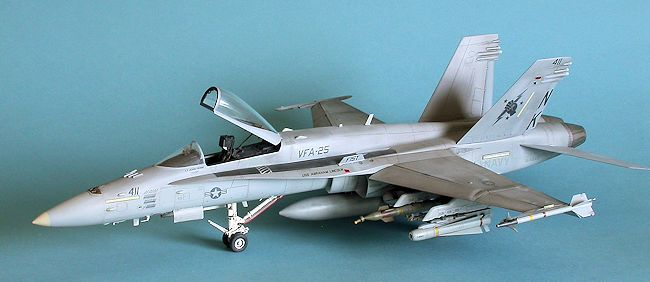
elected to have the wings extended, the flaps in the full down position, the
nose cone, air brake, and boarding ladder closed, and an asymmetrical
ordnance load that reflected a typical mission in the early days of the
conflict. Even with thorough ordnance options in the kit, I still needed to
borrow a 500 pound GBU-12 laser-guided bomb left over from the Trumpeter
AV-8B Harrier kit.
My first task was to assemble the engines, which while
they can’t be seen in the finished model (shades of Trumpeter), are still
needed to mount the intakes and exhausts. As mentioned above I decided to
go with aftermarket intakes in
 order to avoid having to deal with filling
the seams inside the intakes. Even though they are cast in white resin I
still gave them a quick spritz of flat white so as to avoid any yellowing
that might occur over the years.
order to avoid having to deal with filling
the seams inside the intakes. Even though they are cast in white resin I
still gave them a quick spritz of flat white so as to avoid any yellowing
that might occur over the years.
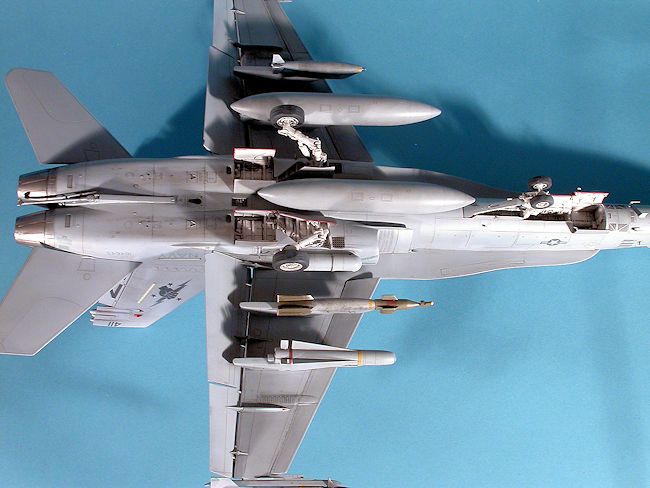
Next up was assembly and painting of the ordnance. I do
this with modern jet projects as I find it keeps my momentum going better
than building the model first and then become discouraged when I realize I
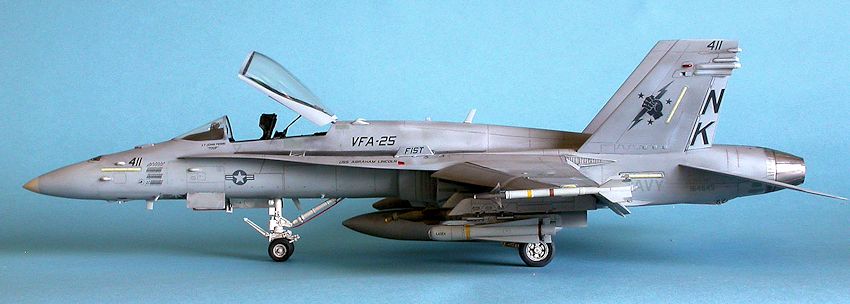
have many more hours of work to do to complete the ordnance. I found a
clear picture of a VFA-25 F/A-18C on the USS Abraham Lincoln during the time
period depicted by the decals and chose the following load which is referred
to as the “goofy gas” configuration: an AIM-9M Sidewinder on the port wing
tip, fuel tanks on the centerline and right inboard station, an AGM-65
Maverick on the left outboard station, a GBU-12 bomb on the port inboard
station, the LANTIRN pod on the port cheek, and a Mk 82 bomb on the right
outboard pylon. The starboard wing tip was left empty. Each piece had to
have the seams filled, painted including the necessary warning stripes,
decals applied, and the appropriate launchers and sway braces added to the
pylons. I roughed up the surface of the two bombs to depict the
heat-retardant coating seen on Navy ordnance by slathering the plastic with
liquid glue and stippling the melted surface with a stiff brush. I enjoyed
painting the fin and seeker assembly of the GBU-12 Olive Drab with a Light
Ghost Gray body, another frequently-seen mismatch of colors at the time of
transition from all green to all gray bombs.
The landing gear was the next subproject, and they took
a good amount of time to assemble and paint. There are 22 parts for each
for each main strut, with some of the teeny-tiniest pieces I have ever had
to apply to a model. There is an oft-repeated piece of conventional wisdom
that states that as modelers get older and lose their visual acuity that
they tend to build larger scale kits to compensate. I have to strongly
disagree with this notion because I find the opposite to be true: larger
scale kits include parts that are smaller on average due to the need to
provided detail in places like wheel wells and cockpits
 that would be
simplified in smaller scale kits. I had to use a magnifying glass to get
some of the parts properly attached and aligned. If I had an Optivisor, I
surely would have used that, but alas I don’t own one.
that would be
simplified in smaller scale kits. I had to use a magnifying glass to get
some of the parts properly attached and aligned. If I had an Optivisor, I
surely would have used that, but alas I don’t own one.
The rear fuselage was glued together and there were a
number of relatively large seams on each side that had to be filled. The
wings were next. After assembly I glued the wings onto the fuselage and
noticed that the port wing was warped. I remedied this by repeated dunking
of the wing in a pot of almost boiling water for ten seconds at a time and
gently pressing it back into proper alignment. The flaps were glued onto
the wings in the fully down (45 degrees) position as seen in most photos of
Hornets at rest. I chose to do this before painting because I wanted the
strongest possible bond for the flaps. The vertical stabilizers were added
to the top of the fuselage and the rudders posed in a right turn. Photos
show a lot of variation in rudder position, so just about anything is
acceptable.
Cockpit assembly was done without incident. The cockpit
was painted Dark Gull Gray FS36231 and the consoles were flat black. The
instruments were highlighted by drybrushing light gray and a dark wash was
added to give depth to the structures. There are a number of aftermarket
cockpits out there that provide more detail for the “hell hole” behind the
ejection seat, but I think the kit parts look just fine and are busy enough
for my tastes. The nose wheel well and landing strut was assembled,
painted flat white, dirtied up with a wash and pastels, and inserted into
the forward fuselage section. Joining the front fuselage section to the
rear revealed fairly large gaps that had to be filled, which was made
somewhat more difficult by the one piece resin aftermarket intakes. I glued
on the windscreen and carefully filled the seam in order to make a nice
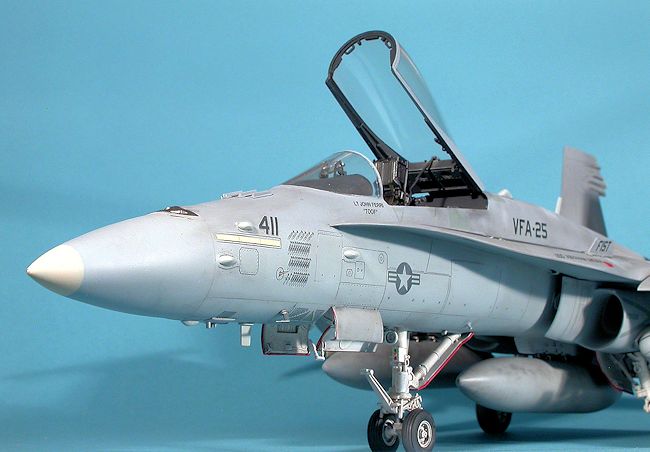
smooth transition to the surrounding nose section. The aircraft I modeled
had the early style avionics vents (Academy provided two styles) and the
“bird slicer” antennae just ahead of the windscreen. The LERX pieces were
glued onto either side of the nose and the resulting seams were filled. Fit
wasn’t quite up to the standard of the rest of the model here.
I restored all the panel lines that were lost in the
seam filling process by re-scribing and washed the model thoroughly in the
sink with warm soapy water in preparation of paint
.
As I rule I prefer to model line jets rather than the
more colorful CAG aircraft, mostly because I prefer to have a model that few
if any other modelers have done. I chose Bureau number 164645, modex number
208 from VFA-25 “Fist of the Fleet” as seen aboard the USS Abraham Lincoln
in the first days of
 the Iraqi Freedom campaign. Finished in the standard
Tactical Paint Scheme of Dark Ghost Gray FS36320 over Light Ghost Gray
FS36375, I used paint from the Testors Model Master Acryl line. The
exhausts were painted with Testors Metalizer Burnt Metal and the aftermarket
resin tires were painted with the last remaining bottle of Polly Scale Scale
Black. I decided to paint the walkways rather than use decals, so I masked
the sections of the LERX off and used Polly Scale Steam Power Black, also
from my last remaining bottle of that color. I’m really going to miss these
two black paints – they have served me faithfully for decades. The tip of
the radome was painted with Testors Sand.
the Iraqi Freedom campaign. Finished in the standard
Tactical Paint Scheme of Dark Ghost Gray FS36320 over Light Ghost Gray
FS36375, I used paint from the Testors Model Master Acryl line. The
exhausts were painted with Testors Metalizer Burnt Metal and the aftermarket
resin tires were painted with the last remaining bottle of Polly Scale Scale
Black. I decided to paint the walkways rather than use decals, so I masked
the sections of the LERX off and used Polly Scale Steam Power Black, also
from my last remaining bottle of that color. I’m really going to miss these
two black paints – they have served me faithfully for decades. The tip of
the radome was painted with Testors Sand.
The model was sealed with a coat of Testors Arcyl Clear
Gloss before the decals and extensive weathering was applied. Since I have
been bedeviled with silvering issues even with good aftermarket decals, I
tried a technique of adding just a tiny puddle of Future floor polish to the
surface of the model immediately before applying the decal. This helped
tremendously with the stencils, filling the air pockets that get trapped
under the clear carrier which is the cause of the silvering effect. I had
to do almost no application of Micro Sol afterwards because the Future
helped draw the decals down to the surface of the model as it cured.
What makes a modern US Navy jet model dazzle with
realism is how effectively one can replicate the grungy paint effects that
the real aircraft endure during carrier operations. Contrary to popular
impression, these aircraft are kept really clean as they are washed down
regularly with fresh water to combat the corrosive effects of sea spray and
salt air from attacking the aluminum airframe. But the TPS paints pick up
dirt from spilled fluids, the greasy boots of the maintenance crew, and the
constant touch-ups from spray cans. This gives a unique opportunity for a
modeler to see if they can mimic these effects in miniature.
 My technique starts with a dark gray wash applied to all
the panel lines, wheel wells, and landing gear. For this I used MIG
Productions “Dark Wash” for the first time and I’m really impressed with how
nice it was to apply. Then the camouflage paint was diffused by spraying a
random pattern of squiggles of a dark gray paint, followed by more random
application of very light gray paint. This is all blended back into the
camouflage scheme with a highly-thinned filter of the original Dark Ghost
Gray and Light Ghost Gray colors on the top and bottom, respectively. Then
I got my airbrush very close to the model and added more of the Ghost Grays
at select panel line joints and wear areas on the airplane to replicate the
spray can corrosion control. After that, I added chalk pastels to mimic the
places where the deck crew placed their grubby hands (particularly on the
fuel tanks) and to add the lines of hydraulic fluid leaks usually seen
coming out of the rear of the main wheel wells. When I was satisfied with
the effect, I applied a light coat of Testors Acryl Clear Flat to seal
everything for the final assembly stage.
My technique starts with a dark gray wash applied to all
the panel lines, wheel wells, and landing gear. For this I used MIG
Productions “Dark Wash” for the first time and I’m really impressed with how
nice it was to apply. Then the camouflage paint was diffused by spraying a
random pattern of squiggles of a dark gray paint, followed by more random
application of very light gray paint. This is all blended back into the
camouflage scheme with a highly-thinned filter of the original Dark Ghost
Gray and Light Ghost Gray colors on the top and bottom, respectively. Then
I got my airbrush very close to the model and added more of the Ghost Grays
at select panel line joints and wear areas on the airplane to replicate the
spray can corrosion control. After that, I added chalk pastels to mimic the
places where the deck crew placed their grubby hands (particularly on the
fuel tanks) and to add the lines of hydraulic fluid leaks usually seen
coming out of the rear of the main wheel wells. When I was satisfied with
the effect, I applied a light coat of Testors Acryl Clear Flat to seal
everything for the final assembly stage.
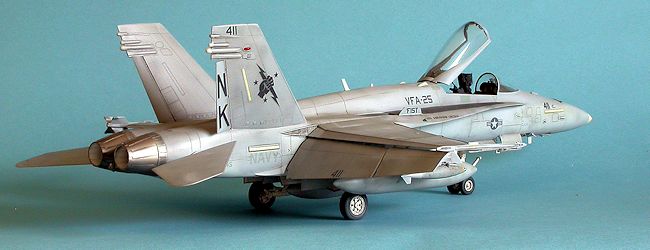
 All the ordnance was hung underneath the pylons and on
the fuselage and wingtip. I give Academy great credit for providing robust
attachment points for these relatively large pieces. The resin wheels were
glued onto the landing struts being very careful to align them
properly. This is a big, heavy model and the wheels have to carry a lot of
weight. The stabilators were glued on in their characteristic nose-up
attitude, the ejection seat glued in the cockpit and the canopy posed in the
open position. More kudos go to Academy here as the attachment of the
canopy is quite secure with good gluing surfaces.
All the ordnance was hung underneath the pylons and on
the fuselage and wingtip. I give Academy great credit for providing robust
attachment points for these relatively large pieces. The resin wheels were
glued onto the landing struts being very careful to align them
properly. This is a big, heavy model and the wheels have to carry a lot of
weight. The stabilators were glued on in their characteristic nose-up
attitude, the ejection seat glued in the cockpit and the canopy posed in the
open position. More kudos go to Academy here as the attachment of the
canopy is quite secure with good gluing surfaces.
It took me 90 hours of effort over the course of a year
to complete this model, and I am pleased with how it turned out. While it is
certainly intimidating in scope, I found that following my plan and removing
the unneeded parts from the box helped tremendously in reducing clutter and
keeping me organized. This is still one of the finest jet kits on the market
today and has been issued as a two-seat F/A-18D version. As of this
writing, my friend who shared this journey with me is still working on his
model, albeit slowly. Any modeler considering building this kit is
encouraged to understand that it will require a lot of time to complete but
the reward at the end will be great.
Danny Coremans and Nico Deboeck: Uncovering the Boeing F/A-18A/B/C/D
Hornet
Dennis R. Jenkins: US Naval Aviation, A Military Photo Logbook,
Volume 1
Lee Kolosna
May 2015
If you would like your product reviewed fairly and fairly quickly, please
contact
the editor
or see other details in the
Note to
Contributors.
Back to the Main Page
Back to the Review Index Page