
Trumpeter 1/32 A-6E/Tram Intruder
| KIT #: | 02250 |
| PRICE: | $225.00 SRP |
| DECALS: | 2 Options |
| REVIEWER: | Donald Zhou |
| NOTES: |
Advantages: Extremely detailed throughout,
loads of weapons, BIG. Disadvantages: Radome in two halves, instructions can be vague, and decal problems! Ultracast 70’s-90’s U.S. Navy pilots used |
| HISTORY |
The Grumman A-6 Intruder was the navy’s first all weather, low flying attack aircraft. It was a mid-winged monoplane with a two man crew, seated sided by side ala the air force’s F-111 capable of carrying a huge load of ordinances and able to fly a 500mile combat radius without aerial refueling.
The aircraft was requested in 1955, with official proposals submitted in 1956 by various manufactures as a jet powered replacement for the venerable A-1 Skyraider. The Grumman proposal was accepted in 1958. At first called the A2F, this designation was later changed to the A-6 after the tri-service nomenclature consolidation. The first proto-type was flown in 1960.
One of the earliest
requirement for the new aircraft was that it should have a short-takeoff and
landing capability so that it can take off without the use of the catapult and
tail hook for landing. To this end, the aircraft was originally designed with
exhaust nozzles able to swing some 15 degrees downward. However, after the first
proto-type, this was quickly dropped because fly-by-wire systems was at least 20
years away and the aircraft was hard to control otherwise, not to mention the
exhaust, when deflected downwards, will probably burn two holes onto the flight
deck during take-off and will prove to be maintenance nightmare otherwise.
Otherwise, the aircraft was a conventional design with a very unusual dual
side-by-side seating with the pilot on the left, seated slightly forward and
higher than the bo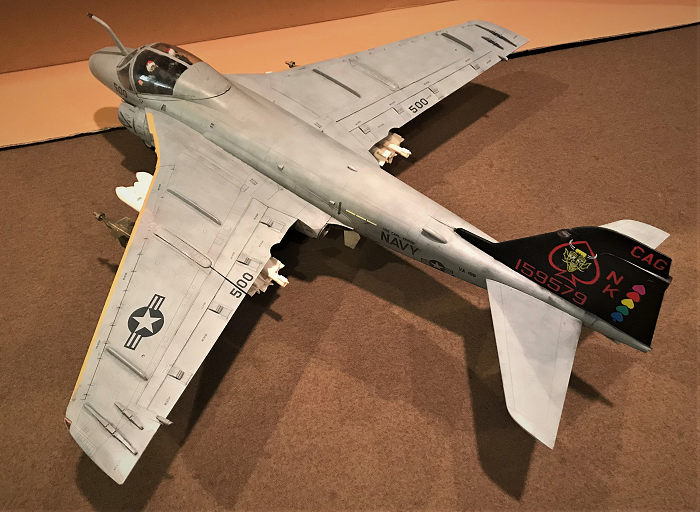 mbardier/navigator.
The aircraft, at that time, was considered to be state of the art with a highly
advanced avionics suit and a terrain following radar, which generated a
topographical picture, and display it to the pilot/navigator on a cathode-ray
tube screen. The wings was very strong and very efficient at subsonic speeds and
was able carry a huge load underneath. In fact, a slightly modified version of
these wings was used on Grumman’s next project, the F-14 Tomcat, especially
since the lead designers for both aircraft was Lawrence Mead Jr. One of the
earliest mission requirement was the aircraft was able to deliver a nuke and the
navy practice this as soon as the aircraft entered service.
mbardier/navigator.
The aircraft, at that time, was considered to be state of the art with a highly
advanced avionics suit and a terrain following radar, which generated a
topographical picture, and display it to the pilot/navigator on a cathode-ray
tube screen. The wings was very strong and very efficient at subsonic speeds and
was able carry a huge load underneath. In fact, a slightly modified version of
these wings was used on Grumman’s next project, the F-14 Tomcat, especially
since the lead designers for both aircraft was Lawrence Mead Jr. One of the
earliest mission requirement was the aircraft was able to deliver a nuke and the
navy practice this as soon as the aircraft entered service.
And as soon as the aircraft entered service, it gained a nickname, “The Iron Tadpole!” (among others including “Double Ugly”, “Big Iron 6”, and “Drumstick”) The aircraft ungainly and unusual appearance with a huge big nose, two framed side-by-side windscreen, giving off the appearance of two huge buggy eyes and a thin tapered tail, made the Intruder look like a young frog indeed, especially from above. The aircraft officially entered service in 1963 with both the Navy and Marines. The “Tadpoles” was eventually upgraded throughout its service life, and was converted to the crucial KA-6D tanker and the even more crucial EA-6B Prowler electronic warfare variant.
As soon as the Intruders entered service, it entered into its first war in the jungles of Southeast Asia. The aircraft’s immense carrying load, up to 18,000lbs of ordinances can be carried and its massive range, a combat radius of 500 miles fully loaded without aerial refueling, meant the aircraft was heavily used from everything to strategic bombing to ground support, especially since it can fly and bomb in any weather. Over 80 Intruders were lost during the war. See the movie Flight of the Intruder on this.
With the Vietnam War
winding down and the aircraft entering into the 80’s the A-6 became the Navy’s
frontline medium attack aircraft. It eventually was able to drop or fire any and
all weapons in the Navy’s service, capable of dropping dumb iron-bomb in a
carpet bombing raid, destroy pin-point targets with the new laser guided “Smart
Bombs”, or go on an “Iron-Hand” mission with MK. 20 cluster bombs and two of the
then new AGM-88 HARM’s. Because of this, the aircraft was constantly upgraded,
resulting in the definitive version of the aircraft in 1971 with the A-6E
version, the A-6E was also modified into the last official version with the A-6E
TRAM, or Terrain Recognition and Attack Multi-sensor, which was a small pod
under the nose containing a FLIR and laser designator among other t hings.
Upgrades were still being added to the aircraft even then, resulting in the
Intruder being able to use every weapon then in service.
hings.
Upgrades were still being added to the aircraft even then, resulting in the
Intruder being able to use every weapon then in service.
And as the years wore on, the aircraft constantly found itself in action, first over Lebanon, then a series of actions against Libya with operation Prairie Fire, culminating in Operation Eldorado Canyon. Then came the big one, the 1991 Gulf War, in which A-6E from the Navy and Marines flew a combined total of 4,700 combat sorties, doing everything from firing Harpoons against Iraqi naval units, dropping dumb bombs in support of troops, destroying Iraqi air defense with HARM’s and dropping laser guided smart bombs. The Intruder was the Navy’s primary attack aircraft during the period, doing most of the heavy lifting and bombing missions. Three A-6’s were lost during the war. General Chuck Horner felt it was the most useful Navy aircraft in the air war.
The aircraft was retired in 1997, even though several aircraft were newly built and modified with the new composite wings to prolong their life for F-14D “Bombcats”, which was eventually replaced with the F/A-18E/F super bugs that didn’t have anywhere CLOSE to the range and load of the Bombcat, much less than the Tadpole!
| THE KIT |
See my preview
here. Whatever I said in the preview still holds true. This thing is
BIG with a capital and bolded B, have plenty of weapons and some other
faults…Namely, the decals. The font is wrong and what the hell is a “Kalkray?!?!?”…Yes,
it’s supposed to be “Walkway” but it seems Trumpeter’s decal department once
again, brain farted. Ohh well, th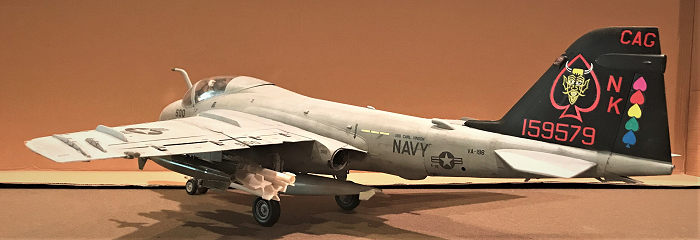 ere
are now plenty of third-party decals available. Me? I’ll just use the kit’s
decals, wrong fonts not withstanding and just not use the “Kalkray” on the
sheet. Also, to help crew the bird, I got two U.S. Navy crew man, Early 70’s to
late 90’s from Ultracast, which I also did for my F-14B Bombcat kit. These are
combination of various resin arms, a resin body and three different heads with a
soft metal air hose. With everything in place, time to begin!
ere
are now plenty of third-party decals available. Me? I’ll just use the kit’s
decals, wrong fonts not withstanding and just not use the “Kalkray” on the
sheet. Also, to help crew the bird, I got two U.S. Navy crew man, Early 70’s to
late 90’s from Ultracast, which I also did for my F-14B Bombcat kit. These are
combination of various resin arms, a resin body and three different heads with a
soft metal air hose. With everything in place, time to begin!
Also, again, just to mention, be prepared to pick a version since both the A-6E and A-6E TRAM are included in the kit. These involve two different instrument panels and of course, the TRAM version has that little turret under the nose. I picked the TRAM version.
| CONSTRUCTION |
Basically, I followed the instruction book. Before you can begin, decided what to do first. The kit, as stated in the preview, offers a lot of options with open/closed radome, with a nice AN/APG-148 radar set, deployed or closed crew boarding ladders and rear avionics bay, and two massive open engine bays with two detailed J52’s. For this version, I decided to close everything up, hence why I grabbed the two Navy crew figures.
Construction begin with the two J52 and their associated intake and exhaust pipes. These fit and since I’m going to close up shop, I did not attach any of the details on the engine. Then they were put aside until later.
The cockpit is next. And
it’s an amazing piece of molding! Again, no need to get any resin aftermarket as
this one is more than up to the job. Even the ejection seats are top notch. Now,
I didn’t put down
 the seat
belts since I will be attaching the crew figures. I used light ghost grey to
pick out the details and buttons and used the kit’s decals for the radar scope
and screens. The cockpit is correct with the pilot’s seat seated slightly up and
forward than the bombardier/navigator. Just be aware again that the instrument
panel has two versions, A-6E and A-6E TRAM. Be sure to use the right one. Once
completed, again, I set the cockpit aside for use later.
the seat
belts since I will be attaching the crew figures. I used light ghost grey to
pick out the details and buttons and used the kit’s decals for the radar scope
and screens. The cockpit is correct with the pilot’s seat seated slightly up and
forward than the bombardier/navigator. Just be aware again that the instrument
panel has two versions, A-6E and A-6E TRAM. Be sure to use the right one. Once
completed, again, I set the cockpit aside for use later.
The rear end avionics bay is next. Since I’m not going to open it, I just skipped it except part E14. This is the bottom bay piece and it has two K42 parts. These are the flare and chaff dispensers. The blank plates are also included in the kit but that’s for the A-6A so don’t get confused.
Take it slow with main gear assembly. They are again, white metal since the end model will be heavy, especially with all the nose weight. I skipped the wheels assembly since painting won’t begin until later. Leave the main retracting gear rod, K22 and K21 loose since you need some leeway when it comes to inserting them into the correct place in their bays.
Now break out your clear parts glue for the next part as there are a few parts that will be needed to be glued onto the wind screen and the canopy. Take it slow as to not ruin the transparencies and cut off the locating tabs on parts U46 since these tabs are for the open canopy. Cut them off if you want the canopy to close.
I skipped the speed brake bays assembly…Come to think of it, I should just attach the empty bays into their slost in order to add strength to the rear of the plane since when it took a crap fall onto the carpet, the rear came loose….Those bays would’ve added strength to the rear and would’ve held it in place.
Again, take it slow with the nose gear assembly and leave part K41, the nose gear retracting rod loose so you can fiddle with it when it comes time to insert it into its bay. I didn’t and had to break it off in order to get it properly into its bay.
In order to show off the
engines and give the bulging back some strength, the long spine is assembled
now, with the nose gear wheel on the b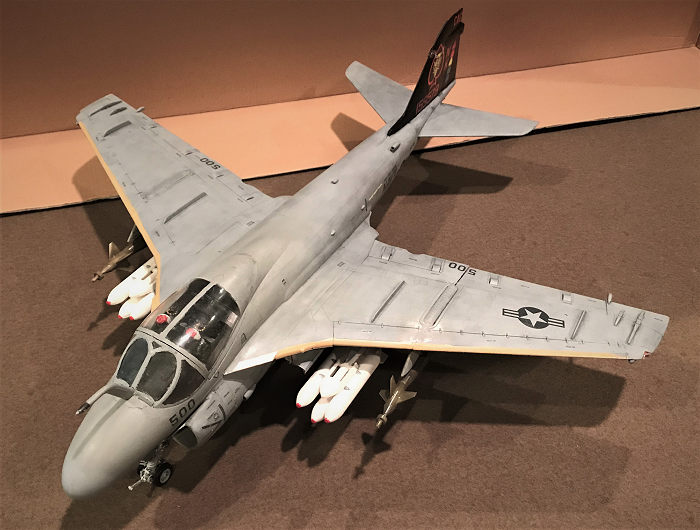 ottom.
Make sure all the parts here are cemented on and cemented tight or else it will
cause problems later.
ottom.
Make sure all the parts here are cemented on and cemented tight or else it will
cause problems later.
After assembling and inserting the intakes, the fuselage speed brake bays are inserted from the back. Again, I left them off in order to save weight to the rear when I should’ve cemented them in to add strength to the weak tail. Now the speed brake panels. This is your first clue that Trumpeter’s A team did this kit. The first big clue is that the deployment pins on the brakes are missing…Meaning these brake panels are never meant to be deployable. As stated in the preview, the Intruder’s fuselage brake panels interfered with the tail controls when deployed to the point that the wing tip brakes were eventually added and these panels were bolted shut. And sure enough, there are the big bolt details on the brake panel themselves, denoting these panels are bolted shut on this version! And here I thought I had to go and putty the panel shut! Good job on Trumpeter’s A team for spotting this critical detail difference!
The fuselage are now brought together with the bottom arrester hook bay, with an operable hook (although it is so loose that eventually, I got tired of its “self-deploying” habit and cemented it), an operable rudder which I did not place to ease assembling (I still made it operable after the fuselage was assembled together by just chipping enough of the top and bottom pins off that it can be inserted into their slots). It’s also at this stage that the detailed AN/ALQ-148 radar was assembled. However, again, I’m keeping the radome closed so assembled the radar, painted it and display it beside the aircraft. In its place, what with that bulging deep hole, I inserted several lead fishing sinker weight to weight the nose down and glued them in place with super glue and 2 part epoxy glue. I then set the fuselage to dry for a day before coming back.
Now it’s time to assemble the inner wing halves. And when the instructions says to assemble it now, assemble it NOW! I tried to be cute and put on all the engine bays maintenace panels on first and as it turn out, the upper engine bay and upper landing gear bay panels, which are molded onto the wings themselves had a really hard time of going into their slots and into place since the maintenance panels interfered with them to the point I had to rip them off and do it as the steps called for them! Shoulda saved me the headaches and just assemble them and insert them in the first place.
In order to make it easier, since I’m building this bird with the wings unfurled, I skipped to step 24 and 25 and built the outer wings. Again, decisions decisions decisions…..The wings can be built with all the slats, flaps and wing tip speed breaks open or closed. I chose to keep everything closed, as if the bird is ready and waiting to hit the cat for take-off. Because of this, becareful which parts goes where. This is especially true for the slats and wing tip breaks as there are different parts for open or closed versions.
Now to bring the wings
together. Usually, I use Tom Cleaver’s technique of taking the top wings, and
using pieces of plastic strips, cut down to size, super glue the wings together
for a tight joint. However, this time, that will not work here because 1. The
outer wing weapon pylons has the folding joint detail panel molded directly on
top to insert it right in between the middle inner wing hole. 2. This wing is
LONG and it needs some form of support in the middle or else it will be too weak
and any stress in the middle will crush it without some support…And that outer
wing pylon, with the integral wing fold j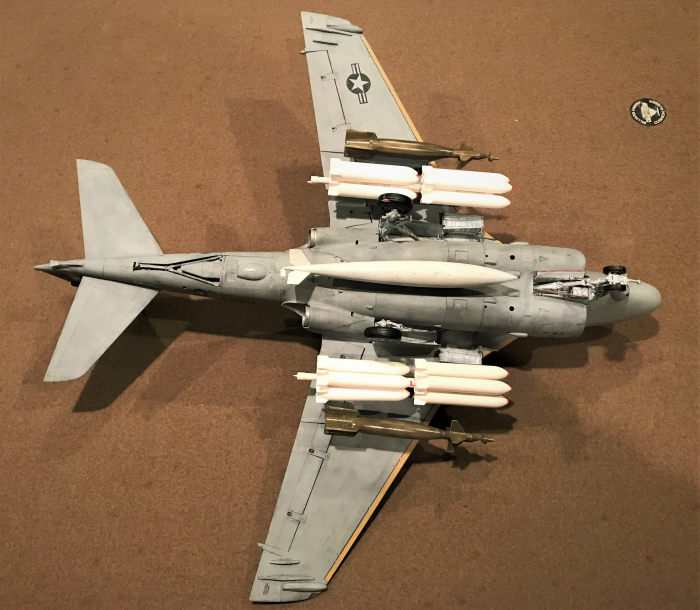 oint
acts as that support! So without any choices, I had to make do. To help you with
that joint a huge long pin, U2, is inserted into the middle hole to grip and
hold the two wing pieces together. That still left some seams to cure. But
anyways, just becareful and take it REALLY slow when you come to this point.
oint
acts as that support! So without any choices, I had to make do. To help you with
that joint a huge long pin, U2, is inserted into the middle hole to grip and
hold the two wing pieces together. That still left some seams to cure. But
anyways, just becareful and take it REALLY slow when you come to this point.
After getting the wing done and into their proper place, which cost me two days, I inserted the engines into their intake slots and bays. The front, where the rear intake trunking meets the front one, the connection joint wasn’t designed too well. In fact, the mismatch almost reminds me of Tamiya’s infamous F-4 Phantom II jet intake, with that huge mismatch seam. This time, the seam isn’t nearly as big but still a huge headache to fix since it’s deep down just enough that you can’t insert a dremel down there and sand it down, putty it up and then clean it…..I chose to left it as it is.
The final bit is the radome…Again, it’s in two pieces. I cement it, then puttied it up, sand it smooth and then put it onto the plane. As it turned out, the model is really designed for the radome to be opened to display that wonderful AN/ALQ-148…..I had to take some time to cure the seam. Half of the problem was again, I just had to insert the engine maintenance panels BEFORE inserting the inner wings first! That knocked the spine to front nose wheel well joint loose enough that the fit aint all that great here and I had to spent time puttying and sanding the radome clean. Sigh, again, when the instructions call for you to insert the inner wing panels in now, insert it NOW please!
Canopy and windscreen go on next. Keep the windscreen forward as much as possible. Use superglue if you must. This is because tolerances are tight here and if the windscreen is even a touch back, the canopy will not be able to close correctly. I had to sand and nudge quite a bit before the canopy settled correct. Again, half of the problem I think was the stupid “I inserted these things too early and it snowballed” effect. Fit should be a lot better if you just follow instructions. Also, do not forget the bottom nose instrumentation bay. This bay contains the TRAM’s turret, which is assembled now and should rotate if you are careful. Insert it right under the nose.
The plane is pretty much finished. The rest, like landing gears etc, can be skipped until painting is done.
| COLORS & MARKINGS |
The first thing I did was break out Tamiya flat black and my artistic jet black paint and heavily dilute them and then coat the plane with three coats of washes. This is because A-6E were never that clean of a bird and a tadpole at the end of its life was just about some of the dirtiest aircraft you can ever see! Still remember after the Gulf War, I attended the Dayton Air and Trade Show (yes, I lived near Wright-Pat AFB for most of my life) and saw a couple of Tadpoles and a Prowler and man! My friend who came with me just commented on as if the planes took an oil bath…A dirty oil bath. The crew just smiled at us at that comment. So yes, this bird will be dirty. Hence the three coat of washes.
The paint scheme are all the same for both markings that came with the kit. The only exception is the “Main Battery” one has a black vertical stab. Otherwise, the bottom is light ghost grey, top mostly dark ghost grey, with neutral grey that runs from the radome to just the small of the back, beyond the canopy.
First of all, insignia
white was sprayed into the intakes and all the wells, the gears and inner gear
door panels. After they are dry, heavy jet black was washed over them before a
second coat, this time heavily thinned was sprayed on to show heavy use. The
wheels are assembled and then super glued onto the gears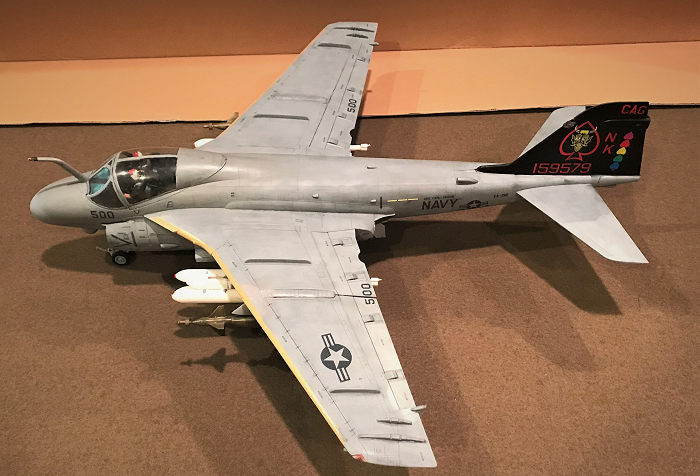 .
Afterwards, I tore off some tissue paper and covered up the wells.
.
Afterwards, I tore off some tissue paper and covered up the wells.
I started at the bottom with light ghost grey. After the first pass, I added a thin layer of jet black wash. After that is dry, a second coat of white, flowed by another thin layer of black wash, this time running a coarse cloth over the plane along the airflow. Afterwards, a third layer of paint. This is allowed to dry completely before a final black wash, thinned very fine, was added to pop the details out further and add even more dirt to the plane. The end result is that the plane, especially along the crew boarding hatches, the engine access hatches and various vents, look as if they had seen better days, with black splotches darkening the lines.
The same effect were carried out for the dark ghost grey and neutral grey, just not as heavy, but still showed the effects of heavy use. The top of the plane had a much lighter wash, but still ran over several times with coarse cloth to show the effects of airflow over the wings. After that was done, the canopy was unmasked and pin washes was added for further pop off the details
I next masked off the bottom of the vertical stab and the horizontal stab to prepare them for the black paint. I used Tamiya semi-gloss black, with washes of rubber black to off set the tone. Then came the hard part. The forward wing walk way area was masked off and sprayed with tan before the painting was completed.
The end result is a very dirty and had seen better days bird that look like it is well in need of a bird bath soon. The light during the picture session toned down this effect somewhat but trust me! This is a very dirty bird. And before I could go further, the mailman called and I got my two crew figures from Ultracast.
Figures
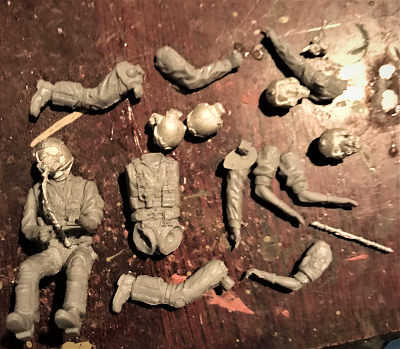 These came
in a small Ziploc bag with four different heads each. These heads are metal and
all of them are helmeted except the visor and oxygen mask. These include: fully
covered face with visor pulled down and oxygen mask put on. Open face with visor
pulled up and oxygen mask on the side. With visor down but mask not on and
finally with mask on but visor up. For the heads with oxygen mask not snapped
on, a metal mask and hose is provided. For both figures, I chose to put on the
head with both visor pulled down and oxygen mask on. This not only save me on
painting with the crew faces, but also for added realism since any navy crew
ready for a cat shot has the visors pulled down and oxygen mask on.
These came
in a small Ziploc bag with four different heads each. These heads are metal and
all of them are helmeted except the visor and oxygen mask. These include: fully
covered face with visor pulled down and oxygen mask put on. Open face with visor
pulled up and oxygen mask on the side. With visor down but mask not on and
finally with mask on but visor up. For the heads with oxygen mask not snapped
on, a metal mask and hose is provided. For both figures, I chose to put on the
head with both visor pulled down and oxygen mask on. This not only save me on
painting with the crew faces, but also for added realism since any navy crew
ready for a cat shot has the visors pulled down and oxygen mask on.
There are also different arms. One arm is posed to hold the stick. Unfortunately, this has the top of the stick molded on….Which is a huge hassle since the stick on my bird is already put in, which caused me to snip the stick in the hand off and try to pose it as close to the cockpit stick as possible. With the canopy on, it is buried deep inside enough that you can’t really tell. The other for the right arm is one in which it is hold onto something. For the left arm, one has its arm straight out, as if the finger is pushing a button on the instrument panel. Other again, are designed to grip something or holding the throttle. However, two of the arm poses have full sleeve, like the holding the stick pose. And two have sleeves rolled up, like finger pushing a button. This created a problem since holding the throttle is sleeve up, which I decided to use for the pilot, with holding the stick pose. For the navigator/bombardier, I chose the pushing button, which has the sleeve rolled up and the only arm that could fit inside the cockpit is an arm that is gripping something, but with down sleeve…Wish Ultracast can cast all of them in both rolled up and down sleeve!
Assembly begin with cutting the mold block off, then washing the resin in warm soapy water. After they are dried, all the parts are assembled with super glue and test fitted into the cockpit. They fit. You just have to push the two lower body parts all the way up until the lower pockets hit the upper body and can’t go any further. I had to cut off the bombardier’s boots since they seemed to interfere with the seating of the figure. Same with the rudder pedals. I had to knock them off since the pilot’s feet will interfere with them. Otherwise, the only other problem I had was I should’ve removed the bottom seat cushion from the seat since they caused the crew to sit too tall. I had to dremel sand them down and also sand the crew’s bottom down to the bear minimum to get them to sit within the seats. Otherwise, the figures fit great!
For colors, I consulted
the picture that came with the bags. I painted them olive green with black
washes. Deta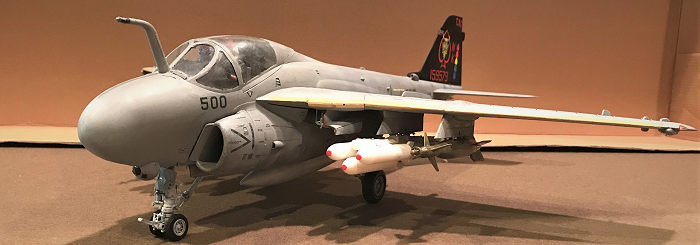 ils
includes silver belt buckles, yellow life jackets and grey belts. The exposed
arm is painting in flesh. The head is white helmet and red visor cover and flat
black visor, rubber black oxygen mask and hose. The hose is soft metal so you
can bend it into shape to fit the mask and figure properly. After they are
painted and then assembled, they are superglued into their respective seats and
the canopy can finally be permanently cemented on.
ils
includes silver belt buckles, yellow life jackets and grey belts. The exposed
arm is painting in flesh. The head is white helmet and red visor cover and flat
black visor, rubber black oxygen mask and hose. The hose is soft metal so you
can bend it into shape to fit the mask and figure properly. After they are
painted and then assembled, they are superglued into their respective seats and
the canopy can finally be permanently cemented on.
The decals can now be put on. If you had read my previous review about Trumpeter’s decals, you will know they are thin, too thin. It seems with this kit Trumpeter wizened up a bit and made the decals a little thicker. They do not roll as easily, with made the rest a cinch. Just dip in water, wait a few seconds longer, pull out, put on the model, dry, and slobber on some Mr. Marks and they settle down nice and neatly. Of all the Trumpeter kits, this by far is my most pleasant experience when it comes to putting down their decals!
| FINAL CONSTRUCTION |
These consists of some sensors and mostly the landing gears. Again, I already blasted the gears with insignia white and both the bays and gears are washed. Since all the gears are metal, use superglue. They go in rather easy. Again, just remember to keep the retracting rods loose so you can adjust and play around with them to get them into the correct position. Afterwards, the doors, with their associated hydraulic links, are put on. Careful with the nose front door. There is a rather large landing light with the three landing sequence focusing lights (painting red, yellow and green) on there. Then the formation lights and wing tip lights are put on. Finally, the piece that also characterizes the tadpole, the in-flight refueling probe, wryly called “the donkey dick” by the crews, are put on, right in-between and in front of the windscreen. The only thing missing is the pitot tube on the top of the vertical stabilizer….That thing is so thin, it looks like it will break just by looking at it! I already collected a metal replacement but it will not be put on until my youngest kid is much older! The stupid thing is about as sharp as a freaking hypodermic needle! And no, not over yet!
Armaments
Yep, as you may have
guessed it, Trumpeter is more than willing to fill your kits with bombs,
missiles and things that go BOOM to the fact you can arm several planes with
what comes in the box. My preview has the weapon listing so will not say them
here. Safe to say, there are A LOT! Finally, I de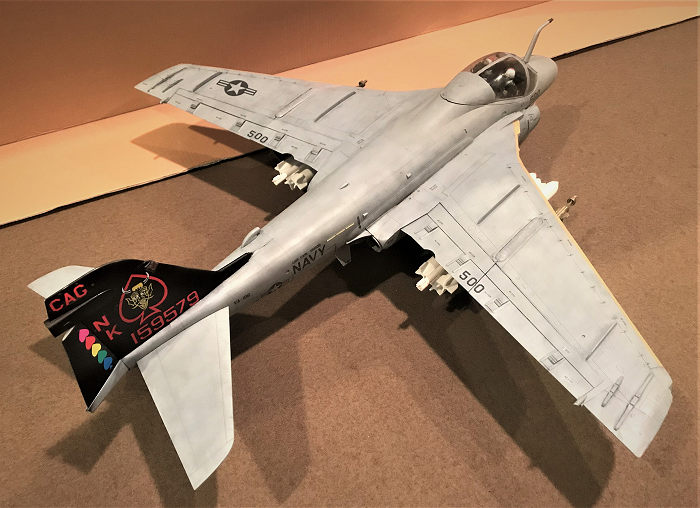 cided
to arm my tadpole with two GBU-10’s, a pack of 12 Rockeye clusters and a
centerline fuel tank.
cided
to arm my tadpole with two GBU-10’s, a pack of 12 Rockeye clusters and a
centerline fuel tank.
Now, the fuel tank had already been painted and weathered in the painting session. The GBU-10 that came in the kit is ok, but I still have 4 more from my ancient Tamiya F-15E kit from over 20 years ago. The plane is now on the top of my friend’s t.v. stand but he did kept those in that box after I graduated from Ohio-State. The F-15E kit also saved me because I still have the rockeyes since the MER given by Trumpeter is WAAAYYYY too short! Putting them alongside the MER that came with the Strike Eagle, the distance between the weapon pylons are the same. However, the length of the main pylon is about 4 inches too short on the Trumpeter one and is also around 3mm too thin. The correct pylons only support their own rockeyes and thankfully, I still have the full complement! With the weapons sorted out, I hit the paint shop.
The rockeyes and the MER’s are sprayed insignia white. Could use some more weathering but I’m happy with it. The GBU-10’s are sprayed with green drab and then the rockeyes are cemented onto their MER’s and put on the inner wing pylons, with the GBU’s on the outer pylons. Model complete!
| CONCLUSIONS |
WOW with a capital W! This is one big kit and there are A LOT of stuff in the box! Is it worth it for $225? Yes it is! But these days, this kit has gone down WAY in price! Again, even with shipping and handling, you can get this from hobbylinc for a total of $142 or so! That is a HUGE bang for the bucks as this kit got so much to offer even if you close everything down! The only problem is its size. To give you an idea, the fuselage is 1 inch longer than the 1/32 B-25 and the wing span (unfolded) is 1 inch less so you will need some real-estate. The kit is now on the defunct printer in my office (yes, finally found a permanent place for my 1/16th King Tiger!). And yes, it’s about the same size as that printer! I love this kit! But for anyone who want a tadpole that’s more manageable, Hobbyboss, aka, Trumpeter under a different name has taken this kit and dumb it down to 1/48 and hopefully, 1/72! Me? Well, I love it so much that I got the A-6A in the same scale!!!! DUUUUUHHHHHHHH!!!! What are YOU THINKING?!? 2 1/32 scale tadpoles?!? Well, for the A-6A, I’ll be building a clean bird with the wings folded, everything open and the rear avionics bay deployed so it will save some space right? RIGHT?!? (Yeah, you tell yourself that!!! Meanwhile, let me run to the nearest wall and act like Homer Simpson: “doh, Doh, DOH, DOOOOHHH!!!!!” Two 1/32 Tadpoles?!?!?! “WHAT WERE YOU THINKING?!?!?!?!?!?!?”).
9 January 2018
Copyright ModelingMadness.com
If you would like your product reviewed fairly and fairly quickly, please contact the editor or see other details in the Note to Contributors.
Back to the Main Page Back to the Review Index Page Back to the Previews Index Page