
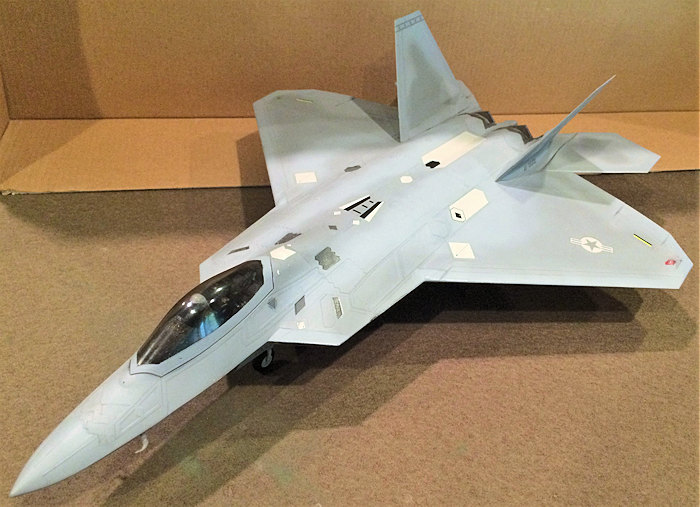
Hasegawa 1/48 F-22 Raptor
| KIT #: | 7245 |
| PRICE: | $70.00 |
| DECALS: | Four options |
| REVIEWER: | Donald Zhou |
| NOTES: | Notes: Advantages: Well detailed, full weapon fit, and choice of open or closed weapon bays. Disadvantages: Some minor details quibbles, wrong version of the Sidewinder, and slightly over engineered |
| HISTORY |
The history of the F-22
can be traced to the F-15. Just after the Eagle won the “F-X” competition, calls
already went out for a successor. This request was officially given out in 1981.
In 1986, two competitors, Lockheed Martin/Boeing/General Dynamics (Who dropped
out after Lockheed purchased their aerial division) and Northrop/Grumman (who
later became literally, Northrop Grumman) were chosen to become the competitors
in the next phase of the development. Two prototypes from each team was ordered.
The requirements was stringent to say the least. The least of which is by 1981,
stealth, then a newfangled idea was proving itself with the “Have Blue”
demonstrator having its way with any radar then currently in service and the
F-117 already under secrete testing and just a few years from service. So the
first requirement was the fighter will be stealthy and still be a fighter since
the F-117 was “F” in moniker only. This required the fighter carrying all
armaments inside externally. On top of that, the Air Force still requested the
fighter have
 the same combat radius of the F-15, this also required the fighter
to hold all of the required fuel internally, unlike the Eagle, which required
three 650 gallons drop tanks to achieve the same thing.
the same combat radius of the F-15, this also required the fighter
to hold all of the required fuel internally, unlike the Eagle, which required
three 650 gallons drop tanks to achieve the same thing.
Next was avionics, the air force wanted something that’s a whole new generation ahead of the APG-66 then in service with the Eagle. Luckily breakthrough in AESA or Activate Electronic Scanned Array radars was nearing fruition. This not only double the detection range, but also most importantly, AESA can hide its electronic footprint with LPI or Low Probability of Intercept mode. This is achieved through keeping the frequency ultra-low while also frequency hopping over 1000 times a second. Since AESA array is made up of hundreds and in the case of the APG-77 fitted to the F-22, over 1000 T/R (transmitter/Receiver) modules, the Raptor can do this almost instantly, and through any of the T/R modules that it elects to, further hiding its radar signature from being detect. RWR and EM is supported by the ALQ-94. Unlike previous systems, the ALQ-94 passive system has over 30 different antennas spread all over the airframe, carefully blended in. The system can track radar emissions from over 250 miles away or more and can eventually generate a tracking solution for its missiles. This is why some commanders in exercises would actually like the F-22 act as an “information distributor” and only attack other aircrafts when the need arises.
The next requirement required new advancement from the engine manufactures since the Air Force required the new plane to be able to achieve supercruise of at least Mach 1.5. This means the engines have to generate enough thrust at military thrust much higher than the F-100 that powers the F-15 since the F-22 will have to carry all armaments and twice the fuel load of the F-15 initially.
In June 1990, Northrop was the first to roll out the YF-23. Lockheed followed quickly in August 29, 1990 with the YF-22. Two prototypes of each was built, each with two different engines, one from Pratt & Whitney’s F-119 and General Electric F-120. During testing phase, the YF-22 was able to achieve a supercruise of Mach 1.53 with the F-120 (Mach 1.42 with the F-119) and was test fired missiles from its bay. In April 23 1991, the F-22 was announced to be the winner with engines being selected as the Pratt & Whitney’s F-119. Some 880 aircraft will be produced, an almost one to one replacement for the F-15. Many speculated that the reason why was the YF-22 proved to be more maneuverable and also slightly less risky even though the YF-23 was faster and stealthier.
However, like so many weapon programs of that period, everything went out of the window when slightly more than a year later, the USSR decided to kick the bucket and die a quiet death. Many programs, including the Navy’s NATF, which was supposed to be based on the ATF, was canceled out right or put on the back burner. The F-22 suffered also with delays for its introduction and IOC pushed back into the 21st century.
In fact, the first F-22 wasn’t produced until 1997. It was somewhat different from the YF-22 having a smaller tail, cockpit pushed forward, jet intakes pushed back and a slightly less swept wings. It also did not have the proposed side mounted radar and an IRST. These were lost to budget cuts. In fact, planned numbers have already dropped from some 800 airframes to only 430. Despite this, testing went ahead.
 The Raptor quickly
proved to be not just a step up, but actually several “floors” up from the
previous generation fighters. Not only was it practically invincible from medium
range, where its stealth prevents the opponent from detecting it, but also, the
APG-77 and especially the ALQ-94 can detect the opponent without the enemy
detecting it, but it proved to be just as deadly from up close. With its
thrust-vector, the Raptor can pitch up to 60 degrees while in control.
Instantaneous alpha was 30 degrees with sustained at 27, far better than
anything else on the market at that time. Its RCS also proved to be much smaller
than anticipated, as little as 0.0001M from the frontal arc while supercruise
was much faster, as fast as Mach 1.8, rather than reported Mach 1.6. IOC was
finally achieved in 2005.
The Raptor quickly
proved to be not just a step up, but actually several “floors” up from the
previous generation fighters. Not only was it practically invincible from medium
range, where its stealth prevents the opponent from detecting it, but also, the
APG-77 and especially the ALQ-94 can detect the opponent without the enemy
detecting it, but it proved to be just as deadly from up close. With its
thrust-vector, the Raptor can pitch up to 60 degrees while in control.
Instantaneous alpha was 30 degrees with sustained at 27, far better than
anything else on the market at that time. Its RCS also proved to be much smaller
than anticipated, as little as 0.0001M from the frontal arc while supercruise
was much faster, as fast as Mach 1.8, rather than reported Mach 1.6. IOC was
finally achieved in 2005.
Full operational capability was not achieved until 2007, fully ten years after the first F-22 was introduced and some 20 years later then first envisioned at the height of the Cold War. Already, the F-22 proved itself to be almost invincible against 4th gen fighters like the F-15. In Exercise Northern Edge 2006, some 12 Raptors achieved a kill ratio of 145 to 1 while helping the “blue” force kill some 240 “enemy red force” fighters with no losses to its own. However, it’s also that success and lack of then any competing aircraft that doomed the fighter further. Production numbers kept on dropping. First to 383, then to 260 before finally stabilizing at 187. It’s also that success and the Raptor’s stealth and host of other secrets that caused Congress to put it off the export market. This raised the cost of each aircraft to 250 million a pop because 187 airframes is not even close enough to allow economy of scales to kick in.
As with any new weapon platforms, the Raptor experienced some operation issues during its first few years of service. The worst of it was the OBOG or On Board Oxygen Generation system problems. Starting at around 2010, Raptors suddenly started to crash without any given reason, similar to the F-16 “Bolts to Screw job” fiasco. It took several crashes, loss of life before the Air Force can nail down the problem to faulty valve that regulate the pilot’s G-Suit in the OBOG system. In fact, the whole entire episode grounded the entire fleet for four months in 2011 before it was fixed. It was during this time that the Raptors participated in a Red Flag exercise against the Typhoon with many Typhoons wearing Raptor “kill” markings. Many questions were thrown against the fighter. However, what was not well known was the Raptor was still suffering from OBOGS problems. This restricted service celling to only 35,000 ft, compared to the actual 55,000ft of the F-22. Because of the OBOGS problem, pilot were not allowed to wear G-suits, restricting maneuvers to only 5.5G’s max. The Raptors were further not allowed to engage from medium ranges. Even the most adamant Tiffie pilots admits they would probably get shot down long before they can engage any F-22’s from medium ranges. Despite basically having one arm and a leg tied behind its back, the actual exchange ratio was one to one.
 Despite the
advent of Chinese J-20 and Russian T-50, the Raptor will still be the queen for
quite a while due to the fact both J-20 and T-50 have weakness of their own.
Especially critical is the fact both currently do not have anything similar to
the F-119, making them subsonic while the Raptor can supercruise. Not only that,
questions about J-20 and T-50’s stealth persists what with T-50’s “straight
shot” into the engine face intakes while J-20 has those unhidden canards and
belly fins that increases its radar cross section (and reported material
problems with its RAM coating).
Despite the
advent of Chinese J-20 and Russian T-50, the Raptor will still be the queen for
quite a while due to the fact both J-20 and T-50 have weakness of their own.
Especially critical is the fact both currently do not have anything similar to
the F-119, making them subsonic while the Raptor can supercruise. Not only that,
questions about J-20 and T-50’s stealth persists what with T-50’s “straight
shot” into the engine face intakes while J-20 has those unhidden canards and
belly fins that increases its radar cross section (and reported material
problems with its RAM coating).
Upgrades are planned for the future, however, due to the fact its biggest opponents are still an unknown, major upgrade funds for the Raptor was canceled in 2014, the biggest loss was the loss of the planned helmet cueing system upgrade, meaning the F-22 can not use the 9X Sidewinder to its full potential. However, despite this, as the only fighter currently that contain both full blown mature next-gen avionics, stealth, and supercruise, nothing likely will supersede the F-22 for years to come.
| THE KIT |
Hasegawa’s F-22 was released in 2010. Previously, there was only one other F-22 kit and that was Italerie’s, which was released in 1998. However, that kit is based on the prototype EMD version and have several detail faults or no details at all. The Hasegawa one is fully correct in outline. The only other 1/48 F-22 out there currently is made by Academy. Despite the fact it has more weapons, including external stores, some details better than the Hasegawa, it has two rather massive external outline faults. The first is the tail, they are way too small. The second is the nose. The prominent chine and hawk like beak that characterizes the Raptor’s nose are completely missing. However, as stated, Hasegawa one does have several minor faults. The biggest one detail wise is the fact many top surface area are replicated by decals, the biggest eye sore is the APU. This is very prominent on the real aircraft and features a top opening vent that’s usually in burnt iron color. The kit doesn’t even give you a plastic part (unlike Academy), much less a photo-etch (most wanted). Rather a decal that look nothing like the real thing is there as a substitute!
 Upon opening
the box, one is greeted by 9 sprues with two clear ones. The clear
transparencies are duplicates, one clear, the other one smoked since like all
fighters since the 90’s (past F-15 MSIP II and F-16 Block 30), all U.S. fighters
canopies contain a slightly smoked/goldenish color to block in coming radar
waves from bouncing around inside the cockpit. However, other details such as
HUD piece, wing tip lights etc are also smoked. This is weird since they are not
need when Hasegawa only need to smoke the canopy, and make the rest in clear
rather make two duplicates. Ohh well, save me when I lost the clear HUD to the
carpet monster. A full armament is included including six AMRAAM and two
sidewinders. Unlike the Academy version, external stores are not offered and
strangely, the sidewinders are the AIM-9X, which is totally wrong for the Raptor
since currently, only one squadron have been upgraded to carry the missile and
since this kit was made before that ever happened, all the markings included in
the kit are not meant to carry the 9X ‘Winder so some 9L/M version of the
missile has to be sourced. Also, a pilot is included with two heads, one
standard, the other looks like it’s wearing a Joint-Helmet Mounted Cueing
System. As stated above, all major funding for upgrades are currently canceled
since 2014 so the F-22 will not receive any helmet mounted cueing system for
now, making the “new type” helmet head redundant.
Upon opening
the box, one is greeted by 9 sprues with two clear ones. The clear
transparencies are duplicates, one clear, the other one smoked since like all
fighters since the 90’s (past F-15 MSIP II and F-16 Block 30), all U.S. fighters
canopies contain a slightly smoked/goldenish color to block in coming radar
waves from bouncing around inside the cockpit. However, other details such as
HUD piece, wing tip lights etc are also smoked. This is weird since they are not
need when Hasegawa only need to smoke the canopy, and make the rest in clear
rather make two duplicates. Ohh well, save me when I lost the clear HUD to the
carpet monster. A full armament is included including six AMRAAM and two
sidewinders. Unlike the Academy version, external stores are not offered and
strangely, the sidewinders are the AIM-9X, which is totally wrong for the Raptor
since currently, only one squadron have been upgraded to carry the missile and
since this kit was made before that ever happened, all the markings included in
the kit are not meant to carry the 9X ‘Winder so some 9L/M version of the
missile has to be sourced. Also, a pilot is included with two heads, one
standard, the other looks like it’s wearing a Joint-Helmet Mounted Cueing
System. As stated above, all major funding for upgrades are currently canceled
since 2014 so the F-22 will not receive any helmet mounted cueing system for
now, making the “new type” helmet head redundant.
| CONSTRUCTION |
Before construction can begin, a choice needs to be made. The kit offers both closed or open bays and cockpit options and one needs to make a clear decision before construction can even begin. Now, since like my F-35 kits, I got two of them, I can have both worlds. This one will be all closed. Closed cockpit and closed weapon bays also with a pilot.
Construction begin with
the cockpit. The ejector seat contain six pieces alone. The only thing missing
are some harness but since I will be including the pilot, that wasn’t missed.
The cockpit was quickly assembled due to the fact the Raptors are kept
constantly clean and like all modern fighters, features a glass cockpit that are
devoid of details. I painted the instrument panel buttons light ghost grey and
used the kits decals to fill the screens. The ejector seat is mostly black, like
the cockpit with olive green padding. The pilot came t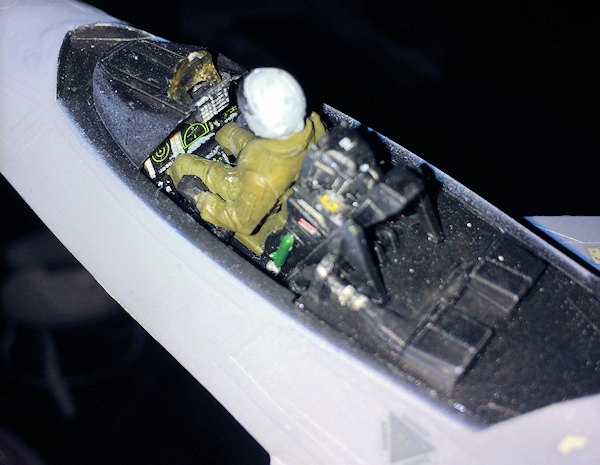 ogether fine. I used the
regular helmeted head and then guided the arms to hold the side mounted stick
and throttles.
ogether fine. I used the
regular helmeted head and then guided the arms to hold the side mounted stick
and throttles.
The next two steps deals with the weapon bays. A LOT of details goes in there. However, since this version will have the bays closed, I didn’t bother. However, the bay themselves are needed to weight down the nose so I put them in and skipped all the way to step 18 and 20 and put in the closed weapon bay doors (two versions are offered in the kit, a closed bay doors and separate open ones so the modeler aren’t forced to use the open version to close the bays and leave nasty seams behind). One needs to be careful here since the fit is tight and you do not want any seams or the doors to jut outwards.
Assembling of the main gear bays are next. Strangely, poly caps are used to hold the main gear legs on, a recipe for disaster later on, same with the nose gear also.
The afterburner cans are next. Leave the pitot tubes off, not unless you want to feed the carpet monster. Various connector pegs are now added due to the fact the Raptor needs to contain both weapon bays, the intake trunkings, the engines, and leave enough room to carry 10 tons of fuel internally (at least twice the amount of the F-15). This however, meant a lot open spaces between the top of the weapon bays and the bottom of the top fuselage. To solve the problem of this area becoming too weak, Hasegawa engineered a lot of connector pegs to connect them together and provide strength. They proved to be way too much however as when putting the fuselage together after putting in the intake trunkings and fan faces, the pegs juts and push the top fuselage up way too much. I cut off the top pegs a little on some of them. Broke some to get them into better position and finally snapped off and removed some completely. The end result was after all these surgeries, the fuselage almost came together and proved very strong and needed very few filler to fill the gaps. And most of that was the fact I knocked the joint off kilter while forced to knock the pegs down.
 Also, for the
intake trunkings, several decals that supposed to replicate the extra bleed air
intakes (why can’t they be photo-etch?) are needed to put in now. When I mean
now, I mean now! I tried to put them on later during the decal session and guess
what? Didn’t work out too well….
Also, for the
intake trunkings, several decals that supposed to replicate the extra bleed air
intakes (why can’t they be photo-etch?) are needed to put in now. When I mean
now, I mean now! I tried to put them on later during the decal session and guess
what? Didn’t work out too well….
Construction of the landing gears and gear doors are next. Save these for later.
Next few steps deals with the open bay doors. Skip directly to step 18 and 20 if you are doing the close bay doors version if you haven’t done that already.
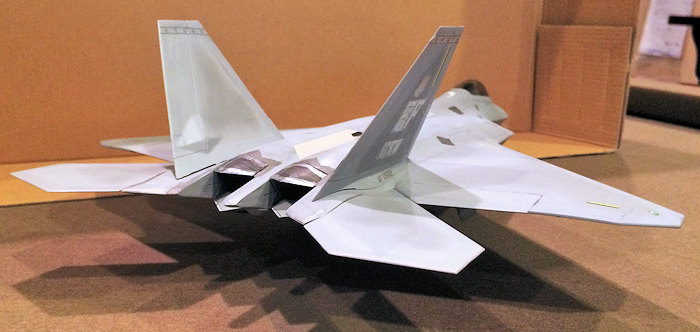
The model are pretty much done at this point. Save the afterburner/thrust vector petals, and the stabilizers for later. The vertical stabilizers especially since like the F-35, they are canted and a lot decals goes on there. Just be award the vertical stabilizers did not came out too well. You need to work on the seams before they get anywhere close to looking good. This is one of the only few areas where the kit didn’t come together too good.
| COLORS & MARKINGS |
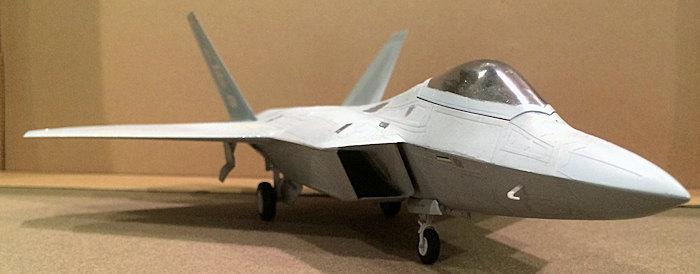
Before main painting can begin, I used Insignia White and sprayed the gear doors, the gears and wells white. Then after 12 hours, I ripped off several sheets of toilet paper and stuffed the wells. Next, I taped the smoked canopy, spray the inside flat black and took a deep breath.
Talk about involving! The F-22 paint job is complex one and will take you some serious time so be patient!
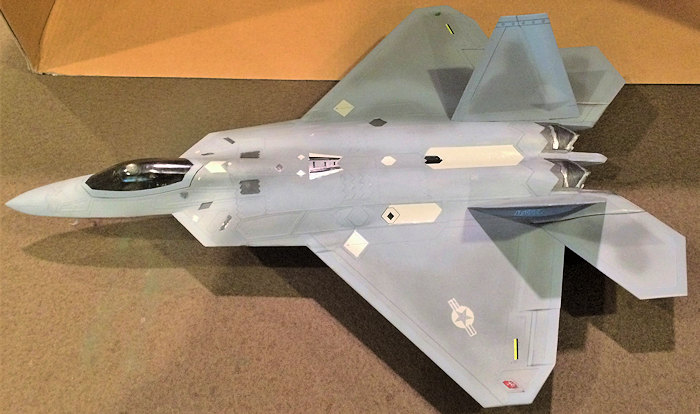
The big problem number 1 is the Raptor Sheen. F-22 paints have a certain sheen to them due to the fact they carry some RAM materials inside. From certain light angles, this make the grey paint look goldenish. Once upon a time, Talon Metalizers make a sheen specifically for the Raptor but now since Talon went “POOF”, you gotta make your own. After trawling the web and experimenting, here are my recommendations:
Basic color: Light ghost grey. This is mixed with Testors “Steel” in the small bottle in a 65-70% grey, 35-30% steel to give the most distinct goldenish hue
Neutral Grey for the top camo mix color. Mixed in a 60% grey, 40% Silver mix. This color has a lot more RAM inside it seems since the color disappears in certain light conditions.
Dark Ghost Grey with nothing mixed in for the leading and trailing edges of various wings, stabilizer surfaces and the radome. This is because these paints are transparent due to the fact Raptors have their ECM, communication and RWR gears hidden inside the leading and trailing edges of the wings and stabilizer surfaces.
 Main painting
began with the Light ghost grey mix. This was sprayed on in several coats for
maximum coverage. This was the easy part. Now I did wash the model with Tamiya
Flat Black but don’t go overboard with it as the Raptors are constantly
maintained due to its RAM coating and kept very clean. This was born with
various pictures and photos. These birds are not all that dirty.
Main painting
began with the Light ghost grey mix. This was sprayed on in several coats for
maximum coverage. This was the easy part. Now I did wash the model with Tamiya
Flat Black but don’t go overboard with it as the Raptors are constantly
maintained due to its RAM coating and kept very clean. This was born with
various pictures and photos. These birds are not all that dirty.
Next was the Neutral grey part. I goofed on this right off the bat when I mixed half a bottle of silver paint into the grey and turned it into a horrifying hue of metallic grey! That’s a no go. Two days later, I finally got the time to hit the local hobby shop to get another bottle of neutral grey to get the correct mix. I freehanded right on without tape…Yeah, it’s not that accurate but no one will notice. This took several nights to get right as I kept on messing with the mix as it was still too silvery.
The next was the hard part. After 24 hours to allow dry, I started taping the leading edges of the intake, wings, both trailing and leading, same with the stabilizer surfaces, top and bottom and then the radome too. This took better part of six hours and across five days to complete (well, mostly cause I’m doing two Raptors at the same time here)! My eyes were screaming when I was done! The paint went on no problem. All in all, it took better part of a month to do all the painting! It’s much more complex than the F-35, even if you are doing one with the RAM strips!
Four markings are included. Two are from the 1st Fighter Wing. The first option is the commander of the 94th Fighter Squadron, the famous “Hat in the Ring”. The second one is 192 Fighter Squadron, 1st Fighter Wing. The third one is 302nd Fighter Squadron located in Alaska and the final one is the 49 Fighter Wing out of Holloman Air Force Base. For this one, I chose the first option, the 94th Fighter Squadron, 1st Fighter Wing.
Decals go on nicely with Mr. Mark Softer. Hasegawa decals works very differently. They took a LOOONNNGGG time to come off the backing paper. A little too long even with warm water. I soon started an “assembly line” method of putting on one decal, having another just cut off and dipped in water, the put it behind the two others that are waiting. It’s either that or waiting the next three or four minutes for just one decal to start moving on its backing paper. The decals, once in place, are zapped by Mr. Mark Softer for two minutes before drying. They stick on nicely. Just make sure to keep your fingers away or else as I’ve found out painfully a few times!
| FINAL CONSTRUCTION |
Now that decals are done, the “fiddly bits” can be attached. The first thing to go was the afterburner/thrust vector petals. These are paint with chrome silver outer edges and burnt metal center with insignia white inner surfaces and attached.
Next are the vertical stabilizers. This was put on near the end since they are canted and various decals goes on the inside and outside. The horizontal ones are also inserted. If you read the instructions carefully and put in the two poly caps, they should be operable when done. Just becareful not to stress out the plastic connector pegs since by experience, it’s a question of when, not if when they will break off! Hrmmmm….Might be a good idea to hit the local hobby store to get some metal rods as replacements!
 The majority of the
final efforts goes to the landing gears and the associated doors. They are
already painted insignia white. The wheels are insignia white wheels with flat
black tires, and a wash of NATO black to tone it down. A speckle of dirt was
represented by artist acrylic “cream” color. This was not overdone since these
birds are constantly cleaned. Silver was added to the nose landing light and
exposed hydraulic gear sections. After all this, they were added to the correct
placement and the retraction gears attached. Lastly, the doors are attached. A
couple of decals have to be placed on the nose gear doors before attachment.
The majority of the
final efforts goes to the landing gears and the associated doors. They are
already painted insignia white. The wheels are insignia white wheels with flat
black tires, and a wash of NATO black to tone it down. A speckle of dirt was
represented by artist acrylic “cream” color. This was not overdone since these
birds are constantly cleaned. Silver was added to the nose landing light and
exposed hydraulic gear sections. After all this, they were added to the correct
placement and the retraction gears attached. Lastly, the doors are attached. A
couple of decals have to be placed on the nose gear doors before attachment.
Again, strangely, all gears are held in place with poly caps. I do not understand this so cured all them with super glue to ensure they sit in place. This lead to almost disaster as the right main gear snapped during construction, resulting in one side slightly higher than the other. Why did Hasegawa over engineer this I do not understand.
Finally, just as the photo sessions starts, I remembered that I forgot the pitot tubes! I added them quickly. They are not painted in the photos but are right afterwards.
| CONCLUSIONS |
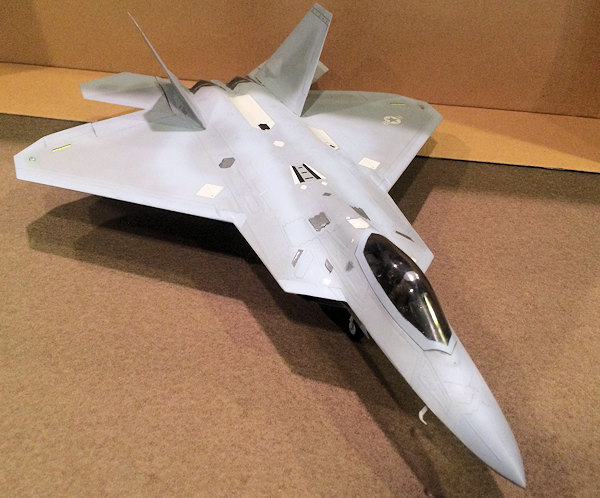
And there you have it! Despite all the problems I encountered, the model turned out real nice. Now, if there are some aftermarket improvement parts, especially for the surface areas, then go get them! This is absolutely the biggest fault of the model. Otherwise, enjoy building one, especially with the tips above since this is the most accurate F-22 on the market right now!
May 2016
Copyright ModelingMadness.com If you would like your product reviewed fairly and fairly quickly, please
contact
the editor or see other details in the
Note to
Contributors.