Hobby Boss 1/48 F-111C
| KIT #: | 80349 |
| PRICE: | $109.00 SRP |
| DECALS: | Two options |
| REVIEWER: | Dale Rannals |
| NOTES: |
| HISTORY |
Four aircraft were modified to
"RF-111C" reconnaissance configuration in 1979-80, retaining their strike
capability. The RF-111C carries a reconnaissance pack with four cameras and an
infrared line-scanner unit. Four ex-USAF F-111As were refitted to F-111C
standard and delivered to
F-111C aircraft were equipped
to carry Pave Tack
 In
late 2001, wing fatigue problems were discovered in one of the F-111C fleet. As
a result a decision was made in May 2002 to replace the wings with spares taken
from ex-USAF F-111Fs stored at the Aerospace Maintenance and
In
late 2001, wing fatigue problems were discovered in one of the F-111C fleet. As
a result a decision was made in May 2002 to replace the wings with spares taken
from ex-USAF F-111Fs stored at the Aerospace Maintenance and
The F-111's long-time nickname Aardvark literally means "earth pig" in
Dutch/Afrikaans. Consequently in Australia, the F-111 is often known by the
affectionate nickname "Pig".
In mid-2006, an RAAF F-111 was chosen to scuttle the North Korean ship, the Pong
Su which had been involved in one of Australia's largest drug hauls in recorded
history. The ship had been sitting in "Snails Bay", off Birchgrove, while the
government decided its fate, and it was decided in March 2006 it would be
scuttled by air attack. The Pong Su was sunk on 23 March 2006 by two GBU-10
Paveway II laser guided bombs.
In 2007, Australia decided to retire all of its RAAF F-111s by 2010, and the government signed a contract to acquire 24 F/A-18F Super Hornets as an "interim" replacement, pending the acquisition of the under development F-35 Lightning II. In March 2008, after a review, the new Labor government confirmed its purchase of the Super Hornets. The drawdown of the RAAF's F-111 fleet has begun with the retirement of the F-111G models operated by the No. 6 Squadron RAAF in late 2007. The No. 1 and No. 6 Squadrons are to be reequipped with the F/A-18Fs, beginning in 2010. One of the reasons given for the retirement is the average of 180 hours of maintenance required for every flight hour. The RAAF retired its last F-111s on 3 December 2010.
| THE KIT |
HB’s Aardvark kits come in a
huge box with amazingly tight tolerances.
They are very hard to get open!
Inside the box rests sprues upon sprues of gray colored plastic.
Inside the box is another, smaller box.
This box contains the fuselage top and bottom.
Why this was done here I do not know, but the box came in handy during
the build as a secure place to put the many sub-assemblies of the kit.
Two full engines are included…detailing seems quite adequate and a good
foundation for the super-detailers out there.
Unfortunately, the engines and their detail are all but hidden inside the
aircraft. A full radar suite is
included 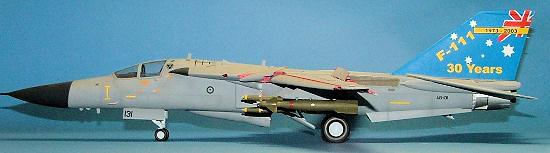 and
the forward/nose electronics bays can be displayed open.
You’ll have to scratch build whatever type of hinges these panels open
on, as none are included in the kit.
An odd omission methinks.
Wing slats and flaps can be posed down, and the canopy can be posed open or
closed with separate parts for both.
A plethora of weapon types and ECM pods are included. You need to
determine, however, what types are applicable to the version you’re building.
Instructions show a load-out diagram that oddly shows no weapons on the
outer pylons. Not being an Aardvark
expert in any way, shape, or form, I didn’t understand this until later in the
build.
and
the forward/nose electronics bays can be displayed open.
You’ll have to scratch build whatever type of hinges these panels open
on, as none are included in the kit.
An odd omission methinks.
Wing slats and flaps can be posed down, and the canopy can be posed open or
closed with separate parts for both.
A plethora of weapon types and ECM pods are included. You need to
determine, however, what types are applicable to the version you’re building.
Instructions show a load-out diagram that oddly shows no weapons on the
outer pylons. Not being an Aardvark
expert in any way, shape, or form, I didn’t understand this until later in the
build.
The instructions consist of
16 pages in two fold out affairs. A
very nice large full color glossy
foldout provides aircraft and weapon paint guides, color call-outs (cross
referencing several paint brands) and serves as a decal placement guide.
Very nice indeed.
The decals sheets (there are
three of them….one very large sheet and two smaller sheets) look very nice.
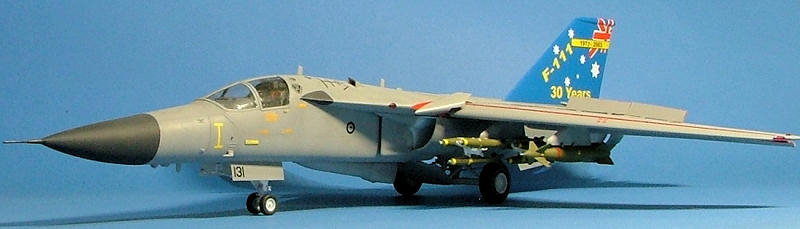
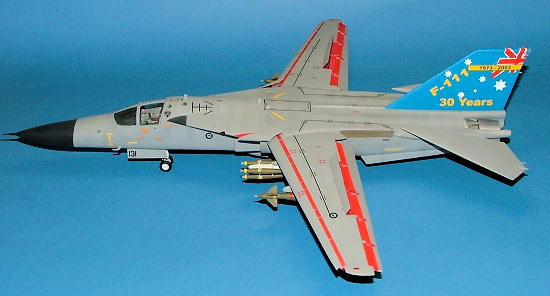
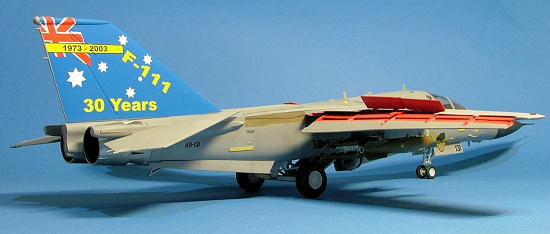
The first things that catch your eyes are the two very large fin decals
in bright blue that denote a 30 year mark with the aircraft.
Wing walks, stencils, and full weapons markings make for a very complete
offering.
| CONSTRUCTION |
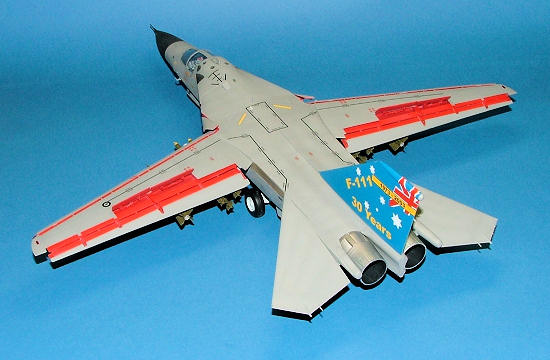
Out of the starting gate I knew the configuration I wanted: a Pig waiting
for takeoff with flaps and slats down and with all kinds of junk hanging out on
those pylons. So I wasn’t going to
worry about displaying the radar or having the electronics bays open.
So these parts went in the “not gonna use” bag.
Also into the bag went most of the engine detail parts.
I’m just not going to bother with parts that you cannot see. (I think it
would have been much better to have one full engine on a stand that you could
display next to the kit, and then just engine faces and exhausts to put in the
kit. Oh well.)
 First up are many sub assemblies
that can be built. The forward and
aft gear wells and the main weapons bays each consist of four separate sides and
a top, along with any braces and detail parts…..more parts here than in some
whole kits I’ve built!! These were
built, allowed to dry, and painted white.
I attached the electronics bays covers to the nose, since I wasn’t
displaying them open, and glued the forward fuselage halves together.
(These are split vertically, and mate to two rear/main halves, that are
split horizontally.) Since I
wasn't going to display it open, I added some weight (lead sinkers) to the
radome (wasn't sure if I'd need any but figured it wouldn't hurt) and attached
it to the forward fuselage. The
forward gear well and the main weapons bay then fit in this forward fuselage
assembly….location is positive and it makes for a quite solid structure.
I then turned my attention to the cockpit/escape module.
This was painted as per the color call-outs and the instrument decals put
in place. Oddly, the
instrument panel decal just lay on top of the panel
like a small piece of cardboard. It made no attempt to conform.
Once I hit it with setting solution though, it snuggled right down.
Quite strange and it had me wondering just how the rest would react.
The seats are a weak point here...not much detail at all and they will be
very visible underneath all that glass.
The cockpit was glued to the escape module…... I test-fitted this to the
forward fuselage and the results looked very promising.
First up are many sub assemblies
that can be built. The forward and
aft gear wells and the main weapons bays each consist of four separate sides and
a top, along with any braces and detail parts…..more parts here than in some
whole kits I’ve built!! These were
built, allowed to dry, and painted white.
I attached the electronics bays covers to the nose, since I wasn’t
displaying them open, and glued the forward fuselage halves together.
(These are split vertically, and mate to two rear/main halves, that are
split horizontally.) Since I
wasn't going to display it open, I added some weight (lead sinkers) to the
radome (wasn't sure if I'd need any but figured it wouldn't hurt) and attached
it to the forward fuselage. The
forward gear well and the main weapons bay then fit in this forward fuselage
assembly….location is positive and it makes for a quite solid structure.
I then turned my attention to the cockpit/escape module.
This was painted as per the color call-outs and the instrument decals put
in place. Oddly, the
instrument panel decal just lay on top of the panel
like a small piece of cardboard. It made no attempt to conform.
Once I hit it with setting solution though, it snuggled right down.
Quite strange and it had me wondering just how the rest would react.
The seats are a weak point here...not much detail at all and they will be
very visible underneath all that glass.
The cockpit was glued to the escape module…... I test-fitted this to the
forward fuselage and the results looked very promising.
Next up were the wings. The
instructions would have you attach the flaps, slats, and spoilers here, but this
would make painting difficult at best down the road.
I also knew I would break something off later if I glued these on now.
I test fitted the wings together and checked to see if I could attach the
flap actuator afterward. A tight
fit for sure but I figured I could enlarge the holes to makes things a bit
easier. So I glued the wings together
and glued the flaps to the actuators and set them aside to dry.
Step five on the instructions are the engines.
Again, I did the basics, leaving most of the detail parts off.
The faces were painted a steel color, the exhausts a dark gray and these
were glued in the bottom main fuselage along with the main gear bay that I built
up previously. There are no positioning lugs for the engine placement, but they
must be positioned correctly for the exhausts to fit right, so make sure you dry
fit the exhausts while you glue in the engines to get the alignment right.
 So far we have some fairly large sub assemblies, but now is the time for
it to all come together and make a monster. The wings are attached to the upper
main fuselage and this then glued to the lower portion.
So far we have some fairly large sub assemblies, but now is the time for
it to all come together and make a monster. The wings are attached to the upper
main fuselage and this then glued to the lower portion.
Though the
instructions do not show it, the kit does have the ability to be built with the
wings fully swept. There are two
sets of lugs in the fuselage that the wings attach to.
For the swept option I noticed there is a small fillet on the fuselage
bottom on each side that will need to be cut or sanded away.
Also, in the wings, there are three holes for each pylon; you will need
to fill in one hole in each set depending on your decision.
When this was all dry, I attached the forward fuselage along with the
escape module. Fit is excellent in
all these areas.
After the fin and tail-planes are attached, you have a mostly complete airframe....a big airframe that get cumbersome to handle. The intakes are attached next and these have no positive positioning lugs. It would be very easy to screw these up. I looked at photos online to figure things out, and attached them to the kit. Another poor area of the kit is the main landing gear attachment. Again it is not positive and seems very fragile, especially since a small kit this is not. We'll see how it holds up over time, but in my opinion it should have been very easy to engineer a sturdier lug for this. After a few more detail parts are on the airframe, it is time for the paint shed.
| COLORS & MARKINGS |
At first I was going to go with the
So, neutral gray was sprayed on the entire aircraft.
I went back with a darker mix and sprayed panel lines, and back again
with a lighter mix for panel center areas.
With all but the flaps and slats attached, this was a big, awkward
aircraft to manipulate for painting.
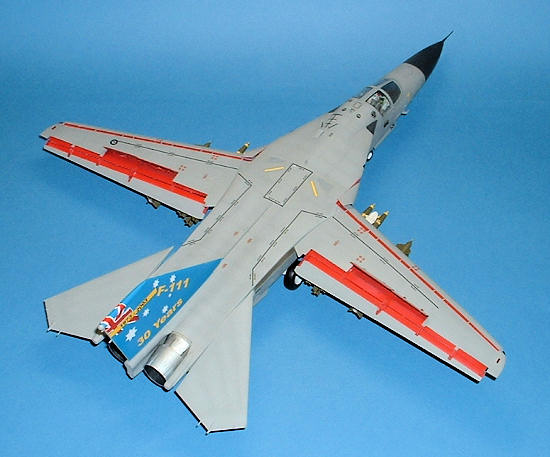
Once it was all dry I removed the masking from the red flap and slat
areas and attached the flaps and slats.
The flaps fit very tight and care was needed to prevent breakage of the
delicate parts. The slats were
easier to attach but exact placement is vague in the instructions so I went with
what looked right to me. A gloss
coat of Future to shine things up and we are ready for the decals.
Decals: Boy, a
tough one. Definitely a love/hate
relationship here. On one hand I
want to tell you to just do yourself a favor and get aftermarket ones.
On the other hand the decals that I actually got on the aircraft okay
snuggled down nicely and conformed to surface detail well, and with no
silvering. One thing for sure:
never have I seen decals that like to fold up on themselves so much.
 My biggest
problem was the wing walk decals.
These are long stripes with “no walk” markings spaced out on them.
The first one lay down with little effort and I thought I was off to a
good start. I next attempted one of
the tail plane stripes. It folded
in on itself and my attempts to persuade it back ended up with it looking like a
piece of spaghetti on the end of my paintbrush.
I cut the remaining long stripe decals into sections, figuring smaller
sections would be more manageable.
Not so much. I managed to get most
of the main fuselage stripes in place, but a couple of sections did the
“spaghetti maneuver” on me once again.
I resorted to taking sections of the wing stripes to complete the
fuselage area. The wings would just
have to go without. I was not
having fun here and my frustration continued to grow with the next set I laid in
place…..two yellow and black warning stripe decals that went in triangular vent
areas on the fuselage top. Once
again the decals just lay on top of the vent corrugation.
I hit these with setting solution, and nothing happened.
The problem here I think is that the decals are a tad oversized and laid
on and adhered to the outer perimeter of the vents, above the corrugation.
Okay, okay, fine. I’ll let
this dry overnight and slice the decals and then hit it again with solution.
So with a new #11 blade, I began slicing and watched in disgust as the
decal began curling up into little jagged clumps.
AARRRGGGHHH!!! So out came
the scotch tape and I ripped the remains off the vent areas.
Of course, I couldn’t get it all off, the perimeter area of the decals
refused to depart the fuselage.
They just sat there, somehow fused with the plastic, immobile…mocking me.
I scraped what I could off with a blade and touched up the area with some
paint. I was not a happy
camper.
My biggest
worry now was the huge fin decals I had to try to get in place without mishap.
I let things sit for a few days, to allow my frustration to diminish; at
least below the threshold of throwing everything against the nearest wall.
I went back at it still worried but at least hopeful.
To my delight the first fin decal slid off the paper and onto the model
in one piece and perfectly placed.
I brushed some setting solution on and it snuggled down beautifully to the fin
detail. I was truly amazed after
the stripe debacle. The other side
went on, though not quite so easily.
A small triangular section of the front broke off, but I was able to get
it onto the model and aligned with little further trouble.
 The rest of
the decals went on well. My
confidence was elevated enough to try putting some of the remaining wing walk
stripes on the wing. I had enough
for one stripe on each wing. The
first one went down okay, but the next, on the other wing, fought me all the
way. I managed to get it on and for the
most part straight, but I was completely done at this point….no more wing
stripes for me. There is just one
per wing….not accurate but I think it looks better than with none.
Hobby Boss supplies some yellow stripes to go around the frame of the
canopy portions……..unfortunately, at that point I was in no mood to even try
putting these on. Also, by this
time, I had managed to break off almost all the small tips (aerials?) that
protrude off the back of the fin and tailplanes.
The rest of
the decals went on well. My
confidence was elevated enough to try putting some of the remaining wing walk
stripes on the wing. I had enough
for one stripe on each wing. The
first one went down okay, but the next, on the other wing, fought me all the
way. I managed to get it on and for the
most part straight, but I was completely done at this point….no more wing
stripes for me. There is just one
per wing….not accurate but I think it looks better than with none.
Hobby Boss supplies some yellow stripes to go around the frame of the
canopy portions……..unfortunately, at that point I was in no mood to even try
putting these on. Also, by this
time, I had managed to break off almost all the small tips (aerials?) that
protrude off the back of the fin and tailplanes.
Looking back on this, I’m going to chalk this up to my inability to manage these long straight decals. If I were to do this again, I think I would cut the “no walk” areas away from the stripes and apply these separately. It would be more work, but I think it would end up much better. It was these areas that always wanted to fold under, and in trying to get them back flat, I managed to make a mess.
| FINAL CONSTRUCTION |
It was at this
point that I realized I had forgotten to paint that big radome black.
A bit of masking and a quick trip to the spray booth solved that problem.
A flat clear coat was applied next and then it was onto the ordinance.
Midway through this build, I started researching the aircraft’s weapons
load-outs. I learned much
about Aussie F-111’s here. Hobby
Boss supplies a cornucopia of ordinance for their Aardvark kits but
unfortunately they don’t tell you what weapons were used on what versions.
So I looked this up online.
While researching this, I found out why the load-out diagram shows nothing on
the outboard pylons. Apparently,
the Aussie Pigs did not use the outboard pylon, and pictures of F-111C’s, at
least later in their lives, seem to confirm this.
It would have been nice if Hobby Boss would have put a small note
explaining this by the load-out diagram.
Thankfully I discovered this and filled in the outer pylon holes before I
started painting.
I decided on
putting GBU-10’s on the outboard pylons with Mk-82’s on
I wheels/tires
were next, these being rubber tires sandwiched by plastic rims.
Makes painting the wheels easier, but I don’t know about the
rubber….we’ll see if it starts eating the plastic in a few years.
Wow! I do believe I’m done!
| CONCLUSIONS |
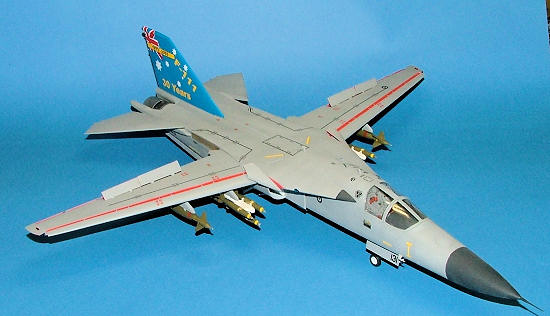
This is an awesome kit that is not without its faults.
Superb fit and detail sit next to vague placement and some strange
engineering choices. Sadly, most of
the confusion present in my build could have been alleviated with just a few
more notes in the instructions. And
strangely, even though the swept back wing option is clearly therein the
plastic, is isn't fully implemented or even mentioned in the assembly guide.
Once finished though it is a truly impressive model.
| REFERENCES |
February 2011
Thanks to your editor via Squadron Products for the review kit. Get yours at your local hobby shop
If you would like your product reviewed fairly and quickly, please contact me or see other details in the Note to Contributors.