Italeri 1/72 RQ-1/MQ-1 Predator
|
KIT #: |
1279/1289 |
|
PRICE: |
|
|
DECALS: |
2/3 options |
|
REVIEWER: |
Nicolai Plesberg |
|
NOTES: |
Both kits reviewed. |
The
Central Intelligence Agency (CIA) and the Pentagon began experimenting with
reconnaissance drones in the early eighties. The CIA preferred small,
lightweight and unobtrusive drones, in contrast to the
United States
Air Force (USAF). In the early nineties the CIA became interested in the
“Amber”, a drone developed by Leading Systems Inc. The company’s owner, Abraham
Karem, was the former chief designer for the Israeli Air Force, and had
immigrated to the
US
in the late seventies. Karem’s company had since gone bankrupt and been bought
up by a US defense contractor, from whom the CIA secretly bought five drones
(now called the “Gnat”). Karem agreed to produce a quiet engine for the vehicle,
which had until then sounded like “a l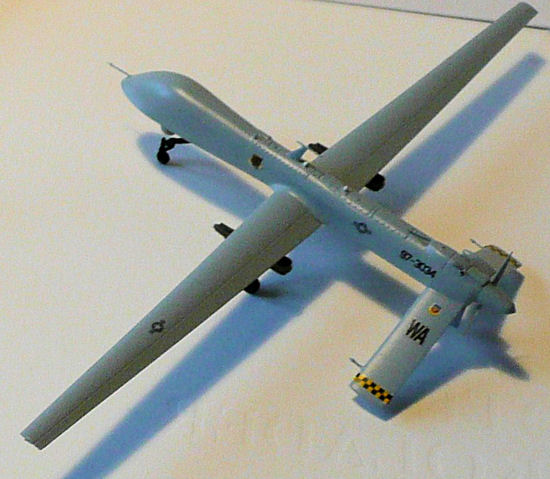 awnmower
in the sky”. This new development became known as the “Predator”.
awnmower
in the sky”. This new development became known as the “Predator”.
General Atomics Aeronautical Systems (GA) was awarded a contract to develop the
Predator in January 1994, and the initial Advanced Concept Technology
Demonstration (ACTD) phase lasted until June 1996. The aircraft itself was a
derivative of the GA Gnat 750. During the ACTD phase, three systems were
purchased from GA, comprising twelve aircraft and three ground control stations
(as one complete system consist of four vehicles (Predators), one ground control
station together with a primary satellite link communication suite).
From April through May 1995, the Predator ACTD aircraft were flown as a part of
the Roving Sands1995 exercises in the US.These exercise operations were
successful and this led to a decision to deploy the system to the Balkans later
that summer.
By
the beginning of the
US
Afghan campaign in 2001the USAF had acquired 60 Predators of which 20 had been
lost in action. Few if any of the losses were from enemy action, the most likely
reason for these losses being foul weather, particularly icy conditions. Some
critics within the Pentagon saw the high loss rate as a sign of poor operational
procedures. In response to the critics, the Predators were equipped with
de-icing systems together with improved avionics as well as an uprated engine.
This improved “Block
1”
version was referred to as the “RQ-1B”, or the “MQ-1B” if it carried munitions;
the corresponding air vehicle designation was “RQ-1L” respectively “MQ-1L”.
The
Predator system was initially designated the RQ-1 Predator. The “R” is the
US
Department of Defense designation for reconnaissance and the “Q” refers to an
unmanned aircraft system. The “1”
describes it as being the first of a series of aircraft systems built for
unmanned reconnaissance. Preproduction systems were designated as RQ-1A, while
the RQ-1B (not to be confused with the RQ-1 Predator B, which became the MQ-9
Reaper) denotes the baseline production configuration.
These are designations of the
system as a unit. The actual aircraft themselves
were designated RQ-1K for pre-production models and RQ-1L for production models.
In 2002 the USAF officially changed the designation to MQ-1 (“M” for multi-role)
to reflect its growing use as an armed aircraft.
The
USAF handed the Predator over to the service’s Big Safari office after the
Kosovo campaign in order to accelerate the vehicles testing into a strike role,
fitted with reinforced (and longer) wings and stores pylons to carry precision
guided munitions as well as a laser designator. This effort led to a series of
tests in February
2001
in
which a Predator fired three Hellfire anti-armor missiles scoring three direct
hits on a stationary target.
 The scheme
was put into service with the armed Predators given the new designation MQ-1A.
Given that a Predator is very unobtrusive and the Hellfire missile is
supersonic; that combination gives little warning of attack to any unsuspecting
targets.
The scheme
was put into service with the armed Predators given the new designation MQ-1A.
Given that a Predator is very unobtrusive and the Hellfire missile is
supersonic; that combination gives little warning of attack to any unsuspecting
targets.
Further weapons test occurred between May and June 2001 with mixed results.
However, the armed version of the Predator, did not go in to action before the
9/11 attacks.
After 9/11 however, the MQ-1 has been used extensively, first and foremost in
the wars in Afghanistan and Iraq, but also in the tribal areas of Pakistan, in
Yemen and some areas in Africa.
Thanks to its engine’s low noise and low fuel consumption gives the Predator the
ability to sneak into hot zones several hundred kilometres away, observe (in
real time that is!), take pictures or deliver a precision guided blow to any
unsuspecting targets virtually unobstructed.
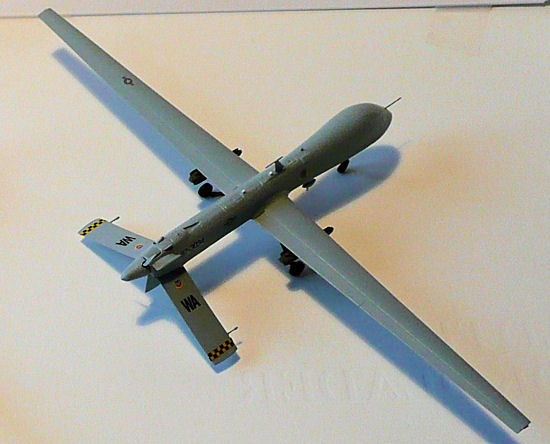
The Predator is powered by a turbo charged Rotax
914F
four cylinder horizontally opposed piston engine, driving a two bladed
propeller. The engine yields nominally 100hp (73kW), but can sustain 115hp
(84kW) for five minutes. The maximum take-off weight is just above one metric
ton (1,020
kg
to be exact) and normal cruise speed is between 130 to
165
km/h,
but can be squeezed up to
217
km/h
should the need arise.
Until a few years ago I wasn’t aware of UAVs as
such, but it’s fair to say that the wars in Afghanistan and Iraq changed all
that. I thought it would be cool with a model of such a drone because then my
collection would be completely up to date and also to make a change of all the
WW2 and Cold War subjects I normally stick to. A few years ago a local hobby
shop celebrated its 25th
anniversary by giving a 25% discount on all products. Among the kits I picked up
was the RQ-1 Predator from Italeri. It was of course the unarmed version, but I
thought to myself that to scratch build a couple of pylons and missiles would be
easy. When I came home and examined it, I found 23 parts o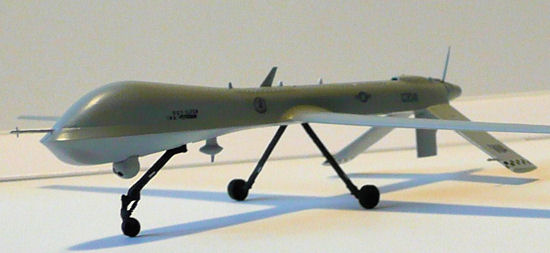 n
two grey colored sprues were crisply recessed panel lines and subtle rivet
detail was the name of the game. Two decal options were offered; an Italian Air
Force version from the 32o Stormo in Iraq, 2006 and an US Air Force version from
the 11th Reconnaissance Sqn, Indian
Springs Air Force Auxiliary Field (later to become known as Creech Air Force
Base), Nevada spring 2004. The only thing about this kit was that the price tag
to be somewhat heavy: 159,50 Danish kroner. WHAT???!!
For
23 plastic parts and some decals? The price of an old
Airfix series one kit with a similar parts count is about one quarter of that!
Oooops! Well, as it clearly states on the box and in the instructions the
plastic parts are made in Japan and imported and packed in Europe by Italeri. I
tried to track down the Japanese manufacturer via the web, but I had no luck
with that! Well with 25% (actually it was closer to 44% due to a typing error on
the cash register, but that’s another story which I won’t bother you with here)
discount the price still seems heavy!
n
two grey colored sprues were crisply recessed panel lines and subtle rivet
detail was the name of the game. Two decal options were offered; an Italian Air
Force version from the 32o Stormo in Iraq, 2006 and an US Air Force version from
the 11th Reconnaissance Sqn, Indian
Springs Air Force Auxiliary Field (later to become known as Creech Air Force
Base), Nevada spring 2004. The only thing about this kit was that the price tag
to be somewhat heavy: 159,50 Danish kroner. WHAT???!!
For
23 plastic parts and some decals? The price of an old
Airfix series one kit with a similar parts count is about one quarter of that!
Oooops! Well, as it clearly states on the box and in the instructions the
plastic parts are made in Japan and imported and packed in Europe by Italeri. I
tried to track down the Japanese manufacturer via the web, but I had no luck
with that! Well with 25% (actually it was closer to 44% due to a typing error on
the cash register, but that’s another story which I won’t bother you with here)
discount the price still seems heavy!
 A couple
of years later I almost “stumbled” over the MQ kit, because on July 2nd
2011 the worst cloudburst hit Copenhagen and surrounding areas causing massive
floods. Since the city’s sewer system could not handle all that water the skies
poured all over the place the consequences were, that streets, basements, parks
well anything were flooded. So unfortunately also Stoppel Hobby at Frederiksberg
was flooded (it is a basement shop!) and a number of kits were destroyed. Well
the plastic of course survived, but the boxes, instructions and the decals… you
get the picture! The kit came in a zip lock bag with all the contents plus the
backside of the box included (two of the options showed there). From that, I
could see the ordinary price at 145 Danish kroner but bought for 50 kroner. A
very decent price! The kit contained by the way 30 parts split on three sprues
in grey plastic. It was almost the same as the first kit, but of course with the
missiles and pylons together with some extra smaller details specific for the MQ
version. There
is an error in the instructions though: the sprues are marked as A, B and C but
it should have been: A, C and D (the sprues
are marked
like that)! Three decal options are available; two from the 432nd
Air Expeditionary Wing (different numbers all right!) , Creech Air Force Base,
Indian Springs, Nevada and one from the 57th
Wing, Nellis Air Force Base , Nevada.
A couple
of years later I almost “stumbled” over the MQ kit, because on July 2nd
2011 the worst cloudburst hit Copenhagen and surrounding areas causing massive
floods. Since the city’s sewer system could not handle all that water the skies
poured all over the place the consequences were, that streets, basements, parks
well anything were flooded. So unfortunately also Stoppel Hobby at Frederiksberg
was flooded (it is a basement shop!) and a number of kits were destroyed. Well
the plastic of course survived, but the boxes, instructions and the decals… you
get the picture! The kit came in a zip lock bag with all the contents plus the
backside of the box included (two of the options showed there). From that, I
could see the ordinary price at 145 Danish kroner but bought for 50 kroner. A
very decent price! The kit contained by the way 30 parts split on three sprues
in grey plastic. It was almost the same as the first kit, but of course with the
missiles and pylons together with some extra smaller details specific for the MQ
version. There
is an error in the instructions though: the sprues are marked as A, B and C but
it should have been: A, C and D (the sprues
are marked
like that)! Three decal options are available; two from the 432nd
Air Expeditionary Wing (different numbers all right!) , Creech Air Force Base,
Indian Springs, Nevada and one from the 57th
Wing, Nellis Air Force Base , Nevada.
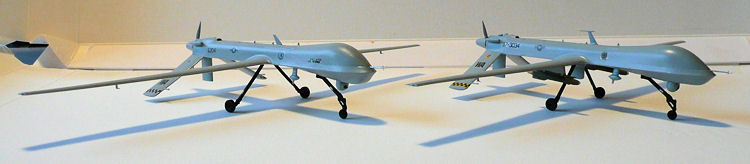
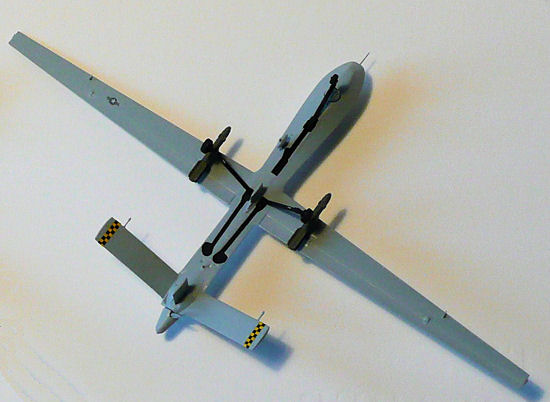
The show started with the removal of the larger
parts from the sprues and carefully removing the sprue attachment points plus
the parts constituting the camera “ball” turret, which were glued together and
left to cure. Following that, they were painted Humbrol 127 US Ghost Grey
FS26375 together with the camera balls themselves; painting them was a
challenge, but I found that a pair of tweezers was indispensable for that
action! The camera lenses were painted Flat Black using both ends of a needle,
since any brush is really no good here! Meanwhile some sink
marks on the wing in the RQ kit needed attention; they were filled and
sanded smooth when the filler had cured. The balls were then squeezed into place
in the turrets and they can move up and down!
 Before
gluing the whole thing together I wanted to see whether nose
weight would be necessary so the kit was dry assembled (only one since
they were identical!) and I stretched my index finger out from my fist, put it
on the table and put the kit on the finger, more specifically were the main gear
is supposed to be placed and saw how it behaved. The kit tilted down on the
nose, so no weight was required!
Before
gluing the whole thing together I wanted to see whether nose
weight would be necessary so the kit was dry assembled (only one since
they were identical!) and I stretched my index finger out from my fist, put it
on the table and put the kit on the finger, more specifically were the main gear
is supposed to be placed and saw how it behaved. The kit tilted down on the
nose, so no weight was required!
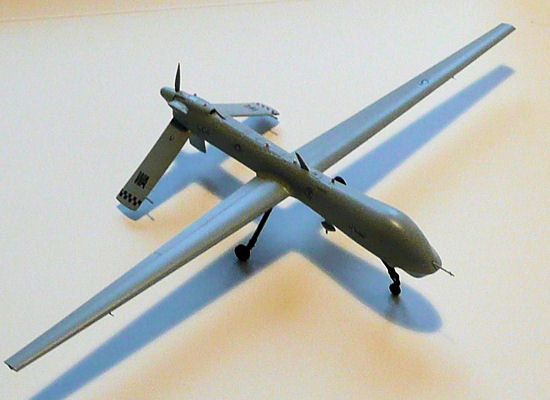
The wings were, as per instructions, glued in
the upper halves of the fuselage first, then fuselages glued together with the
camera ball turrets inserted of course – and they can revolve perfectly!
Spinners were at this stage glued to the propellers (for easier painting).
Seam filling was next especially at the rear
fuselage it is important to hide the seam present there as well as the fuselage
/ wing seams, but they are really no big deal, so they are quite easy to deal
with.
Also the forward fuselage needs a little attention; the pointed shape here,
which is very noticeable, must be sanded with a
very light
hand or else the shape will be destroyed! Especially if the sprue attachment
points have not been adequately dealt with, it will show! No less coarse than
1200 grit sand paper is recommend here! Gear was next; it fitted with no
problem, but on the main wheels there was a very noticeable cast seam of plastic
which required quite a bit of sanding (and filling too!) to look acceptable. The
remaining parts, with the exception of the tiniest ones (antennae mostly) were
glued in place at this stage before the kits went on to the paintshop!
As some of the detail paint information in the
instructions is sparse, at least regarding the gear and gear bays, I had to rely
on what I could find of material. Photos I found on the web, as well as the
photos on the box of the RQ kit, indicated it to be very dark so I decided to
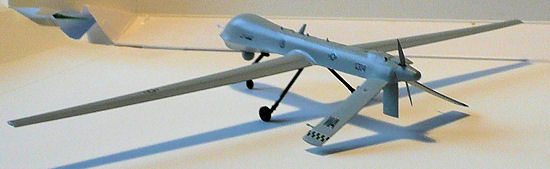
paint the whole lot Flat Black. As I had chosen to build the US version of the
RQ and the MQ with the extra ventral fin between the main gear legs (the version
from Nellis) they both were painted Grey FS26375. Two more layers were required
before I was satisfied with the coverage. The missiles for the MQ were painted
Humbrol 155 Olive Drab FS34087. The tips were painted Silver.
 Decaling
came on next and as usual with Italeri decals (at least my experience) they
worked fine, on the RQ at least, because as I mentioned earlier, the decals from
the MQ kit had been exposed to moisture and I was a little exited about whether
they would work or not. In recent years Italeri has finally come up with a
replacement part service, the coupon in the instructions indicating that, but at
first I thought it would be a waste of time (Italians!) or second the decal
sheet itself didn’t look that bad; just some dark spots were present. It turned
out that they were a little slower to get loose from the backing paper, but the
addition seemed to be acceptable considering the circumstances. Where I
encountered those dark spots, I had to
peel off the
decal from the backing paper
very carefully, but I succeeded doing that until I
came to the very last decal (one of the stars and bars insignia for the wing).
It simply refused
to get loose from the paper at one end, so I peeled it off and put it reversed
on the saucer edge. I then took my X-Acto knife with a no 10 blade (edge worn
slightly) and simply
scraped the obstinate backing paper off VERY CAREFULLY!!! I
then transferred the “freed” decal to some of the backing paper from the RQ
decals to pick up some decal glue (as if it should help), then transferring it
to the model, attached it and phew(!) job done!
Decaling
came on next and as usual with Italeri decals (at least my experience) they
worked fine, on the RQ at least, because as I mentioned earlier, the decals from
the MQ kit had been exposed to moisture and I was a little exited about whether
they would work or not. In recent years Italeri has finally come up with a
replacement part service, the coupon in the instructions indicating that, but at
first I thought it would be a waste of time (Italians!) or second the decal
sheet itself didn’t look that bad; just some dark spots were present. It turned
out that they were a little slower to get loose from the backing paper, but the
addition seemed to be acceptable considering the circumstances. Where I
encountered those dark spots, I had to
peel off the
decal from the backing paper
very carefully, but I succeeded doing that until I
came to the very last decal (one of the stars and bars insignia for the wing).
It simply refused
to get loose from the paper at one end, so I peeled it off and put it reversed
on the saucer edge. I then took my X-Acto knife with a no 10 blade (edge worn
slightly) and simply
scraped the obstinate backing paper off VERY CAREFULLY!!! I
then transferred the “freed” decal to some of the backing paper from the RQ
decals to pick up some decal glue (as if it should help), then transferring it
to the model, attached it and phew(!) job done!
I then attached the last details with CA glue
(to speed things up), did the last paint / touch up with the grey color I had
used and the whole thing sat aside overnight to dry.
The next day both models were given a coat of
Humbrol Satin Cote with the exception of one the wing tips (to have a clear spot
to hold on!). The next day those wing tips together with forgotten spots (!)
were “Satin Coted” and the last detail painting done (navigational / positional
lights) stuff like that, propellers squeezed on the shaft although it needed
some thinning to compensate for the springy action of the propeller, which was
removed when the spinner was glued onto the prop (my choice!) plus the Hellfire
missiles for the MQ glued onto the pylons with CA glue and that’s that.
These are indeed exceptional fine kits,
which really
 goes
together with no real obstacles other than some of the details are TINY, so if
you have ten thumbs on each hand, these kits would probably not be something for
you. For example I actually broke both kits nose probe when trying to remove the
sprue attachment points (the damned things almost breaks just by staring at
them!) only because they were a bit too tiny for me to handle them properly!
Apart from that I think I was able to get the things out of these birds;
enjoyment and having a relaxing time!
goes
together with no real obstacles other than some of the details are TINY, so if
you have ten thumbs on each hand, these kits would probably not be something for
you. For example I actually broke both kits nose probe when trying to remove the
sprue attachment points (the damned things almost breaks just by staring at
them!) only because they were a bit too tiny for me to handle them properly!
Apart from that I think I was able to get the things out of these birds;
enjoyment and having a relaxing time!
Regarding accuracy the dimensions check out
perfectly for all but the span for Block 10/15 aircraft, which requires an
additional
2.8
centimetres
added to the span of the wing.
http://en.wikipedia.org/wiki/MQ-1_Predator
Nicolai
Plesberg
November 2012
Copyright ModelingMadness.com. All rights reserved. No reproduction in part or in whole without express permission from the editor.
If you would like your product reviewed fairly and
fairly quickly, please
contact
the editor or see other details in the
Note to
Contributors.
Back to the Main Page
Back to the Review
Index Page 2025