| KIT #: | ` |
| PRICE: | $ |
| DECALS: | One option |
| REVIEWER: | Martin Pohl |
| NOTES: | Eduard photo etch, Begemot decals |
| HISTORY |
The Northrop Grumman B-2 Spirit (also known as the Stealth Bomber) is an
American heavy bomber with low observable stealth technology designed to
penetrate dense anti-aircraft defenses and deploy both conventional and nuclear
weapons. The bomber has a crew of two and can drop up to eighty 500 lb (230
kg)-class JDAM
Development originally started under the "Advanced Technology Bomber" (ATB)
project during the Carter administration, and its performance was one of the
reasons for his cancellation of the B-1 Lancer. ATB continued during the Reagan
administration, but
 worries about delays in its introduction led to the
reinstatement of the B-1 program as well. Program costs rose throughout
development. Designed and manufactured by Northrop Grumman with assistance from
Boeing, the cost of each aircraft averaged US$737 million (in 1997 dollars).
Total procurement costs averaged $929 million per aircraft, which includes spare
parts, equipment, retrofitting, and software support. The total program cost,
which includes development, engineering and testing, averaged $2.1 billion per
aircraft in 1997.
worries about delays in its introduction led to the
reinstatement of the B-1 program as well. Program costs rose throughout
development. Designed and manufactured by Northrop Grumman with assistance from
Boeing, the cost of each aircraft averaged US$737 million (in 1997 dollars).
Total procurement costs averaged $929 million per aircraft, which includes spare
parts, equipment, retrofitting, and software support. The total program cost,
which includes development, engineering and testing, averaged $2.1 billion per
aircraft in 1997.
Because of its considerable capital and operational costs, the project was
controversial in the
Though originally designed primarily as a nuclear bomber, the B-2 was first used
in combat to drop conventional bombs on
This is what Wikipedia is telling about and other sources too. For me a Spirit
is much more, it proves the possibilities of flying wings at which Mr. Northrop,
the Hortens and others were aiming at.
| THE KIT |
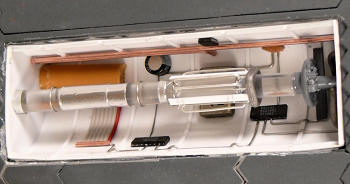
This kit comes in a pretty big box and when you open it you don't see that much.
There are less than 50 parts inside. 3 big pieces for the upper side and the 3
for the under side and the rest are for the landing gear, the bomb bay and some
for the cockpit. So
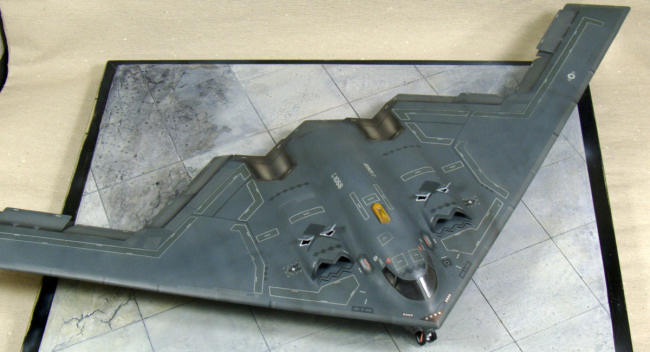
 from the amount of parts it's an easy kit. But it will be a
big one when finished, the width over all is almost 29 inch or 73cm.
from the amount of parts it's an easy kit. But it will be a
big one when finished, the width over all is almost 29 inch or 73cm.
The parts are mold in gray of which the internet tells it is the correct gray to
paint this bird. Well then just glue it together and give it a flat over spray –
only this wont work, see next section.
The plastic is a bit soft, but this is very good in the end, because you can
bend it better as the big parts are deformed, at least mine were and from what I
read on the web this is common to almost every example.
There are some raised panel lines molded to the parts, but those don't matter at
all if you ask me cause a Spirit dose not have any panel lines.
I also was lucky to get the Eduard photo etched set for the Spirit, which offers
some nice additions for the auxiliary intake doors, the bomb bay and the gear
and its bays.
| CONSTRUCTION |
 To say it up front I did get carried away during this build which lasted for
over a year.
To say it up front I did get carried away during this build which lasted for
over a year.
When looking at the parts I decided to start this by gluing the parts for the
upper and the under half to have a chance to get them straight. I ended by
gluing sprue parts and a lot other strengthening pieces to both half. I even
heated them to have them somehow straight. It worked OK in the end.
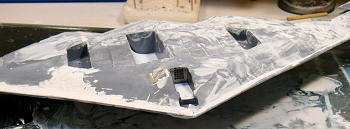 When you look at this two half of the hull you have then you'll realize that you
have to go and buy more filler. On the complete bird I used more than 500 gram
of different fillers, mostly car filler and I did sand hours to have it all
smooth in the end.
When you look at this two half of the hull you have then you'll realize that you
have to go and buy more filler. On the complete bird I used more than 500 gram
of different fillers, mostly car filler and I did sand hours to have it all
smooth in the end.
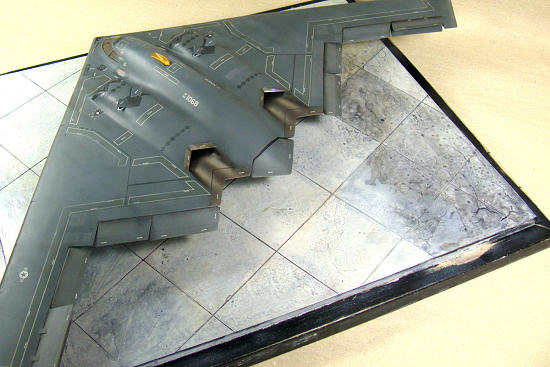
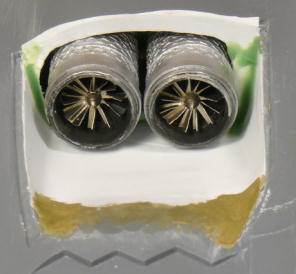 Next step on the construction were the engines and the engine bays. Well the kit
does not offer engines and the engine bays are much to narrow two house two
General Electric F118-GE-110 engines on each side. So I did cut away almost all
the molded plastic and rebuild that from plastic cards. For the engines you
could buy some after market F-15 engines as those are quite the same but this I
realized at the end soon after I had scratched four engines myself.
Next step on the construction were the engines and the engine bays. Well the kit
does not offer engines and the engine bays are much to narrow two house two
General Electric F118-GE-110 engines on each side. So I did cut away almost all
the molded plastic and rebuild that from plastic cards. For the engines you
could buy some after market F-15 engines as those are quite the same but this I
realized at the end soon after I had scratched four engines myself.
For the engine bay covers I opened the auxiliary intakes and used the PE doors
here.
And on to the exhaust areas and the exhausts. Again the kit does not offer
anything here so I scratched some exhausts to have something in there instead of
having only some black holes there.
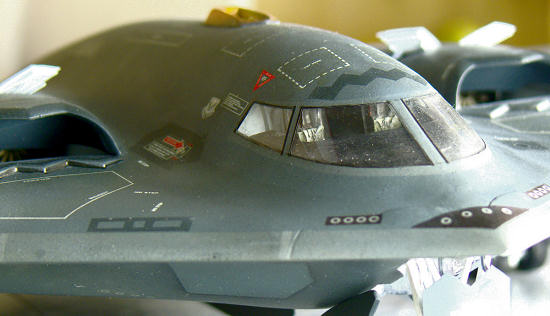
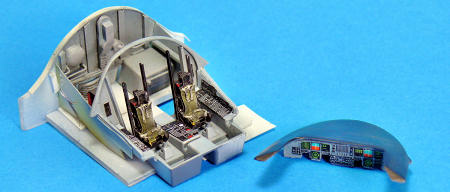 After that the cockpit followed. The pit given by the kit is way to short in
depth it ends right were the wind screen is ending. So I used the front of the
kit part here and scratched something behind it to have some depth here. During
this operation I decided to open the gangway to have an entrance and an entrance
ladder. This is all made form plastic karts and some soldering wire.
After that the cockpit followed. The pit given by the kit is way to short in
depth it ends right were the wind screen is ending. So I used the front of the
kit part here and scratched something behind it to have some depth here. During
this operation I decided to open the gangway to have an entrance and an entrance
ladder. This is all made form plastic karts and some soldering wire.
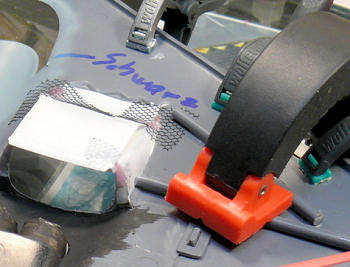
 Some words on the windscreen; this piece is a bit too short but the real strange
thing with it are its side struts. Those struts are molded the wrong way. They
should run from below front to up rear and are molded the other direction. Well
one could most probably live with that but as I already did such much
destruction to the kit parts I decided to sand those struts off and re-polish
the part. Gluing the windscreen into its place is a bit fiddly cause it is a
little too short and not high enough. A lot of filler went here to close all
gaps and to get it all lined up.
Some words on the windscreen; this piece is a bit too short but the real strange
thing with it are its side struts. Those struts are molded the wrong way. They
should run from below front to up rear and are molded the other direction. Well
one could most probably live with that but as I already did such much
destruction to the kit parts I decided to sand those struts off and re-polish
the part. Gluing the windscreen into its place is a bit fiddly cause it is a
little too short and not high enough. A lot of filler went here to close all
gaps and to get it all lined up.
As I glued the windscreen and the pit in place when the hull half’s were
separated, well there is no other option, I had to remove the windscreen twice
because of sanding dust crawling inside.
Inside the pit I used the parts coming with the Eduard set and two after market
ACESII seats. The pit I painted mid gray and white and the some highlights for
the instruments. The seats were painted black and olive.
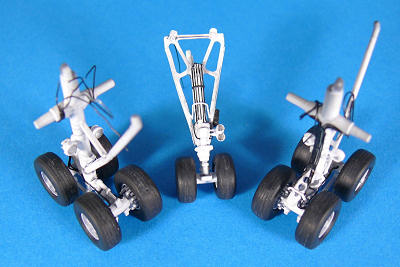
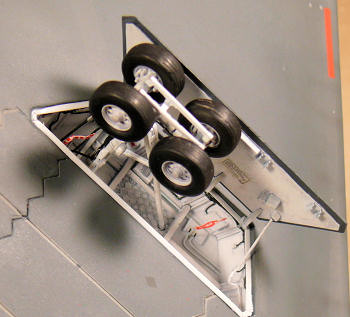
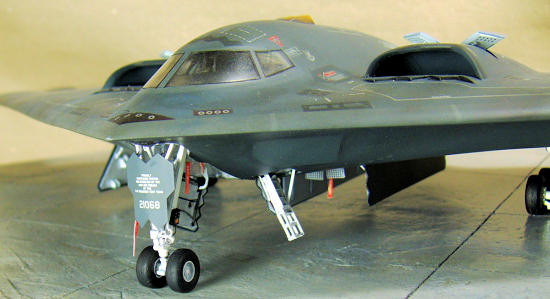
 Then the gear work began. The kit offers some nice representations of the gear
itself but the gear bays are just some gear graves so to speak without any
details given or molded. The Eduard PE set offers some parts especially for the
front gear and all the rest are just bit's and pieces laying around or cut from
plastic card. The
Then the gear work began. The kit offers some nice representations of the gear
itself but the gear bays are just some gear graves so to speak without any
details given or molded. The Eduard PE set offers some parts especially for the
front gear and all the rest are just bit's and pieces laying around or cut from
plastic card. The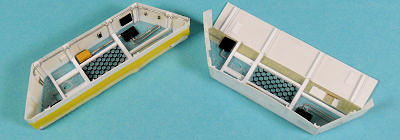 only thing to mention perhaps, I did find some electronic
pieces very useful for detailing the gear bays. The legs themselves were
detailed with some soldering wire in 0.2, 0.3 and 0.5 diameters.
only thing to mention perhaps, I did find some electronic
pieces very useful for detailing the gear bays. The legs themselves were
detailed with some soldering wire in 0.2, 0.3 and 0.5 diameters.
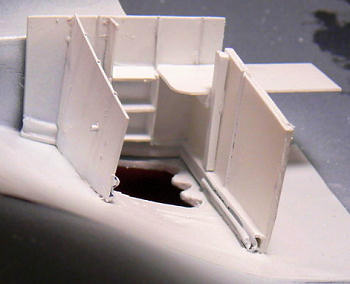
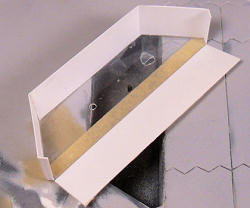
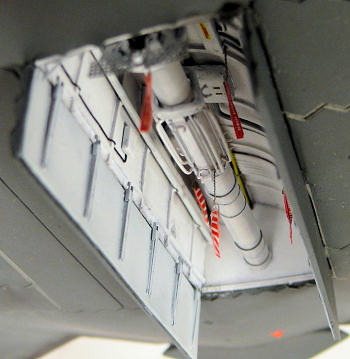
The last thing on the construction side was the bomb bay. The kit offers
something which should represent the bomb rotary and the two doors to have one
bomb bay open. The bay is molded in a rectangular shape where it should have a
 rounded sidewall on the outside this I did again with some plastic card. For
detailing the bomb bay I used some of the kit parts here and again lead wire and
different other stuff and for the doors I used the PE parts given in the PE set.
rounded sidewall on the outside this I did again with some plastic card. For
detailing the bomb bay I used some of the kit parts here and again lead wire and
different other stuff and for the doors I used the PE parts given in the PE set.
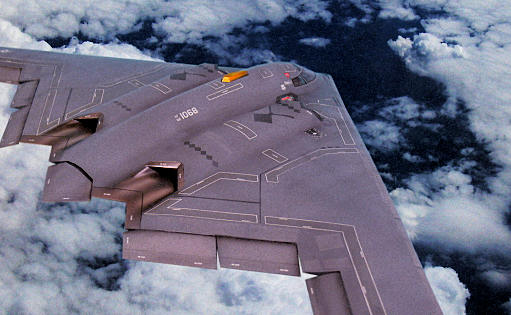
 To have the end result looking a little more dynamic I decided to cut all flaps
and the tail and repositioned them. I did not do something special here I just
cut the flaps and the tail of before I glued upper and lower half together.
Before gluing the flaps on I just sanded them a
To have the end result looking a little more dynamic I decided to cut all flaps
and the tail and repositioned them. I did not do something special here I just
cut the flaps and the tail of before I glued upper and lower half together.
Before gluing the flaps on I just sanded them a
 bit to have some different
angels.
bit to have some different
angels.
To end the story about the construction section, I did build up some inlets for
the main gear bays and the bomb bay. This made it easy to paint the complete
plane and the bays and then just stick them inside. Only the front bay was
painted directly.
| COLORS & MARKINGS |
 I also did buy the Begemot decals sheet for the Spirit as the kit decals are
only for an early B-2 and I wanted to do the Edwards B-2 in a block 30 layout.
I also did buy the Begemot decals sheet for the Spirit as the kit decals are
only for an early B-2 and I wanted to do the Edwards B-2 in a block 30 layout.
As
stated above after some massive filling and sanding and filling and sanding and
…. The plane did get 3 coats of
So on with the lower half; on top of the base paint I sprayed a lighter self
mixed gray. I mixed the paints according to some inflight refuel shots. Then
some areas were masked and a darker gray went on, this gray again I mixed
myself. After that has dried out some areas were masked and sprayed with some
darker and lighter shades of gray. Then this all did get a mid gray filter,
which was just tinted Future. On went the decals and a sealing Future coat. To
end the lower half some washing with wood color
(dark gray) and some light mists of tinted thinner were sprayed – just
“wash” a brush of oil colors in thinner. Those mists were some blue, some black
and some almost white tinted thinner to get an idea of more deepness and a used
look. At the end two coats of
The procedure for the upper half was quite the same: a complete coat of my self
mixed lighter gray; masking; a complete coat of my self mixed darker gray. Then
I changed the process a bit because I needed the decals first. After the decals
are layed out you have a better orientation where to mask the darker areas. So a
Future coat followed and then the decals. The main walkway
 decals are pretty big
and they need to be exact on both sides. The inner walkways which are 3 decals
on each side I put on at once. I had enough water layed out on the plane and
then moved all decals on both side around until I thought it looks OK. After all
decals were placed another coat of Future followed. Then I masked the areas
which have to be painted in a darker gray and sprayed that. Then the same
procedure followed like on the underside, a tinted Future filter, some washings,
some tinted thinner mists and two coats of
decals are pretty big
and they need to be exact on both sides. The inner walkways which are 3 decals
on each side I put on at once. I had enough water layed out on the plane and
then moved all decals on both side around until I thought it looks OK. After all
decals were placed another coat of Future followed. Then I masked the areas
which have to be painted in a darker gray and sprayed that. Then the same
procedure followed like on the underside, a tinted Future filter, some washings,
some tinted thinner mists and two coats of
The exhaust area was masked off and sprayed in this order: Vallejo glossy black
full coverage; ALCLAD white aluminum full coverage; Model Master exhaust not in
full coverage just misted; then for the lighter parts ALCLAD stainless steel;
ALCLAD burned metal; ALCLAD chrome; red tinted thinner; blue tinted thinner and
last some shadows with very thinned black oil pain
The last thing to paint was the refuel intake which did get a ALCLAD white
aluminum full coverage and then some semi opaque coats of yellow and orange
airbrush colors. A light wash ended this then.
Ah, one last word on the finish; those “Remove before Flight” flags are from the
P.P.Aeroparts model accessories “RBF” set. Those are printed on paper and with
some thin wire are easy to use.
| CONCLUSIONS |
 When I
started this I searched the
When I
started this I searched the
It took me more than a year to complete this but I did some other beside it and
this way it was real fun and I have learned a lot. The only thing you better
should think up front – which I haven't – is where to put this. I still have no
clue.
| REFERENCES |
Mainly the internet and those books:
B-2 Spirit in Action (Squadron)
Northrop B-2 Stealth Bomber (Aerofax Extra 4)
Martin Pohl
April 2012 If you would like your product reviewed fairly and fairly quickly, please contact the editor or see other details in the
Note to
Contributors.