
Revell 1/48 B-1B Lancer
| KIT #: | 5714 |
| PRICE: |
$56.00
at a prominent online retailer. |
| DECALS: | Two options |
| REVIEWER: | Scott Lyle |
| NOTES: |
Two Bobs Decals #48-204, B-1B Dakota
Backbone |
| HISTORY |
A
case study in the difficulty of successfully introducing a large, expensive
weapons platform during peacetime, the B-1 bomber was initially as controversial
as its gestation period was long.
A victim of all manner of politics, the B-1 very nearly
joined the long list of US Air Force bomber projects never to make it into
service.
Once in service however it quickly proved its worth, and has served well
in every conflict the
The B-1 began life in 1965 when the Advanced Manned
Strategic Aircraft (AMSA) study was commenced by the Air Force to find a new
bomber to replace the cancelled B-70 Valkyrie project.
An exhaustive study, AMSA was completed in 1969 with
Request for Proposals to which Boeing, General Dynamics (formerly Convair), and
Rockwell (formerly North American) responded.
In June 1970 Rockwell was awarded the contract, which
called for five flying prototypes and a production run of 244 to begin in 1975.
The B-1A went through exhaustive tests and studies
before it first flew, and development was proceeding relatively on schedule
through the early 1970s.
The first B-1A rolled out of the Palmdale,
 eliminated funding for the production of any B-1 bombers, keeping alive only the
testing part of the program.
Rockwell, stunned and furious, immediately laid off
16,000 workers.
eliminated funding for the production of any B-1 bombers, keeping alive only the
testing part of the program.
Rockwell, stunned and furious, immediately laid off
16,000 workers.
While testing continued for the next four years, the
political winds changed yet again.
With the election of Ronald Reagan in 1980 came a
massive surge in spending on weapons systems as he made the modernization of the
military a high priority.
In October 1981 he resurrected the B-1 program with an
order for 100 bombers, the first of which was produced in September 1984 and the
last of which rolled out in May 1988.
Since its acceptance into service in 1986 the B-1B has
broken several flight records, including some held for decades by the
One of the most
famous actions in which a B-1B was involved was the famous “head shot” attempt
that occurred during Operation Iraqi Freedom on
| THE KIT |
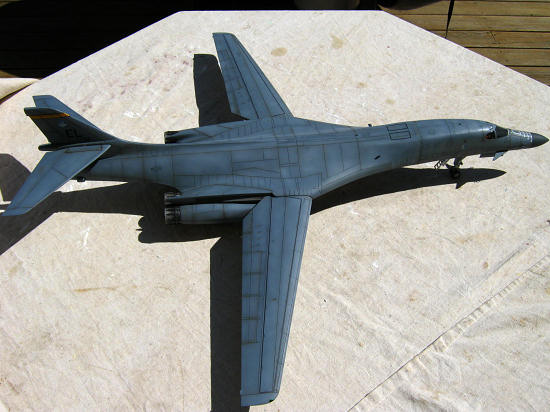
Molded back in the 1980’s, I’m pretty
sure this kit still holds the title of “biggest” injection molded 1/48 scale kit
ever made.
Opening up the box one is greeted with lots of light gray plastic
- including some truly large molded parts.
Although the crispness of the molding isn’t up to
today’s standards, Revell didn’t skimp on what they included in the box.
Starting at the nose cone, you can build the bomber’s
radar set, a nicely detailed rendition of the four-man cockpit, all three wheels
wells, and all three
 bomb bay interiors.
The huge variable geometry wings can be left free to
swing back and forth, although there is no mechanism to tie them together.
Surprisingly for an 80’s-vintage kit, the panel lines
are recessed.
Much has been made over the years of the size of those recessed
lines, and scale-wise they are in fact too big.
Still, given the size of the model, I don’t think they
visually detract from its overall appearance.
bomb bay interiors.
The huge variable geometry wings can be left free to
swing back and forth, although there is no mechanism to tie them together.
Surprisingly for an 80’s-vintage kit, the panel lines
are recessed.
Much has been made over the years of the size of those recessed
lines, and scale-wise they are in fact too big.
Still, given the size of the model, I don’t think they
visually detract from its overall appearance.
Revell provides enough nuclear cruise missiles to fill
up two of the bomb bays and an auxiliary fuel tank to fill up the third.
This load-out is representative of what the bomber flew
with in the late 80s and early 90s when it was still nuclear-capable, but now it
is strictly a conventionally-armed bird, and no conventional munitions are
included in the kit.
An online search for 1/48 versions of the JDAM munitions
it frequently used during Operation Iraqi Freedom came up empty, so I decided to
build the model with the bomb bays empty and closed.
I knew I’d be doing my fair share of filing and sanding
on this one, so I figured I could save some time and effort by essentially
blowing off the bomb bays.
I purchased a couple of aftermarket items to spruce up the kit; a set of cast metal landing gear from Scale Aircraft Conversions to take the weight of all that plastic, and Eduard’s photo etch engine nozzle set. The kit’s engine nozzles represent the B-1A versions, and Eduard’s set is a neat upgrade. Many online builders remarked that their kit came with rubber tires, but in my boxing the tires were plastic.
| CONSTRUCTION |
The instructions start off with the
cockpit, and that’s where I began.
In the real thing the pilot and co-pilot sit side by
side, followed by the Offensive Systems Operator and the Defensive Systems
Operator, also sitting side by side.
Revell replicated these stations nicely.
There’s certainly room to add more detail if desired,
but very little of it is going to be visible through the smoky-colored canopy
sections.
I airbrushed the panels, bulkheads, ejection seats, and inner
surfaces of the nose sections Testors Acrylic
Dark Gull Gray (FS36231)
and then picked out the various instrument panels by
hand in black and white.
Parts of the ACES II ejection seats were picked out in
red and green, and then the cockpit stations were assembled.
Revell engineered the cockpit to mount on top of the
nose wheel well, forming a sort of cockpit/nose wheel well module.
That module is then trapped between the two nose section
halves.
I held off on gluing the nose section halves together however in an
attempt to employ some model building strategy, as follows:
 The big bomber is basically broken into
three sections; the nose section, the tail section, and the center section.
Having read online reviews of the kit, I knew I wanted
to pay careful attention to how those sections attach to each other or I’d have
a seam Armageddon on my hands.
It seemed logical to assemble the center section first
and then carefully attach the nose and tail sections to it with the hopes of
being able to minimize the seam work.
That was my strategy.
As it turned out it didn’t matter.
I spent the
next three months filing, sanding, and puttying seams anyway, so if my so-called
strategy was successful, it was a Pyrrhic victory at best.
The big bomber is basically broken into
three sections; the nose section, the tail section, and the center section.
Having read online reviews of the kit, I knew I wanted
to pay careful attention to how those sections attach to each other or I’d have
a seam Armageddon on my hands.
It seemed logical to assemble the center section first
and then carefully attach the nose and tail sections to it with the hopes of
being able to minimize the seam work.
That was my strategy.
As it turned out it didn’t matter.
I spent the
next three months filing, sanding, and puttying seams anyway, so if my so-called
strategy was successful, it was a Pyrrhic victory at best.
So I set the completed cockpit aside
and began work on the center section, which not only consists of the three bomb
bays and the main landing gear wells, but also the wings.
I started with the wings, which ended up presenting the
first of many seam challenges.
Each wing consists of a top half and a bottom half, but
the seam on the trailing edge of each wing is about a 1/2” inboard on the
underside, and it’s big.
A few nights of filling and sanding were needed before
that seam was in a state I could live with.
Turning the wings over to the top side, there was a
large sink mark running the length of the wing directly over the seam on the
underside, so that had to be dealt with as well.
The sanding and puttying was already tedious, and I was
only on the wings!
With the wings complete I built up the
main landing gear wheel well, which consists of several large plates that are
glued together to form a large box-like structure.
The size of the landing gear bay alone rivals some 1/48
WW1 aircraft models I’ve built!
There are some nasty knockout pin marks on the exposed
surfaces of the plates, but I judged it easier to live with them than try to
fill them.
I knew I wasn’t yet that far into the kit and I wanted to
conserve my reserves of patience for the seams yet to come.
I attached the bay to the lower
fuselage section, and once that was dry I positioned the wings on their large
support pins.
I then used masking tape to secure the two fuselage sections
together, and then went crazy with my CA glue.
With the wings posed in their fully spread position, I
drenched the pin joint of each wing with CA glue as well as I could – the joint
is hard to get at with the fuselage halves closed up.
I then did the same to the inside seams of the fuselage
sections.
Once it was all dry it seemed strong, but to this day I remain
worried about the overall strength of the assembly.
It’s a lot of plastic
 held together by just a few
joints, none of which are tremendously confidence-inspiring.
held together by just a few
joints, none of which are tremendously confidence-inspiring.
The next step was to finish the seams
on the center section, and here’s where my Dremel was called into duty.
The seams on the leading edges of the aircraft’s center
section were fairly mismatched, but a few passes with the Dremel took care of
that.
The final step on the center section was to add the inflatable bladders
that the wings swing into.
Revell provides a piece for each area, but it’s not very
accurate.
I added some plastic card to the area to try to make it look more
authentic.
Up next were the engine nacelles.
Intake trunks are provided in the form of upper and
lower halves, and once joined there is a nasty seam on the inside of those
trunks.
That wasn’t going to be dealt with.
When you’re in a tough battle, you’re going to take some
losses!
I closed up the engine nacelles with the trunks inside and then glued on
the front intake sections.
There were seams to be dealt with again – oh yes, there
were seams.
Again with the Dremel.
Bumps on the rear of the nacelles, apparently holdovers
from the B-1A era, also had to be Dremeled off.
Finally I used some plastic card to recreate the
vertical vanes inside each intake and set the engine nacelles aside.
Continuing on to the tail section, the
elevator upper and lower halves went together easily, and the seams of the two
tail halves were also manageable.
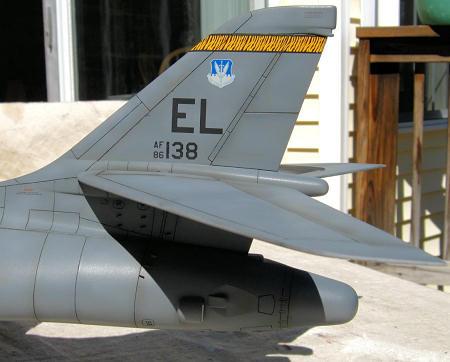
It was time to tackle another small issue with the kit
however, the missing Tow Decoy System housings.
I scratch-built those as best I could from parts in my
spares box and a healthy dose of Squadron Green Putty.
They’re not perfect, but they’ll do – any aftermarket
resin companies reading this, here is an opportunity!
I also added the small vortex generator fins on each
side of the lower tail from plastic card.
At this point I decided it would be
wise to start priming and pre-shading the subassemblies before joining them all
together.
I used Tamiya’s Light Gray Primer sprayed directly out of the
can, and then pre-shaded all of the panel lines on the subassemblies using
Tamiya XF-1 Flat Black.
Two months into the project and only
about halfway through the assembly stage!
It was now time to start joining some of the
subassemblies together.
My heart sank as I test-fitted the engine nacelles to
the center section – more big gaps, and hard to get to at that.
Someone needs to make a miniature caulking gun with a
long, narrow snout for models like these.
A couple more nights of work was required to get the
nacelles squared away, and then it was on to fastening the tail section to the
center 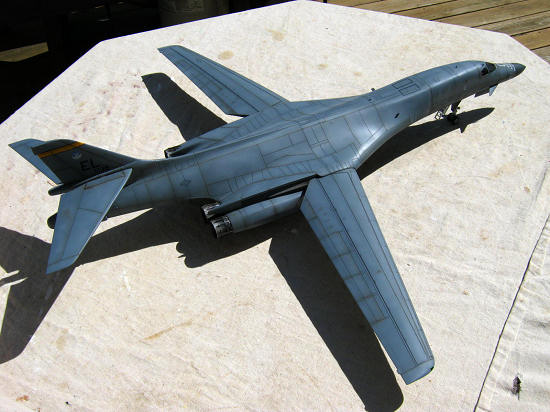 section.
Here at least the joint was pretty good, with not much seam-work
required.
The horizontal stabilizers went on next, and they also
cooperated.
section.
Here at least the joint was pretty good, with not much seam-work
required.
The horizontal stabilizers went on next, and they also
cooperated.
The next step required joining the nose
section to the model, but I knew some serious weight would have to be added to
the nose to prevent the model from becoming a tail sitter.
In order to figure out how much I started assembling the
two main landing gear strut assemblies, as the model would essentially pivot
forwards or backwards on them.
The Scale Aircraft Conversions landing gear set I bought
for the kit was the first product of theirs that I’ve used, and I was very
impressed.
The sturdy metal parts are nicely cast, finely detailed and go
together nicely.
The B-1’s main landing gear are complicated structures, but once
completed they look very robust.
There are some small clear windows to be added to each nose section half, and I attached them using Testors Clear Cement. Then I glued the cockpit/nose wheel well assembly into one of the nose section halves, and then closed up the two halves. I used Tamiya masking tape to temporarily attach the nose section to the rest of the bomber and then placed the whole model on a large, flat surface (i.e. the dining room table – don’t tell my wife). With the nose cone left off there is a convenient hole through which to add nose weights. I used ¼ ounce fishing sinkers and attached them to the area forward of the cockpit with CA glue. I ended up inserting eight of them to make the bomber nose-heavy instead of tail-heavy! With that finished I detached the nose section and worked on its seams, which took a couple of nights. I carefully added the clear (but smoky) windscreen, and then masked all of the windows off to give them some protection from scratches and fingerprints. I then used CA glue to attach the nose section to the rest of the model. The good news was that the assembly stage was now largely complete and the hugeness of the model was fun to revel in. The bad news was that the joint between the nose section and the rest of the model was very nasty, and required a fair amount of work with the usual instruments, including the Dremel, to fix. With that done I glued a couple more fishing sinkers in the nose cone for good measure, and then attached it to the model. Finally, the heavy lifting part of the model assembly was finished. I added the nose landing gear and the nose canards, and declared the model ready for paint.
| COLORS & MARKINGS |
With
the model already primed and pre-shaded, it was time to start applying color.
Since the early 1990’s the B-1 fleet has been painted in
overall Gunship Gray (FS36118), so I chose Tamiya’s AS-27 Gunship Gray 2 spray
paint.
Misting on the coats lightly so the pre-shading would show through, the
Tamiya spray paint performed very well, creating a very fine spray with no
spattering.
I was able to paint the whole model in a couple of sessions
whereas trying to do that with an airbrush would have taken much longer.
The paint also dried with a slightly glossy sheen, which
helped with the upcoming Future stage.
At this point I had a giant dark gray bomber on my
hands, so I lightened some Testors Acrylic Gunship Gray with Flat White and
airbrushed some random splotches all over the upper surfaces of the model to
represent random fading.
This is a step I’m rapidly coming to enjoy; to my eye it
really makes the model start to come to life.
 Next I masked the areas around the wheel wells and
airbrushed them, the landing gear, the wheels, and the inner surfaces of the
gear doors Tamiya Flat White.
I then glued the gear doors in place before spraying the
ever-present coat of Future, after which the model was set aside for a few days.
Next I masked the areas around the wheel wells and
airbrushed them, the landing gear, the wheels, and the inner surfaces of the
gear doors Tamiya Flat White.
I then glued the gear doors in place before spraying the
ever-present coat of Future, after which the model was set aside for a few days.
I applied the TwoBobs decals next, which went on just
fine with Walthers Solvaset solution.
I used the wing stripes from the kit’s decals, and then
sealed all the decals with another coat of Future.
While that cured I airbrushed the tires flat black,
dry-brushed them Testors Neutral Gray, and then assembled them onto the wheel
hubs.
The next weathering step was to apply a wash of Mig Productions “Dark
Wash” to all of the model’s panel lines, as well as the wheel wells, landing
gear, and wheels.
With a model this size, it took me about a week just to
apply that wash!
A coat of Testors Model Master Flat Finish was
airbrushed on next, and then it was time to paint a few remaining areas.
I brush-painted the nose cone with a very dark gray mix
of Vallejo paints and then brush-painted the inflatable wing bladders white and
dark gray.
The next weathering step was to airbrush a very thin mix of 50/50
Tamiya XF1 Black and Tamiya XF64 Red Brown over the panel lines, keeping it
subtle and focusing on the wing flap areas.
At this point I was finally seeing the light at the end
of the tunnel.
I removed the masking from the canopy, and then brush-painted the
wingtip lights Testors Chrome followed by Tamiya Clear Red and Clear Green.
With most models I add some paint chipping effects at
this point, but on this modern bomber I skipped that step.
I’ve seen photos of B-1s with fairly extensive paint
chipping on the leading edges of the wings, but I didn’t think that would look
right on this model.
| FINAL CONSTRUCTION |
 Nearing the end of this exhausting
build I had two steps left: add the last few remaining small parts (pitot tubes,
antenna fins, boarding ladder, and landing gear lights) and build the Eduard
photo etch exhaust nozzles.
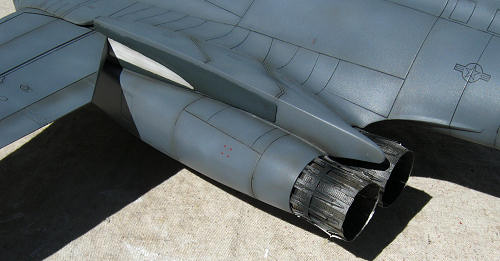
The Eduard nozzle set uses the kit’s aft exhaust part
(not the nozzle, but the round piece that serves as the back face of the nozzle)
as a base, on top of which the photo etch parts are added.
Each nozzle is very intricate and it took me a few
nights to build all four of them, but when finished my patience was rewarded
with very busy and detailed looking exhaust nozzles.
Test fitting them to the engine nacelles resulted in
problems however – they wouldn’t fit.
I ended up popping the base part off and that gave me
the flexibility I needed to fit them into the nacelles.
I painted them by first priming them with Tamiya XF69
NATO Black and then misting on a custom mix of “dirty steel”; basically Testors
Steel and Raw Umber mixed together.
A Dark Brown
Nearing the end of this exhausting
build I had two steps left: add the last few remaining small parts (pitot tubes,
antenna fins, boarding ladder, and landing gear lights) and build the Eduard
photo etch exhaust nozzles.
The Eduard nozzle set uses the kit’s aft exhaust part
(not the nozzle, but the round piece that serves as the back face of the nozzle)
as a base, on top of which the photo etch parts are added.
Each nozzle is very intricate and it took me a few
nights to build all four of them, but when finished my patience was rewarded
with very busy and detailed looking exhaust nozzles.
Test fitting them to the engine nacelles resulted in
problems however – they wouldn’t fit.
I ended up popping the base part off and that gave me
the flexibility I needed to fit them into the nacelles.
I painted them by first priming them with Tamiya XF69
NATO Black and then misting on a custom mix of “dirty steel”; basically Testors
Steel and Raw Umber mixed together.
A Dark Brown
With that done I scratch-built six pitot tubes (the kit only supplies two, and the B-1 has six prominently arrayed on its nose), and then carefully glued all the final small parts to the model. And finally, the model was finished.
| CONCLUSIONS |
Well it took me a good five months, but it’s done.
This was a challenging model, testing the limits of my
patience and at times, my interest.
Some of my lack of enthusiasm for the kit is a result of
the subject - somehow modern aircraft just don’t have the same allure to me that
WW2-era aircraft have.
Am I glad I built it?
Absolutely yes.
It’s a massive model, instantly taking center stage in
my collection and drawing the most interest from those who generally have no
interest in models.
Plus the B-1 is a cool looking aircraft; very sleek with
lots of sweeping curves and a very purposeful appearance.
Would I build another one?
Not anytime soon.
Perhaps if a brand new kit appeared that promised
flawless kit engineering and a whole slew of current munitions options I could
be enticed, but that’s not likely to happen anytime soon.
If you choose to build this one, be ready for a long
slog, with lots of tedious filling and sanding.
At the end of the day it’s a 25 year old model that
presents some challenges due to its size.
Whether or not you build it depends on your individual
modeling capacities and tastes.
If you enjoy long projects entailing the use of
scratch-building and lots of modeling skills, this could be the one for you.
If you prefer “quick kills”, think twice about tackling
it.
I tend to fall more towards the latter side of the spectrum with
occasional forays into big, long builds.
Now that I’ve finished this one, I need something fast
and clean!
| REFERENCES |
-
Osprey Publications, Combat Aircraft #60, “B-1B
Lancer Units in Combat”
-
Squadron/Signal Publications, Aircraft in Action #179,
“B-1 Lancer in Action”
- Wikipedia, the
Online Encyclopedia
May 2011
If you would like your product reviewed fairly and fairly quickly, please contact the editor or see other details in the Note to Contributors.