| KIT #: | AR48102 |
| PRICE: | $ |
| DECALS: | Four options |
| REVIEWER: | Stefan Buysee |
| NOTES: |
Afterburner Decals 48-062 “Red Flag Tigers” used. |
| HISTORY |
The Pentagon never intended the F-5E to be used as a front-line USAF fighter,
but the aircraft was ideal for imitating the Mig-21 during air combat exercises.
The types do not only have nearly the same flying characteristics, they are both
relatively small and hard to spot during air-to-air combat.
From the mid-1970’s, the USAF operated four squadrons of F-5E’s in the aggressor
role. Two squadrons
were at Nellis AFB: the 64th
aggressor squadron with red “bort numbers” and the 65th
aggressor squadron with blue “bort numbers”. The Nellis-based aggressor
squadrons were obviously the ones providing the opposing air force for the
famous Red Flag exercises. When they
 weren’t
busy with Red Flag, they sent detachments to USAF bases around the
weren’t
busy with Red Flag, they sent detachments to USAF bases around the
In 1988, the USAF replaced its aggressor F-5E’s with F-16C’s because these were
considered much better suited to mimic more recent
threat aircraft like the Mig-29.
(Your
editor saw the F-5s from the 527th being escorted back to the US by a pair of
VAK-308 KA-3B Skywarriors during his stay at Keflavik.)
USAFE and PACAF only had their aggressor F-16C’s for about one year, but to this
day, there are aggressor F-16’s at Nellis AFB.
The F-5E’s were not scrapped: they moved on to new careers with USN and USMC
Adversary squadrons and foreign air forces. Some went to the Brazilian Air
Force, for example.
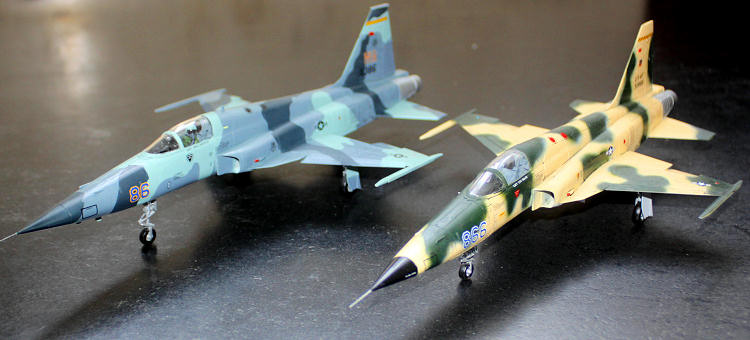
There are plenty of reasons for me to like the Nellis-based F-5E’s.
 I
love
I
love | THE KIT |
For decades, the Monogram kit was the best F-5E in 1/48 scale.
Several manufacturers were said to be preparing a new tool 1/48 F-5E, but in the
end it was
 AFV
AFV
AR
48102 “F-5E
AR 48103 “F-5F Sundowners”
AR 48105
“RF-5E Tigereye”
AR 48106 “Northrop F-5F”
AR 48S01 “F-5E RoCAF 46
AR 48S06 “F-5E Swiss/Austrian AF”
AR 48S07 “F-5F RoCAF Aggressor”
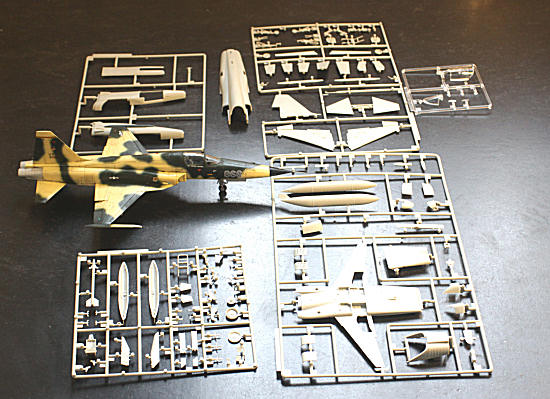
There are optional parts for open/closed canopies, airbrakes and engine louvres.
The flaps can also be positioned as one desires. There are two nosegear struts,
allowing you to build a parked F-5E with the shorter one or an F-5E ready for
take-off with the nosegear extended.
There is a small photo-etch fret with a canopy frame with rear-view mirrors and
with two mesh screens that go on the splitter plates of the intakes.
Some modellers have mentioned that there are shape
problems on the
| CONSTRUCTION |
I do not know if these Nellis-based F-5E’s had the early or the late seat.
Keeping it cheap and because I do not perform great work on cockpits anyway, I
went with the kit seat. Pictures revealed that the USAF aggressors very rarely
carried droptanks: sometimes a centerline tank on cross-country deployments but
never anything under the wings.
The underwing tanks, pylons and their delicate sway braces went
into the spares box.
I did install the centerline pylon, but left it empty.
 Construction
went pretty smoothly except for a step on the bottom where the front and rear
fuselage meet and closing the port gun bay panel. This panel is provided
separately, but there is no gun bay interior. Also, the nose pitot tube is very
delicate and not easy to install straight. So far, mine have had a tendency to
droop. I should probably drill even more out of the hole in nosecone in which it
is to be glued.
Construction
went pretty smoothly except for a step on the bottom where the front and rear
fuselage meet and closing the port gun bay panel. This panel is provided
separately, but there is no gun bay interior. Also, the nose pitot tube is very
delicate and not easy to install straight. So far, mine have had a tendency to
droop. I should probably drill even more out of the hole in nosecone in which it
is to be glued.
Be
careful when you assemble the intakes, there is some potential for unwanted gaps
there but by taking my time I achieved an acceptable result by my standards.
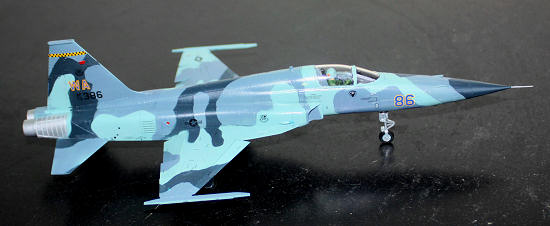
I have seen pictures of 73-0866 which show it in the early antenna
configuration, so I could build it per the kit instructions, leaving part P22
off the top of the tail and the small antenna off the spine just behind the
canopy. When I
finished my first
Naturally, I wanted to build another one.
One of the things I was going to do differently was to build as carefully as
possible, but not fill any gaps unless they were really bad. My feeling is that
most of the gaps can be seen as panel lines and that my efforts at filling and
sanding on the first model had only made it look worse.
 After
I built the F-5E in the pumpkin scheme , I saw a model by a guy who had worked
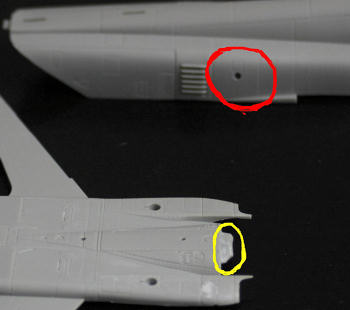
on USAF F-5's. The red dots on the rear fuselage were really inspection gauges
to check the oil level. He drilled them out and replaced them with a piece of
clear plastic, painted red at the bottom. So, I gave it a shot on the “New Blue”
F-5E too. I've circled the dot in red in the picture.
After
I built the F-5E in the pumpkin scheme , I saw a model by a guy who had worked
on USAF F-5's. The red dots on the rear fuselage were really inspection gauges
to check the oil level. He drilled them out and replaced them with a piece of
clear plastic, painted red at the bottom. So, I gave it a shot on the “New Blue”
F-5E too. I've circled the dot in red in the picture.
Circled in yellow is a location tab that I reduced in size a bit hoping to
reduce the step in the lower fuselage. The “careful construction” plan went all
right until I assembled the forward fuselage. Something went wrong and I ended
up with a bigger step in the lower fuselage than on the first F-5. I think that
the trouble originated from the open gun bay panel.
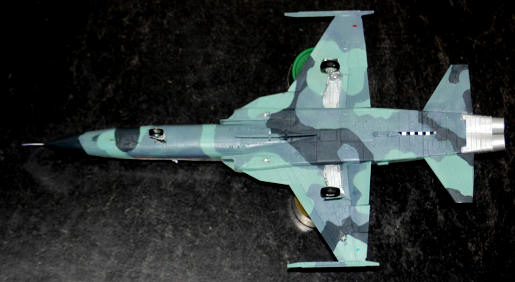
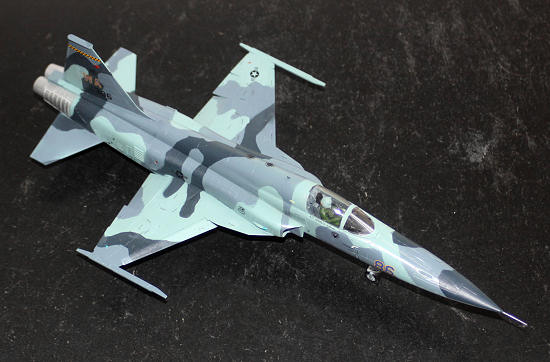
I built this one as an aircraft that’s about to start its take-off run. The
engine louvres are open, the nose gear is extended and I positioned the flaps as
I had seen on pictures of Swiss F-5E’s taking off. The pilot figurine is from an
Hasegawa F-16. I posed his head as if he’s looking at his leader starting to
roll. This was done to make the red star on the back of his helmet visible.
| COLORS & MARKINGS |
 The
colour schemes for which there are instructions are: New Blue, Old Blue,
Flogger, Modified Flogger, New Lizard, Old Lizard, New Ghost, Old Ghost, Grape,
Frog, VNAF, Silver, Gray, Sand, Snake and Pumpkin.
The
colour schemes for which there are instructions are: New Blue, Old Blue,
Flogger, Modified Flogger, New Lizard, Old Lizard, New Ghost, Old Ghost, Grape,
Frog, VNAF, Silver, Gray, Sand, Snake and Pumpkin.
| CONCLUSIONS |
When I completed the first F-5E, I realised that I hadn’t had that much fun building a model in years. If I can find some more F-5E’s with the standard nose, I’ll build more Red Flag Tigers.
November 2011
If you would like your product reviewed fairly and fairly quickly, please contact the editor or see other details in the Note to Contributors.