
| KIT #: | 12209 |
| PRICE: | $63.99 on discount |
| DECALS: | See review |
| REVIEWER: | Len Roberto |
| NOTES: |
| HISTORY |
 The
CH-53E, the Marine Corps' heavy lift helicopter designed for the transportation
of material and supplies, is compatible with most amphibious class ships and is
carried routinely aboard LHA (Landing, Helicopter, Assault: an amphibious
assault ship), LPH (Landing Platform, Helicopter: an amphibious assault ship)
and now LHD (Landing, Helicopter, Dock: an amphibious assault ship) type ships.
The helicopter is capable of lifting 16 tons (14.5 metric tons) at sea level,
transporting the load 50 nautical miles (57.5 miles) and returning. A typical
load would be a 16,000 pound (7264 kilogram) M198 howitzer or a 26,000 pound
(11,804 kilogram) Light Armored Vehicle. The aircraft also can retrieve downed
aircraft including another CH-53E. The 53E is equipped with a refueling probe
and can be refueled in flight giving the helicopter indefinite range.
The
CH-53E, the Marine Corps' heavy lift helicopter designed for the transportation
of material and supplies, is compatible with most amphibious class ships and is
carried routinely aboard LHA (Landing, Helicopter, Assault: an amphibious
assault ship), LPH (Landing Platform, Helicopter: an amphibious assault ship)
and now LHD (Landing, Helicopter, Dock: an amphibious assault ship) type ships.
The helicopter is capable of lifting 16 tons (14.5 metric tons) at sea level,
transporting the load 50 nautical miles (57.5 miles) and returning. A typical
load would be a 16,000 pound (7264 kilogram) M198 howitzer or a 26,000 pound
(11,804 kilogram) Light Armored Vehicle. The aircraft also can retrieve downed
aircraft including another CH-53E. The 53E is equipped with a refueling probe
and can be refueled in flight giving the helicopter indefinite range.
| THE KIT |
 Academy’s
CH-53E kit follows their CH-46 kits and goes one better. The kit has been
praised by all previewers as looking great in the box and the state-of-the-art
in molding tech, etc. The model is huge if built in the flight ready
position. Academy also gives you the option of having the main rotors folded as
well as the tail- saving a lot of space in your display area! Decals provide 3
options.
Academy’s
CH-53E kit follows their CH-46 kits and goes one better. The kit has been
praised by all previewers as looking great in the box and the state-of-the-art
in molding tech, etc. The model is huge if built in the flight ready
position. Academy also gives you the option of having the main rotors folded as
well as the tail- saving a lot of space in your display area! Decals provide 3
options.
A NOTE ON ACCURACY:
Since I am in Connecticut and live about 5 miles from where these monsters are built, I am lucky to have a few members of my model club that actually work on the production line. My friend and superb modeler Andy Petrahai gave us the lowdown on the kit at our last meeting. He said basically the kit is 95-98% correct. However, the only decal option on the sheet that is truly accurate is the Iraqi Freedom version on the box-top, which is the one I chose. Andy is being prodded by my group to write up a detailed analysis of the kit and if so I will pass it on to Scott.
So how does it build?
| CONSTRUCTION |
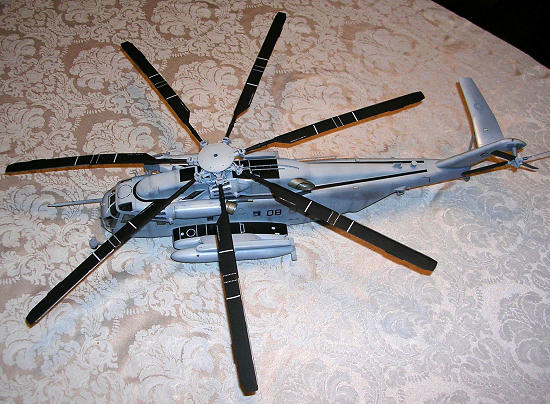
 Building
starts with the very detailed main rotor head. Lots of parts here and they are
not interchangeable so stay alert! You are rewarded with a solid and sturdy
assembly so much so that the main blades do not even require glue- they push in
to the heads that tightly.
Building
starts with the very detailed main rotor head. Lots of parts here and they are
not interchangeable so stay alert! You are rewarded with a solid and sturdy
assembly so much so that the main blades do not even require glue- they push in
to the heads that tightly.
Next up was the tail rotor with 4 individual blades again sliding into a very well thought out assembly to provide strength.
No problems so far - all parts are clean and fit together wonderfully…can you tell what’s coming up soon?
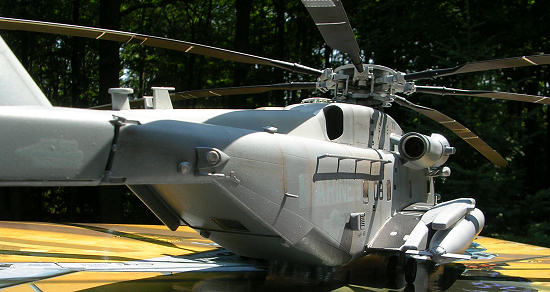
You next move on to cockpit and interior assembly. The side walls of the interior are individual pieces hiding any ejector marks.
My
problem occurred when joining the big fuselage halves.
The main cockpit and interior floor go into the right fuse half. You are also provided an interior roof again to go into the right fuse half- then you attach the left fuse half followed by a large exterior bottom piece. For some reason- I did not get it right leaving a 1/8 inch gap on one side of the bottom piece. The roof piece was not fitting in well causing it to push out somewhere. I figured the bottom was best so rather than break something- I put in a strip of evergreen plastic to finish the bottom. Lots of putty and sanding later- it was the best I could do. Judging by how well the rest of the kit fit, I am guessing the fault was mine and mine alone.
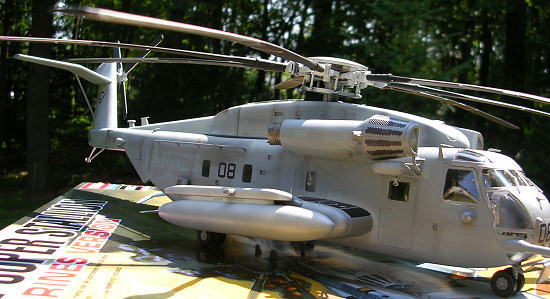
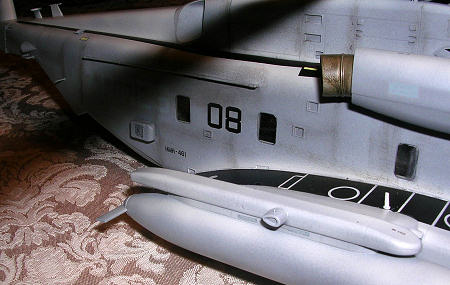
The rest of the assembly was straightforward and easy. The sponsons, fuel tanks, engines, and tail went together very well with no fuss. Sanding was needed to smooth put the tail and all around the fuselage but nothing abnormal.
I left off the winch, rotors, and FLIR assembly (which I still managed to break twice resulting in a paperclip solution) until after most assembly and painting were done.
| COLORS & MARKINGS |
 Not too
difficult although these aircraft weather very harshly. Lots of exhaust stains
and dirt builds up all over the airframe. Andy is going to provide a more
detailed painting guide I hope soon- for me I followed the directions and
weathered with pastel chalks based on lots of pics I have taken.
Not too
difficult although these aircraft weather very harshly. Lots of exhaust stains
and dirt builds up all over the airframe. Andy is going to provide a more
detailed painting guide I hope soon- for me I followed the directions and
weathered with pastel chalks based on lots of pics I have taken.
This was the first time I used Gunze/ Mr. Hobby paints. They airbrushed really nicely. Bottom color is a light gray (see instructions) and the overall color is Dark Ghost Grey FS36320. Topsides are a different grey FS36495 but this color weathers to the point where it blends in almost totally to the Ghost Grey. I used Testors Jet Exhaust for the burnt iron engine exhausts and flat black for the tires and FLIR pod. After decals and flat coat, I smudged in heavily with pastel chalks in the exhaust stain areas and in most panel lines. Black washes filled in the mesh screens on the tail. Decals worked very well with Microset.
| CONCLUSIONS |
This model is a monster. I will store the rotor in a box and whip it out only for show. The kit fit together very well- just be real careful with the floor/ roof/ fuselage assembly to avoid the problem I had. Everything else fits perfectly.
July 2006
| REFERENCES |
http://www.fas.org/man/dod-101/sys/ac/h-53.htm
http://www.sikorsky.com/details/1,,CLI1_DIV69_ETI896,00.html
http://www.naval-technology.com/projects/ch-53e/
If you would like your product reviewed fairly and fairly quickly, please contact the editor or see other details in the Note to Contributors.