Revell AG 1/144 E-2C Hawkeye
| KIT #: | 04012 |
| PRICE: | AUD $20.00 |
| DECALS: | Three options |
| REVIEWER: | Graham Riddle |
| NOTES: |
| HISTORY |
The Grumman E-2C is the current model of the successful E-2 'Hawkeye' series of carrier based twin turboprop Airborne Early Warning aircraft that have been embarked aboard US Navy carrier battle groups since the E-2A joined the fleet in 1973. The aircraft, normally deployed aboard carriers in detachments of four aircraft, form the long range 'eyes and ears' of the fleet, tracking hostile targets and co-ordinating defensive and offensive operations by other aircraft.
The updated E-2D Advanced Hawkeye with a new ventral radar array and six-bladed props will join the fleet from 2010.
The main reference for this information and a host of other data on this machine is available at http://www.globalsecurity.org/military/systems/aircraft/e-2.htm
| THE KIT |
 I picked up this kit
in a local Toyworld store, the owners of which are specialising in 'hobby'
lines – good on 'em for keeping the suburban model shop alive. I think the
kit was a distributor discount (or mispriced) at A$9.99 - I've not seen it
since below A$20.
I picked up this kit
in a local Toyworld store, the owners of which are specialising in 'hobby'
lines – good on 'em for keeping the suburban model shop alive. I think the
kit was a distributor discount (or mispriced) at A$9.99 - I've not seen it
since below A$20.
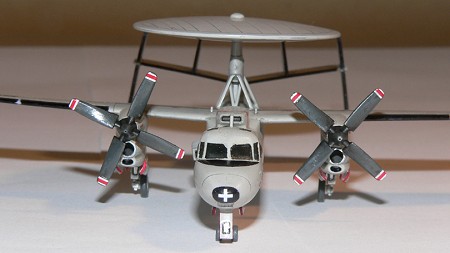
The kit is beautifully moulded in crisp grey styrene with the slightly exaggerated scribed panel lines which give most modern 1/144 kits more a representative look rather than strictly accurate, but satisfy the needs of the average modeller for recessed panel lines. The canopy transparency is of clear styrene and encompasses the 'glass' and a section of the upper forward fuselage behind it, so no fiddling around with tiny windscreens here.
The instructions read like a booklet rather than the odd newsprint notebook style, which I've seen in other recent Revell boxes. Colours are called out in Revell's usual alchemical formulas, but are not hard to interpret in FS and the box art is a fantastic painting for reference.
| CONSTRUCTION |
(I began this kit as a return to modelling: in front of the TV while my 2 month–old firstborn son was asleep and my wife popped out for a precious hour or two between feeds.)
Construction begins with the cockpit, which has a crude but acceptable representation of detail – rear bulkhead, two seats, control yokes, a dashboard and two tiny decals for the instruments. A walk around on Aircraft Resource Center provided some handy interior shots, which allowed me to build up the cockpit seats to a more realistic height with headrests (and I'm glad I did because a surprising amount of this detail can be seen via the upper cockpit windows). The interior was painted Humbrol light grey with olive drab seat cushions and black headrests.
 Next step was to
glue the fuselage halves, trapping the cockpit, nose wheel bay and chin
window between, a nice fit with no gaps. At this point I also added my
usual overkill nose-weight of 4 bean sinkers superglued through the open
wing recess forward of the C of G to keep the thing properly on it's toes.
Next step was to
glue the fuselage halves, trapping the cockpit, nose wheel bay and chin
window between, a nice fit with no gaps. At this point I also added my
usual overkill nose-weight of 4 bean sinkers superglued through the open
wing recess forward of the C of G to keep the thing properly on it's toes.
Following this, the single-piece wing and horizontal stabiliser parts went on, achieving perfect dihedral straight away, and, in a move which I would delay if I repeated the build, the four (count 'em) fins of the tail assembly. These are characteristically angled inwards so needed to be carefully jigged as there is only a couple of tiny pips to hold them in place while the glue dries. A small amount of correction fluid was the sole filler required in the thin gaps that resulted.
(Note for rivet counters - there's small distinction between port and starboard inner fins – use references to get it right.)
 With the heady whiff
of polystyrene cement in the air, I consciously departed for the
instructions and added the radome support assembly next, as it was clear
some filling would be required where the struts met the upper fuselage.
The instructions suggest you leave these off until after the walkway decals
are applied, but it's not necessary, and the radome support gives you a
handy 'handle' to grip while the myriad decals are being applied (see
below).
With the heady whiff
of polystyrene cement in the air, I consciously departed for the
instructions and added the radome support assembly next, as it was clear
some filling would be required where the struts met the upper fuselage.
The instructions suggest you leave these off until after the walkway decals
are applied, but it's not necessary, and the radome support gives you a
handy 'handle' to grip while the myriad decals are being applied (see
below).
Next I glued the radome halves together, trapping the spindle between. My aircraft does not have a rotating radome, though the kit allows for it.
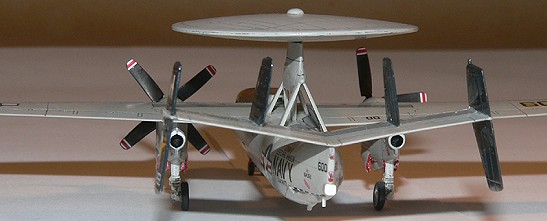
Following up were the engine nacelles, which required some scratch built wheel wells and intake/exhaust blanking plates to prevent see-through. Again, the ARC photos were extremely useful here. These were finished and offered up to the wings. A little filler and sanding were required, followed by a gentle wipe-down with soapy water.
At this point I also cleaned up and thinned down the turboprop blades, and gave the canopy a wash on the inside of Tamiya Smoke to simulate tinting and glued it in place. A little filling is required to blend the canopy piece to the upper fuselage.
| COLORS & MARKINGS |
Painting
First paint was the wheel wells, wheel rims and gear legs which I airbrushed Humbrol 22 Gloss White. The exhaust and intakes were painted Modelmaster #1749 Flat Black. With these dry, I closed up the wheel wells by Blu-Tacking on their close-fitting covers, which come as one-piece affairs which suit the modeller who wishes to have their E-2C in flight (though no stand is included). They must be cut apart along clearly marked grooves if you wish to model the undercarriage deployed.
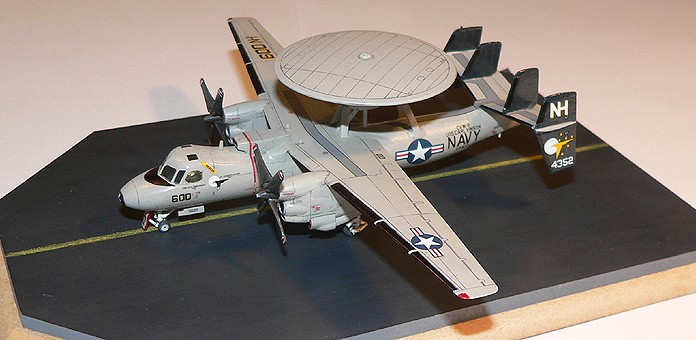
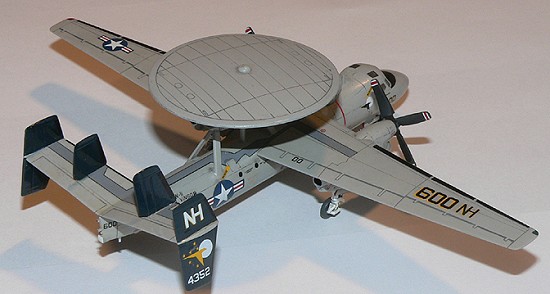
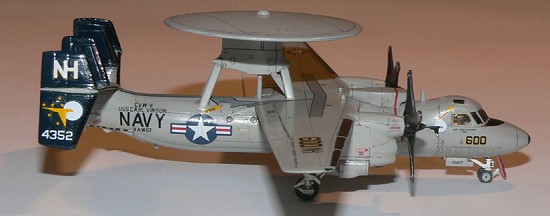
Choosing the VAW-117
'CAG bird' depicted on the box cover, the basic scheme is Gloss Light Gull
Grey (FS16440) with dark blue fins. I masked off the clear parts with
Tamiya masking tape, and the kit was then given two all-over coats of
Humbrol 129 Light Gull 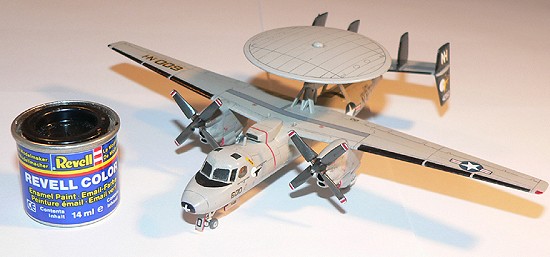 Grey.
As the kit plastic is a similar colour, no undercoat is really required, as
long as the plastic is clean and grease-free, and a couple of coats are
applied.
Grey.
As the kit plastic is a similar colour, no undercoat is really required, as
long as the plastic is clean and grease-free, and a couple of coats are
applied.
Next, I brushed USN Dark Sea Blue (FS15042/ Modelmaster #1717) on the fins. If I have left them off, the need for tiresome masking and touch up of these parts may have been eliminated. This colour was a guess, as I was not inclined to mix Revell's colours as instructed. The tires and props got a coat of Humbrol 67 Panzer Grey.
With the paint dry, the de-icing boots along control surface leading edges, and the black nose-tip were inked in using both fine and not-so-fine tips of a double-ended black Sharpie marker. Note that the instructions indicate that for this aircraft the radome has a black rim, but the box cover and my references contradict this, so after over-zealously colouring this, I had to touch up with more grey.
The port and starboard navigation lights were also picked out using appropriately coloured Sharpies.
After a little back-and-forth touching up, I brushed on Pascoe's Long-Life (arguably the Aussie equivalent of Future). Once dry, time for decals.
Markings
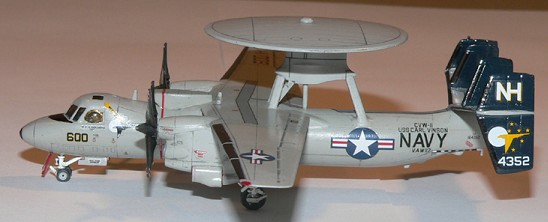
The decal sheet provided for this kit is nothing short of staggering for an out of the box 1/144 kit. There are three aircraft depicted on the Cartograf sheet:
 The sheet has 70-odd
decals between all aircraft, and decalling for the VAW-117 aircraft took me
two and a half (interrupted – the baby was by then six months old!)
evenings, as the stencils alone number around 50 decals! The decals are
acceptably thin and opaque, but benefit from a little trimming of carrier
film here and there. The walkways and red fuselage prop warning band are a
bit tricky to apply, but caused no major issues, especially if, like me,
you cut them here and there and add them in sections.
The sheet has 70-odd
decals between all aircraft, and decalling for the VAW-117 aircraft took me
two and a half (interrupted – the baby was by then six months old!)
evenings, as the stencils alone number around 50 decals! The decals are
acceptably thin and opaque, but benefit from a little trimming of carrier
film here and there. The walkways and red fuselage prop warning band are a
bit tricky to apply, but caused no major issues, especially if, like me,
you cut them here and there and add them in sections.
This presents another case for leaving the fins off, as this would allow easier application of the walkway decals on top of the horizontal stabiliser. Both props have decals for the tips (4 each front and back) which I used as it was a toss-up between the fiddly decals or equally fiddly masking and painting.
Weathering was kept to a minimum, as it can rapidly get out of hand at this scale and besides, the crew chief of this CAG bird has been keeping the machine in tip-top shape…
| FINAL CONSTRUCTION |
 The decals were then
given another coat of Long Life, after which I worked across the entire
airframe with a sludge wash based on Citadel's 'Codex Grey'. The cockpit
side windows have a pronounced bulge to them, which were not represented on
the kit, so to simulate these blisters I applied a blob of PVA glue to the
sides. These were then brushed with Citadel 'Shining Gold' to simulate
their anti-radiation coating.
The decals were then
given another coat of Long Life, after which I worked across the entire
airframe with a sludge wash based on Citadel's 'Codex Grey'. The cockpit
side windows have a pronounced bulge to them, which were not represented on
the kit, so to simulate these blisters I applied a blob of PVA glue to the
sides. These were then brushed with Citadel 'Shining Gold' to simulate
their anti-radiation coating.
I glued the undercarriage in place, and when the glue was strong enough but not dry, left it on its wheels overnight to ensure it sat properly. After applying a red Sharpie on the edges of the undercarriage doors, I glued them in place and the work was done.
The model is displayed on a piece of pre-cut MDF board of a suitable aircraft carrier-esque shape, bought from the craft section of a local discount store. This was painted a mix of Citadel Acrylics to a very dark grey and with generic deck markings in yellow coloured pencil.
| CONCLUSIONS |
 The beautiful 1/144
Revell E-2C Hawkeye kit offers great potential for future projects:
The beautiful 1/144
Revell E-2C Hawkeye kit offers great potential for future projects:
It's great to see the E-2C in 1/144 – at some time in the future I will muster the courage to tackle the rather less exciting 1/72 Heller (re-boxed Fujimi) offering, for which I recently acquired some Superscale decals.
Interesting side note is that as I finished this kit, the local port of Fremantle received a visit from the USS Nimitz, current home to VAW-117 as part of Nimitz's Carrier Air Wing 11. Now if I could only get out onto the ship to check out some minor details like we used to be able to do in different times…
| REFERENCES |
I trusted the Revell kit instructions for the main colour scheme and decals.
For interior/wheel well details I used the E-2 Walkarounds on Aircraft Resource Center:
http://s96920072.onlinehome.us/AWA1/001-100/walk056_E2C/walk056.htm
http://s96920072.onlinehome.us/AWA1/001-100/walk056_E2C/part2/walk056b.htm
December 2005
Graham Riddle
Copyright ModelingMadness.com. All rights reserved. If you would like your product reviewed fairly and quickly, please
contact
the editor or see other details in the
Note to
Contributors.