
Italeri 1/48 CH-118 Iroquois
|
KIT # |
2621 |
|
PRICE: |
$20.99 CDN |
|
DECALS: |
THree options |
|
REVIEWER: |
Olivier Lacombe |
|
NOTES: |
Belcher Bits Decals used |
|
HISTORY |
 Will the one who never heard of
the Huey please stand up? The UH-1 is to choppers what the DC-3 is to
aircraft: instantly recognizable, rugged and dependable. It was used
extensively in Vietnam by the United States, and is remembered for its
star role in “Apocalypse Now” and other Vietnam war movies.
Will the one who never heard of
the Huey please stand up? The UH-1 is to choppers what the DC-3 is to
aircraft: instantly recognizable, rugged and dependable. It was used
extensively in Vietnam by the United States, and is remembered for its
star role in “Apocalypse Now” and other Vietnam war movies.
Canada began using this helicopter when 403 OTS received ten CH-118s for training. After CH-136 Kiowas took over the training role, the Iroquois found a new job as base search-and-rescue choppers, replacing old H-34s. They soldiered on in that role until 1995, when they were replaced by the CH-146 Griffon (that’s a green-painted Bell 412).
|
THE KIT |
This is not an actual Italeri mould, but in fact a reissue of an old ESCI kit (see note at the end of the article. Ed). The box sports a nice painting of an AB-205 of the Carabinieri and upon opening it, you are greeted by two olive drab sprues comprising all the airframe part, plus a single clear one (separately bagged). The parts are well detailed, with no sink marks or short shots, but some flash is apparent. The interior is busy enough with seats filling the rear cabin, but you could stuff anything you want in there. Options include a winch and a sling attachment under the fuselage. Also, different antennas can be positioned alongside the tail boom and there is a choice of intakes and side panels (better check your references!)
|
CONSTRUCTION |
This one starts with the cockpit, which is very important on a chopper model since so much glazing surrounds it. It’s then important to make a good job out of it!
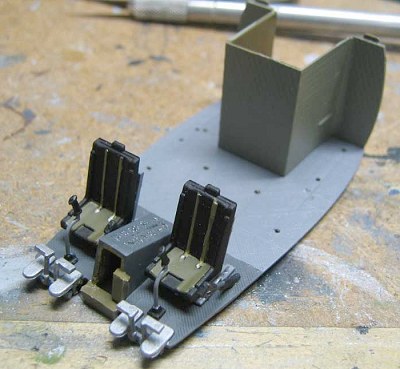 I started by gluing the nose
frames each side of the central console and then proceeded to dry fit
this sub-assembly into the fuselage halves. Oh boy! The lack of
apparent fit told me I was embarking on a grand journey! Next, I painted
the cabin floor Gunze H337 Greyish-Blue while the cockpit floor, the
doors, the instrument panel and surrounding areas in the fuselage halves
were painted RLM 66. A few weeks prior to this, I had the good fortune
of eyeing a CH-146 Griffon of the Canadian Air Force. Those colours came
from my observation of the more modern machine, but I decided that they
would do for this one. The cyclic and collective sticks received the
same treatment. The rudder pedals were detailed with aluminium and black
paint. Don’t forget to drill the holes in the floor to accept the seats
at a later stage!
I started by gluing the nose
frames each side of the central console and then proceeded to dry fit
this sub-assembly into the fuselage halves. Oh boy! The lack of
apparent fit told me I was embarking on a grand journey! Next, I painted
the cabin floor Gunze H337 Greyish-Blue while the cockpit floor, the
doors, the instrument panel and surrounding areas in the fuselage halves
were painted RLM 66. A few weeks prior to this, I had the good fortune
of eyeing a CH-146 Griffon of the Canadian Air Force. Those colours came
from my observation of the more modern machine, but I decided that they
would do for this one. The cyclic and collective sticks received the
same treatment. The rudder pedals were detailed with aluminium and black
paint. Don’t forget to drill the holes in the floor to accept the seats
at a later stage!
 I used Gunze Flat Black to paint
the main and tail rotor blades, the seats and the landing skids. The
seat’s frames were painted Light Grey. I used Model Master Dunkel Gelb
for the seat belts. For the fabric covered cabin rear wall and roof, I
used Model Master RLM 02. It’s a close match for the light tan material
used in those areas.
I used Gunze Flat Black to paint
the main and tail rotor blades, the seats and the landing skids. The
seat’s frames were painted Light Grey. I used Model Master Dunkel Gelb
for the seat belts. For the fabric covered cabin rear wall and roof, I
used Model Master RLM 02. It’s a close match for the light tan material
used in those areas.
I elected not to fit the cabin seats at this point and proceeded with the rotor mast assembly. I broke one of the supports for the fixed cyclic platter and had to cannibalize my Italeri Bell 212 to get the part. That 212 will become a 412 using the Belcher Bits set, so it was a good deal! The area where the mast plugs on the cabin roof was painted Model Master Interior Green, while the mast was painted Aluminium and set aside for later.
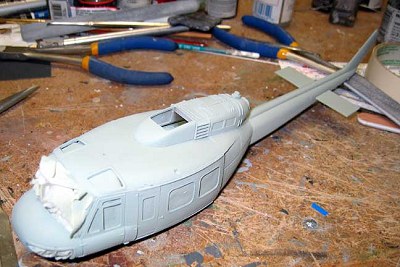
 It was then time to fit the
cabin into the fuselage. All I can say is yikes! I can’t recall exactly
how I did it, but it involved swearing, cutting off parts and lots of
glue and pressure. Seriously, I started by trapping the rear of the
cabin between the fuselage, and I let it set. I then cut the nose frames
off the cabin, glued the cabin front more or less in place and then glued
back those frames. I secured the floor and ceiling of the assembly with
Humbrol glue, letting capillary action take care of the hard work. I had
previously glued and cleaned up the engine fairing, making sure I had
used the right intake gills. A quick look at “AIRCOM : Canada’s Air
Force” by Larry Milberry provided the necessary reference. I glued the
fuselage top, and then mated the fairing to it. I puttied all the seams
with Tamiya Putty and cleaned them. The work involved here is
considerate, but not impossible. The worst fitting part was the optional
panel on the right side of the tail boom. A big sanding stick took care
of it. Depending on which version you make, you might have to open holes
in the tail boom to accept various antennas. Check your references.
It was then time to fit the
cabin into the fuselage. All I can say is yikes! I can’t recall exactly
how I did it, but it involved swearing, cutting off parts and lots of
glue and pressure. Seriously, I started by trapping the rear of the
cabin between the fuselage, and I let it set. I then cut the nose frames
off the cabin, glued the cabin front more or less in place and then glued
back those frames. I secured the floor and ceiling of the assembly with
Humbrol glue, letting capillary action take care of the hard work. I had
previously glued and cleaned up the engine fairing, making sure I had
used the right intake gills. A quick look at “AIRCOM : Canada’s Air
Force” by Larry Milberry provided the necessary reference. I glued the
fuselage top, and then mated the fairing to it. I puttied all the seams
with Tamiya Putty and cleaned them. The work involved here is
considerate, but not impossible. The worst fitting part was the optional
panel on the right side of the tail boom. A big sanding stick took care
of it. Depending on which version you make, you might have to open holes
in the tail boom to accept various antennas. Check your references.
The tail planes were glued on, and they fit pretty well! I masked all the window openings in the fuselage and doors from the inside, and glue the doors to the airframe with white glue in preparation for painting. I also masked the windscreen.
|
COLORS & MARKINGS |
Painting
 I chose RLM 04 for the yellow on
the aircraft’s fuselage for two reasons: firstly, it’s my favourite
colour and secondly, it matches the somewhat warm yellow used on Canadian
SAR birds. Before applying the colour, I primed everything with Tamiya
IJN Grey (merci Pierre-André!) as it allows you to spot any sore areas on
the kit and will allow the main colour to adhere without having to resort
to multiple coats to cover the Olive Drab plastic. Once that was dry, I
painted the red bands on the fuselage and tail planes using Gunze H23
Shine Red. Next was the anti-glare panel on the nose, for which Gunze
Flat Black was
I chose RLM 04 for the yellow on
the aircraft’s fuselage for two reasons: firstly, it’s my favourite
colour and secondly, it matches the somewhat warm yellow used on Canadian
SAR birds. Before applying the colour, I primed everything with Tamiya
IJN Grey (merci Pierre-André!) as it allows you to spot any sore areas on
the kit and will allow the main colour to adhere without having to resort
to multiple coats to cover the Olive Drab plastic. Once that was dry, I
painted the red bands on the fuselage and tail planes using Gunze H23
Shine Red. Next was the anti-glare panel on the nose, for which Gunze
Flat Black was
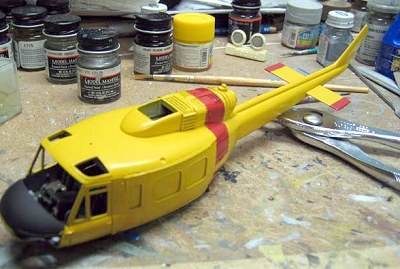 used. I then masked everything and proceeded with Gunze RLM 04 for the main colour. Two coats were enough to cover everything.
Once everything had dried, I masked the top fuselage and used Gunze FS 36375 to paint the walkway. I used Tamiya Clear Green paint to tint the overhead windows and I hand painted the tail’s anti-abrasive rubber band on its leading edge.
Construction continues
Now came the really tiring part:
paint touch ups! Using various brushes, I fixed all the leakages and
misses to make the chopper presentable. I also built and
 painted the
main cabin’s seat, they were detailed with Testor Aluminium and Olive
Drab paint. I installed the instrument panel, which for reasons best
known to itself refused to fit were it should have, so there is a space
between it and the windscreen. More careful dry-fitting at an earlier
stage of the project would have solved the problem. The rotor head was
painted with Testor Aluminium paint and the blades were attached to it.
The tips were masked and brushed with Model Master Insignia Yellow. The
tail rotor was painted the same way, except that the tips were done in a
similar way to the fuselage: first a coat of Tamiya IJN Grey was brushed
on, and then Tamiya Flat White came over it. Some fancy masking was done
before Gunze Red came in last. I painted and installed the various
antennas, be sure to check your references on that, because the avionics
fit varies a lot from one bird to another. The landing skids were
attached, and then I more or less installed the seats. I say more or
less because they don’t fit at all, you need to trim their top and bottom
to make them fit, and even though I did that, mine look crooked.
painted the
main cabin’s seat, they were detailed with Testor Aluminium and Olive
Drab paint. I installed the instrument panel, which for reasons best
known to itself refused to fit were it should have, so there is a space
between it and the windscreen. More careful dry-fitting at an earlier
stage of the project would have solved the problem. The rotor head was
painted with Testor Aluminium paint and the blades were attached to it.
The tips were masked and brushed with Model Master Insignia Yellow. The
tail rotor was painted the same way, except that the tips were done in a
similar way to the fuselage: first a coat of Tamiya IJN Grey was brushed
on, and then Tamiya Flat White came over it. Some fancy masking was done
before Gunze Red came in last. I painted and installed the various
antennas, be sure to check your references on that, because the avionics
fit varies a lot from one bird to another. The landing skids were
attached, and then I more or less installed the seats. I say more or
less because they don’t fit at all, you need to trim their top and bottom
to make them fit, and even though I did that, mine look crooked.
Decals
Belcher Bits decals went on beautifully, although the little black trim line around the red bands was very, very fun to apply! I used Future floor polish to seal the decals, then carefully masked the anti-glare panel and the walk-way before Poly Scale Flat was used to tone them down.
|
FINAL CONSTRUCTION |
 I glued the doors into position,
along with the rotors and I added the cable cutters supplied in the kit,
though I did scratch built one for the windscreen, as it was missing. I
use a length of Evergreen plastic rod painted black and it did the
trick. The windows were glued on, they fit pretty well for the most
part, except for the windscreen who has gaps on each side. Be careful
not to crack open any seams while getting it into position. I used White
Glue to plug the gaps.
I glued the doors into position,
along with the rotors and I added the cable cutters supplied in the kit,
though I did scratch built one for the windscreen, as it was missing. I
use a length of Evergreen plastic rod painted black and it did the
trick. The windows were glued on, they fit pretty well for the most
part, except for the windscreen who has gaps on each side. Be careful
not to crack open any seams while getting it into position. I used White
Glue to plug the gaps.
|
CONCLUSIONS |
Whew! First chopper! I can say that it was not a walk in the park, mainly because of the interesting fit issues of the old ESCI kit and the smart paint scheme. But I did learned a lot, mainly that choppers are totally neat (along the way I took up helicopter flying lessons and am now close to having my licence) and that I wanted to build more, a lot more! I do not recommend this kit to a beginner, although a modeller of average skills will have no problems in making this kit.
August 2004
|
REFERENCES |
MILBERRY, Larry, AIRCOM : Canada’s Air Force, CANAV Books, Toronto, 1991.
Very late note (Nov 2010) from our kit guru, Tony Hodun " Italeri has never reboxed the ESCI 1/48 Huey; their Huey kits are all produced with nice new tooling with more details and options. I’ve got several of the ESCI versions, and all of the Italeri kits (including the one Revell Germany version), and it is clear from the features of Oliver’s nicely built CH-118 that he built one of the newer tooled Italeri kits. "
Copyright ModelingMadness.com. All rights reserved. No reproduction in part or in whole without express permission.
If you would like your product reviewed fairly and fairly quickly, please contact the editor or see other details in the Note to Contributors.