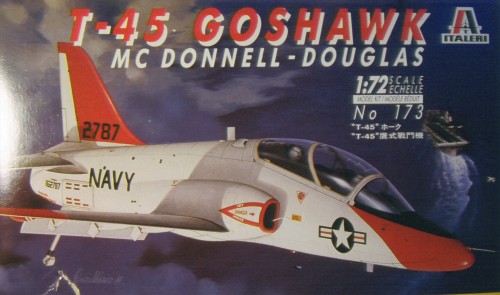
Italeri 1/72 T-45A Goshawk
| KIT #: | ? |
| PRICE: | $10.00 MSRP when new |
| DECALS: | One option |
| REVIEWER: | Joel Hamm |
| NOTES: |
| HISTORY |
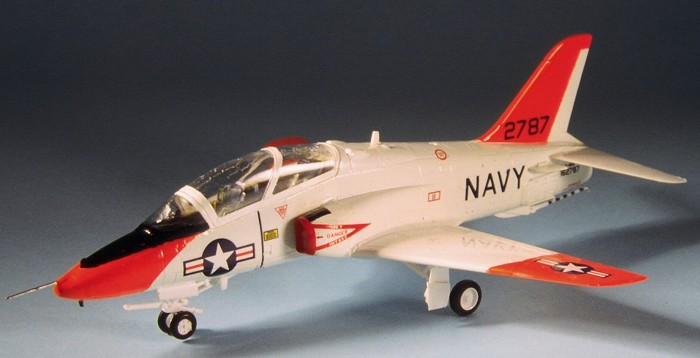
After a string of low-tech “limited edition” kits requiring extensive plastic surgery skills, a bit of a rest is called for by building one straight out of the box. For a no-mess, no-fuss quickie, anything by Italieri is a good choice. Their kits are cleanly molded and precisely engineered to fit without the need for filling, filing, or fidgeting. Their T-45 Goshawk appeared to be a promising prospect. It is small, simple, and most of all “cute”, fitting in nicely with a collection of other jet trainers sporting the bright orange and white Navy training livery
While the Goshawk is a recent immigrant to the U.S., replacing both the T-2 Buckeye intermediate and TA-4 advanced trainers, it is licensed by Boeing / McDonnell Douglas as an improvement of the RAF’s principle trainer and light attack aircraft, the Hawk, first produced by Hawker Siddeley, later to become British Aerospace, in the early 1970’s. The plane’s performance and maneuverability made it the mount of the RAF Aerobatic team, the Red Arrows. A single Rolls-Royce turbofan drives the 30 foot wide by 40 foot long craft to a maximum speed of 560 knots and ceiling of 50,000 feet. In adopting the T-45A, the Navy did not buy just an airplane. The Goshawk trainer is part of an integrated training system including advanced flight simulators with computer generated cockpit views, computer assisted instructional programs, “electronic classrooms” and a contractor logistics support package, all designed to produce a better, quicker, cheaper naval aviator.
| THE KIT |
 True
to Italieri’s form, all parts are highly detailed, crisply molded, free of
flash and minimal sprue attachments. A minor annoyance is presented by the
molding of centerline antenna and projections, where they will have to be
ground off to cleanup the fuselage joint line, and later replaced. Even
the best of kits have some room for improvement, and the Goshawks weakness
is its twin ejection seats. While everything else in the cockpit is
fairly flawless, these are rather rudimentary and look lost under the
expanse of canopy.
True
to Italieri’s form, all parts are highly detailed, crisply molded, free of
flash and minimal sprue attachments. A minor annoyance is presented by the
molding of centerline antenna and projections, where they will have to be
ground off to cleanup the fuselage joint line, and later replaced. Even
the best of kits have some room for improvement, and the Goshawks weakness
is its twin ejection seats. While everything else in the cockpit is
fairly flawless, these are rather rudimentary and look lost under the
expanse of canopy.
| CONSTRUCTION |
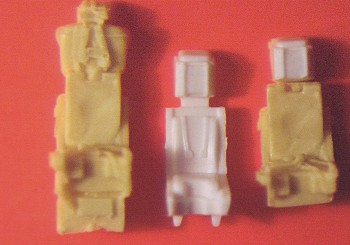 Rummaging
through the spare parts box produced a packet of True Details highly
detailed resin seats. While these included everything from belts, to
buckles, to firing handles to actuator rails, they were not quite the
correct type, having a massive headrest that stores the drogue chute
assembly. The Goshawk uses a newer seat with a small boxy headrest.. These
days it’s possible to mail order any proper after-market replacement part
from a tail wheel tire to a canopy
Rummaging
through the spare parts box produced a packet of True Details highly
detailed resin seats. While these included everything from belts, to
buckles, to firing handles to actuator rails, they were not quite the
correct type, having a massive headrest that stores the drogue chute
assembly. The Goshawk uses a newer seat with a small boxy headrest.. These
days it’s possible to mail order any proper after-market replacement part
from a tail wheel tire to a canopy
 mirror;
but that would take time and wouldn’t have been as satisfying as performing
a “headrest-ectomy”. A few strokes of a razor saw and a glob of glue
allowed the tops of the respective seats to be separated and swapped,
forming a part that’s perfectly acceptable, as long as no one peeks in the
cockpit with a microscope. The only modification necessary is to narrow the
base of the seat and/or widen the cockpit tub a few microns. Modelers who
regularly work with resin sing the praises of cyanoacrylate glues, but I
was unable to get a decent joint of dissimilar materials with liquid or
gel superglue, with, or without accelerator. Pardon the pun, but I’ll
stick with my favorite five-minute epoxy. True Details provides a precise
paint design for their seats, which resulted in more interest and
visibility than the overall black scheme called for in the kit
instructions.
mirror;
but that would take time and wouldn’t have been as satisfying as performing
a “headrest-ectomy”. A few strokes of a razor saw and a glob of glue
allowed the tops of the respective seats to be separated and swapped,
forming a part that’s perfectly acceptable, as long as no one peeks in the
cockpit with a microscope. The only modification necessary is to narrow the
base of the seat and/or widen the cockpit tub a few microns. Modelers who
regularly work with resin sing the praises of cyanoacrylate glues, but I
was unable to get a decent joint of dissimilar materials with liquid or
gel superglue, with, or without accelerator. Pardon the pun, but I’ll
stick with my favorite five-minute epoxy. True Details provides a precise
paint design for their seats, which resulted in more interest and
visibility than the overall black scheme called for in the kit
instructions.
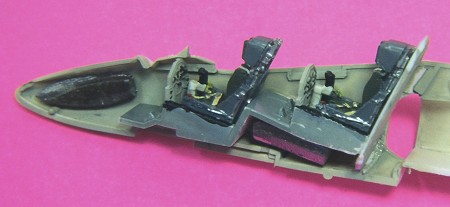 I assembled the complete cockpit tub before mating the fuselage halves, but
there is enough room to insert seats, control columns, and instrument
panels from the top after all the paint and decals are on. This sequence
would considerably facilitate masking. There is lots of space for lead
ballast in the nose, which will be needed to keep the tail off the ground.
Don’t overdo it, because the trailing link main landing gear can’t take as
much weight as “stick legs”. Glue the tailpipe plug in securely if you
intend to insert a dowel rod in there to hold the model for painting. I
poked too hard, dislodged it, and spent an interesting hour or two with
surgical tools trying to get it back into place.
I assembled the complete cockpit tub before mating the fuselage halves, but
there is enough room to insert seats, control columns, and instrument
panels from the top after all the paint and decals are on. This sequence
would considerably facilitate masking. There is lots of space for lead
ballast in the nose, which will be needed to keep the tail off the ground.
Don’t overdo it, because the trailing link main landing gear can’t take as
much weight as “stick legs”. Glue the tailpipe plug in securely if you
intend to insert a dowel rod in there to hold the model for painting. I
poked too hard, dislodged it, and spent an interesting hour or two with
surgical tools trying to get it back into place.
All parts, major and minor fit well together with only one exception: a slight gap at the wing-to-fuselage joint requires the wings to be drawn together with tape, adding a bit more dihedral than called for by the designers. The alternative is a fine bead of filler and sanding. The fragile flap hinge fairings are another slight annoyance; being easily broken, if not carefully cut from the sprue and treated with kid gloves.
| COLORS & MARKINGS |
After masking the cockpit with
tissue, the fuselage received several layers of Model Master gloss white.
Despite the flood of acrylics and space age formulations on the market,
nothing works as well as trusty old Testors - except for the fluorescent
red trim, where Humbrol’s “Orange Blaze” produced a smooth glossy finish as
opposed to MM’s flat and grainy. Masking was done with 3M’s PVC (Poly Vinyl
Chloride) masking tape, which is the stretchiest and most conforming on the
market - but also 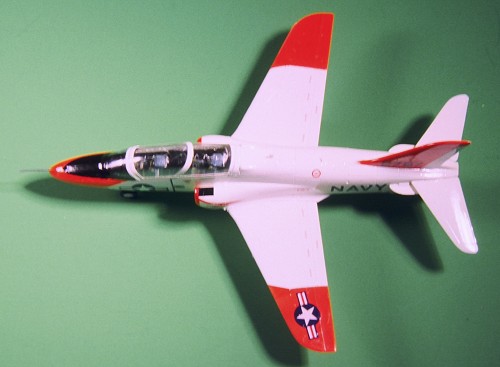 at $7 a
roll the most expensive. The engine intake scoop lips don’t get the same
fluorescent shade. They take a standard red to match the “Danger” chevron
decals. No masking medium conformed well enough on these compound curves
to produce a sharp line, so I resorted to loosely draped strips of decal
film. After drying in place, several applications of Solvaset decal fluid
made them nestle down like paint. The kit-supplied decals go on easily and
conform well but got a light brushing of Micro-Sol just to make sure. The
white portions of the wing insignia allowed some orange to show through,
but no one has yet invented a transfer that is both thin and opaque. The
instruction sheet contains an error in reversing the relative positions of
decal numbers 8 and 9. The black aircraft serial number goes just below
the stabilizer, while the red “Danger...” marking goes below that. Most
photos of the Goshawk show a short black walkway on the port inlet scoop,
presumably for the aft-seaters’s entry and exit convenience. This marking
was missing from the decal sheet but is easily made from a scrap of black
or dark gray transfer.
at $7 a
roll the most expensive. The engine intake scoop lips don’t get the same
fluorescent shade. They take a standard red to match the “Danger” chevron
decals. No masking medium conformed well enough on these compound curves
to produce a sharp line, so I resorted to loosely draped strips of decal
film. After drying in place, several applications of Solvaset decal fluid
made them nestle down like paint. The kit-supplied decals go on easily and
conform well but got a light brushing of Micro-Sol just to make sure. The
white portions of the wing insignia allowed some orange to show through,
but no one has yet invented a transfer that is both thin and opaque. The
instruction sheet contains an error in reversing the relative positions of
decal numbers 8 and 9. The black aircraft serial number goes just below
the stabilizer, while the red “Danger...” marking goes below that. Most
photos of the Goshawk show a short black walkway on the port inlet scoop,
presumably for the aft-seaters’s entry and exit convenience. This marking
was missing from the decal sheet but is easily made from a scrap of black
or dark gray transfer.
Several light applications of Future acrylic floor wax, thinned with Tamiya acrylic thinner, sealed the decals and put a finish coat on the model, readying it for all the appurtenances. The undercarriage is a tangle of struts and door panels, but the instructions are not explicit on their placement. A number of gear-down views were available on the Internet, leading to a best guestimate of door placement. Forming and replacing the sub-microscopic antenna on the upper and lower nose cone surfaces (which had been sanded off for seam smoothing) was a chore that sorely tested eyesight, dexterity, and composure.
| FINAL CONSTRUCTION |
After attaching the pitot probe, tailhook, and blade antennae, the two piece canopy completed the project. Actually, it is a three piece canopy, which includes an internal windshield partition between the two pilot’s stations (presumably to preclude total incapacitation in the event of a bird or ordinance strike). Despite extensive trimming, this part butted up against the center glare shield and prevented the canopy from properly fitting. Being essentially invisible to the unaided eye, it was omitted. The clear parts were masked for painting using narrow strips of 3M masking tape, which actually conformed to the complex curves of the framing. Canopy and windscreen were attached with Testors Clear Parts Cement, using a new (to me, at least) gizmo called Microbrushes. These resemble miniature cotton swabs (two sizes are available) but have tufts of fiber bristles that are useful for applying glues and paints, and for polishing out small boo-boos with various fine abrasive compounds.
| CONCLUSIONS |
For what was supposed to be a quick-build, no-fuss project, the Goshawk consumed considerable time, effort, and energy; from which relief must now be sought by indulging in a low-tech, limited edition kit.
May 2005
Copyright ModelingMadness.com.
If you would like your product reviewed fairly and fairly quickly, please contact the editor or see other details in the Note to Contributors.