
Sword 1/48 T-38 Talon
| KIT #: | 48004 |
| PRICE: | $? |
| DECALS: | 2 options |
| REVIEWER: | Paul Cheung |
| NOTES: | 30 pieces injection parts, 3 pieces clear injection parts, 19 pieces resin parts |
| HISTORY |
Aesthetics is one of the most important yet complex inborn capabilities of
our minds - somehow we feel comfortable and safe when we encountered
something we think it looks nice and reflects humanity - that is why
someone says mother's breasts are one of the world's most beautiful
container designs. There are a lot of military machines that can be
classified as good looking and powerful; such as the Spitfire and the
Fw-190 respectively but not many that can be judged as sexy or beautiful
Personally, the T-38 Talon belongs to the later group of machines -
especially when you look at it from behind at eye level, those complex
curves formed by the canopies merged perfectly with the rudder while at the
same time it interacts with the air intake ducts that make a perfect ending
at the engine coverings. All these curves and bendings echo inside my head
of a female figure - waist and legs - so rare that a machine with such
enormous power (don't forget it is a supersonic jet trainer) could make
people's mind comes into connection and even goes in parallel with the
aesthetic of human body.
| THE KIT |
The previously available kit of T-38 is the Fujimi release almost of a vintage history. It is of 1/50th in scale not
to mention the intakes and canopy are of incorrect shape and curvature plus
the almost empty cockpit. In spite of all these short comings, the T-38 is
too much a beauty to miss that there were a lot of modelers (including
myself) tried all sorts of method to turn the Fujimi kit into an acceptable
model - replaced the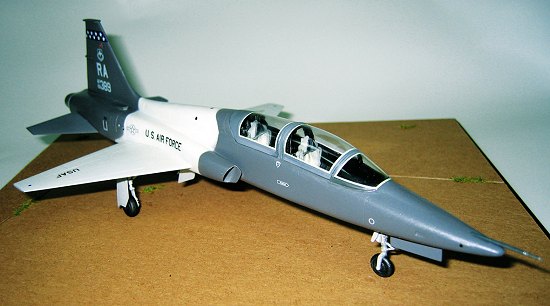 cockpit with a modified one from the Monogram's F-5F,
borrowed the main landing gears from Italeri's F-5E, added a piece of
plastic sheet to mimic the metal baffle plate over the exhaust nozzles and
reshaped the intakes as well the nose contour by putty. Still you can only
have a T-38 with a canopy of wrong outline.
cockpit with a modified one from the Monogram's F-5F,
borrowed the main landing gears from Italeri's F-5E, added a piece of
plastic sheet to mimic the metal baffle plate over the exhaust nozzles and
reshaped the intakes as well the nose contour by putty. Still you can only
have a T-38 with a canopy of wrong outline.
No wonder the Sword T-38 Talon is a welcome release to the modeling
community for we finally have an injection model of correct outline in
1/48th scale. There have been a few kit preview of this product in various
websites (including
this one) so we shall go straight to the building process of the model.
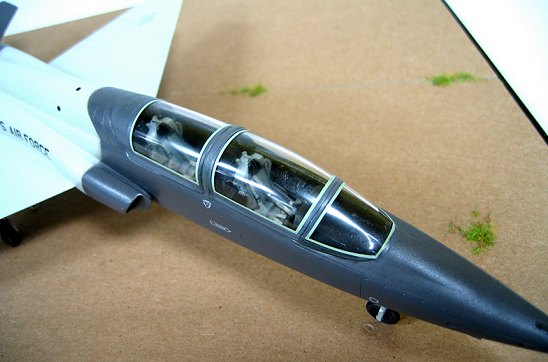
Overall, the resin parts presented themselves with no major problem, the
details and fittings are okay provided the cleaning process is properly
executed. While the fuselage length and the wing span dimensions are well
within the acceptable tolerance of 1/48th scale the major discrepancy comes
from the nose just in front of the windscreen. There is a very obvious hump
in this area with the even obvious consequence that the very front part of
the windscreen is chopped rather than a perfect curve as per the kit part
(fig. 2). Then the front and rear canopies are presented in two pieces of
which the modeler is instructed to build the airplane in an open-cockpit
configuration. As long as the modeler is willing to conform to the
instruction sheet no major problem will be encountered but if anyone tries
to make it in a closed-cockpit version, one is warned to prepare oneself
for some surgery work.
| CONSTRUCTION |

 The problem comes from the under size of the canopy frame between the front
and rear canopies. While the width of the base of this frame is equal to
the width of the cockpit the height of this frame is short of about 1.5 mm
which means the modeler has to compensate the height without alternating
the width . It is not only difficult but extremely delicate, thus
very time consuming - patience, the ultimate skill, comes to rescue again.
The first step is to glue this middle frame onto the cockpit and everyone
understands that the bonding can never be too strong for the frame is only
about 2 mm thick. Then a layer of thin plastic strips (of 0.5 mm thick) was
added to the frame and sanded off the two sides to make sure only the
height is being enhanced. Repeat this process two more times to accumulated
the overall increment reached 1.5 mm. Needless to say one has to very
careful during th
The problem comes from the under size of the canopy frame between the front
and rear canopies. While the width of the base of this frame is equal to
the width of the cockpit the height of this frame is short of about 1.5 mm
which means the modeler has to compensate the height without alternating
the width . It is not only difficult but extremely delicate, thus
very time consuming - patience, the ultimate skill, comes to rescue again.
The first step is to glue this middle frame onto the cockpit and everyone
understands that the bonding can never be too strong for the frame is only
about 2 mm thick. Then a layer of thin plastic strips (of 0.5 mm thick) was
added to the frame and sanded off the two sides to make sure only the
height is being enhanced. Repeat this process two more times to accumulated
the overall increment reached 1.5 mm. Needless to say one has to very
careful during th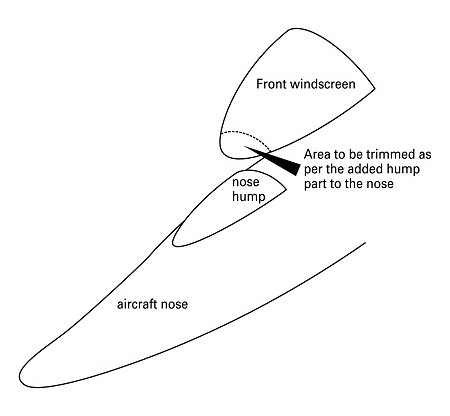 e sanding process in not breaking the bonding between the
frame and the fuselage. Inevitably one was keep asking why Sword doesn't
provide a one-piece canopy as an option for the modeler or should we wait
for Squadron to come up with a clear vac-form canopy?
e sanding process in not breaking the bonding between the
frame and the fuselage. Inevitably one was keep asking why Sword doesn't
provide a one-piece canopy as an option for the modeler or should we wait
for Squadron to come up with a clear vac-form canopy?
Comparatively, the adding of nose hump is an easier task. Just locate a
fuel tank in the spare box of appropriate diameter and cut the required
size from it then glued onto the nose and blended in by putty. After the
grafting is settled, use it as the guidance to trim the front windscreen to
match with the new nose contour. Took each step slowly but carefully (it
took me 2 months to finish the above modifications). The main landing
gears are more straight forward, just sand down the thickness of the two
halves wheel to half of the original but always referred to photographs of
real aircraft for guidance.
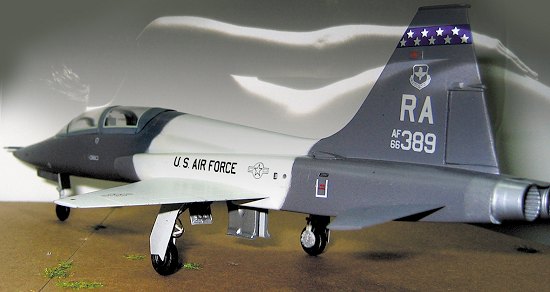
| COLORS & MARKINGS |
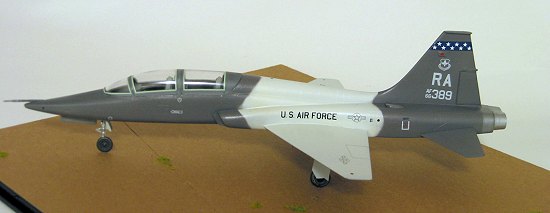
This model was released in mid-2004 while the real aircraft has received a new color scheme as well - should we say, the Panda scheme, because it really looks like the black and white demarcation of a panda. It is quite a cool design although we are still not clear about the actual philosophy behind this color scheme. Then the after market decal suppliers started to offer markings related to this color scheme but not by Sword. This is hardy a complaint rather a puzzle of why the latest marking scheme is being omitted from the most recently released model? All that Sword needs to do is to add the tail markings, quite a minimal effort by any standards.
 Regarding the painting of the model I have firstly searched the internet
for relevant panda color scheme in various websites and traced the
demarcation from the downloaded photos. It is basically a very simple
pattern of two grey tones only: a sky grey and a warm dark grey. However,
grey colors are always, in most modelers minds, the most controversy ones
because their hues and tones could change dramatically according to the
on-site lighting/weather condition. It is only better than nothing to quote
the FS number purely as a guideline. My personal approach in dealing with
grey tones is to collect as many photos as possible and use the
Mark-One-Eye-Ball judgment to mix the paints and test sprayed on plastic
strips. When dried, one will realize how much the differences are between
wet and dry status of the paints. And it is always a matter of personal
preference to prepare a second set of grey paints in a darker tone to
stimulate the shadowing areas of the model.
Regarding the painting of the model I have firstly searched the internet
for relevant panda color scheme in various websites and traced the
demarcation from the downloaded photos. It is basically a very simple
pattern of two grey tones only: a sky grey and a warm dark grey. However,
grey colors are always, in most modelers minds, the most controversy ones
because their hues and tones could change dramatically according to the
on-site lighting/weather condition. It is only better than nothing to quote
the FS number purely as a guideline. My personal approach in dealing with
grey tones is to collect as many photos as possible and use the
Mark-One-Eye-Ball judgment to mix the paints and test sprayed on plastic
strips. When dried, one will realize how much the differences are between
wet and dry status of the paints. And it is always a matter of personal
preference to prepare a second set of grey paints in a darker tone to
stimulate the shadowing areas of the model.
There was an article in Scale
Aircraft Modelling (from UK) about 15 years ago that deals with the color
tones effects on scaled down objects. For an aircraft model of 1/48th
scale, it is like looking at the real one from a distance of 48 feet which
results the color tones to be lightened by about 10-15% (I have retraced
the chart to attach here as a reference of Model
 Scale Color*). Whether or
not a third set of paints is required in order to depict the hi-lighted
areas is up to the individual modelers as well as the selected color
scheme. In this T-38 only a slightly darkened sky grey was applied to the
lower fuselage as the dark grey is already very dark by itself it is no
point to use a darker grey to stimulate an already very dark grey. No
hi-lighted grey was used either as the T-38 is formed purely by complex
curves from head to tail (except the wing areas whereas in this case the
wing area is occupied mainly by the sky grey which is by itself matched the
off-white closely) which reflects enough hi-lights from any angles.
Scale Color*). Whether or
not a third set of paints is required in order to depict the hi-lighted
areas is up to the individual modelers as well as the selected color
scheme. In this T-38 only a slightly darkened sky grey was applied to the
lower fuselage as the dark grey is already very dark by itself it is no
point to use a darker grey to stimulate an already very dark grey. No
hi-lighted grey was used either as the T-38 is formed purely by complex
curves from head to tail (except the wing areas whereas in this case the
wing area is occupied mainly by the sky grey which is by itself matched the
off-white closely) which reflects enough hi-lights from any angles.
 In
summary, if we employed all the above tactics we usually termed it as the
oil-painting approach - to stimulate a certain kind of 3-D effects on a 2-D
media (as the canvas in oil paintings), only this time we borrow the method
and applied it on a 3-D object. And if one did try to paint one model with
a touch of hi-lightening and shadowing tones the final effect is a model
featuring its color scheme with a depth-of-field?- the model looks more
solid, hence
presents itself against the background more prominently. The application
of paints was achieved by free hand spraying started with the sky grey.
With the after market decals had been applied and the canopies being masked
the whole model was sealed with a coat of semi-glossy clear (again, the
gloss of an object also obeys the distance rule that the farther the
distance from the object the shine reduces accordingly, plus the friction
generated between the airflow and the fuselage a new paint job will turn
semi-glossy after a few flights).
In
summary, if we employed all the above tactics we usually termed it as the
oil-painting approach - to stimulate a certain kind of 3-D effects on a 2-D
media (as the canvas in oil paintings), only this time we borrow the method
and applied it on a 3-D object. And if one did try to paint one model with
a touch of hi-lightening and shadowing tones the final effect is a model
featuring its color scheme with a depth-of-field?- the model looks more
solid, hence
presents itself against the background more prominently. The application
of paints was achieved by free hand spraying started with the sky grey.
With the after market decals had been applied and the canopies being masked
the whole model was sealed with a coat of semi-glossy clear (again, the
gloss of an object also obeys the distance rule that the farther the
distance from the object the shine reduces accordingly, plus the friction
generated between the airflow and the fuselage a new paint job will turn
semi-glossy after a few flights).
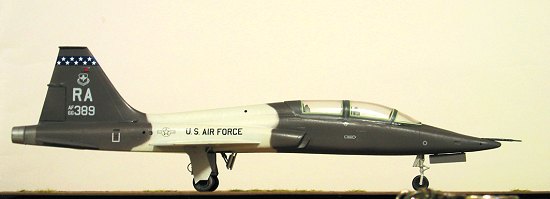
| CONCLUSIONS |
As a whole, this is not an easy
build. The breakdown of parts between injection ones and the resin ones
needs the modelers to do a lot of filling and sanding. The exact
positioning of canopy opening mechanisms are not clearly illustrated even
the modeler chooses to build the aircraft in open cockpit version. The
main landing gears need careful cleaning and
 enhancement. Then the air
intake cross section is not oval enough that one has to sand it to a more
rounded cross section. Having said all these it is still a quantum leap of
improvement from the Fujimi kit and worth the labor and time of the modeler
to make the Sword kit into an acceptable representation of the T-38. This
is far from a perfect kit but what's the point of building a perfect kit if
one aims to learn from overcoming difficulties.
enhancement. Then the air
intake cross section is not oval enough that one has to sand it to a more
rounded cross section. Having said all these it is still a quantum leap of
improvement from the Fujimi kit and worth the labor and time of the modeler
to make the Sword kit into an acceptable representation of the T-38. This
is far from a perfect kit but what's the point of building a perfect kit if
one aims to learn from overcoming difficulties.
*To quote from Scale Aircraft Modelling, vol.12, no.11, Aug 1990, the
meaning of model Scale Color is as follows:
If the size and color of the full size object varies with distance (or
scale), then at some point along the line of reduction a model must equal
that same size and color. Since a small scale (1/48) model viewed at the
ideal 10 to 12 inches from the eyes is almost exactly the same size as the
full size object at a distance of 48 feet. Under these circumstances the
model represents the identical size, shape and coloring of the full size
object at that range and under the same lighting condition. The colors
involved are therefore reduced Value Hues and this is termed as the model
Scale Color.
February 2005
If you would like your product reviewed fairly and quickly, please contact me or see other details in the Note to Contributors.