Revell 1/72 F-22A Raptor
| KIT #: | 04386 |
| PRICE: | $22.00 |
| DECALS: | Seven options |
| REVIEWER: | Carmel J. Attard |
| NOTES: |
| HISTORY |
There is a brief but good history about the Raptor appearing in the preview and therefore there is no point in repeating.
| THE KIT |
 The list of
combat jets continues to expand with recent release by Revell of the Lockheed
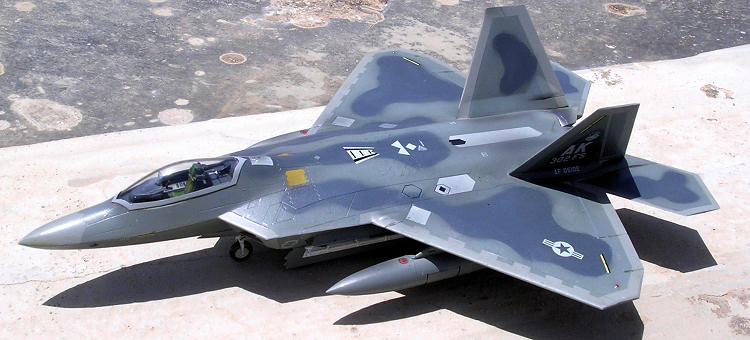
F-22 Raptor. The kit is moulded in good quality light grey plastic and
represents in every detail the latest multi-role combat aircraft now in active
service with the USAF. The few visible panel lines and fin detail are well
represented. The kit parts come in separate sealed bags which avoid any risk of
scratching the smooth surfaces of the kit parts. In spite of the large number of
parts that makes up the kit, there is a simplified method of assembly by
following the sequence of stages in the 12 page instruction sheet. The fit of
parts is so precise that it is worth noting, a clear indication of the state of
the art method used to produce the kit.
The list of
combat jets continues to expand with recent release by Revell of the Lockheed
F-22 Raptor. The kit is moulded in good quality light grey plastic and
represents in every detail the latest multi-role combat aircraft now in active
service with the USAF. The few visible panel lines and fin detail are well
represented. The kit parts come in separate sealed bags which avoid any risk of
scratching the smooth surfaces of the kit parts. In spite of the large number of
parts that makes up the kit, there is a simplified method of assembly by
following the sequence of stages in the 12 page instruction sheet. The fit of
parts is so precise that it is worth noting, a clear indication of the state of
the art method used to produce the kit.
| CONSTRUCTION |
There are 61
stages of construction and each one is well illustrated making it easy to
follow. The assembly starts with the 4 part filigree ejection seat and cockpit
interior and colour detail clearly marked for a careful paint job as we go
along. Having a complete cockpit the next stage is the twin jet exhaust nozzle
and the intake ducts that snake upwards and inwards concealing the engine face
from the radar compartment and away from the weapons bay. There are three
internal weapons bays having detailed interior consisting of reinforced brackets
integrally cast against the bay walls. The main weapons bay carries AMRAAM
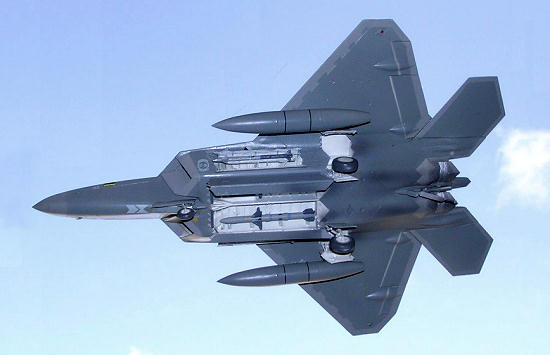 guided missiles or a combination of AMRAAMs and GBU-32 JDAM bombs. The outer two
weapons bays carry sidewinders each of which is mounted on an internal rail. The
three separate weapons bay housings fit very well to the lower fuselage which is
split horizontally. The wheel wells and intake ducts sub assemblies also fit to
the lower fuselage section. The cockpit assembly is inserted and glued to the
upper fuselage half. Before closing the fuselage the tail planes are located in
place which can be made moveable if so desired. No nose balance weight is
needed. There is a choice of the rear engine exhaust clam shell doors. The next
stage is the nose wheel, and this consist of six detailed items and two wheel
doors. The interior wheel well structural detail remains visible when the doors
are in place. A scrap view shows the position of the wheel doors in relation to
the main wheels. The only spot that one needed to attend to was the rear of
cockpit detail part which houses the cockpit hinge mechanism. I have found that
in order to close the canopy, part item 46 required trimming down until the
canopy rests in place. However I was unsure if it was the kit or me but still it
was a simple problem to sort out. The hydraulic lift mechanism requires to be
shortened as it is supplied in the extended position for an open canopy. A
crystal clear canopy is provided and is fitted at the final stage. Going back to
the weapons bay, my choice went for two AMRAAM missiles. I did not select the
sleek missiles supplied with the kit but the instructions showed a different
AMRAAM, an AIM-120. This I have available in a weapons set and my choice fell on
this type of weapon which the instructions show in stage 60. Each of the two
side weapons bay take a single AIM-9M or AIM-9X missiles.
guided missiles or a combination of AMRAAMs and GBU-32 JDAM bombs. The outer two
weapons bays carry sidewinders each of which is mounted on an internal rail. The
three separate weapons bay housings fit very well to the lower fuselage which is
split horizontally. The wheel wells and intake ducts sub assemblies also fit to
the lower fuselage section. The cockpit assembly is inserted and glued to the
upper fuselage half. Before closing the fuselage the tail planes are located in
place which can be made moveable if so desired. No nose balance weight is
needed. There is a choice of the rear engine exhaust clam shell doors. The next
stage is the nose wheel, and this consist of six detailed items and two wheel
doors. The interior wheel well structural detail remains visible when the doors
are in place. A scrap view shows the position of the wheel doors in relation to
the main wheels. The only spot that one needed to attend to was the rear of
cockpit detail part which houses the cockpit hinge mechanism. I have found that
in order to close the canopy, part item 46 required trimming down until the
canopy rests in place. However I was unsure if it was the kit or me but still it
was a simple problem to sort out. The hydraulic lift mechanism requires to be
shortened as it is supplied in the extended position for an open canopy. A
crystal clear canopy is provided and is fitted at the final stage. Going back to
the weapons bay, my choice went for two AMRAAM missiles. I did not select the
sleek missiles supplied with the kit but the instructions showed a different
AMRAAM, an AIM-120. This I have available in a weapons set and my choice fell on
this type of weapon which the instructions show in stage 60. Each of the two
side weapons bay take a single AIM-9M or AIM-9X missiles.
| COLORS AND MARKINGS |
Full colour
painting guide is provided quoting Revell mix for each respective 3 tone grey
camouflage. This is the usual Revell habit to mix paints in proportions out of
several Revell paints. FS numbers are quoted FS36375, FS 36251 and FS36176 so
that I went for paints I am more used to. These made things easier than going
about mixing paints in % proportions indicated. In general as far as the kit
assembly goes my only reservation is that the locating holes to take the various
pylons in main bay are
 not deep enough and this also applies for the holes to
take the undercarriage legs. So it is advisable to drill deeper using 1mm drill.
Besides stores, the sprues also contain two large under-wing fuel tanks that
continue to decorate the model. With the undercarriage legs in place one can go
about painting the wells and weapon bays semi gloss white, leaving the wheels to
be fitted at a later stage.
not deep enough and this also applies for the holes to
take the undercarriage legs. So it is advisable to drill deeper using 1mm drill.
Besides stores, the sprues also contain two large under-wing fuel tanks that
continue to decorate the model. With the undercarriage legs in place one can go
about painting the wells and weapon bays semi gloss white, leaving the wheels to
be fitted at a later stage.
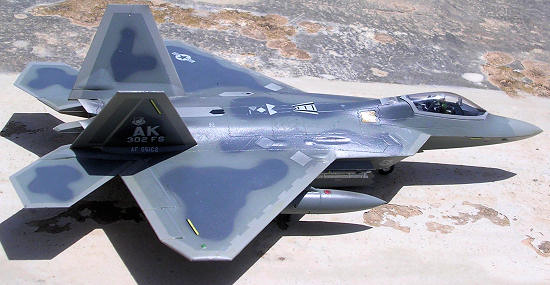
The decals are printed in Italy for Revell GmbH contain
no less than 166 items and covers the first three operational squadrons with
ample of stencilling to spread all over the surfaces. Decals also provide
instruments for the main panel and side consoles. I found that those detail
decals that go on the upper fuselage are a little too conspicuous which needed
toning down with a mist of airbrush mix of varnish with a little grey while
those that go on the underside were almost invisible when applied on the lighter
grey underside. The squadron markings are those of 94th commander
aircraft based at
| CONCLUSIONS |
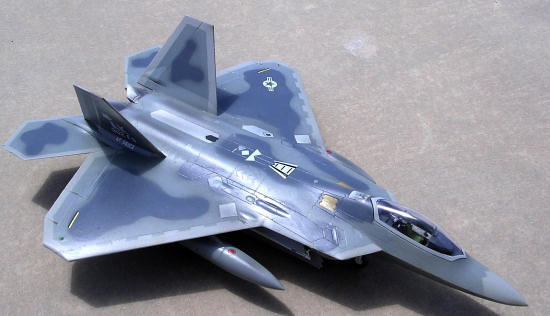
 This
is an impressive model which greatly differs from the YF-22 prototype seen in
early releases by other brands. The kit goes together very well particularly the
difficult intake ducts that fitted so well and is a clever piece of design
engineering with a convincing result. No filler whatsoever was used throughout
the build. I regard this kit as a wonderful release by Revell which makes into a
truly pleasing model, a must for the present day military model enthusiast.
This
is an impressive model which greatly differs from the YF-22 prototype seen in
early releases by other brands. The kit goes together very well particularly the
difficult intake ducts that fitted so well and is a clever piece of design
engineering with a convincing result. No filler whatsoever was used throughout
the build. I regard this kit as a wonderful release by Revell which makes into a
truly pleasing model, a must for the present day military model enthusiast.
November 2008
Copyright ModelingMadness.com. All rights reserved. No reproduction in part or in whole without express permission.
If you would like your product reviewed fairly and quickly, please contact me or see other details in the Note to Contributors.