| KIT #: | 09872 |
| PRICE: | $ |
| DECALS: | Three kit options |
| REVIEWER: | Nicolai Plesberg |
| NOTES: | Two aircraft reviewed |
| HISTORY |
While
the development history of this Swedish fighter jet is already covered well in
other reviews, I will here concentrate on the Draken story seen from a Danish
perspective both regarding service entry as well as the background for the Royal
Danish Air Force (shortened to “Air Force” from now on as it is a damned long
one to write)‘s acquisition of it.
 attrition
rate while in Danish service. By 1967 19 aircraft had been lost in accidents and
thereby reducing the Air Force’s operational strength by one third. This was of
course unacceptable to the Air Force, and as
attrition
rate while in Danish service. By 1967 19 aircraft had been lost in accidents and
thereby reducing the Air Force’s operational strength by one third. This was of
course unacceptable to the Air Force, and as
 state
had chosen to buy hardware originating from outside of the alliance. Saab,
however, had not come to this by ease, but they had been willing to suit the Air
Force’s requirements best. They had to totally redesign the Draken so that it
could carry bombs and a greater fuel load at a longer range, than it originally
was designed for.
state
had chosen to buy hardware originating from outside of the alliance. Saab,
however, had not come to this by ease, but they had been willing to suit the Air
Force’s requirements best. They had to totally redesign the Draken so that it
could carry bombs and a greater fuel load at a longer range, than it originally
was designed for.
AR-103
on 3rd of August 1971. Cause of crash: super stall. Pilot ejected
safely.
A-003 on
20th of September 1974. Cause of crash: compressor failure. Pilot
ejected safely.
A-013 on
21st of November 1974. Cause of crash: electric and nozzle failure.
Pilot ejected safely.
 AR-101
on 24th of May 1977. Cause of crash: compressor failure. Pilot
ejected safely.
AR-101
on 24th of May 1977. Cause of crash: compressor failure. Pilot
ejected safely.
AT-159
on 25th of October 1977. Cause of crash: flew into the sea. Pilots
killed.
AT-161
on 27th of June 1978. Cause of crash: hit by a lightning. Pilots
ejected safely.
A-016 on
9th of June 1980. Cause of crash: flew into the sea. Pilot killed.
AT-152
on 5th of October 1993. Cause of crash: ran out of fuel! Pilots
ejected safely.
| THE KIT |
Upon
opening the box you are greeted with 16 sprues including 3 clear sprues. As you
can construct either a Danish RF-35 or a Swedish S35E some of the sprues are not
in use for this build. As the Hasegawa 1/48 Draken kit is already well known I
will concentrate on the “Danish” sprues included in this kit:
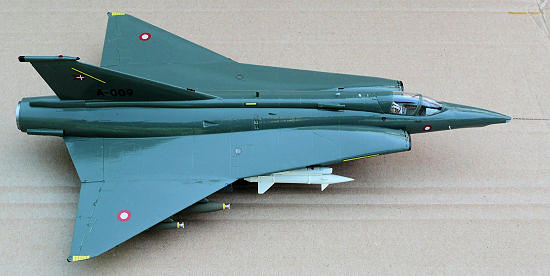
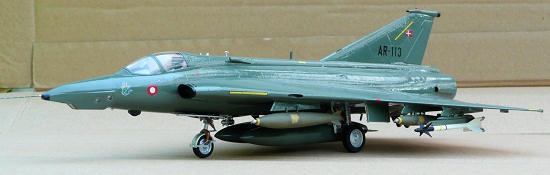
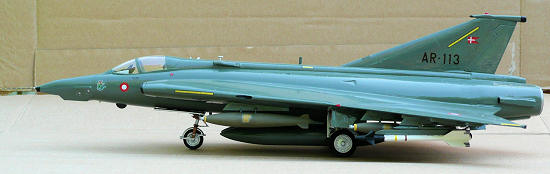
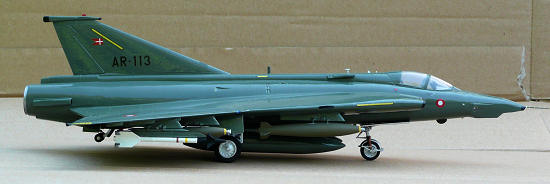
RF-35
AR-113 Draken Team Karup
(and not ESK 729 as Hasegawa has
depicted)
RF-35
AR-111 ESK 729
RF-35
AR-108 ESK 729
One
remark of the first option:
One
remark of the third option:
If you
for some reason wishes to model AR-108, the “0“
in “ AR-108 “ is in a wrong style; no parallel sides, just a plain oval
shape (photos of the real thing will confirm that).
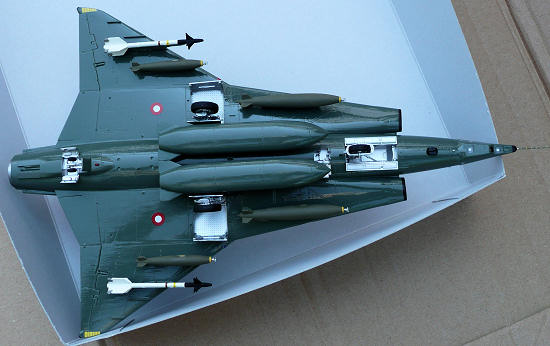
All in all a well molded and designed kit but I find that it has indeed some flaws (most of these are actually of paint related character) and if build straight from the box it will result in a satisfying looking model; but the usual (Hasegawa style) lack of weapons … well maybe it’s just me being overcritical, but with a little patience and some modeling skills it can be made in to a striking model of this Cold War warrior. So if you are interested in how to build a Danish Draken please follow the next few paragraphs on what I did and which difficulties I had to face.
| CONSTRUCTION |
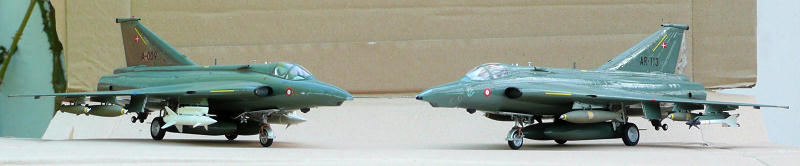
As I
bought three examples of this kit, my intention was to construct one of each
version. The two single seaters are dealt with here. The external differences
are limited to the nose section and armament carriage.
The two
seater is on stand-by until I get more information on the second cockpit and
other differences that version will display.
I
started by removing all the cockpit parts, except the control stick, plus the
fuselage halves from the sprues and cleaned them up. The throttle levers were
glued in first then I did some dry fitting to see how things would come
together. It turned out nicely so I went on painting the interiors. And it’s
exactly here I found the first flaw, because the instruction sheet tells you the
interior color to be FS34079 green. I can’t really answer for the correctness of
this color applied to the Swedish version, as I haven’t seen one, but Danish
Drakens were definitely NOT green in the cockpit but grey. A few years ago I was
lucky enough to be able to photograph a Draken’s
“main office” (correctly guessed, AR-113). When I had transferred the
photos to my computer, I took my paint stirring sticks to all my grey paints and
compared them with the pictures I had taken and in combination with the fact,
that while I took the cockpit photos, I also stood several minutes trying to
memorize the cockpit colors appearance. I came to the conclusion that Humbrol 64
Light Grey was the way to go. And so I went on painting the interiors ’64 Light
Grey. The rudder pedals were painted Silver (Humbrol 11) and after drying glued
in place, then the sticks were glued in place and painted Flat Black (Revell 8)
together with the throttle levers and their bases.
 The
instrument decals went on next, but I do recommend using a decal softener of
some kind, because I felt when pressing the decals down over the panel details
with my decal cloth they were stretched to the limit but luckily enough there
was no breakage. Phew! The dried decals were then sealed with Humbrol Satin Cote
(non yellowing stuff) and the panels glued in place.
The
instrument decals went on next, but I do recommend using a decal softener of
some kind, because I felt when pressing the decals down over the panel details
with my decal cloth they were stretched to the limit but luckily enough there
was no breakage. Phew! The dried decals were then sealed with Humbrol Satin Cote
(non yellowing stuff) and the panels glued in place.
I then
drilled the holes for the pylons and the antenna Q2 in the lower fuselage
halves. The interiors were glued to the bottom fuselage halves then glued the
top and bottom halves together. On the one which should become the F, there was
a slight misalignment from the nose to the port intake on approx half a
millimetre. Despite my dry fitting sessions this happened! “Well that’s a job
for the filler tube to fix”, I said to myself. The RF fuselage was ok – no
misalignments of any kind.
The
outer wing sections were next issue. The parts were cut off the sprues, cleaned
up and, after drilling the holes for the pylons, glued together. While the
fuselage joints were treated with several filling and sanding sessions (and a
bit tedious I might add) the forward inserts and auxiliary air intakes blended
in nicely by the way, I removed wingtips from the sprues, cleaned and glued them
in place. As I had feared, the fit was not perfect so filler plus sanding was
also needed here to blend them in properly. I also plugged the slot for the
Swedish antenna L13 and sanded smooth.
The fin
was next, and here an improvement can be made that is also valid for any other
Draken one may be modeling some other time. I am talking about the small intake
at the base of the fin, which is an air coolant intake for the afterburner
section on the real thing. Before gluing the fin halves together I removed the
solid plastic with a small half round needle file so a thin edge remained. Then
the fin is glued together and after drying, four small and very thin lamellae
are cut out and glued in place using a very small pair of tweezers. These
lamellae were made from small pieces cut out from flakes of flash! Flash is rare
on modern kits, but if you encounter it don’t throw it away -
save it! It is usually much thinner than
one can sand down manually. I once made some pitch and yaw vanes out of flash
and added them to the pitot probe on a MIG-21 I did many years ago and it looks
great!
Now back
to track when these lamellae are dry the area was painted Flat Black with a very
fine brush (I am not an airbrusher!). The RWR was next, glued together (a
little sanding and filler was also necessary here), then glued to the fin and
blended in with the usual filler and sanding
The main
air intakes were next. First they were sanded down slightly on the i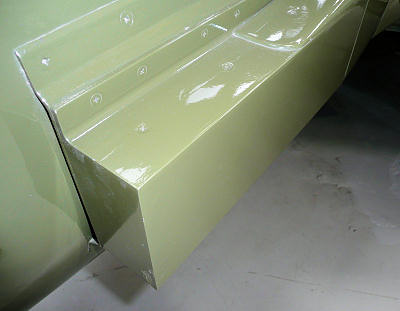 nside
with a small round needle file, blown clean with compressed air as it turned out
to be the only way to remove the dust, then painted Silver. When that was dry
the outer approx five millimetres or so of the intake interiors were painted
Flat Black. This is more than Hasegawa shows in the instructions, but on all the
photos of the real thing that I have seen without covers it seems to be the
case. When fitting the intakes to the fuselage I had to cut down the locating
tab (in fact almost removing it completely), I could minimise the use of filler
in this area because they fitted a bit better after that surgery.
nside
with a small round needle file, blown clean with compressed air as it turned out
to be the only way to remove the dust, then painted Silver. When that was dry
the outer approx five millimetres or so of the intake interiors were painted
Flat Black. This is more than Hasegawa shows in the instructions, but on all the
photos of the real thing that I have seen without covers it seems to be the
case. When fitting the intakes to the fuselage I had to cut down the locating
tab (in fact almost removing it completely), I could minimise the use of filler
in this area because they fitted a bit better after that surgery.
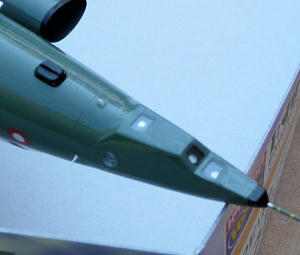
The tail
cone was next issue. Here it may again pay off to do a little extra. Before
applying any glue I started with a small file to round off the intakes on these
pieces (correctly guessed also cooling intakes for the afterburner on the real
thing) and a round one for the inside of the intake as it is a tad thick. The
other end places the chaff and flare dispensers carried by Danish aircraft (and
later Austrian as well), but being too angular in shape, a few strokes with a
flat file can make them look better. A photo of the real thing, which I have
included here, is a must to do it correctly. Before cone halves are glued
together, the interiors of the abovementioned intakes were painted Flat Black.
The cone itself still has the famous horrific fit to the fuselage, but I was
able to blend it in and saved the airbrake outlines in the process!
Now it
is getting interesting, because the nose sections are where all the fun begins.
 RF
(camera) nose:
RF
(camera) nose:
I
started with detaching the nosepieces and cleaned them up. Then I took some
plastic sheet and cut it out so it would cover the camera ports in the sides and
bottom of the nose then painted them Flat Black. When dry I placed them (without
glue!) inside the nose and with a needle marked the center of each camera port
hole and with the other end of the needle made a slight dab with Silver paint on
top of these markings, to represent the camera lenses. Then window pieces T4, T5
and T7 were located in their respective holes in the nose and secured with two
tiny drops of glue at each end. I finished the camera windows by gluing the
“camera sheets” on top of windows. Then the nosepieces were glued together and
the bottom “camera sheets” glued in afterwards. To finish the nose weight (
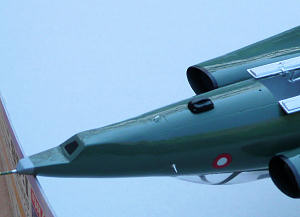
F (laser) nose:
As above
I detached the nosepieces, cleaned them up, cut out some pieces of plastic sheet
which were bend a little to fit the inside of the nose. But unlike before, I
simply glued them inside the nose to cover the port holes.
Some pieces are also needed in the
bottom front part of the nose, because risk of sanding through the plastic is
present. Then the nosepieces were glued together. When dry the next task is
simply to sand the new nose to shape. If you look close at photos of the real
thing it is evident, that the “bulge” on top of the RF nose is to be removed as
the “laser nose” has a definitely more continuous curved con-tours so this is
simply sanded off. The “cheeks” (where the camera ports are located) are to be
sanded flush so the nose appears more streamlined seen from the front. Seen from
the side, from the pitot probe and to where the laser rangefinders window is,
that section needs to be thinner than the RF nose and sand through the material
I did that’s why plastic sheet on the inside was cleverly attached before I
began so that the nose don’t get
stuffed with filler! After many many
 filling
and sanding sessions the laser nose was finished just the nose weight remained.
It was glued in but unfortunately for me I used too much glue (I use a solvent
based contact glue for this sort of job) with the result of some nasty sink
marks appearing especially at the upper right hand side of the nose. Damned! At
first I didn’t know what to do, I even considered to employ the Swedish RF nose
(sprue G), but I eventually repaired the damaged nose, after several more
filling and sanding sessions were employed. Finally I could glue the nose on the
fuselage with the consciousness that the nose weight wouldn’t go anywhere! But
for those who might not have caught it yet; use either a
water based glue or epoxy
glue for this sort of job, then you should be able to avoid that extra work!
filling
and sanding sessions the laser nose was finished just the nose weight remained.
It was glued in but unfortunately for me I used too much glue (I use a solvent
based contact glue for this sort of job) with the result of some nasty sink
marks appearing especially at the upper right hand side of the nose. Damned! At
first I didn’t know what to do, I even considered to employ the Swedish RF nose
(sprue G), but I eventually repaired the damaged nose, after several more
filling and sanding sessions were employed. Finally I could glue the nose on the
fuselage with the consciousness that the nose weight wouldn’t go anywhere! But
for those who might not have caught it yet; use either a
water based glue or epoxy
glue for this sort of job, then you should be able to avoid that extra work!
Now with
all those sub assemblies done it was time to glue on the wings. First
(naturally) checking the fit and I found a little to be removed from the tabs
since there was some misalignment also here. But the outer wing panels else went
on with ease, although a little filler was needed, so did the fin (at the front)
and now both kits sure looks like a Draken.
Before I
moved on with construction, I cleaned up the models from all that sanding dust
and fingerprints so a mild detergent applied with a soft brush, then cleaning
with clean water and wiped the water off with an antistatic cloth so that no
dust settled.
You
could say it was about time to paint, however I prefer to mount the gear first,
so the model can stand and dry properly without something to ruin the paintwork
(like a box lid edge or similar objects). The gear went together without any
real obstacles, but when it came to paint it there was a bit more to do because
it is not just plain silver all over the place as the instructions suggest. The
main legs of both main gears and nose gear were painted Revell 91 Steel
(although a white grey color could probably do this as well, as it is difficult
to see on photos what the color is). The forward leaning strut as well as the
little strut mounted behind on the main leg on both main gears were painted
Humbrol 55 Bronze, as was the fork on the nose gear and part L2 as well. The
forward supporting struts of the nose gear was painted Silver Revell 90 together
with the splash guard including its supporting struts. The oleos went FS17178
Humbrol 191 Chrome Silver. The propeller
for “nødmøllen”, the “emergency mill” (as the RAT was nicknamed among Air Force
personnel), had the blades thinned down with a flat needle file and glued to the
housing. The housing it self was painted Steel and both ends of the housing
including the propeller painted Silver. A small heat stretched bit was attached
as the power cable at the rear and painted Black.
 Wheel
hubs went Silver and the tires Flat Black (including those of the tail unit of
course). The brakes on the backside of main wheels were painted Steel. Wheels
were then glued to the gear legs and gear doors painted silver together with
wheel wells. The two landing lights (R8) were extensively modified to match
photos then glued in place and the two doors (B18 and B19) glued to gear legs.
For ease of access the gear doors were painted green on the outside (more on
this color later). When all that fiddly detail painting was over the gear plus
mill went on with no further hassles. All the other gear doors were also
attached at this stage (and of course had been painted Silver on the inside).
Wheel
hubs went Silver and the tires Flat Black (including those of the tail unit of
course). The brakes on the backside of main wheels were painted Steel. Wheels
were then glued to the gear legs and gear doors painted silver together with
wheel wells. The two landing lights (R8) were extensively modified to match
photos then glued in place and the two doors (B18 and B19) glued to gear legs.
For ease of access the gear doors were painted green on the outside (more on
this color later). When all that fiddly detail painting was over the gear plus
mill went on with no further hassles. All the other gear doors were also
attached at this stage (and of course had been painted Silver on the inside).
The last thing I did before painting was to mount the pylons and the outer wing fences. Forget the kit pylons as they are strictly for the Swedish version. The only items I did recycle, were the Sidewinder launch rails, as these are close enough. The pylons I bought aftermarket are made by Maestro Models, cast in resin and rather detailed including the pylon attachment points (for the weapons that is). Some fitting and shaving off a bit was necessary to get a proper fit. The only downside I find with resin is, that one has to use CA glue to attach it! Well despite that I succeeded in getting them placed correctly, using the holes I had drilled earlier as the pylons are without mounting tabs. The holes act solely as a guide on where to attach them. Some filler was needed to blend them in properly. The three under wing fences ( M7, M8 and M9) were also glued in place prior to painting (and this partly because the fit here is also not without gaps). Regarding the inner fence, M7, it was actually only the outer tip that was used, as the pylon was placed where it should be. However (again I could say) photos show clearly that the wing fence is partially hidden inside the pylon so this was the way to come around this issue. I then cleaned the airframes once more … and now it’s time to paint!!
| COLORS & MARKINGS |
I wanted
to see if the surface was without any glitches so I primed the whole of both
airframes with Revell 75 Grey. One layer was sufficient. It turned out to be an
okay job I had done so far, so the green light to go ahead was given (did
you catch that?!). Regarding the green color which Hasegawa refers to as being
FS34079, but on the real thing the surface was gloss, at least when freshly
applied from the paint workshop. Anyway when examined closer, I feel that this
color is too dark and has too much green in it; it’s more in like olive with a
brownish tint. But it turned out to be no real problem because the solution was
already at hand. My dad had for some 25 years ago build a sailing model of one
of the fast motor torpedo boats of the Søløven-class of the Danish navy which
were painted green and it turned out this way, that the combined Danish armed
forces (Air Force, Navy and Army) was in to common purchases regarding c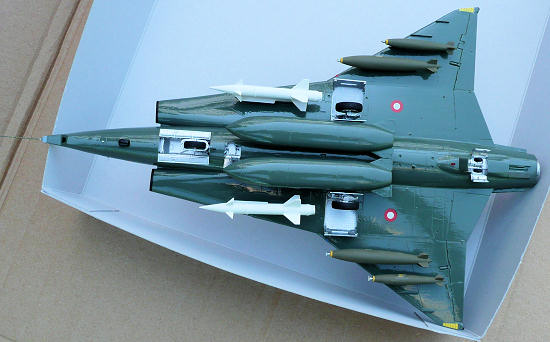 amouflage
colors of paint in the late sixties (supposedly to save some taxpayer money), so
the color the Navy were using for its ships, was also used by the Air Force as
is. The paint was, by the way delivered by the Danish manufacturer of ships
paints, Hempel. My dad was gracious enough to provide me with some of this green
paint he had used to his model. A tip: when mixing this color to its correct
appearance, it can be checked the following way by taking a painted object
outside: on a sunny day the color appears green; when overcast it appears
brownish!
amouflage
colors of paint in the late sixties (supposedly to save some taxpayer money), so
the color the Navy were using for its ships, was also used by the Air Force as
is. The paint was, by the way delivered by the Danish manufacturer of ships
paints, Hempel. My dad was gracious enough to provide me with some of this green
paint he had used to his model. A tip: when mixing this color to its correct
appearance, it can be checked the following way by taking a painted object
outside: on a sunny day the color appears green; when overcast it appears
brownish!
Now back
to track, the whole of both airframes was painted with this green color. It
needed several layers before it covered perfectly. When that was dry the whole
surface were given a coat of Humbrol Gloss Cote in preparation for the decals.
Black was used to detail paint some areas; both tips of the RWR, both wing tips,
but not as much as instructions show (another glitch), both cannon ports and the
area below the pitot probe of the RF nose; the same area on the laser nose was
painted Humbrol 128 Grey (FS26320).
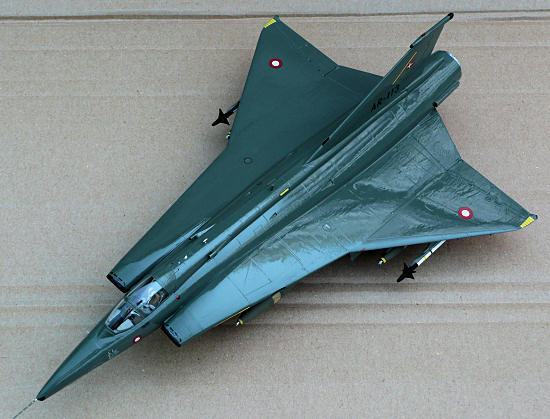
I used
the kits decals which turned out okay although some minor glitches appeared; the
light stripes for example is too yellow, but I think it’s a common mistake that
kit manufacturers do regarding those things. Also decal 13 should have been
different at the port side; the stencil being large enough to be readable … and
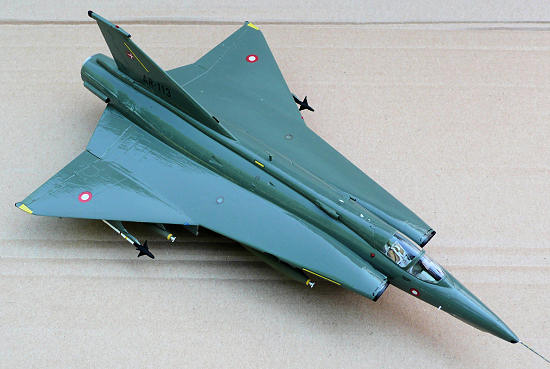
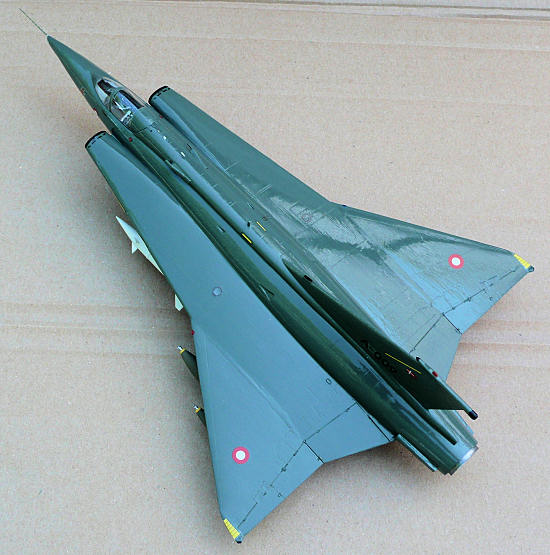
understandable!! The biggest
blunder on the instruction sheet is however the placement of the Danish roundels
on the underside of the wing; they should be placed like on Swedish aircraft:
behind the main wheel bays and not as
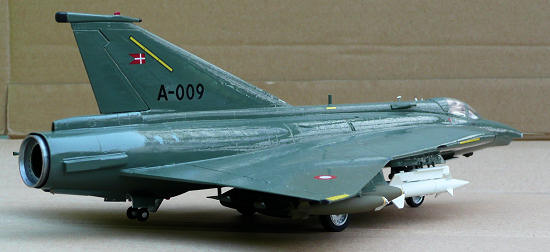
shown in the instructions! All though researchers from Hasegawa did visit the
Danish Veteran Aircraft Museum at Stauning Airport, where the A-009 is
exhibited, to check things out, but they apparently didn’t bother to go down on
their knees to check the underside of the wing! If they had done so, they
wouldn’t have made this error!
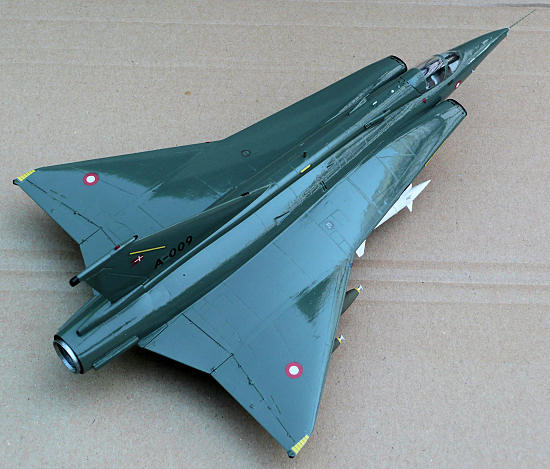
Now back
to track, the only thing I did not have was the squadron badge of ESK 725. The
shield detail is different from that of ESK 729. Luckily it turned out okay
since, in parallel with this project, I build a Swedish J35J from the first
release (07241). I only bought it as it proclaimed “danske decals”, Danish
decals outside on the box. It turned out to be an A4 sized zip lock bag with a
placement guide (but no painting instructions) and a tiny decal sheet
containing the most important decals (national insignia, code letters and
numbers, a few (very!) stencils, but most importantly the squadron badge of ESK
725! However it was largely
 useless
(a silver outline being the most prominent error), but again genius struck me; I
simply cut out the shield detail and put it on top of the shield detail of the
ESK 729 badge from the kit and voila … ESK 725 badge! The text on the kit badge
saying “ESK 729 “ together with that squadron’s slogan is anyway too small to be
readable. The last thing that went on (the F that is), was a piece of black
painted white decal spare cut out to simulate the window that the laser
rangefinder “looks” through.
useless
(a silver outline being the most prominent error), but again genius struck me; I
simply cut out the shield detail and put it on top of the shield detail of the
ESK 729 badge from the kit and voila … ESK 725 badge! The text on the kit badge
saying “ESK 729 “ together with that squadron’s slogan is anyway too small to be
readable. The last thing that went on (the F that is), was a piece of black
painted white decal spare cut out to simulate the window that the laser
rangefinder “looks” through.
After
decals got dry and I had cleaned the surface for any excess decal glue, I sealed
them off with Humbrol Gloss Cote (again the non yellowing stuff). It was
originally my plan to give the models a satin finish, but after considerations I
did them the gloss way. The exception was in fact all the black areas (tips of
RWR, wingtips, cannon ports etc.) which were given a Satin Cote. When I later
showed the finished models to my dad, he said that the light reflexes in the
surface (as some of the pictures included in this review may show) were exactly
as they had been on the real planes! A greater compliment can a modeler not
receive!
| FINAL CONSTRUCTION |
With the
paintjob and decaling job well done it was time to finish the models. Ejection
seats, canopies, exhaust pipes and smaller details as well as weapons and the
external fuel tanks were in the queue.
First to
the ejection seats. I didn’t think that the kit provided seat is adequate at
least regarding the seat and back cushions so I went aftermarket also here. I
bought the seat made by Aires, which consists of a resin seat with PE seat
harnesses and other details. After removing the casting blocks, I painted the
seat frames Silver and seat cushions Olive Drab Humbrol 155 (FS34087),
 the
head rests Humbrol 149 Dark Green (FS34092) and the back cushions Humbrol 93
Desert Yellow (sorry, I have no FS number here). The firing handles were painted
Black / Yellow striped all though they are almost invisible when the seat is in
place. The harness pieces were cut from the fret one at a time and the plan was
to build as complete a set of harnesses as possible then glue it in place.
Unfortunately the drawing that Aires provide is not very good as I feel there
are several “black spots” where it is not clear on how to place
things exactly, at least in my view. The final result was … let me just say it
was the best achievable result that I could hope for! The harness was painted
Vallejo White Grey 70993 and buckles Silver. I might add here that this was my
first try in aftermarket seats, but apart from that the drawings should be in
such a quality that beginners should be able to do the job without spending an
entire Saturday (and also a part of the Sunday as well) to fiddle around with
this! If I thought my troubles with the Aires seat was over, I was wrong! The
seat simply didn’t fit into the cockpit! After all the trouble with the belts
this happened! “ Well “, I said to myself,
“ I have gone this far but I must see it through” so I broke off the two
feet supports (parts 10 and 11 on the fret), took my knife, and simply shaved
off material of the lower part of the seat in each side, checking regularly if
it would fit into the cockpit. When that goal was achieved, with about half a
millimetre removed in each side, I glued back on the feet supports, repainted
the damned thing and squeezed it into the cockpit and securing it at the back
with a drop of CA glue. Yuk!
the
head rests Humbrol 149 Dark Green (FS34092) and the back cushions Humbrol 93
Desert Yellow (sorry, I have no FS number here). The firing handles were painted
Black / Yellow striped all though they are almost invisible when the seat is in
place. The harness pieces were cut from the fret one at a time and the plan was
to build as complete a set of harnesses as possible then glue it in place.
Unfortunately the drawing that Aires provide is not very good as I feel there
are several “black spots” where it is not clear on how to place
things exactly, at least in my view. The final result was … let me just say it
was the best achievable result that I could hope for! The harness was painted
Vallejo White Grey 70993 and buckles Silver. I might add here that this was my
first try in aftermarket seats, but apart from that the drawings should be in
such a quality that beginners should be able to do the job without spending an
entire Saturday (and also a part of the Sunday as well) to fiddle around with
this! If I thought my troubles with the Aires seat was over, I was wrong! The
seat simply didn’t fit into the cockpit! After all the trouble with the belts
this happened! “ Well “, I said to myself,
“ I have gone this far but I must see it through” so I broke off the two
feet supports (parts 10 and 11 on the fret), took my knife, and simply shaved
off material of the lower part of the seat in each side, checking regularly if
it would fit into the cockpit. When that goal was achieved, with about half a
millimetre removed in each side, I glued back on the feet supports, repainted
the damned thing and squeezed it into the cockpit and securing it at the back
with a drop of CA glue. Yuk!
The
instrument panel shroud is painted Humbrol 64 Light Grey; only the upper part is
painted Flat Black as well as the sides on the HUD, another little glitch from
Hasegawa’s side. The windscreen and canopy went on next, it was painted (first
the interior color of course, then green) and glued on with Humbrol Gloss Cote
varnish applied with a very small brush as this guaranteed dries crystal clear,
as white glue, in my view, does not. The position lights (R3 and R4) and anti
collision lights were painted their respective colors (clear red for the port
position light and the two anti collision ones and clear blue for the starboard
position light). They were also attached with Humbrol Gloss Cote varnish. One
thing about the position lights; I found it would have been easier to remove the
plastic from the leading edges of the outer wing panels
before these are glued in place, as
it’s a lot easier to handle the outer wings alone than an almost completed model
where things are prone to break off! Also the remaining camera windows on the
RF, T2 and T3, were put in place; the fit was so tight that glue was
unnecessary, so I just used a bit of green paint around the edge to secure them.
The
other details were attached and final detail painting was okay with no further
incidents. The jet pipe was glued together and painted Jet Exhaust X504 from
Xtracolor, as was the surrounding area in the tail cone. However, after close
examination of various photos, I painted the outer most edge of the pipe Revell
91 Steel. It seems to me that the afterburner section was replaced from time to
time so a nice well tinted and burned pipe could also be almost natural metal
when new. I went for the last look.
 A thing
I added here was the small Satin Black colored contraption which is located on
the underside of the nose below the windscreen. This was made from scratch, as
it’s not included in the kit, but since it is so prominent and very noticeable
on photos, I felt I was bound to add it to my models also.
A thing
I added here was the small Satin Black colored contraption which is located on
the underside of the nose below the windscreen. This was made from scratch, as
it’s not included in the kit, but since it is so prominent and very noticeable
on photos, I felt I was bound to add it to my models also.
The fuel
tanks and weapons went together with no obstacles other than I had to buy all
three weapons sets from Hasegawa (Set A provided the bombs, Set B provided the
Bullpups and Set C provided the Sidewinders) to get the bombs and missiles I was
looking for, as my spares box in this scale is somewhat meagre (thanks
Hasegawa!). I had to enlarge the fins on the tanks a bit to the rear to match
photos as well as thinning them down a bit. All these items were painted as
instructions show, and glued to the pylons with CA glue; only the drop tanks
were glued using ordinary plastic glue. The last things fitted were the enhanced
stall indicator (at the starboard side below the windscreen front) and pitot
probe from Fine Molds made from turned brass and clearly superior to kit items.
The instructions in this fine aftermarket set is straight forward; no hassles at
all! The set contains two pitot probes; one short and one long plus two stall
indicators although only one is needed. Be aware that the short pitot probe is
not to be used on Danish aircraft and
the long one is actually too long for Danish Drakens (about
two millimetres), but I didn’t have the heart to cut it away, so fine is
the workmanship of it! These items were secured with a tiny drop of CA glue
after the respective holes had been drilled. The stall indicator (or AOA
according to the instructions) was painted Silver and the pitot probe green (as
the rest of the airframe) and with yellow bands around it. The yellow bands you
see around the probe are brush painted! The yellow color I used was by the way
Humbrol 99 Lemon.
| CONCLUSIONS |
 All the
other things went nicely together, though not without filler, but I have to say,
I took the liberty of some artistic freedom regarding the armament. It is not
entirely authentic with the Bullpups on the F-35, laser edition, because what I
have heard the missile was phased out of Air Force service in 1982 and the laser
upgrade took place on most of the aircraft in 1983-84. Also the placement under
the intake trunks seems a little out of order, but I tried to see how it would
look (dry fitting!) under the outer wings, as I have read they were attached,
and it was absolutely awful. The fin tips on the missile were almost scraping
the ground and it looked ridiculous. Without the mounting rail, the fins would
touch the bottom of the wing! It is hard to get photos of Danish Drakens
carrying live weapons so I chose the shown solution, but that’s a modelers
privilege to do so! However some modeling experience is definitely required to
do these kits as fit is far from perfect (just count the times were I have used
the word “filler”!).
All the
other things went nicely together, though not without filler, but I have to say,
I took the liberty of some artistic freedom regarding the armament. It is not
entirely authentic with the Bullpups on the F-35, laser edition, because what I
have heard the missile was phased out of Air Force service in 1982 and the laser
upgrade took place on most of the aircraft in 1983-84. Also the placement under
the intake trunks seems a little out of order, but I tried to see how it would
look (dry fitting!) under the outer wings, as I have read they were attached,
and it was absolutely awful. The fin tips on the missile were almost scraping
the ground and it looked ridiculous. Without the mounting rail, the fins would
touch the bottom of the wing! It is hard to get photos of Danish Drakens
carrying live weapons so I chose the shown solution, but that’s a modelers
privilege to do so! However some modeling experience is definitely required to
do these kits as fit is far from perfect (just count the times were I have used
the word “filler”!).
If I
have had the extra will to spend more money I would have disregarded the kit
decals and bought the sheet from Stoppel Decals with accurately colored light
stripes, full stencils as well and of course for a little extra the sheet with
the squadron badges, as they come on a separate sheet. But with $85 (converted
from the various currencies I paid for all this) I think that’s enough! But just
for clarity sake the kit decals is useable, but Stoppel Decals adds that little
extra touch.
Despite the fact that it took me 17 months to complete these models, I am very happy with the result and I’m looking forward to do another Hasegawa Draken kit some other time (and hopefully in a shorter time!).
| REFERENCES |
I would
like to thank my dad for letting me use some of that “ Danish Defence Green “
color so my models could get the right look!
Danish
Veteran Aircraft Museum (located at Stauning Airport)
Stoppel
Decals:
www.stoppel.dk/shop/frontpage.html
The National
Test Pilot School:
Nicolai Plesberg
August 2012
If you would like your product reviewed fairly and quickly, please contact me or see other details in the Note to Contributors.