Academy 1/48 Su-27 Flanker B
|
KIT # |
2131 |
|
PRICE: |
@30.00 |
|
DECALS: |
See review |
|
REVIEWERS: |
Alexander Sidharta, Andreas Pramaditya, and Iwan Winarta |
|
NOTES: |
Aftermarket decals used. |
Indonesian Bird of Prey : Sukhoi Su-27SK Flanker
|
HISTORY |
The Su-27
Flanker is a front-line fighter aircraft designed by Sukhoi Design
Bureau. Su-27 entered production in 1982 and still in service with 29
countries, including Indonesia and soon, Malaysia.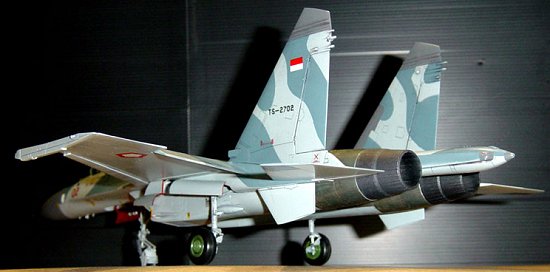
Su-27 has many, many variants including naval variant (Su-33), strike variant (Su-30 series), and Super Flanker variant (Su-35 & Su-37). Indonesia itself operates Su-27SK & Su-30MK variant and formed under Sq.11.
In the middle of Flanker hysteria here in Indonesia after the first batch of Indonesian Flankers arrived, an idea to be the first to complete a Flanker model in Indonesian markings aroused. Alex mentioned the idea to do it together and split the works to cut the building time considerably as we want to be the first to build an Indonesian Flanker.
The Academy 1/48 Su-27 was chosen principally because there is no major modification necessary for Indonesian Su-27SK.
|
THE KIT |
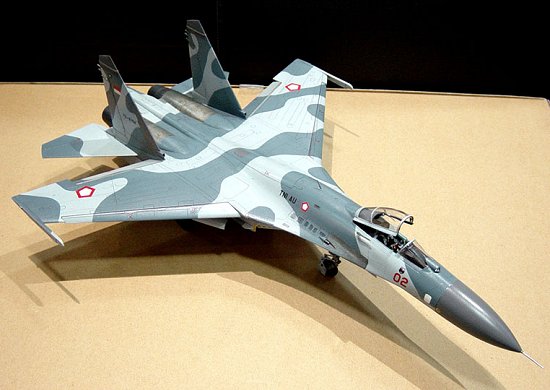
 By opening the box, a
big, wide, blue-grey colored Flanker upper and lower fuselage are found,
tied-up in a hard, well printed thick paper. The wing is moulded into the
fuselage so it doesn’t require any removal of seams or joint marks.
By opening the box, a
big, wide, blue-grey colored Flanker upper and lower fuselage are found,
tied-up in a hard, well printed thick paper. The wing is moulded into the
fuselage so it doesn’t require any removal of seams or joint marks.
More sprues are found below it, clear parts, a decal sheet which we didn’t use except the stencilings, photoetched part and rubber tires. There are some sink & injection marks found, but the details are generally good. All panel lines are recessed and there are thousand of recessed rivets all over the kit.
Some says that the radome is too big and bulbous but in our eyes, the model surely captures the impressive look of a Su-27 Flanker.
|
CONSTRUCTION |
As usual, cockpit was always the first step. We didn’t want to go into details, so we used kit supplied cockpit (and rather-too-short K-36DM ejection seat) which after painted light blue and washed, looks OK to us. The only things we added were seat belts and throttle lever.
 After everything was in
place, the upper & lower fuselage parts were glued together. As we used
to build 1/72 models, joining this huge model did required extra hands.
We began gluing the tail, moved to nose, and then went to the wings.
Engine blades was installed, but after the mesh grill installed, the
blade is hardly to be seen.
After everything was in
place, the upper & lower fuselage parts were glued together. As we used
to build 1/72 models, joining this huge model did required extra hands.
We began gluing the tail, moved to nose, and then went to the wings.
Engine blades was installed, but after the mesh grill installed, the
blade is hardly to be seen.
The model’s fitting is quite good except on tail, engine trunks and area around the stabilizer which need extra filler. A little cut following the intake circular shape wheel well is required on main wheel well area. We chose to install the fins on the final stage to make the metal engine area easier to paint. Joint seams are visible, but still in acceptable level.
Inserting the plastic wheel-hubs into the rubber tires was quite hard. Trimming, forcing, and cursing were required but the effort was well worth…
Clear parts need cleaning from injection lines. We used 1000, 1500, and 2000-grid sandpaper and Future brought the clearness back. We modified the panel behind cockpit so when the canopy is opened, the panel stayed on the canopy.
There was no more anything special during the construction, except that the kit went back and forth between our homes. We still used some filler here and there, but overall the fitting is quite good except said areas and generally we faced no trouble at all.
|
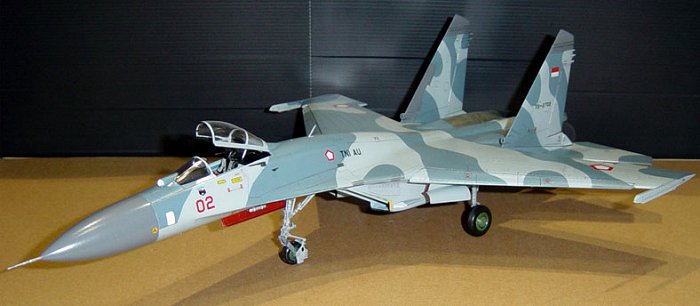
CAMOUFLAGE & MARKINGS |
Problems started to
appear during the painting stage. The camouflage (especially the upper
fuselage) and markings were still sketchy and un-clear at the time we
started the painting session. Discussions, dispute, guessing and even
cursing was  common during this period, until finally we reached a
compromise on using Tamiya Spray light ghost gray and Testors/Model
Master intermediate blue for the color. The camouflage scheme itself was
mostly based on the Su-27SKU scheme during MAKS 2003.
common during this period, until finally we reached a
compromise on using Tamiya Spray light ghost gray and Testors/Model
Master intermediate blue for the color. The camouflage scheme itself was
mostly based on the Su-27SKU scheme during MAKS 2003.
We were so relieved and pleased when some official photographs were released just in time we finished this Flanker. It was a cheerful time to know our “guessing” camouflage scheme turned out to be quite accurate.
We used supplied kit decals for the stencils, Scale Nutz decal for the national insignia and “TNI AU” letter, Aeromaster and Carpena for the serial numbers, and Iwan’s trusted pointed brushes for the squadron 11 badge.
This huge & fierce-looking baby was completed in about 5 weeks after the real things landed and most of time was for the camouflage & markings.
|
CONCLUSIONS |
It was an enjoyable project for us, especially because we tried to build a kit together. More, also because we tried to guess what our newest fighter/striker looks like. The model itself is generally good and there should be no major problem when building one.
|
REFERENCES |
- “Angkasa” special edition on Sukhoi
- IAPR, WAPJ books on Sukhoi Su-27 Flanker
- Other magazines, internet web-sites, etc
Text & article by Iwan Winarta & Alexander Sidharta
Photos by Alexander Sidharta
November 2003
If you would like your product reviewed fairly and quickly, please contact the editor or see other details in the Note to Contributors.