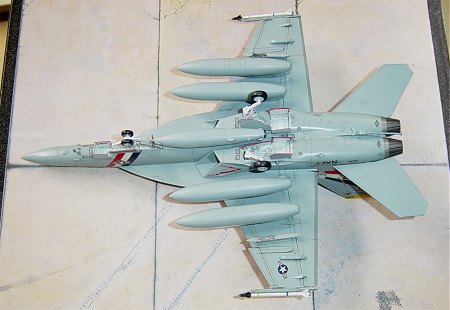
Hasegawa 1/72 F-18F Super Hornet
|
KIT # |
E 18 |
|
PRICE: |
1800 yen at Hobby Link Japan |
|
DECALS: |
Two options |
|
REVIEWER: |
Alexander Sidharta |
|
NOTES: |
Brand new tooling |
|
HISTORY |
You like it or not, Super Hornet has become US Navy’s backbone of the fleet right now, replacing F-14 Tomcat, and will replace F/A-18A/B/C/D baby Hornet as well. Its birth was controversial. But, Tomcat has its age and its maintenance cost are growing higher and higher…
It’s the brand new tooling of the Super Hornet by Hasegawa that has caused quite a hysteria among 1/72 modelers, including me. I got mine from HLJ, a well-known online store from Japan.
|
THE KIT |
 Inside the box, you’ll find 10 sprues in typical
Hasegawa grey, 2 smoked clear-part sprues, 4 polycaps and a decal sheet
for VFA-102 in 2003, VFA-102 in 2002 and VFA-2 CAG 2003.
Inside the box, you’ll find 10 sprues in typical
Hasegawa grey, 2 smoked clear-part sprues, 4 polycaps and a decal sheet
for VFA-102 in 2003, VFA-102 in 2002 and VFA-2 CAG 2003.
The panel lines of the entire kit are recessed a la Hasegawa, with hundred of recessed rivets everywhere. Cockpit panels are flat and decals for the panels are provided. No side walls details.
Weapon provided are 2 AIM-9X, 2 AIM-120 (with wrong launcher. Hasegawa gives HARM launcher for AIM-120), 4 Drop tanks, and 2 types of wingtip launchers. For more info and a peek at what comes in the box, please visit the preview.
|
CONSTRUCTION |
 Less than an hour after I received the kit, I have
made the first cut ! Dry fitting the major parts resulting a really
convincing start. Looks like I wouldn’t need filler anywhere on the kit,
but let’s see…
Less than an hour after I received the kit, I have
made the first cut ! Dry fitting the major parts resulting a really
convincing start. Looks like I wouldn’t need filler anywhere on the kit,
but let’s see…
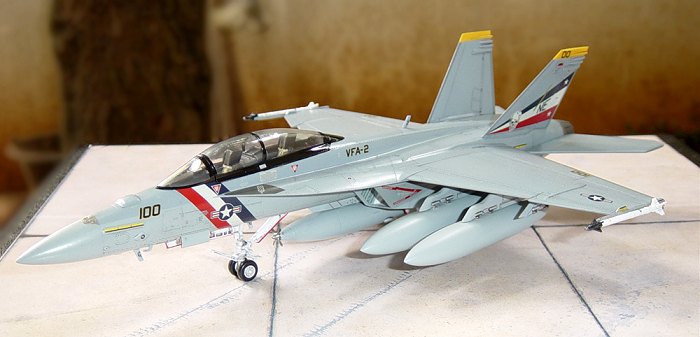
My first headache was to decide which marking would be for my Superbug. 2 VFA-102 Diamondbacks markings and VFA-2 Bounty Hunters are all interesting. My choice was then the VFA-2 as I plan to build a F-14D with the same marking in the near future.
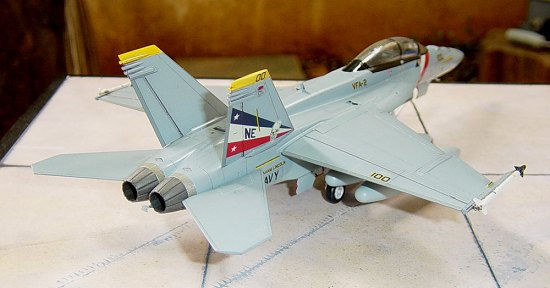
Construction began at…. rear fuselage. That means
intakes, installing polycaps for the stabilizers, and back-end (or
front-end ?) of the nozzles. All were done nicely except that Hasegawa
doesn’t indicate to paint inside of the intakes white. There are also
slight gaps on top of the intakes. I chose not to fix it, as it’s quite
hidden and still acceptable for me. The backend of the intakes are flat
and perhaps any aftermarket brands will produce intake trunks for this
area.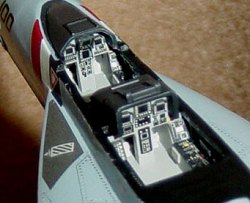
The construction then moved to the cockpit. I tried to ask for help from Hornet-experts Joe Hegedus & Dave Roof (thanks to you both!) on the color of sidewalls. Both suggested painting the sidewalls black. (Just FYI, in the latest 'F/A-18E/F Super Hornet in Detail and Scale', it appears that the sidewalls are the standard FS36231 Dark Gull Grey. Ed) I detailed the sidewalls using “baby Hornet” sidewalls as my guidance. It wouldn’t be accurate but I had no single picture at that time. Also I cut the MFDs from panel decals, applied them to 0.02 styrene then glued to the front panels. For a 1/72 kit, they look OK and add 3-dimensional look to the cockpit.
I corrected the gun hole as the kit gives a vertical one before inserting the cockpit into the front fuselage. The part breakage reminds me of that Italeri kit I built before. Then, the rear and front fuselage joined up. I used a little filler just below the windshield where the upper/rear fuselage met the lower/front one. It is because my additional details of the cockpit have deformed the cockpit area a little bit.
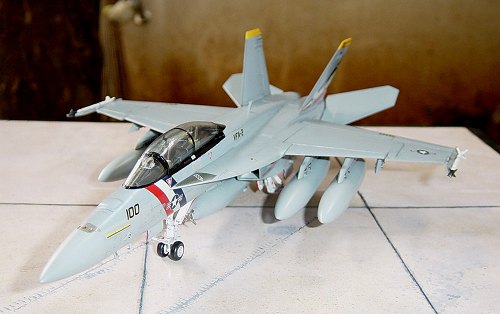
Wings, fins, gears, pylons, etc were done without problem. Pylons are correctly outboard canted, although I didn’t measure whether they are correctly 4 degrees canted out or not.
Hasegawa provides smoke clear parts, but there is a mould line at the center of the canopy. I sanded it smooth and polished it back to clarity. Future came as usual to add glare to the canopy.
|
COLORS AND MARKINGS |
 I painted my Superbug using Gunze Sangyo
lacquer-based paint. It was my first time using Gunze lacquer and the
result was superb! Gunze’s result looks bluer than Model Master paint I
usually use.
I painted my Superbug using Gunze Sangyo
lacquer-based paint. It was my first time using Gunze lacquer and the
result was superb! Gunze’s result looks bluer than Model Master paint I
usually use.
Decaling was coming next and then I airbrushed Future all over the model to protect the decals and let it alone for a day. Oil-paint wash was next just enough to bring out the panel lines and the rivets. I didn’t weather my Super Hornet as I want it in clean condition. I used MM’s Semi Gloss Coat instead of Flat coat for final finish.
|
CONCLUSIONS |
In my personal opinion, this is the type of kit I expect from Hasegawa, and of course from any other kit brands. It falls together nicely, very nice details and there is room for improvement or aftermarket stuff. I highly recommend it.
|
REFERENCES |
- various internet sites.
February 2004
Copyright ModelingMadness.com. All rights reserved. No reproduction in part or in whole without express permission.
If you would like your product reviewed fairly and fairly quickly, please contact the editor or see other details in the Note to Contributors.