| KIT #: | 9071 |
| PRICE: | Out of production and pricey |
| DECALS: | One option |
| REVIEWER: | Greg Ewald |
| NOTES: | Difficult fit, dubious details and general outline |
| HISTORY |
“Say what you want about the Russians, they do build ‘em pretty”
Tom Clancy
It was while reading Red Storm Rising by Clancy
that I first became fascinated with the ship killing Backfire strategic bomber.
 Firing a
range of massive anti-ship missiles like the AS-6 (almost as big as a ww2
fighter), these supersonic jets could swoop in and demolish a naval group in
minutes. On top of that, they are arguably the best looking jet bombers ever
developed.
Firing a
range of massive anti-ship missiles like the AS-6 (almost as big as a ww2
fighter), these supersonic jets could swoop in and demolish a naval group in
minutes. On top of that, they are arguably the best looking jet bombers ever
developed.
Rolling out of the hangar in 1969, the Backfire caused quite a stir in the west, the jet looked fast and dangerous just sitting on the tarmac. When photos of the speedy craft refueling in midair came out in the 70’s, panic started to set in. A Soviet jet bomber that could theoretically span the globe? Yikes.
With advances in swept-wing technology, the Backfire could blast through the air at a stunning 1800 kmh, well past mach 1, fully loaded. The design was so successful that a number of variants were produced, and were still being upgraded into the 1990’s. Unfortunately, this also leads to a lot of confusion for the modeler, especially tangled up with the Soviet/Russian “nutshell” games in renaming and re-designating prototypes and production aircraft. Many modelers have seen a photo or two of one version, and assume that it is the only Backfire out there, heated debates quickly follow.
| THE KIT |
 Esci often comes under fire for this kit, for some inaccuracies,
especially in regards to the nose and intakes.
Two separate nose sections are included in the massive
sprues (this is a big plane), make of that what you will. With modifications
being made to the real airframe constantly, you can’t call the company wrong,
though if you want to build the naval version, the nose will have to be altered
slightly. There are hundreds of reference photos available for any particular
type on Google.
Esci often comes under fire for this kit, for some inaccuracies,
especially in regards to the nose and intakes.
Two separate nose sections are included in the massive
sprues (this is a big plane), make of that what you will. With modifications
being made to the real airframe constantly, you can’t call the company wrong,
though if you want to build the naval version, the nose will have to be altered
slightly. There are hundreds of reference photos available for any particular
type on Google.
The plastic is the very best of styrene, soft enough to cut easily, but easy also to sand. Thank god, because you are going to be doing that quite a lot!
The fit of the parts is marginal, sort of a “matchbox” thing, and many of the major joints are going to require some serious filling and support.
Looking at the 4 section fold-out instructions, you would think that this kit is a simple build, but that is deceiving. Test fitting is mandatory, and make sure you are well stocked up on paper and sanding sticks of different grades…as well as a large tube of putty.
The molded detail is so-so, but in a jet model this size, one tends to be overwhelmed by mass rather than fiddly bits.
| CONSTRUCTION |
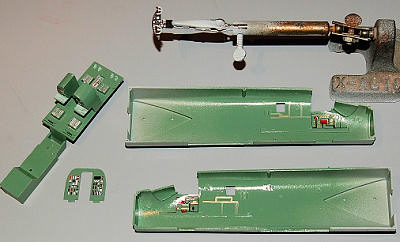 Where do
you almost always start an airframe? The cockpit, of course! The Backfire is no
exception, with the four seat arrangement going in to a simple slab of plastic.
Whatever you do, don’t glue the rear bulkhead (8c) in place, leave it floating
so that when you attach the fuselage halves together, you can get it into the
correct position.
Where do
you almost always start an airframe? The cockpit, of course! The Backfire is no
exception, with the four seat arrangement going in to a simple slab of plastic.
Whatever you do, don’t glue the rear bulkhead (8c) in place, leave it floating
so that when you attach the fuselage halves together, you can get it into the
correct position.
I’ve seen some models of the Backfire with open cockpits, and also read accounts of how the pilots entered the craft from below…go figure. Detailing this version in the pit would be silly, the little windows don’t let you see anything of the interior, though I did go ahead and apply the instrument decals anyway, and hit the raised bits with some marker.
With your pit built, it is time to attach the forward section of the fuselage together. After making sure everything was aligned, I taped the thing, clamped it, and applied CA in a capillary fashion.
 My wing
halves went together easily, without any warping at all, and using the same
technique, assembled the rear fuselage. Tape, rubber bands, and clamps all came
into play for this one.
My wing
halves went together easily, without any warping at all, and using the same
technique, assembled the rear fuselage. Tape, rubber bands, and clamps all came
into play for this one.
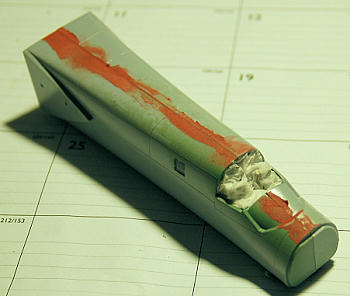
Test fitting showed that the mating of the fore and aft were not going to be simple, so I skipped a few steps in the instructions and attached them together. Even with sanding, this joint (ingeniously placed by the model creator where and actual joint line is on the real aircraft) was going to need some serious PSR.
To be honest, I was so disheartened by how badly
this joining was that I shoved the kit into the back of the closet for a few
months, though I did check on it from time to time to see if the elves had made
it any better. Sigh. Using some bootstrap levitation, I finally did tackle the
seams with the help of auto body putty, and a series of dvd’s that kept me in
the studio for a while. Quite a while. Solving that one,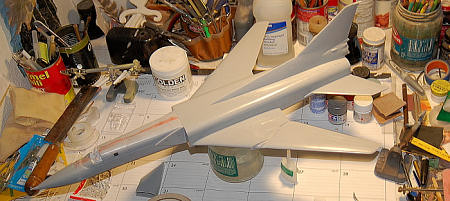 it was time to tackle the gape found at the wing and fin roots. Here we go
again.
it was time to tackle the gape found at the wing and fin roots. Here we go
again.
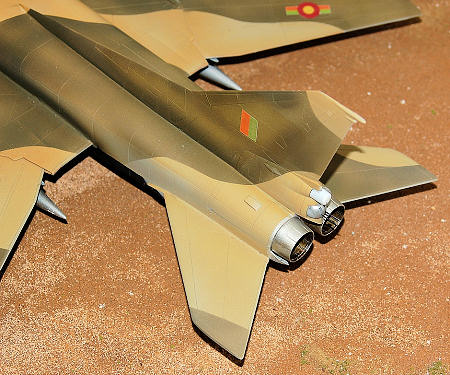
Some kit builders have said that the landing gear is incorrect and too weak…I found the model supplied parts to be just fine. Yeah, don’t bang it around too much, but even in the few test vrooms I did in the backyard, it held up. The biggest obstacle to attaching the main landing gear is the fact that the location points are somewhat dubious. Why the main peg isn’t square, I don’t know, but you will need to use a right angle/square to make sure you get them on straight. Kind of a pain, really.
The little tiny fins for antennae go on easily, and with all of the breakable bits on, let’s look at the paint!
| COLORS & MARKINGS |
 Many of
the Soviet bombers were left in a BMF state (no, I mean bare metal finish, get
your mind out of the gutter), though the naval strike versions were typically a
light blue over white or light gray.
Many of
the Soviet bombers were left in a BMF state (no, I mean bare metal finish, get
your mind out of the gutter), though the naval strike versions were typically a
light blue over white or light gray.
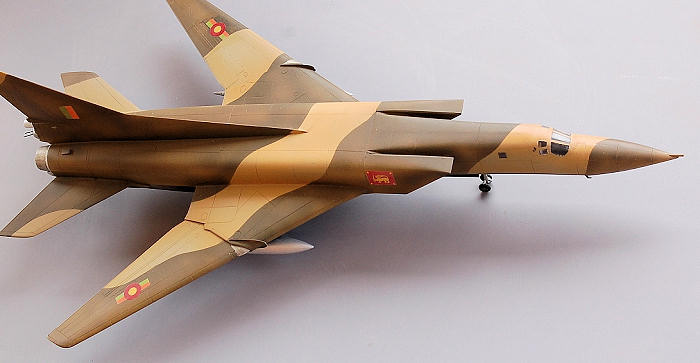
Reality often gets on my nerves, however, so I chucked the reference photos, and went with expanding my Ceylon Air Force wing. I was tempted to do a Libyan version, as suggested by a fellow modeler, but had to have this one on the shelf next to my F-86 Thuggee.
I sprayed the entire craft with a new hybrid airbrush, the Badger 3155, and I must say, I was impressed. You can go from a tiny panel line to a whole wing panel with the flick of your finger ! (Thanks Bear-Air!)
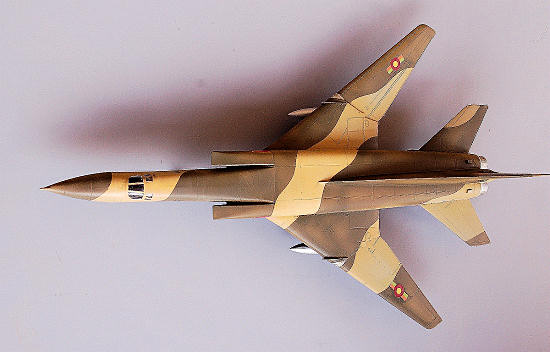
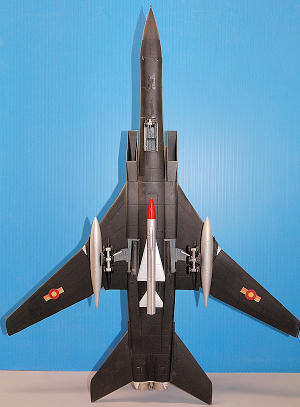
It seemed fitting to keep the desert tan motif going, so using Tamiya acrylics, I applied a few thin layers of mottled tan and brown, then did the underside in flat black.
Decals were applied after a coat of thinned future, and were printed out from my home pc, the same roundels and flags that I used on the Sabre, just enlarged.
Spray the massive thing with another thin coat of future, then a coat of clear flat, and it is time to take off the tape that was applied to those tiny windows (how the heck do they pilot this thing?) and stare at what you have created! It’s Miller time!
| FINAL CONSTRUCTION |
Well, with the huge Kingfish missile riding in the
bay, the two outboard pylons looked somewhat lonely. Hey, how about some fuel
tanks? As part of the SALT 2 talks, the Soviets had agreed to remove the
refueling probes from their premier strategic bomber (they were put back on a
short time later), but it seemed like a good idea for a small country like
Ceylon to have some ability to strike at a farther target, so I added some from
the spares bin. Kali-Ma!
Look out,
| CONCLUSIONS |
Despite all of the whining I have heard from the rc’s, this model builds out to be a fantastic representation of just one of the many, many variants of the Backfire. It is truly a stunningly beautiful jet, and a definitely recommended build. Yeah, it isn’t for the novice, and requires some patience…and maybe some elves.
| REFERENCES |
One of the best airbrushes I have ever used!
If you would like your product reviewed fairly and quickly, please contact the editor or see other details in the Note to Contributors.