|
KIT: |
Italeri 1/72 AH-1T & RAH-66 |
|
KIT # |
168 & )58 |
|
PRICE: |
$8.00 MSRP |
|
DECALS: |
See Review |
|
REVIEWER: |
Len Roberto |
|
NOTES: |
|
HISTORY |
“Sea Cobra”
![]() Bell
initiated production of an armed derivative of the Huey for the Army under the
designation of AH-1G "HueyCobra", and in 1968 set about the development of a
modified version for the Marine Corps. Powered by the Pratt & Whitney PT6T Twin
Pac engine it was designated the AH-1J "Seacobra". The first model produced
incorporated a 20 mm multi-barrel cannon in a new nose turret with Navalized
avionics and airframe. In 1972, a Marine Corps squadron (HMA-369) operated its
AH-1Js at night from the deck of the USS Cleveland off the coast of North
Vietnam in support of blockade operations. Later versions of the "Seacobra",
designated the AH-1T, were developed initially for Iran and used by the Marines.
"Seacobras" were combat-christened during the 1983 invasion of Grenada.
Bell
initiated production of an armed derivative of the Huey for the Army under the
designation of AH-1G "HueyCobra", and in 1968 set about the development of a
modified version for the Marine Corps. Powered by the Pratt & Whitney PT6T Twin
Pac engine it was designated the AH-1J "Seacobra". The first model produced
incorporated a 20 mm multi-barrel cannon in a new nose turret with Navalized
avionics and airframe. In 1972, a Marine Corps squadron (HMA-369) operated its
AH-1Js at night from the deck of the USS Cleveland off the coast of North
Vietnam in support of blockade operations. Later versions of the "Seacobra",
designated the AH-1T, were developed initially for Iran and used by the Marines.
"Seacobras" were combat-christened during the 1983 invasion of Grenada.
“Comanche”
The Comanche RAH-66 is the US Army's new Reconnaissance and Attack Helicopter being developed by Boeing Sikorsky. The first flight of the Comanche took place on 4th January 1996. The program entered Engineering and Manufacturing Development (EMD) in June 2000, which requires the construction of 13 aircraft in addition to the two prototypes by 2006. Full scale production is scheduled to begin in 2007 and continue through 2025. The US Army requirement is for 1213 Comanche helicopters.
|
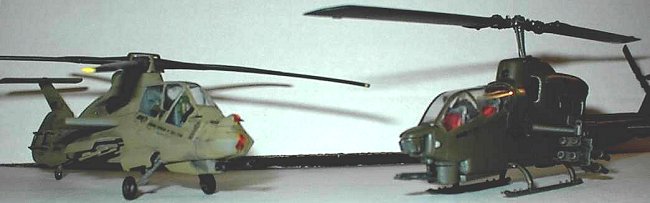
THE KITS |
While perusing a recent ModelExpo sale catalog, I noticed some incredible prices on Italeri kits. I was looking for a bunch of easy to build, quick small projects and I was attracted to some of their 1/72 scale helicopter kits. These kits were better than 50% off their list price so I ordered a handful. I was also in search of some new projects that were outside of my “normal” genre of kits and these fit the bill nicely.
 Both if these kits consist of 2 sprues along with cockpit glass and comprise
about 40-50 pieces each. They are also small when completed and so do not take
up a lot of space in my cramped display case. Painting would be very simple
with only one main color to airbrush and I could bang these out in a weekend or
two.
Both if these kits consist of 2 sprues along with cockpit glass and comprise
about 40-50 pieces each. They are also small when completed and so do not take
up a lot of space in my cramped display case. Painting would be very simple
with only one main color to airbrush and I could bang these out in a weekend or
two.
I have been following the long running discussion on various modeling websites by much better and more experienced modelers than me about getting into a rut with your modeling. Building the same genre or type of model becomes tedious after a while and it is easy to fall into the scenario where you build models like a robot and lose sight of modeling as a relaxing few hours and continually turn your project into an “work.” For myself, I like to moderate the intense projects with occasional “fun” projects where I try a type of kit I am not familiar with just as a healthy diversion and to hopefully practice or learn a new skill or technique. It also brings back a deja-vu feeling of modeling as a kid when you may not have known all there was to know about a subject but still enjoyed the hell out of a new model. I think combining the high-end modeling philosophy along with the exuberance of modeling a new subject makes for an interesting and dare I say “light-hearted” experience. Sorry- I just smashed my very small soapbox- on to these two little ‘copters.
|
CONSTRUCTION |
Both kits are engineered as you expect with left and right fuselage halves. The Sea Cobra has a very thin profile and the pieces are quite small. The top half of the fuselage and engine is an additional left and right piece arrangement, which is then glued onto the lower assembly. A bit of filler is needed to smooth out the entire fuselage assembly.
 Cockpits are sparse but included enough to satisfy me. The interiors were both
painted a dark gull grey with flat black instrument panels dry brushed with
silver. The Sea Cobra’s seat cushions were painted a flat red as indicated in
the instructions.
Cockpits are sparse but included enough to satisfy me. The interiors were both
painted a dark gull grey with flat black instrument panels dry brushed with
silver. The Sea Cobra’s seat cushions were painted a flat red as indicated in
the instructions.
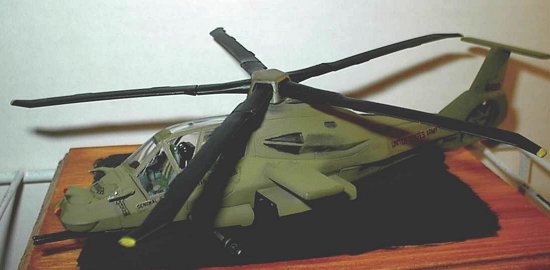
Rotor shafts were trapped between fuselage halves allowing them to spin freely for test flights. Once the main bodies of the copters were assembled and sanded, the “wings” were attached along with armaments. I decided to leave off the Comanche’s weapons for now to allow a cleaner view of the copter’s futuristic profile.
Assembly of both copters went pretty quickly. Everything fit well and no problems were encountered. It was now on to the paint shop.
|
PAINT & DECALS |
To prime or not to prime- my system has been refined over the last year and it does include using Krylon Sandable Grey Primer in a light misting coat. I first had to mask the canopies. My skills at masking are getting better but need improvement. I have used two types of tape- regular Scotch brand clear tape and an old roll of what I think is Pactra Masking tape. Both have pros and cons. The scotch tape seems to cover well and is easier to apply and cut with a sharp blade. However it is a pain to remove when you are done and I still occasionally get residue along the edges. A Q-tip with nail polish remover sometimes help to get rid of this residue but not always as cleanly as I would like. The Pactra tape is much thicker than Scotch tape and it has a bit of flex to it. It does a much better job with edging and is easier to remove. Its drawback is its low tack, which if not burnished continually up to painting sometimes allows seep through. I try to be extra careful when spraying around canopies to make sure I am very light on the mixture so no pooling will occur. Practice makes perfect.
 After light coats of primer, I use my finest sandpaper to smooth out the seam
lines. The Krylon primer reacts to this final sanding by becoming really smooth
and will help to hide any seam lines. This primer also dries to the touch in
about 15 minutes.
After light coats of primer, I use my finest sandpaper to smooth out the seam
lines. The Krylon primer reacts to this final sanding by becoming really smooth
and will help to hide any seam lines. This primer also dries to the touch in
about 15 minutes.
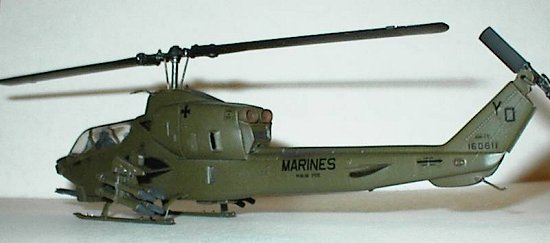
The Sea Cobra offered two versions and I decided to do a basic dark green Marines version. I used Tamiya Spray Olive Drab, which is closer to the Dark Green called for than to Olive Drab. The main and tail rotors were sprayed flat black and the shaft details were dry brushed with steel. The exhausts were painted flat black and then chalk pastels were heavily applied with a dark red brown to simulate rust. Since the paint was semi gloss- decals went right on with Microsol and snuggled down nicely. A few more strategically placed pastel exhaust smudges and a spray of dullcote completed the little Sea Cobra.
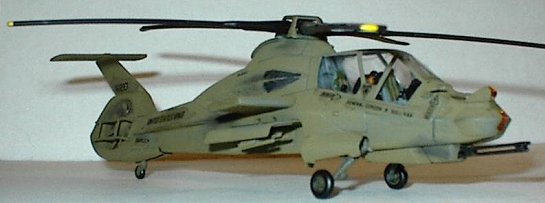
The Comanche was modeled as the 1995 prototype and was an overall Olive Drab. I used Model Master enamel. Main 5 blade rotor was sprayed flat black with yellow tips, the targeting lenses were dabbed with clear orange and what looks like mesh panels on the sides were flat black.
There you have it.
|
CONCLUSIONS |
These kits were a lot of fun and were quick builds. The majority of time was spent in paint preparation, masking, and detailing. At about $4.00 each, you can’t beat these prices either- an inexpensive way to try something new. I think I will build more 1/72 helicopters especially with Sikorsky Aircraft Corporation being only 3 miles from my home here in Connecticut- I have many opportunities for inspiration!
If you would like your product reviewed fairly and quickly by a site that has well over 100,000 visitors a month, please contact me or see other details in the Note to Contributors.