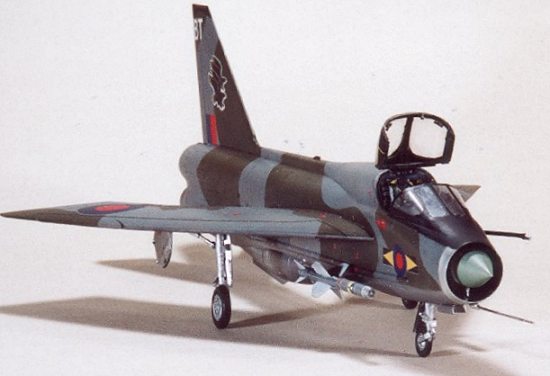
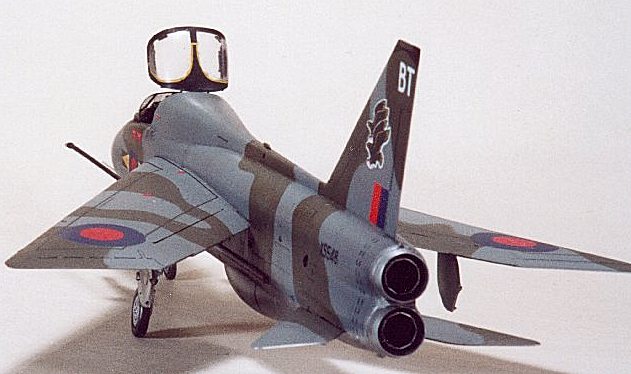
Airfix/Aeroclub 1/48 Lightning T.5
|
KIT # |
9178 |
|
PRICE: |
$33.00 |
|
DECALS: |
See Review |
|
REVIEW : |
Sébastien Privat |
|
NOTES: |
Neomega/CMK sets also used |
|
HISTORY |
The English Electric Lightning is the only Mach 2 interceptor ever designed in Great Britain. Fast, powerful, extremely maneuverable but suffering from a ridiculous endurance, it was nonetheless a fantastic progress from the Hawker Hunter, or the abismal Gloster Javelin. 1000 hours on Hunters were the minimal requirement for pilots to sit inside its cockpit, which was the most sought after one in the RAF.
In order to lower the attrition and the conversion problems, English Electric designed a two seater version. The engineers drew a side by side aircraft, as was then the fashion in UK. This seat arrangement gave a not quite gracious look to this version, which was nicknamed « the Tub ». The final look of the plane was totally unconventional : 60° swept wings, a wide nose with side by side seats, and the engines mounted on top of each other !
 The RAF used two versions of the two seater : the T4, which
derived from the F1, had the pointed fin found on the early versions of the
type, and the T5, used in OCU’s, which was a two seater F3 and had the broad
chord, squared-off fin. The T5 had throttle quadrants on each side of the
cockpit, and not on the left hand side of each pilot. For the instructor, a wave
off was an interesting process, as he had to pull back with his left hand (the
stick) and push forward with his left (the throttles), when instinctively he
would have done exactly the opposite. Miraculously, no instructor got it wrong,.
The RAF used two versions of the two seater : the T4, which
derived from the F1, had the pointed fin found on the early versions of the
type, and the T5, used in OCU’s, which was a two seater F3 and had the broad
chord, squared-off fin. The T5 had throttle quadrants on each side of the
cockpit, and not on the left hand side of each pilot. For the instructor, a wave
off was an interesting process, as he had to pull back with his left hand (the
stick) and push forward with his left (the throttles), when instinctively he
would have done exactly the opposite. Miraculously, no instructor got it wrong,.
The last twxo seater was an export only version : the T54, used by Saudi Arabia and Kuwait, was a F6 with the nose of a T5. The two seater was not exactly an elegant aircraft, but the T54 looked like the cross breeding between a shark and a pregnant cow.
|
THE KIT |
Airfix released two Lightning models in 1/48th scale : the F1/F1A/F2/F3 and the F2A/F6. The content of the big boxes look very similar, as the main differences are the fuselage parts allowing to build the fat bellied F2A and F6. These are very nice models, both with fantastic decal sheets allowing the modeler to build a Lightning from every unit having flown the type.
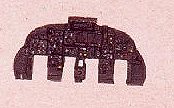
As things were, it was extremely improbable a two seater was to be released. But a very talented individual, Mr John Adams, from Aeroclub, had the idea to release a conversion set for the modelers wanting a tub. His idea was copied shortly thereafter by CMK, who released a resin conversion I bought too, but I don’t intend to use this one, as it is too short, with absent surface details, and badly warped. Aeroclub parts are correctly shaped, but the plastic used is a bit thick, though soft enough. The details are a bit rough, specially in the cockpit area. All details are white metal. The canopy is vacuformed, and you got two pieces. I suppose John Adams read my mind on that one…
 Things went from good to excellent when I read Neomega released a
detail set for the Aeroclub kit. I ordered it at once, and got it even before
the instructions were printed… It caused me some fit problems (I didn’t know
where to put the saw), but it was otherwise excellent. All the details are
finely engraved, the seats are perfect, and the canopy parts are wonderful.
Things went from good to excellent when I read Neomega released a
detail set for the Aeroclub kit. I ordered it at once, and got it even before
the instructions were printed… It caused me some fit problems (I didn’t know
where to put the saw), but it was otherwise excellent. All the details are
finely engraved, the seats are perfect, and the canopy parts are wonderful.
As I had decided to go the hard way, I also used a CMK detail kit for the undercarriage, with all the wheel bays, doors, wheels, some struts and the nose cone. These parts are very nice, but needed a thorough sanding before they accepted to fit, particularly for the wing wheel bays.
|
CONSTRUCTION |
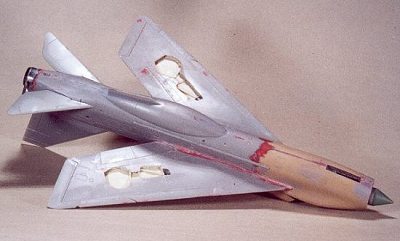
 I begun by sawing off the fuselage halves, with the help of the
Aeroclub instructions. They tell precisely where to cut. I cut a millimeter
before the panel line I used as a guide, and sanded away the remaining styrene.
I then went to the engine exhausts. They were painted acrylic black, before
getting a coat of Alclad II Jet Exhaust. The outside of the nozzles were painted
pale burnt metal before an irregular coat of Dark Aluminium.
I begun by sawing off the fuselage halves, with the help of the
Aeroclub instructions. They tell precisely where to cut. I cut a millimeter
before the panel line I used as a guide, and sanded away the remaining styrene.
I then went to the engine exhausts. They were painted acrylic black, before
getting a coat of Alclad II Jet Exhaust. The outside of the nozzles were painted
pale burnt metal before an irregular coat of Dark Aluminium.
 I glued the assembly inside a fuselage half and glued the fuselage
together. Some joints appeared then, but I decided to leave them for the time
being.
I glued the assembly inside a fuselage half and glued the fuselage
together. Some joints appeared then, but I decided to leave them for the time
being.
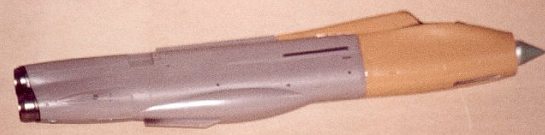
I painted the interior of the Aeroclub nose tire black, as well as the Neomega parts. The CMK nose cone was painted Testors Aluminium, and the radome was painted Testor’s RAF interior green. The Airfix air intake parts are aluminium too. I glued the resin part on one intake half and closed the intake. Some saw and sandpaper work is to be done to get a correct fit.
 I installed the whole air intake in the Aeroclub nose, and the
assembly was used as a guide for the Neomega floor. Some test fitting shown me
the cuts I had to make on the Aeroclub parts to have the top of the instrument
panel fit. After some drybrushing on the sidewalls, the instrument panel and the
rear bulkhead, I cyanoed the Neomega parts. I added two .44 lead balls in the
nose to avoid a tail-sitting Lightning, and joined the nose halves. Some heavy
joint lines appeared, but I left them too.
I installed the whole air intake in the Aeroclub nose, and the
assembly was used as a guide for the Neomega floor. Some test fitting shown me
the cuts I had to make on the Aeroclub parts to have the top of the instrument
panel fit. After some drybrushing on the sidewalls, the instrument panel and the
rear bulkhead, I cyanoed the Neomega parts. I added two .44 lead balls in the
nose to avoid a tail-sitting Lightning, and joined the nose halves. Some heavy
joint lines appeared, but I left them too.
 The first moment of truth was close : joining the nose to the
fuselage ! Well, it was not so bad. My saw cuts were correct (woohoo !)
and there were only minor imperfections. The most troublesome spots came from
the difference in plastic thickness. I treated all that with putty, as well as
the joint lines on the fuselage and nose. A hearty sanding session, followed
with a coat of grey paint to track the remaining flaws, and another
puttying/sanding session gave a good and smooth skin to the model.
The first moment of truth was close : joining the nose to the
fuselage ! Well, it was not so bad. My saw cuts were correct (woohoo !)
and there were only minor imperfections. The most troublesome spots came from
the difference in plastic thickness. I treated all that with putty, as well as
the joint lines on the fuselage and nose. A hearty sanding session, followed
with a coat of grey paint to track the remaining flaws, and another
puttying/sanding session gave a good and smooth skin to the model.
I left the fuselage to give some attention to
the wings. The CMK resin parts are very nice, but need a heavy thinning down of
the wing interiors.. I used a Dremel on low speed, and subrepticiously gave it a
go on the resin parts too. The resin wheel wells were cyanoed in place ad the
wings were assembled. I used some plastic card to avoid a step
 between the parts. On my sample, there were
ugly sink marks on the upper side of each wing, near the leading edge and near
the tip of the slats. Some more putty and sandpaper treated them quickly.
between the parts. On my sample, there were
ugly sink marks on the upper side of each wing, near the leading edge and near
the tip of the slats. Some more putty and sandpaper treated them quickly.
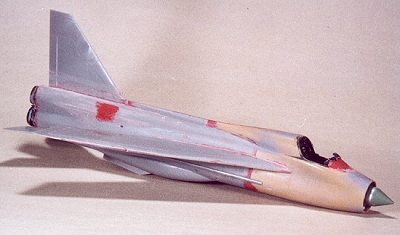
The wings don’t join very well to the fuselage, but this is easily corrected. The fin and the tailerons were glued without any trouble.
The airbrakes were a problem. I had decided to display them closed, as most Lightning have them in this position on the ground. The trouble is, they refuse to be flush with the rest of the fuselage : the port one is too thin, and the starboard one too thick ! Putty and sanding on one side, filing and sanding on the other, and that was that.
The intake lip was rather entertaining, too. There was a lot of cleaning to do on the Aeroclub metal lip, so I decided to use the Airfix part. Sure, but it was not designed for this nose… I got the shape right with putty and sanding and polishing, as the lip is to be polished metal, and that kind of color does need a flawless finish.
I then gave the model an ocean grey coat to check the surface. I was surprised to find it quite good.
|
PAINT & DECALS |
Painting, or if at first you don’t succeed…
 I originally thought of doing a T5 from 5 Sqn as it was on an APC :
all the spine, from 1 meter behind the cockpit to the nozzles was painted white.
I even had it painted that way, and was thinking of doing the tail decals and
squadron markings myself. But I ruined the paint in the nose area trying to
install correctly the windshield, and I had ran out of Aeromaster Ocean grey…
And there was no more Aeromaster Ocean grey to be found around here. So I
decided to paint it all over again, after removing the original paint. I made a
quick poll in various modeling shops in France, and was generally told to use
oven cleaner to get rid of the paint. No problem, I removed the paint in no
time. I removed a good amount of painstakingly polished putty, too. I breathed
deeply, looked for a hammer, took the hammer, looked at the model, and put the
hammer away.
I originally thought of doing a T5 from 5 Sqn as it was on an APC :
all the spine, from 1 meter behind the cockpit to the nozzles was painted white.
I even had it painted that way, and was thinking of doing the tail decals and
squadron markings myself. But I ruined the paint in the nose area trying to
install correctly the windshield, and I had ran out of Aeromaster Ocean grey…
And there was no more Aeromaster Ocean grey to be found around here. So I
decided to paint it all over again, after removing the original paint. I made a
quick poll in various modeling shops in France, and was generally told to use
oven cleaner to get rid of the paint. No problem, I removed the paint in no
time. I removed a good amount of painstakingly polished putty, too. I breathed
deeply, looked for a hammer, took the hammer, looked at the model, and put the
hammer away.
I looked for the hammer once again when I saw the nose cone part had decided to break free inside the intake. The front wheel well was moving freely too, as it is the same chunk of resin. I took care of that using 2 component epoxy and by asking my wife to hide the hammer.
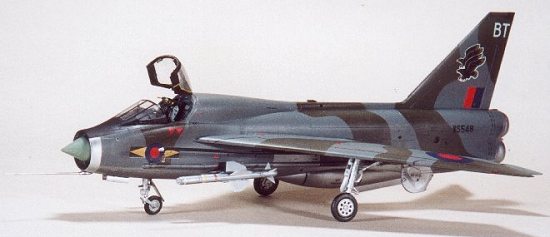
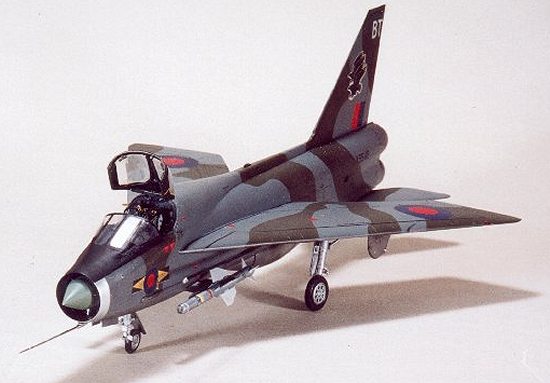
Okay, here I went again, puttying and sanding and generally cleaning the model up. I looked at the decal sheet, and thought a 11 Sqn bird would look good, too. I only had to do the « S » for the serials… Too bad, no white spine for my Lightning, but a lot less work to do !
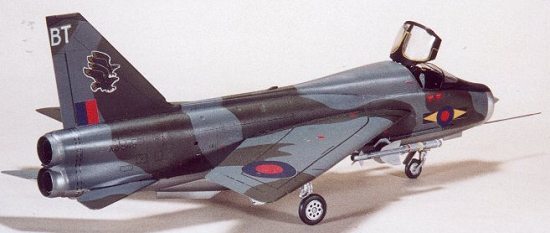
I began with a gloss black acrylic coat on the belly and under the wings, preparing for the Alclad II Duraluminium. I painted the back, the wings and the leading edges under the wings Humbrol Ocean grey, and let the model dry for a whole week. I made masks with drafting tape, and shot the dark green coat, using Gunze #330. Do not use the same dark green as the WW II green, as post war British dark green is more olive than the one used on WW II birds.
A few masks and airbrush sessions later, I masked the flanks and the leading edges, and shot the Duraluminium coat. I painted the part around the nozzles Dark Aluminium and the intake lip Highly Polished Aluminium.
Decaling and finishing
All the bits that protrude and break easily were still to be glued in place.
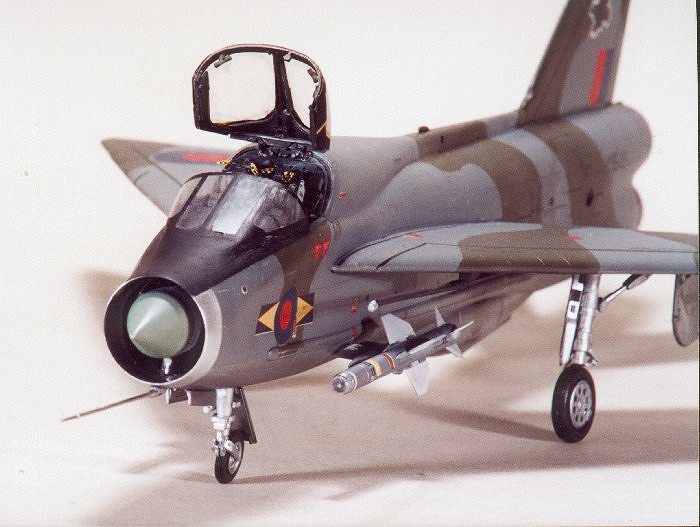
I first painted the seats, using pictures from Wings Of Fame Vol 7 for reference. I made the ejection handles out of thin electrical wire, and painted them yellow with black stripes. The sticks were painted black, and I used a small acetate square as the gunsight.
 I made hydraulic lines on the gear legs and the three white collars
that hold them, painted the legs with MM Aluminium, and glued the legs in place.
The doors were painted Duraluminium and glued too.
I made hydraulic lines on the gear legs and the three white collars
that hold them, painted the legs with MM Aluminium, and glued the legs in place.
The doors were painted Duraluminium and glued too.
I dipped the vacuformed canopy in Klir (in English : Future), and let it dry. I glued all the parts inside it with cyano, after painting them tire black. I masked the canopy using scotch tape (Thanks, Mr C !) and shot some black on it. I made new masks, using the first ones as guides, to shoot some yellow around the windows.
I glued the pitot probe (Highly polished aluminium) and the IFR probe at that time. This one is black with a silver tip.
The decals went down without trouble, as I helped them along with Aerosol. The only problem was the « S » letters in the serial. I used the 8 from the decal sheet, and cut them with a #11 blade. They don’t look exactly right, but I decided I didn’t care about that one. Think of that as a 6 ft model if you want…
Once the decals were dry, and the Redtop missiles glued in place, I gave the model a final coat of dullcote, and breathed deeply.
|
CONCLUSIONS |
This is my first attempt at a conversion. This has not been a walk to the park : I hadn’t the instructions for the Neomega parts, I had trouble with Metallizer paints (if you look at them the wrong way, they flee.), the joys of doing my own decals, or rather of trying to do my own decals, and I had the utter pleasure of destroying an almost completed paint job.
I can’t say this bird is beautiful. It is not. But I’m rather pleased with what I did. And I’ll build another tub, and that one will be NMF !
Copyright ModelingMadness.com. All rights reserved. No reproduction in part or in whole without express permission from the editor.
If you would like your product reviewed fairly and fairly quickly, please contact the editor or see other details in the Note to Contributors.