KP 1/48 Su-22M4 'Fitter K'
|
KIT # |
|
|
PRICE: |
$ |
|
DECALS: |
See Review |
|
REVIEWER: |
|
|
NOTES: |
|
HISTORY |
The Fitter K is a derivative from the Sukhoi Su 7. That one was a short ranged interceptor which evolved into a ground attack plane. In the 70’s, obeying the trends of that time, Sukhoi gave a variable geometry wing to the Su 7 and gave birth to the Su 17/20/22 family. Libya once thought VG wings gave the Fitter what it takes to be a fighter, but two VF-41 crews and their Tomcats quickly reminded the pilots the Cat was not to be messed with, and that Mediterranean waters can be pretty cold at that time of the year.
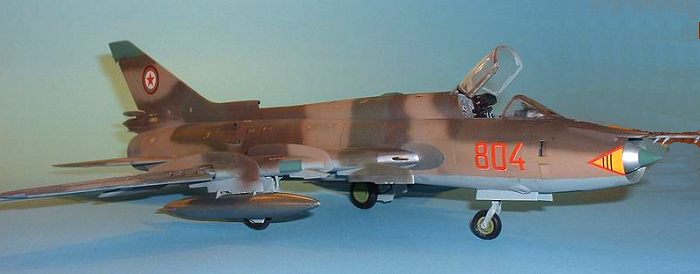
The M4 version is the last produced and can be identified by the air scoop at the base of the fin. That scoop is necessary for cooling the afterburner of the 24,000 lbs thrust turbojet.
This is a monster of a plane : big, noisy, and not that maneuvrable. The curious thing is the Czechs used to have an aerobatic team flying six Fitter K’s… Noisy, smoky, and throwing IR flares away, that wasn’t an easily forgotten sight !
|
THE KIT |
KP released two models : the Su 22 M3 and the Su 22 M4. The box contents are rather similar, and the main difference is the decal sheet and the air scoop at the base of the fin.
The shape looks accurate. The panel lines are scribed, and the model is molded in a soft light grey styrene.
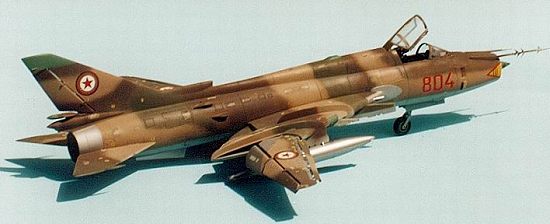
 The M4 version has two 850
liter tanks, two UB 32-57 rocket pods, two air-to-ground missiles, an ECM pod
and a reconnaissance pod.
The M4 version has two 850
liter tanks, two UB 32-57 rocket pods, two air-to-ground missiles, an ECM pod
and a reconnaissance pod.
Details are another story : no cockpit detail, a seat that would look better in a nineteenth century castle than in the cockpit of a Russian fighter-bomber, naked wheel wells, and the most interesting thing is the pylons : they’re made for a straight winged aircraft. The problem is, they have to go under a 60° swept back wing. Get your blades ready !
Three decal options are available in the MasterCraft release : an East German plane, as flown on its last sortie under the East German flag, a post-unification German plane and a Polish bird. The East German one has big red, blue and yellow stripes on the fuselage, a gaudy sharkmouth around the intake, and tiger striped yellow underwing tanks. You have a full complement of stencils on a separate sheet.
|
AFTERMARKET STUFF |
You can get an impressive model building that KP kit from the box. Only thing is, I wanted more, so I went shopping. Three companies released resin cockpits for the Fitter K : Cutting Edge, Neomega and Aires. I bought the Cutting Edge set, which is fantastic. I got a one part resin tub, with superb sculpted detail, a K36 ejection seat with two optional headrests, an instrument panel and its shroud, and the instrument panel curtain. There’s photoetch too, for various probes and canopy piping. I might sound insisting, but it’s really beautiful.
 Cutting Edge also made a
splendid resin ejection nozzle, and an exterior detailing set. The latter has
all the moving parts of the wings, slats, flaps, airbrakes and their housings
and IR flare launchers. It’s beautiful again (I’m not paid in any way by Cutting
Edge, and I wish I was !), but it’s a bit expensive, as the exterior detailing
set is $12 more than the KP kit (thus the wish).
Cutting Edge also made a
splendid resin ejection nozzle, and an exterior detailing set. The latter has
all the moving parts of the wings, slats, flaps, airbrakes and their housings
and IR flare launchers. It’s beautiful again (I’m not paid in any way by Cutting
Edge, and I wish I was !), but it’s a bit expensive, as the exterior detailing
set is $12 more than the KP kit (thus the wish).
For small stuff, Eduard and Part released very nice photoetch sets.
Finishing the hardware review, I added Equipage resin wheels (with rubber tires). They certainly look much better than the kit parts.
Finally, a friend of mine, whose hobby is jewelry, cast gear legs in brass.
There are quite a few aftermarket decal sheets for the late Fitters. Cutting Edge has two, as Aeromaster. Linden Hillhas one, and Hi Decal Line has another. Propagteam released a stencil sheet.
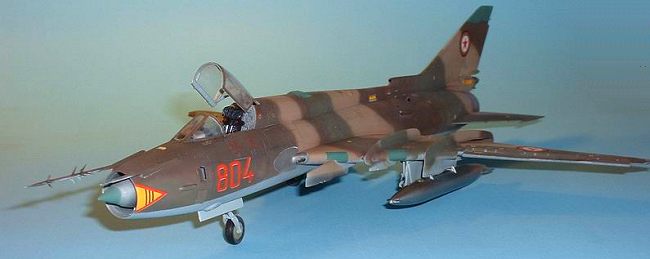
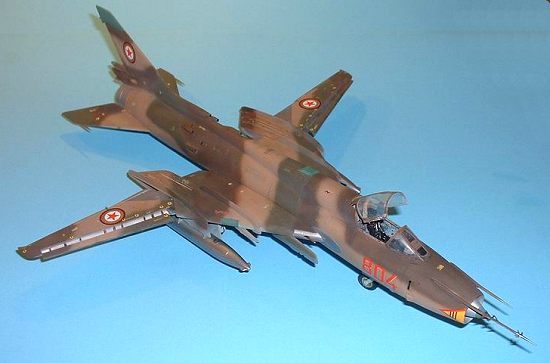
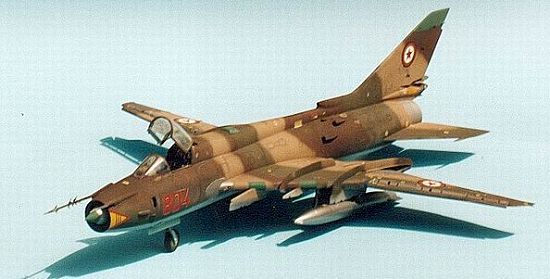
I have an Aeromaster sheet, with three Fitter K’s (Afghanistan, Iraq and Ukraine) and a Fitter J from Hungary I decided to paint my Fitter as an Afghan plane that landed in Pakistan in 1993, when the pilot defected.
|
CONSTRUCTION |
I started working on the main gear wells. Keeping an eye on Verlinden’s Lock On, I added all the piping that you can find in the wheel wells, using thin copper wire, resin bits and some plastic sheet. Gluering the upper and lower wing halves showed some problems which were solved using a file and some putty. I drilled the venting holes and the spent case chutes, then I cut off the flap emplacements.
 A problem I had met in a
previous building attempt of that kit worried me : the wings are thicker than
their root as it is figured on the fuselage halves. I found the solution on the
net. You have to saw the alignement tabs off, sand in order to obtain a flat
surface, and glue the wings to the fuselage. The centerign plots for the outer
wings have to be removed, as they’re useless if you choose using the Cutting
Edge detail set. Some putty on the leading edges, a careful sanding, and the
wings are ready. Then, the funny part : the pylons. The outer pylons are checked
against the wing, then sculpted using a knife. You have to be careful there
because the pylon leading edge has to match a wing fence. The other pylons get
the same treatment.
A problem I had met in a
previous building attempt of that kit worried me : the wings are thicker than
their root as it is figured on the fuselage halves. I found the solution on the
net. You have to saw the alignement tabs off, sand in order to obtain a flat
surface, and glue the wings to the fuselage. The centerign plots for the outer
wings have to be removed, as they’re useless if you choose using the Cutting
Edge detail set. Some putty on the leading edges, a careful sanding, and the
wings are ready. Then, the funny part : the pylons. The outer pylons are checked
against the wing, then sculpted using a knife. You have to be careful there
because the pylon leading edge has to match a wing fence. The other pylons get
the same treatment.
The nose gear well is painted Gunze RLM65 then detailed using the same stuff as the main wells. The components are painted before being installed. The bay is then installed in the fuselage, after adjusting it to the fuselage shape.
The foor auxiliary intakes that surround the nose can take almost any position when the engine is turned off. You can see on pictures that usually the doors drop under gravity. They are cut from the fuselage, thinned, and glued.
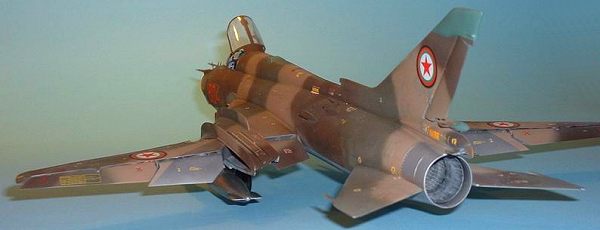
The fuselage interior is scraped using a hobby knife, to allow the resin cockpit tub to take place. The interior is sanded at the rear too, for the nozzle. The nozzle is painted interior black then gets a dry brushing with very light grey pastel chalk. The fuselage interior gets an Alclad II Jet exhaust coat.
 The nose bullet fairing has
two .44 lead balls glued inside, then it is assembled, puttied and sanded. The
radome is painted Aeromaster acrylic Radome Green and the body is painted Alclad
Aluminium, as is the fuselage in the nose area.
The nose bullet fairing has
two .44 lead balls glued inside, then it is assembled, puttied and sanded. The
radome is painted Aeromaster acrylic Radome Green and the body is painted Alclad
Aluminium, as is the fuselage in the nose area.
The interior color is based on Gunze RLM65, to which I added a little Tamiya gloss blue. The resin tub is painted, then the instrument panel. All details are painted with the « Lock On » as a reference, and the whole area gets a wash with sepia ink and a light drybrush with grey pastel chalk.
The instruments are painted black, small details are picked out with white. Do not forget the white line that materializes the middle of the panel. The instrument panel shroud is painted interior black and the canvas part is brown drybrushed with light grey.
I then went to the other end of the beast. I separated the rudder from the fin, which will get replaced with the Cutting Edge part.
First important milestone of the assembly was there : closing the fuselage. I was not disappointed. The nose cone went along almost nicely. The cockpit tub needed some sanding to fit, then the nozzle. I didn’t want to install Cutting Edge airbrakes, and didn’t cut their emplacements. I regretted that later on.
I then glued, an inch at a time, the fuselage halves. Putty was needed almost everywhere, but the result was correct.
The wings went next, needing a serious puttying too.
I glued the airbrakes. The four airbrakes are identical, but not their housings. Well, I sculpted, cut, filed, sanded, puttied, sanded again and scribed to get an acceptable result.
 Then went the two nose
probes. I removed the various antennas and vanes from the left one, and sanded
it because I wanted it to look more like a pitot probe than a brick. The right
one got sanded too, for the very same reason. I glued the probes in a 10h10
position on the nose, then bent both of them for them to point in the right
direction. Putty and sandpaper were needed there to.
Then went the two nose
probes. I removed the various antennas and vanes from the left one, and sanded
it because I wanted it to look more like a pitot probe than a brick. The right
one got sanded too, for the very same reason. I glued the probes in a 10h10
position on the nose, then bent both of them for them to point in the right
direction. Putty and sandpaper were needed there to.
I then went for the canopy and windscreen. They were dipped into Future, then, once dry, masked on the inside and the outside.
I glued the various etched bits with cyano, and shot the whole lot with the cockpit color. I painted then glued the canopy locking mechanism.
I installed the instrument panel shroud in place and added the HUD (some clear acetate glued with Humbrol ClearFix), then glued the windscreen.
I drilled the holes for all of the afterburner section cooling scoops and glued then.
The landing gear lights are simply scribed on the fuselage. I drew their shape on scotch tape, put the Scoth tape on some .03 plastic sheet I then cut and sanded to shape. I glued the pastic sheet bits in place and glued the photoetched part from the Part sheet which figures the landing light. Some puttying and sanding was needed to smoothe the contours and I was done with that.
I then shot a light gray coat for checking the joint lines, and once satisfied, went to the paint shop.
|
PAINT & DECALS |
To give more life to the model, I preshaded it, shooting tire black on the panel lines.
I painted the dielectric panels radome green and masked them.
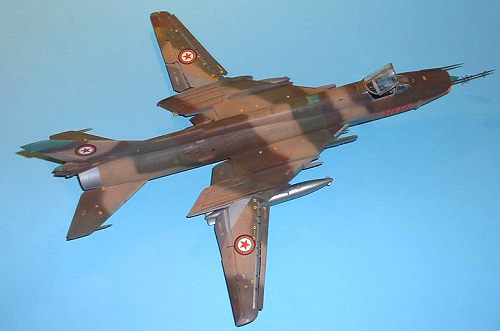
I painted the belly Gunze RLM65, and let it dry, before masking it. The upper side was painted using Aeromaster Acrylics WarPac paints Tan, Red Brown and Dark Green. I shot thin coats, letting the prepainted panel lines lightly show under the paint.
 The outer wings, slats and
flaps arwere painted then. The leading edge of the flaps, the slat interiors and
the part of the wings that slides inside the wing pivot got a Modelmaster
Metallizer Steel coat. A gloss coat later, I was ready for decalling.
The outer wings, slats and
flaps arwere painted then. The leading edge of the flaps, the slat interiors and
the part of the wings that slides inside the wing pivot got a Modelmaster
Metallizer Steel coat. A gloss coat later, I was ready for decalling.
I tried using the box decals, but failed miserably. They didn’t want to cooperate, and broke apart or curled on their own. Luckily, I had a Hi Decal Line sheet with all stencils. Those did correctly behave. The intake markings, side numbers and Afghan roundels came from the Aeromaster sheet.
Once the decals had dried, I shot a light gloss coat and gave a sepia ink wash to some panel lines, being very conservative about that : the picture I have of that very plane (World Air Power Journal vol 2 : « Sukhoi Fitter Family ») shows a rather clean bird.
I painted the steel plates that protect the fuselage from the shockwave of the NR30 cannons, and gave the model a matt coat.
|
FINAL DETAILS |
I prepared the landing gears and glued all the piping that goes on them. The gear legs are RLM65, the piping is black. The main gear doors were cut and glued in place, and the Equipage wheels were cyanoed.
The K-36 was next. I used the large headrest. I painted the seat gloss black, the belts tire black and the buckles silver. I painted the details with the Lock On as a reference (this book is really interesting !).
Then, I had a very entertaining time glueing the twelve etched probes, vanes and antennas on the left pitot probe. I removed the mask from the canopy (everything OK there) and the windscreen. Interestingly enough, instead of seeing the HUD, I saw a nice RLM65 thing. I had forgotten removing the masks from the inside. I had to detach the windscreen, remove the masks, glue the windscreen again and hide the new joint line. But once I had done all that, I breathed deeply, and gave it a good look : it was done !
|
CONCLUSIONS |
This is not an easy model, and if you want to really detail it, things get pretty expensive. But with patience, average modeling skills and organization, you can work your way through it (hey, I did !) and I think the result is worth both the money and the time I invested.
The detail problems can easily be overcome, as only the cockpit needs to be changed. If you’re a bit tight on money, get the Neomega cockpit, and you’ll have a nice model of this aggressive looking fighter bomber.
Copyright ModelingMadness.com. All rights reserved. No reproduction in any form without express permission from the editor.
If you would like your product reviewed fairly and quickly, please contact the editor or see other details in the Note to Contributors.
Back to Reviews Page 2025