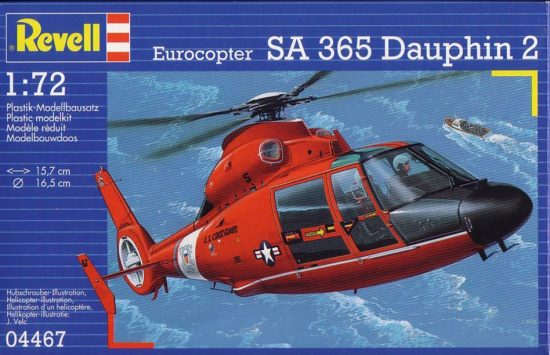
Revell AG 1/72 SA.365 Dauphin 2
|
KIT # |
4467 |
|
PRICE: |
$8.50 |
|
DECALS: |
Two Aircraft |
|
REVIEWER: |
Bill Michaels |
|
NOTES: |
Reboxed Matchbox kit |
|
HISTORY |
In the 1980s, the US Coast Guard was looking for a new MRR (Medium Range Recovery) helicopter to replace the service’s aging Sikorsky HH-52 helicopters. After an extensive evaluation, the French Dauphin was modified for the job. A lot of deliberation and study went into the choice—the previous helicopters had all been capable of water landings, something the new “Dolphin” would not be.
When first acquired, the HH-65As were painted in the standard USCG scheme of overall white, with a red nose section. (The H-19 preview on this page shows this color scheme.) In the 1980s, only helicopters destined for deployment to the polar regions were painted the high visibility scheme of international orange, but this scheme was eventually made standard for all HH-65s.
Note: This is an extended preview, as I built the kit in a short period of time, as an out-of-the-box entry for a local contest. I didn’t decide to do the preview until after the kit was completed, so there are no sprue or decal images.
|
THE KIT |
The kit is molded in bright red plastic. I assume Revell did this to match the color scheme of the USCG helo on the box art. Problem is, USCG helicopters aren’t red- they’re international orange.
The instructions are the typical Revell-Germany newsprint, with the typical multi-language warnings and color chart, with the assembly steps done in pictorial style.
Based on the box art, Revell is selling a USCG HH-65. Unfortunately, the kit has several inaccuracies, as it appears to be the civilian version of the helicopter with USCG decals added. This leads to some interesting inconsistencies. There is no rescue hoist over the right cabin door. The left side of the aircraft is the civilian version- the USCG version doesn’t have the aft window. (This can be fixed by puttying and painting over the window.) They have the basic color of the aircraft wrong.
Just when you may think that Revell doesn’t know anything about the USCG version, they surprise you. It seems they did realize that the HH-65 is different from the French version. There is a nice three view drawing of the aircraft on the last page, the typical paint and decal placement guide. Interestingly enough, they used an accurate HH-65 3-view for this. The drawing shows the correct window arrangement on the left side of the fueslage. The drawing also shows panel lines that aren’t molded in the kit. Also, the black and white photo on the first page of the instructions shows a model built with no aft window on the left side. (The instructions do not tell you to do this.)
Back to the issue of the rescue hoist: As previously mentioned, there is no hoist provided. However, the USCG decals provided are for a helicopter assigned to the US Naval Test Pilot School. I don’t know for sure, but it seems reasonable that they chose to model one of the testbed aircraft, (as opposed to a production aircraft assigned to one of the USCG Air Stations). The evaluation aircraft may not have had the rescue hoist fitted, at least not at first. What seems odd then is that the aircraft is painted in the International Orange scheme—because back in the 1980s, when this aircraft was entering service, only operational helos on temporary assignment aboard polar icebreakers were painted orange. I haven’t found a reference to support or contradict this apparent inconsistency, so I went ahead and used the decals as provided.
I had read in old reviews that the tail rotor on the Matchbox kit was too small for the USCG version of the helicopter. I don’t have a good enough reference to check, but I looked at several photos in the reference below, and the kit looks close enough to me.
|
CONSTRUCTION |
Forgetting about the
doors for a moment, I found fit to be pretty good, with a few exceptions. There
was a small gap to fill where the floor meets the fuselage sides in the
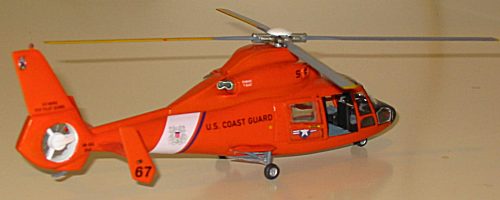
cockpit. The engine exhausts also needed some sanding to fit properly. I built my model with the right cabin door open, because
of problems with the door fit, even though that exposed the big empty cabin.
(Insert cabin picture here.) Small bits like the landing gear, gear doors, and engine
exhausts were left off the model until after painting and decaling.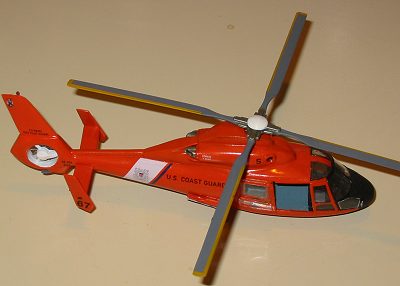 This is the old Matchbox kit. My kit had minimal flash on the main sprues, with
a little on the clear parts. The clear parts are thick, and the doors don’t fit
too well. The cockpit features seats, control sticks, rudder pedals, and a
console and instrument panel. The painting instructions for the cabin are
wrong. The cockpit should be painted black, with light grey seat cushions. The
aft cabin should be a blue grey color. There is no interior in the main cabin,
just a floor and a rear bulkhead.
This is the old Matchbox kit. My kit had minimal flash on the main sprues, with
a little on the clear parts. The clear parts are thick, and the doors don’t fit
too well. The cockpit features seats, control sticks, rudder pedals, and a
console and instrument panel. The painting instructions for the cabin are
wrong. The cockpit should be painted black, with light grey seat cushions. The
aft cabin should be a blue grey color. There is no interior in the main cabin,
just a floor and a rear bulkhead.
|
PAINT & DECALS |
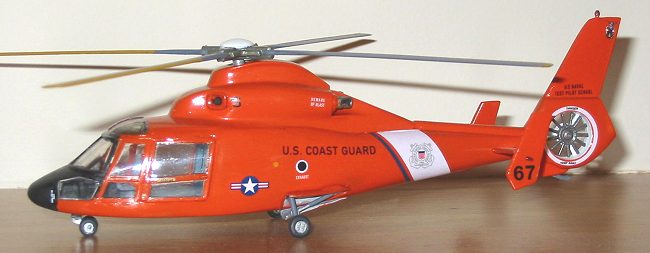
I painted my model with Testors Acrylic International Orange, which is a close match. A couple of months after I finished the model, I noticed that my local hobby shop is now carrying Testor’s new line of Model Master Marine Acrylics, and a Coast Guard Orange is one of the colors. Comparing the two, the new CG orange is a little bit redder. (If I knew then what I know now, I would have added a drop or two of red to the international orange paint.)
One of the biggest challenges in painting the HH-65 is getting the tail rotor area correct. The inside of the tail rotor area is white, so I had to come up with a way to paint the red plastic “hole” white, and then mask it and paint the rest of the fuselage orange. I airbrushed the tail area with light gray, to cover the red plastic. I then put a coat of white over the gray.
 Masking the “hole” so it stays white is a challenge. You
have to cut a circular mask just the right size, and center it perfectly—any
misalignment will stand out like a sore thumb. Adding to the problem is that
the tail rotor drive unit extends out of the “hole”, so the mask can’t lie
flat. After several failed attempts to make a decent mask, I gave up and brush
painted the orange around the edge. I then masked the hole with an oversize
mask and airbrushed the rest of the airframe with the orange. After it dried, I
removed the mask, and touched up the area where the airbrushed and brush painted
areas met.
Masking the “hole” so it stays white is a challenge. You
have to cut a circular mask just the right size, and center it perfectly—any
misalignment will stand out like a sore thumb. Adding to the problem is that
the tail rotor drive unit extends out of the “hole”, so the mask can’t lie
flat. After several failed attempts to make a decent mask, I gave up and brush
painted the orange around the edge. I then masked the hole with an oversize
mask and airbrushed the rest of the airframe with the orange. After it dried, I
removed the mask, and touched up the area where the airbrushed and brush painted
areas met.
I painted the doors off of the airframe. I dipped each piece in Future, and let it dry for a day. I then masked the doors, and sealed the edges of the tape with a little brushed-on Future, and let that dry for a day. I then airbrushed the doors with the orange. The overhead windows in the cockpit were painted with Future that was tinted with a little black acrylic paint.
The windshield is an integral part of the cabin assembly, so it was painted after assembly. I used the same future, mask, future technique, to make sure the black paint didn’t get in the glass areas. The main rotor was assembled and painted off of the model. I painted the rotors a light gray, but recent posts on rec.models.scale report that the color should be a little bit more of a greenish gray than the one I used.
The kit provides decal for two versions: A USCG HH-65A assigned to the US Naval Test Pilot School, and a French version assigned to the French test pilot school. The decals are simply terrific. I found them to be of very high quality, on par with quality after market ones.
The gloss orange paint provided a nice base for the decals. I did not need a gloss coat. I used Future as a setting agent for the decals—I just brushed a little on the spot the decal was going, and then applied the decal. The decals looked terrific once everything was dry. I then gave the entire airframe a brush coat of Future, to even out the glossiness of the finish.
|
FINAL ASSEMBLY |
With the decals in place and everything dry, I attached the landing gear and other little bits. I then used white glue to attach the doors and windows. I used a fine brush to touch up the places where the white glue was filling gaps. I then attached the main rotor, and the model was finished.
|
CONCLUSIONS |
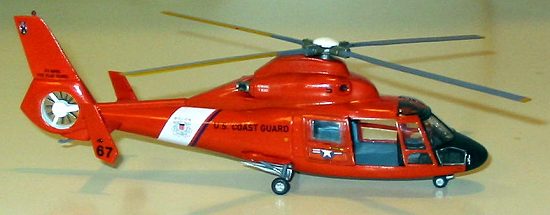 This is the only USCG HH-65 in 1/72 scale, and the
only option in any scale until the recent release of the 1/48 scale Trumpeter
kit. This is the old Matchbox kit, with an attempt to update it to the USCG
version of the helicopter. All of the faults of the old Matchbox kit are still
there, with the typical thick clear parts and some fit problems. On the plus
side, the decals are terrific, and the kit is a good starting point if you want
an HH-65 in 1/72. I built mine OOB, the only change I made was to putty over
the extra window, and it sure looks like an HH-65 to the casual observer.
This is the only USCG HH-65 in 1/72 scale, and the
only option in any scale until the recent release of the 1/48 scale Trumpeter
kit. This is the old Matchbox kit, with an attempt to update it to the USCG
version of the helicopter. All of the faults of the old Matchbox kit are still
there, with the typical thick clear parts and some fit problems. On the plus
side, the decals are terrific, and the kit is a good starting point if you want
an HH-65 in 1/72. I built mine OOB, the only change I made was to putty over
the extra window, and it sure looks like an HH-65 to the casual observer.
Considering the price, and the quality decals, I’d recommend the kit. (Just think of it as a decent Matchbox kit, updated with quality decals.)
|
REFERENCES |
http://www.globalsecurity.org/military/systems/aircraft/hh-65.htm
http://www.uscg.mil/datasheet/dataindx.htm
Review courtesy of me and my wallet.
If you’re interested in US Coast Guard models, check out my list of USCG Model Kits at:
http://home.earthlink.net/~billkaja/kitlist.htm
http://www.globalsecurity.org/military/systems/aircraft/hh-65.htm
http://www.uscg.mil/datasheet/dataindx.htm
Copyright ModelingMadness.com. All rights reserved. No reproduction in part or in whole without express permission.
If you would like your product reviewed fairly and fairly quickly, please contact the editor or see other details in the Note to Contributors.