Italeri 1/48 AC-130A Gunship
|
KIT # |
818 |
|
PRICE: |
£ |
|
DECALS: |
See review |
|
REVIEWER: |
|
|
NOTES: |
|
HISTORY |
 This is the bit I hate doing. Does anyone not know the history of the Herc?
Lots of stuff on the web for that. The AC specifics are possibly more
interesting though again there is far more on the web then I feel like
writing, try here:
This is the bit I hate doing. Does anyone not know the history of the Herc?
Lots of stuff on the web for that. The AC specifics are possibly more
interesting though again there is far more on the web then I feel like
writing, try here:|
THE KIT |
I have to be honest here and point out that I have been making this on and off
about the last 14 years, and if it hadn’t been for the 4 Turning contest it
still wouldn’t be finished (thanks Scott :-) so I really can’t remember what
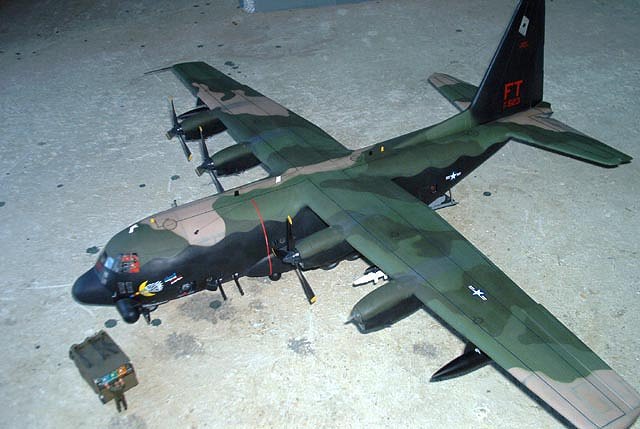
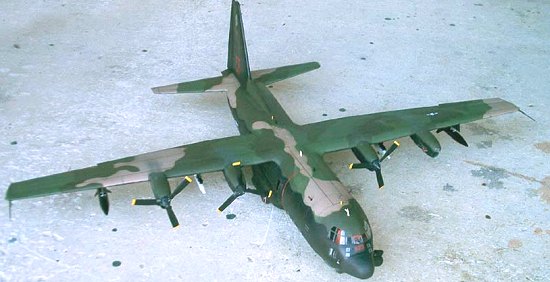
it looked like in the 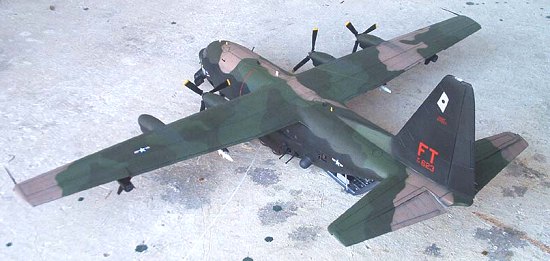 box. Except it’s big. Really BIG. The final kit has a
wingspan of over 80cm and it’s about 60cm long. It’s not exactly state of the
art, raised panel lines, simplified details, some fit issues (they are BIG
pieces though (did I mention that?), which makes that understandable I guess)
but I don’t think you’ll be seeing a Tamigawa kit of this a/c any time soon so
I can live with it. And it looks like a Herc, to me at least. It’s molded in
black plastic and represents one of the AC-130As at around 1970, when they
were armed with two 7.62 miniguns, two 20mm Vulcans and two 40mm Bofors and
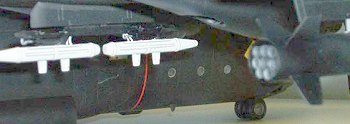
includes a flare dispenser that was carried on the rear ramp. Underwing there
are four ALQ-87 ECM pods (in two pairs) and two fuel tanks (though I
understand these were rarely carried “in country”). The props are the three
bladed type appropriate to the -A but I’m told they have shape issues and a
correction set is available from OZ mods. There are decals provided for
three aircraft, a Vietnam era aircraft 60490 “Thor” in the three colour camo
over black, a AFRES a/c 41630 in overall dark grey (Gunship Grey perhaps :-)
and 56570 in overall black. The decals are a bit thick and didn’t react much
to the Super Sol I’ve been using for years, but then I didn’t use many of the
kit decals so this wasn’t a big issue.
box. Except it’s big. Really BIG. The final kit has a
wingspan of over 80cm and it’s about 60cm long. It’s not exactly state of the
art, raised panel lines, simplified details, some fit issues (they are BIG
pieces though (did I mention that?), which makes that understandable I guess)
but I don’t think you’ll be seeing a Tamigawa kit of this a/c any time soon so
I can live with it. And it looks like a Herc, to me at least. It’s molded in
black plastic and represents one of the AC-130As at around 1970, when they
were armed with two 7.62 miniguns, two 20mm Vulcans and two 40mm Bofors and
includes a flare dispenser that was carried on the rear ramp. Underwing there
are four ALQ-87 ECM pods (in two pairs) and two fuel tanks (though I
understand these were rarely carried “in country”). The props are the three
bladed type appropriate to the -A but I’m told they have shape issues and a
correction set is available from OZ mods. There are decals provided for
three aircraft, a Vietnam era aircraft 60490 “Thor” in the three colour camo
over black, a AFRES a/c 41630 in overall dark grey (Gunship Grey perhaps :-)
and 56570 in overall black. The decals are a bit thick and didn’t react much
to the Super Sol I’ve been using for years, but then I didn’t use many of the
kit decals so this wasn’t a big issue.
|
CONSTRUCTION |
As I said, I’ve been doing this on and off for a long time so you’ll have to
forgive me if I gloss over the bits I can’t remember.
Construction was initially much as the instructions but deviated more and more
as time went on. The main reason for this was that I couldn’t stand the big
empty space in the back of this thing, especially as there should be a large
systems operator booth filling most of it, so armed with a few drawings from
my references I built one. But I figured it was so big I
 should really do it
with the door open so you could see the consoles. So I built those too, and
then realised that you weren’t
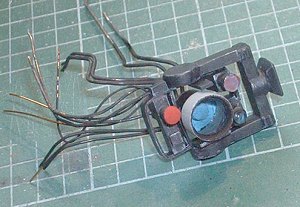
going to be able to see them as it was dark in there. So I thought I would
install some LEDs for a bit of illumination which involved running some
wiring. I figured that the best place to provide power was from the front
ground power point as I had several pics of GPUs plugged in here (behind one
of the wind deflectors that gets folded out for the purpose, so that added a
bit more interest to the outside as well) and I had in mind I could make a
diorama using a GPU cart to provide the power. So the front end of t
should really do it
with the door open so you could see the consoles. So I built those too, and
then realised that you weren’t
going to be able to see them as it was dark in there. So I thought I would
install some LEDs for a bit of illumination which involved running some
wiring. I figured that the best place to provide power was from the front
ground power point as I had several pics of GPUs plugged in here (behind one
of the wind deflectors that gets folded out for the purpose, so that added a
bit more interest to the outside as well) and I had in mind I could make a
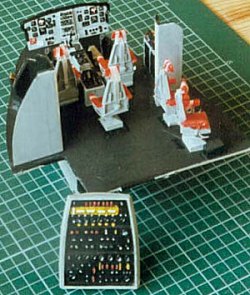
diorama using a GPU cart to provide the power. So the front end of t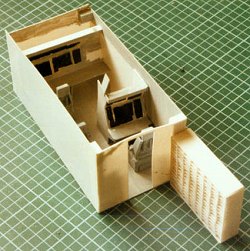 he a/c
was built, cockpit detailed using info from various sources, scratchbuilt five
seats (the kit supplied four as I recall), throttle levers, side consoles etc,
with the wiring in place with enough length to reach down the fuselage.
(The connectors are small PCB plug and socket jobs I bought from Maplin with
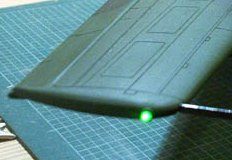
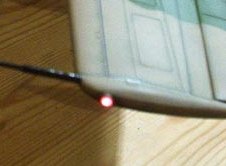
the LEDs). While I was buying these I found some really small red and green
ceramic LEDs (2mm), so we were straight into wingtip lights, and when I found
a self flashing unit as well (just add power) I had to put a beacon on the
tail too.
he a/c
was built, cockpit detailed using info from various sources, scratchbuilt five
seats (the kit supplied four as I recall), throttle levers, side consoles etc,
with the wiring in place with enough length to reach down the fuselage.
(The connectors are small PCB plug and socket jobs I bought from Maplin with
the LEDs). While I was buying these I found some really small red and green
ceramic LEDs (2mm), so we were straight into wingtip lights, and when I found
a self flashing unit as well (just add power) I had to put a beacon on the
tail too.
Anyway, the cockpit was done, front fuselage halves with additional wiring
together and a booth more or less finished. (Unfortunately this was all BDC
(Before Digital Cameras) so I have very few pictures of this stage)
Turning to the rest of the kit I did the following:
Built new barrels for the miniguns and Vulcans from plastic rod and small
circles of plastic card (with little holes drilled in them, fiddly stuff) as
the supplied solid barrel assemblies looked a bit naff to me. These were
eventually fitted to the guns through the open windows after the rest of the
kit was finished and painted. Or they wouldn’t have survived. I added some
bits to the guns and mounts as well based on photos and drawings. But you
can’t see any of it (I must stop doing that!).
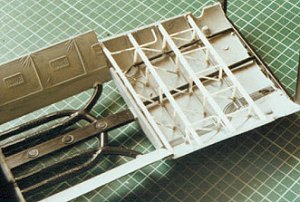 Also made a rack for the 40mm
ammo and filled many of the slots with “40mm Clips” which are actually little
strips of bottles from some HO scale
Also made a rack for the 40mm
ammo and filled many of the slots with “40mm Clips” which are actually little
strips of bottles from some HO scale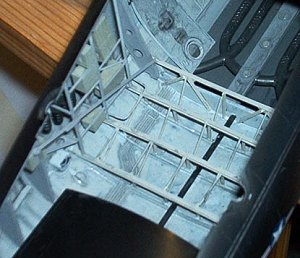 railway platform accessory set. But you
can’t really see them anyway. Again.
railway platform accessory set. But you
can’t really see them anyway. Again.
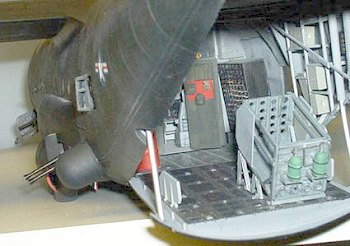
Using info from photographs taken at various airshows I built up some
structure in the rear cargo bay roof using various plastic strips,
I-beam/angle stuff and rods and wires to represent the plumbing. Also in the
same area (but not at the same time) I added similar structural details to the
sides of the aircraft, again based on pictures from various airshows. I
should point out that every a/c I looked at was different with regard to what
was strapped where, different boxes, containers, structure etc so I wouldn’t
pretend my bits accurately represent any particular a/c, but it certainly
looks a lot busier.
One of my reference pointed out that the engine nacelles on the -A models
extended further back under the wing than the kits did, these wings being more
accurately -E apparently. The extensions were built up using multiple layers
of my favourite modelling filler (the Humbrol blue stuff) and laboriously
sanded to shape. While on this point, I intended to scratchbuild the anti
Strella shields fitted about 1972 but I bottled out, settling for the support
structure round each 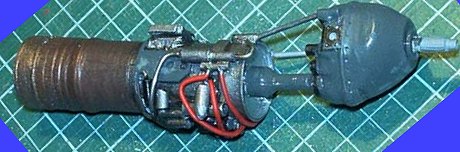 nacelle. Well, they weren’t fitted all the time, weight
and drag issues. And I didn’t have enough good references (please don’t send
me any or I’ll have to add them).
nacelle. Well, they weren’t fitted all the time, weight
and drag issues. And I didn’t have enough good references (please don’t send
me any or I’ll have to add them).
Still on the wings, the fuel vent pipes at the wingtips were removed, again
not a -A feature. While I was at it I removed the ailerons so I could
position them slightly off. But I drew the line at the flaps! The leading
edges of these surfaces were fitted with half round strip and all sanded and
filled so they would look 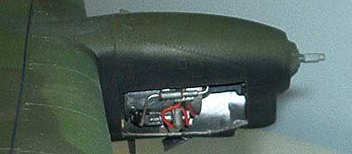 better when fitted back in place. And did the
elevators and rudder at the same time. While in the tail area the “beaver
tail” was cut back (again the kit represents an E model), filled and sanded to
shape.
better when fitted back in place. And did the
elevators and rudder at the same time. While in the tail area the “beaver
tail” was cut back (again the kit represents an E model), filled and sanded to
shape.
STILL in the wing area I opened one of the nacelles and installed an engine
from “Engines and Things”, a bit simplistic but with some additional bits of
plastic, some solder wire for plumbing and a bit of paint it looks the part
 (especially as you can’t see much of it).
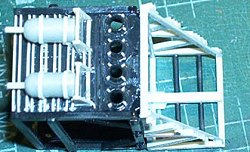
I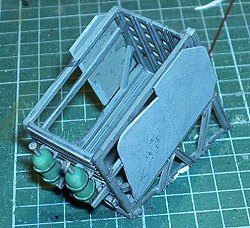 detailed the flare launcher with lots of bits of plastic card, made some gas
bottles and their mounts, added more plumbing, replaced the mounting structure
with a scratchbuilt item and used plastic card to make the armour for it. I
didn’t have any pictures of the flares themselves so I left it empty. Now if
anyone has pictures of them I might be tempted to add some....
detailed the flare launcher with lots of bits of plastic card, made some gas
bottles and their mounts, added more plumbing, replaced the mounting structure
with a scratchbuilt item and used plastic card to make the armour for it. I
didn’t have any pictures of the flares themselves so I left it empty. Now if
anyone has pictures of them I might be tempted to add some....
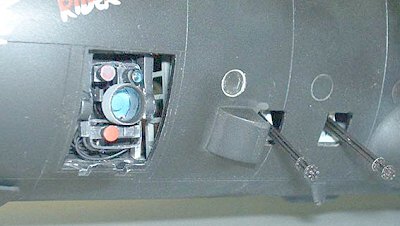
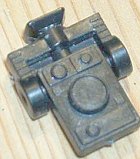 I added some wiring and a control box to the Xenon lamp in the rear fuselage
and started to add some detail to the Low Light TV kit in the front fuselage
door. Then gave up on the kit part and built it from scratch, hopefully the
pictures show why :-)
I added some wiring and a control box to the Xenon lamp in the rear fuselage
and started to add some detail to the Low Light TV kit in the front fuselage
door. Then gave up on the kit part and built it from scratch, hopefully the
pictures show why :-)
About this time it seemed a good idea to put it all together, so the
 various
bits that make up the rest of the fuselage, inside and out, were persuaded to
fit together and join up to the front fuselage section while trying to make
sure the wire runs were OK and there was a way to feed the other wires into
the fuselage. I had already put my little circuit board into the far end of
the booth figuring that wires going into this would look sensible anyway so it
was just a matter of cutting holes where the wings and tail joined the
fuselage and making some access internally. The fit of the two fuselage
sections was a little less than perfect, if I hadn’t been doing the wiring I
would probably have built the fuselage differently, maybe joining the front
and back sections to each other first before putting the two halves together.
But however you do it the fitting of the internal bits is a bit messy I feel.
But it went together and filler hid the worst of the join issues (which
fortunately were underneath anyway).
various
bits that make up the rest of the fuselage, inside and out, were persuaded to
fit together and join up to the front fuselage section while trying to make
sure the wire runs were OK and there was a way to feed the other wires into
the fuselage. I had already put my little circuit board into the far end of
the booth figuring that wires going into this would look sensible anyway so it
was just a matter of cutting holes where the wings and tail joined the
fuselage and making some access internally. The fit of the two fuselage
sections was a little less than perfect, if I hadn’t been doing the wiring I
would probably have built the fuselage differently, maybe joining the front
and back sections to each other first before putting the two halves together.
But however you do it the fitting of the internal bits is a bit messy I feel.
But it went together and filler hid the worst of the join issues (which
fortunately were underneath anyway).
 Then the wings were fitted, and the worst part of the whole thing
followed. Getting the connectors from the wings and the tail into the
fuselage wasn’t too bad, making the connection was a B*&%*£*$D. Trying to
plug a tiny little plug into a
Then the wings were fitted, and the worst part of the whole thing
followed. Getting the connectors from the wings and the tail into the
fuselage wasn’t too bad, making the connection was a B*&%*£*$D. Trying to
plug a tiny little plug into a
tiny little connector, through a tiny little side window with a pair of
tweezers, no light getting in, unable to see past the tweezers and your fat
fingers...... It took an age. And I knocked one of the miniguns off its
mount, so I had to try and glue the thing back in the right place through a
tiny little side window with a pair of tweezers,
 no light getting in, unable
to see past the tweezers and your fat fingers while the glue whatever glue
does .... Ho ho, that was fun! And then one of the wingtip lights didn’t
work and I had to unplug it, get the wire out the window, resolder the
connection and plug it back in (through a tiny little side window with a pair
of tweezers, no light getting in, unable to see past the tweezers a..... you
get the idea by now I’m sure). Eventually all together though, plugged a
battery in through the external GPU and lights all working! Hurrah! But the
LEDs in the booth cast a feeble glow and quite frankly make no difference
whatsoever to visibility of the interior! How I laughed! So if you ever come
to look at this model, please bring a torch......(flashlight to
non-Anglophiles. Ed)
no light getting in, unable
to see past the tweezers and your fat fingers while the glue whatever glue
does .... Ho ho, that was fun! And then one of the wingtip lights didn’t
work and I had to unplug it, get the wire out the window, resolder the
connection and plug it back in (through a tiny little side window with a pair
of tweezers, no light getting in, unable to see past the tweezers a..... you
get the idea by now I’m sure). Eventually all together though, plugged a
battery in through the external GPU and lights all working! Hurrah! But the
LEDs in the booth cast a feeble glow and quite frankly make no difference
whatsoever to visibility of the interior! How I laughed! So if you ever come
to look at this model, please bring a torch......(flashlight to
non-Anglophiles. Ed)
|
CAMOUFLAGE & MARKINGS |
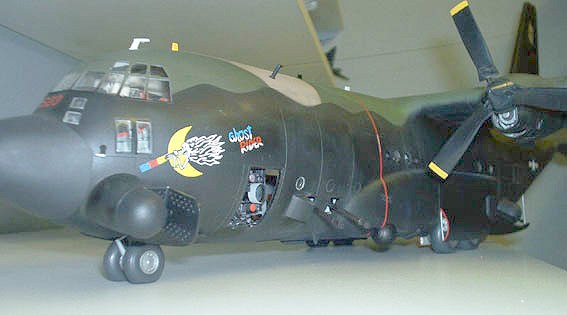
So onto painting! I’ve had the SuperScale sheet for AC-47 and AC-130 Gunships
for years (I will do the -47 one day, honest) so there was no problem with
choosing a scheme (54623 Ghost Rider), just the practicalities of it. It’s a
BIG model and moving round it while painting it was a challenge in itself. I
made a set of paper masks for the different upper surface colours using
Photoshop and Illustrator and a scan from the TO 1-1-4 kindly provided by
someone on line and got on with it. It was painted using a mixture of Humbrol
(Black, Greens 34079 and 34102) and Xtracolor (Tan 30219) paints and as
 the
kit was black plastic to start with I thought I would try “pre-shading” for
the first time (as I hadn’t the bottle to rescribe the thing it was the only
way I could think to do the panel lines) so I took it slowly and tried to
avoid painting the raised lines at all and then when the main paint job was
done, where the panel lines were too wide or too obvious, I misted over them
lightly to tone them down. I need more practice but I’m fairly happy with
it.
the
kit was black plastic to start with I thought I would try “pre-shading” for
the first time (as I hadn’t the bottle to rescribe the thing it was the only
way I could think to do the panel lines) so I took it slowly and tried to
avoid painting the raised lines at all and then when the main paint job was
done, where the panel lines were too wide or too obvious, I misted over them
lightly to tone them down. I need more practice but I’m fairly happy with
it.
The decals were applied (a mixture of Superscale and the kit decals) and I used two lots of Xtradecal thin black lines doing the walkways on the upper wings, fuselage and tail. In fact, if you look very closely, some of them are actually dark blue, as I ran out of black! But no one at the IPMS club night spotted that (or didn’t comment anyway) so I guess you have to know what to look for. I would have liked more stencilling but there you go, only sheet I know of is a Daco sheet for Belgian C-130s and I didn’t think that would be relevant. Then the upper surfaces were matted with Xtracolor Matt varnish. The black was a worry, some of the references say it’s glossy, most of the pictures looked semi-glossy. So I went with that (again Xtracolor varnish).
|
FINAL CONSTRUCTION |
 Then it was just a matter of finishing off. The undercarriage (wheels flatted
by heating them with a candle and pressing them on the table, pictures show
quite a bulge on the main tyres), u/c doors (nose doors modified as per
references, this a/c being an early one with different nose u/c door
configuration to the kit supplied ones) flare launcher, gun barrels, 40mm assy,
LLTV assy, Xenon light, aerials, pr
Then it was just a matter of finishing off. The undercarriage (wheels flatted
by heating them with a candle and pressing them on the table, pictures show
quite a bulge on the main tyres), u/c doors (nose doors modified as per
references, this a/c being an early one with different nose u/c door
configuration to the kit supplied ones) flare launcher, gun barrels, 40mm assy,
LLTV assy, Xenon light, aerials, pr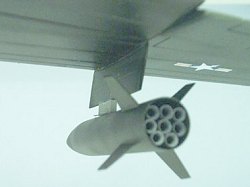 ops etc etc etc were all fitted (and moving
this thing becomes really difficult!)
ops etc etc etc were all fitted (and moving
this thing becomes really difficult!)
Under the wing I wanted something different to the kit supplied parts (as I
said, the tanks were rarely carried) so I found a couple of spare F-4 wing
tanks which were more or less the right size and, using some plastic tube for
the internals and card for the fins, turned then into SUU-42 chaff and flare
dispensers and hung them on the outboard pylons and moved the ALQ-87 ECM
pods to the inboard position as per a few photographs I had showing this
configuration. And it was finished!
|
CONCLUSIONS |
REFERENCES
 The fit isn’t perfect (though some of that may be me), some of the details are
oversimplified, it’s a devil to find space for and to accurately represent a
AC-130A you need to do some work. But no one else is going to make one of
these for us so we should be grateful to Italeri for that and it IS an
imposing model (and I’m glad it’s finished). I won’t be making another one,
but if I did I wouldn’t bother with the wiring (though that went down well at
the club) and I would assemble it differently and I think it would all be a
lot easier and less stressful. Hope you like it!
The fit isn’t perfect (though some of that may be me), some of the details are
oversimplified, it’s a devil to find space for and to accurately represent a
AC-130A you need to do some work. But no one else is going to make one of
these for us so we should be grateful to Italeri for that and it IS an
imposing model (and I’m glad it’s finished). I won’t be making another one,
but if I did I wouldn’t bother with the wiring (though that went down well at
the club) and I would assemble it differently and I think it would all be a
lot easier and less stressful. Hope you like it!
 Gunships - A Pictorial History of Spooky - Larry Davis - ISBN 0-89747-123-7
Lock On No 3 - C-130H/AC-130E - Verlinden - ISBN 90 70932 08 3
FineScale Modeller August 1988
My photos.
March 2003
Copyright ModelingMadness.com
If you would like your product reviewed fairly and fairly quickly, please contact the editor or see other details in the Note to Contributors.