|
KIT: |
Hasegawa 1/48 F-18D 'Hornet' |
|
KIT # |
09389 |
|
PRICE: |
? |
|
DECALS: |
one option |
|
REVIEWER: |
|
|
NOTES: |
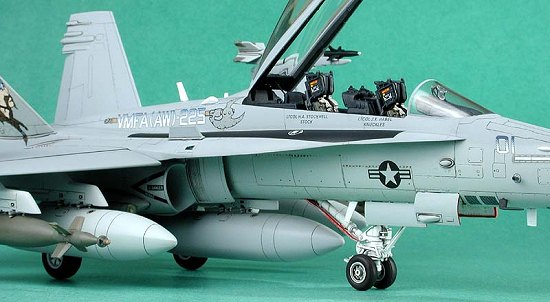
Black Box cockpit; CAM decals |
|
HISTORY |
Roger Jackson has already detailed the history of this magnificent aircraft on M2. Like his models, his history section is far more detailed than I can ever hope for, so go read his!
|
THE KIT |
Hasegawa “owns” the market when it comes to 1/48
F-18’s! They better, since this kit is one of the most expensive 1/48
kit’s in existence! There is simply no better kit available in this
scale. The kit consists of about 207 injected molded plastic parts that
are typical Hasegawa quality, and feature nicely done recessed panel
lines and finely engraved detail. Also included is a photo-etch metal
detail fret consisting of 12 items, and the landing gear are provided in
finely cast white metal for strength.
 Since I was doing a folded wings
version (that is not provided for in the kit), pieces were used from a
Hasegawa F-18C kit that featured that option (wings are identical between
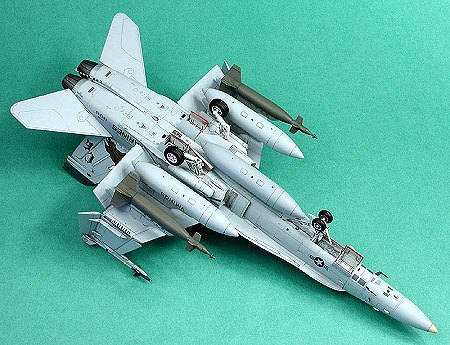
the “C” & “D”). Note that no ordnance is provided in the kit and must be
purchased separately. I used ordnance from Hasegawa Weapons Set B&C. The
kit decals are nicely done; custom printed by Cartograf, featuring the
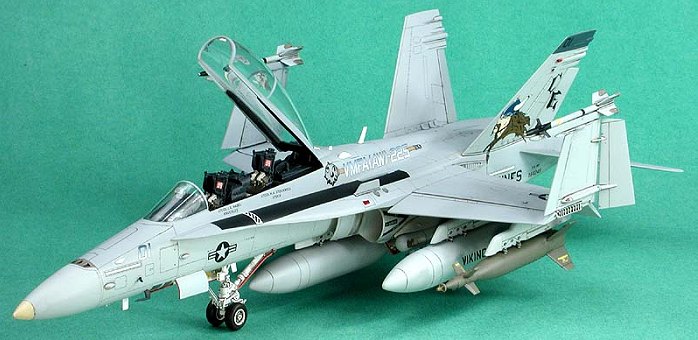
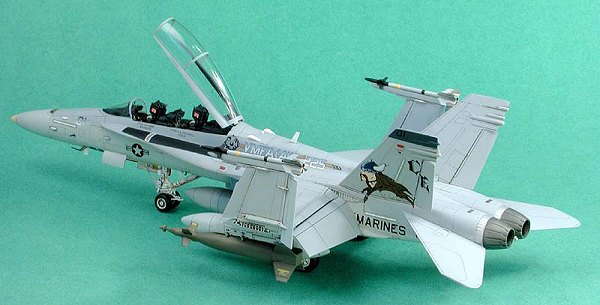
single option of the F/A-18D flown by the VMFA(AW)-225 “Vikings” from
MCAS Miramar. The instruction sheet is an “assembly drawing” type with
painting instructions keyed to Gunze Sangyo paints and consists of 18
pages.
Since I was doing a folded wings
version (that is not provided for in the kit), pieces were used from a
Hasegawa F-18C kit that featured that option (wings are identical between
the “C” & “D”). Note that no ordnance is provided in the kit and must be
purchased separately. I used ordnance from Hasegawa Weapons Set B&C. The
kit decals are nicely done; custom printed by Cartograf, featuring the
single option of the F/A-18D flown by the VMFA(AW)-225 “Vikings” from
MCAS Miramar. The instruction sheet is an “assembly drawing” type with
painting instructions keyed to Gunze Sangyo paints and consists of 18
pages.
In order to spruce up the cockpit (and also to make it a bit more accurate since Hasegawa basically decided to replicate the cockpit from the F-18B!) I used the Black Box (BB) cockpit set for the F-18D (48-014). This set also has some minor accuracy issues (mainly the ejection seat and cockpit display) so the BB F-18D “Multi-Purpose” set (48-037) was also used. Fortunately, the later releases from BB have addressed these issues so only a single set is now needed.
The Cartograf supplied decals are very nicely done, but I had a little accident, spilling decal solvent all over them while they were still on the sheet. I definitely recommend that decal solvents be used after they are on the model and not while still on the sheet! Since I wanted to do the “Vikings” scheme, decals from CAM (48-032) were substituted, and they are far better than the Cartograf decals so I’m glad I screwed up!
|
CONSTRUCTION |
 The first job up was to separate and clean up the
resin cockpit parts. The interior cockpit surfaces were painted Gunze
Sangyo Gray FS 36231 (H317) (Dark Gull Gray). Testors MM Flat Black was
used for most of the radio and interior boxes, and individual details
were picked out in various colors as seen in the detail pictures to
provide a bit of variety. After all painting was completed, all pieces
were given a light wash of Tamiya Smoke and then dry brushed lightly with
Humbrol Light Gull Gray (#129) to enhance the nicely done raised detail
The first job up was to separate and clean up the
resin cockpit parts. The interior cockpit surfaces were painted Gunze
Sangyo Gray FS 36231 (H317) (Dark Gull Gray). Testors MM Flat Black was
used for most of the radio and interior boxes, and individual details
were picked out in various colors as seen in the detail pictures to
provide a bit of variety. After all painting was completed, all pieces
were given a light wash of Tamiya Smoke and then dry brushed lightly with
Humbrol Light Gull Gray (#129) to enhance the nicely done raised detail
There are several areas of assembly that will be quite challenging with this kit. First, the fuselage is split into a top and bottom section and the wheel wells have a large seam that is virtually impossible to fix. In addition, the join between the two pieces is poor creating several gaps. The one-piece seamless intakes are a nice touch, but they fit very poorly into the provided pieces and require some careful sanding and filling to correct. In addition, the engine intake ducting opens into an empty fuselage. The nose section also fit quite poorly and the mating of this part to the fuselage-required lots of careful dry fitting and sanding.
The canopy is the usual one-piece affair with a ridge seam down the middle. However, the fit of the front windscreen is atrocious, and will require a lot of careful work to blend into the fuselage with filler.
The kit provided pylons and sensor mounts fit horribly! I used lots of white glue smoothed into shape with a moist cotton bud to fill the gaps as using Mr. Surfacer and sanding would have destroyed a lot of detail.
|
CAMOUFLAGE & MARKINGS |
 I rarely prime injected molded plastic models
before painting, but I had to correct so many ill-fitting pieces that I
broke that rule with this model. I used Mr. Surfacer 1000 airbrushed to
check all joins. First up was airbrushing the wheel wells and landing
gear components with Polly Scale Acrylic Reefer White. The undersides
were airbrushed with Gunze Sangyo Aqueous Hobby Color Gray FS36375
(H-308). After drying overnight, I airbrushed the topsides with Gunze
Sangyo Aqueous Hobby Color Gray FS36320 (H-307).
I rarely prime injected molded plastic models
before painting, but I had to correct so many ill-fitting pieces that I
broke that rule with this model. I used Mr. Surfacer 1000 airbrushed to
check all joins. First up was airbrushing the wheel wells and landing
gear components with Polly Scale Acrylic Reefer White. The undersides
were airbrushed with Gunze Sangyo Aqueous Hobby Color Gray FS36375
(H-308). After drying overnight, I airbrushed the topsides with Gunze
Sangyo Aqueous Hobby Color Gray FS36320 (H-307).
After applying a Payne’s Gray lightened with Titanium White watercolor based wash to all the surface details, I cleaned up the overruns and then sealed it with a light coat of Model Master Clear Gloss to prepare the surface for decals.
The CAM decals are very nicely printed, in register, and sufficiently opaque. The decals went on beautifully and snuggled down quite well with a coat of Micro Set. After drying overnight, I wiped the decals off with Pollys Plastic Prep to remove any residue. After drying for a few hours, I shot a light coat of Model Master Clear Gloss. I then airbrushed a light coat of Model Master Flat for the final coat.
|
FINAL CONSTRUCTION |
The landing gear, doors, exhaust nozzles, pylons, weapons, and drop tank were all installed. After a final topcoat of Testors Dullcote to provide the final finish, all masking was removed and the final antennae were mounted in place to finish off the model.
|
CONCLUSIONS |
 While this model builds up to a very impressive
“Hornet”, it took quite a bit of work to fix all the ill-fitting pieces
and I would only recommend this kit to more advanced modelers. The lack
of ordnance is also a real gripe because why would you build a “Strike
Hornet” without any ordnance?
While this model builds up to a very impressive
“Hornet”, it took quite a bit of work to fix all the ill-fitting pieces
and I would only recommend this kit to more advanced modelers. The lack
of ordnance is also a real gripe because why would you build a “Strike
Hornet” without any ordnance?
If you would like your product reviewed fairly and quickly by a site that has over 200,000 visitors a month, please contact me or see other details in the Note to Contributors.