Testors 1/48 SR-71 Blackbird
|
KIT # |
7584 |
|
PRICE: |
£ 19,95 |
|
DECALS: |
Four aircraft |
|
REVIEWER: |
|
|
NOTES: |
True Details cockpit set used |
|
HISTORY |
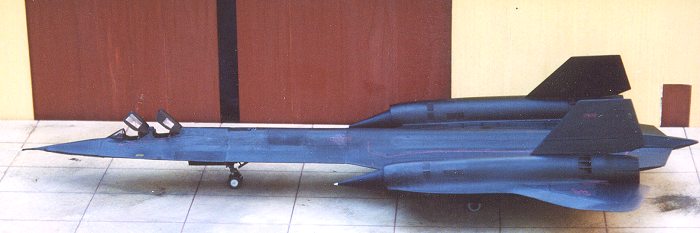
The SR-71 Blackbird is one of the most spectacular planes I know, both in shape and in performance. It was designed to fly at altitudes off over 85.000 feet, and at speeds beyond mach 3 (over 2190 mph). The Russian Mig 25 could reach Mach 3, but at that speed it was a matter of minutes before the engines on this plane would fry themselves. The X-15 is the only plane that could fly both faster and higher, but only for minutes, while these were cruising altitude and speed for the Blackbird...
The SR-71 Blackbird was developed in the late '50th and early '60th at the 'Skunk works' at Lockheed. The line started with the Lockheed A-12, which took to the sky in 1962. In a way it was one of the first plane in which stealth was one of the desired faculties. Along with high altitude and high speed it was meant to make the plane more or less invulnerable to countermeasures. Like the U-2, it was designed for over flight reconnaissance. In the wake of the U-2 incident in Russia, an agreement was signed between the U.S. and the U.S.S.R., that prohibited these over flights. Thus the SR-71 was developed, with side way looking radar and camera's, and a 2 men crew. The first SR-71 flew in 1964. All in all, 36 or 38 of these planes were built, and they served for over 35 years all over the world.
A normal SR-71 flight would be something like this:
Before take off, maintenance crews would prepare the plane for about 19 hours. The final checklist with pilots on board would take 25 minutes, after which
the plane was wheeled out of the hangar. With a low fuel load and afterburners
roaring the plane would takeoff.
Soon after takeoff the plane would rendezvous with a KC 135 Q tanker plane.
After being refuelled, the plane would be able to fly about 2500 miles before
the next refuelling.
It would proceed to cruising speed and altitude and make its flight alongside
the wanted area.
After taking data, it would come down again for refuelling (if necessary) and
return home. After flight another 3 hours were needed by ground crews to 'switch' the
plane off.
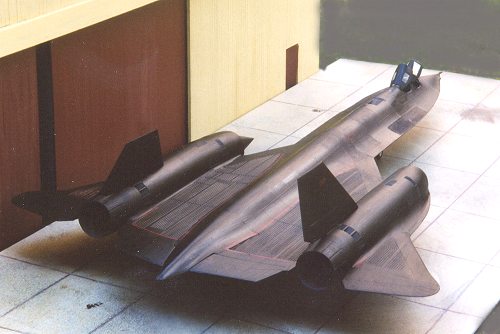 The Blackbird looks spectacular but is, in a way, just ‘normal’ delta winged
large plane. The weird shape is the largely the result of 2 differences; the
huge engines halfway each wing and the double tail fins. The large engines are
to provide the needed power, the large tail fins are the result of the high
altitude the plane cruises. Take those two items off, and one is more or less
left with a smallish Concorde... To cope with friction heat from this speed,
most of the airframe is made of titanium compounds. As Titanium would corrode
after contact with cadmium, special tools had to be produced to work on the
plane. In flight the plane would heat up to about 400 degrees. To provide
possibilities for the expansion that resulted from this heat, on the ground the
plane would leak fuel badly (up to about 100 pounds or 16 gallons an hour).
Since the used JP-7 fuel was not particularly flammable, it was not as dangerous
as it sounds. Other planes in this family are the M21, YF-12A and SR-71B, but
all planes look virtually the same, with only slight differences in nose shape
and cockpits (A-12: one cockpit, YF-12 no fairing along nose section, SR-71B
second cockpit placed higher).
The Blackbird looks spectacular but is, in a way, just ‘normal’ delta winged
large plane. The weird shape is the largely the result of 2 differences; the
huge engines halfway each wing and the double tail fins. The large engines are
to provide the needed power, the large tail fins are the result of the high
altitude the plane cruises. Take those two items off, and one is more or less
left with a smallish Concorde... To cope with friction heat from this speed,
most of the airframe is made of titanium compounds. As Titanium would corrode
after contact with cadmium, special tools had to be produced to work on the
plane. In flight the plane would heat up to about 400 degrees. To provide
possibilities for the expansion that resulted from this heat, on the ground the
plane would leak fuel badly (up to about 100 pounds or 16 gallons an hour).
Since the used JP-7 fuel was not particularly flammable, it was not as dangerous
as it sounds. Other planes in this family are the M21, YF-12A and SR-71B, but
all planes look virtually the same, with only slight differences in nose shape
and cockpits (A-12: one cockpit, YF-12 no fairing along nose section, SR-71B
second cockpit placed higher).
|
THE KIT |
The Blackbird is a big bird, and in this scale, it is a BIG kit. To make sure one knows what one is getting into, Testors delivers it in an even bigger box. Inside there are 3 plastic bags: one contains a small sprue with some clear parts, the other 2 bags contain a total of 5 sprues and one lose fuselage part, all in black plastic. At first glance everything looked nice, crisp and with no huge problems. There is one BIG injection-mark right on top of a fuselage part, but it is well accessible and I expect it to be no real problem. The kit has raised panel lines.
The kit comes with decals for 4 aircraft:
 The instructions are a 12 pages booklet in A-4 format, with some history on
the frontpage, some interesting historical notes scattered all over the place
and with some reference pictures on the back. A nice touch are the preliminary
painting instructions that accompany every step of the building.
The instructions are a 12 pages booklet in A-4 format, with some history on
the frontpage, some interesting historical notes scattered all over the place
and with some reference pictures on the back. A nice touch are the preliminary
painting instructions that accompany every step of the building.
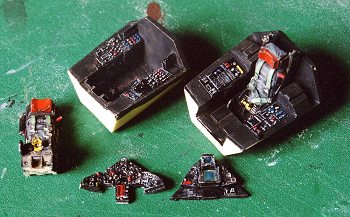
The True Details cockpit came in a plastic bag. It contained 2 cockpit tubs, 2 ejection seats with seatbelts, 2 instrument panels, 4 side wall sticks and one anti glare panel. Upon opening I discovered a thin plate of one of the ejection seats had already broken off, but a little C.A. fixed it. The instructions, both on use and on painting, looked rather minimal to me, and I was a bit worried about how to implement it all into the kit.
|
CONSTRUCTION |
The kit box is sturdy, but opens at the sides, so after taking out the kit I taped the sides shut and cut open the top to get a good box to keep lose components during the building. As I tend build by instructions and this kit offered some distinctive differences between versions to build, I made a choice of what version I was going to build first and used a marker to outline the things I had to do in the building instructions. After that, I figured out the colour numbers in the paints I use.
To make a difference, I did not start with the cockpit. There were a few problems to be solved first, due to the size of this thing. The first problem I ran into was my workbench. I am a ‘born again builder’, and so far I have build small experimental planes like the Me 163, the Ba 349 and a V-1. To build this kit, I had to expand my working area quite substantially. Having done that, I went for a rather refreshing shower, taking the kit with me. Usually I wash all the parts in hand warm water with some dishwashing soap and a wide soft brush, but this time the sprues were too big to fit in my kitchen sink (did I mention it is a BIG kit?).
 And then I started with the cockpit, or rather with cutting up the cockpit,
to create room for the True details cockpit. The plastic from the Testors kit
turned out to be quite soft, so cutting out parts was not to different. I cut
off to little and used sanding sticks and a file to enlarge the openings until
the resin parts seemed to fit. As for trouble implementing the detail set into
the kit, I never managed to figure out how to get the side walls into the
cockpit. The rest also presented some fitting problems. The ejector seats were
to high, the canopy would not fit anymore. I took off some extra material at the
bottom of the ejector seat. I also cut down the ejector seat guide rails a bit.
Since the side walls offered little extra detail, I decided to leave them out.
The ejection seats, instrument panels and cockpit tubs turned out to be a great
addition. They were painted black, then I added some white in the dials with a
toothpick, and finally dry brushed with some lighter grey to bring out all the
details. I added some gloss varnish to the instrument dials. The seats were
painted in the colours I found on the internet. I used some bright red, blue and
yellow to enhance some knobs and switches in the cockpit and on the instrument
panels (using photo’s from a Blackbird Simulator).
And then I started with the cockpit, or rather with cutting up the cockpit,
to create room for the True details cockpit. The plastic from the Testors kit
turned out to be quite soft, so cutting out parts was not to different. I cut
off to little and used sanding sticks and a file to enlarge the openings until
the resin parts seemed to fit. As for trouble implementing the detail set into
the kit, I never managed to figure out how to get the side walls into the
cockpit. The rest also presented some fitting problems. The ejector seats were
to high, the canopy would not fit anymore. I took off some extra material at the
bottom of the ejector seat. I also cut down the ejector seat guide rails a bit.
Since the side walls offered little extra detail, I decided to leave them out.
The ejection seats, instrument panels and cockpit tubs turned out to be a great
addition. They were painted black, then I added some white in the dials with a
toothpick, and finally dry brushed with some lighter grey to bring out all the
details. I added some gloss varnish to the instrument dials. The seats were
painted in the colours I found on the internet. I used some bright red, blue and
yellow to enhance some knobs and switches in the cockpit and on the instrument
panels (using photo’s from a Blackbird Simulator).
Fitting the cockpit tubs into the fuselage turned out to be a long and frustrating exercise. Since the fuselage is shallow, especially under the forward tub, I had to file a lot from the bottom of that tub. I also had to file down the top-front of the forward tub, to create room for the instrument panel. It took me several hours of dry fitting, filing and sanding to get them in.
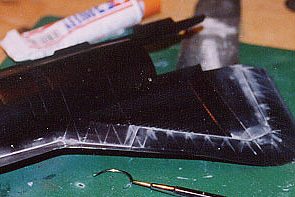
Once the cockpits were done, things started to move on quickly. 5 Large parts make up most of the fuselage. In the bottom plate there are windows for the camera’s, I glued them in place with white glue, and painted the insides dark blue to prevent looking into an otherwise empty fuselage. This bottom plate was badly warped.
I tried to correct it with hot water, but that did not seem to do the trick.
There were also some fit problems. The kit is quite cleverly constructed, in a
way that the ‘side’ seams are hidden underneath the plane; a gap will not be
obvious when the plane is normal displayed,
 and this bottom half provides a nice
place to mess about with filler.
and this bottom half provides a nice
place to mess about with filler.
I would love to see construction this on leading edges of wings in other kits! Before the aft halves are joined, wheel wells have to be glued in place and painted. There were some ejector marks I scraped away with my knife. I used Testors metalizer titanium, painted it on with a brush, and polished it with a cotton stick.
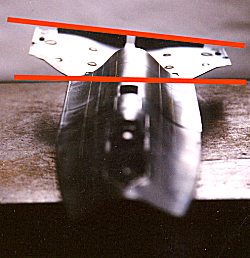
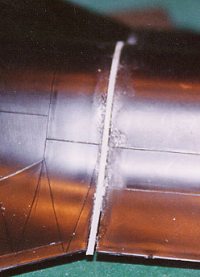
No matter what I tried, after assembling the 5 piece fuselage, I was left with a HUGE gap in the upper fuselage where the wing section starts. I used some sheet plastic and a lot of filler to get rid of it, after practicing my filler skills on the underside of the plane.
Nail polish remover (acetone) and a cotton stick was used to remove putty (Tamiya) surrounding fine raised details that would have been lost by sanding. Next were the engines and outer wings. Each engine/wing consists of an upper and a lower half, and some bits and pieces to make up the air inlet and exhaust. Again, there were some seams, but not in nasty places.
 |
 |
 |
*
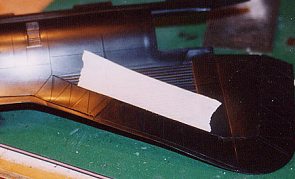
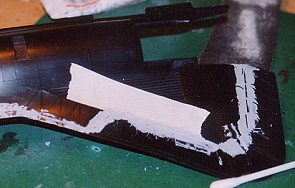
It pays off to give some extra attention to the very fine rim on the intake side, to get that lined up well. Both engine/wing-ends slot into the fuselage. To fill a gap between fuselage and engine, I taped off the upper fuselage close to the joint, to avoid filler getting into the ribs on the wings. And once again, the nail polish remover trick worked like a charm.When most of the work was done, I stuffed the cockpits and wheel wells with wet tissue and sprayed the entire plane with matt black paint (Humbrol nr 33 in a 100 ml spray can). This was not the final paintjob, it was just a way to check my putty work, sort of black base coat. After that I did some more puttying and sanding. I decided to leave wheels and undercarriage off until after painting and decaling.
|
PAINT & MARKINGS |
The building instruction gave colours in FS numbers, and some Testors metal paint numbers. I used the Testors metal paints, the rest was done in Humbrol en Revell paint (I used http://www.airmodel.sk/indns_eng.html for conversion of the colours). As I wrote before, during the build up of the fuselage I already gave the plane a first coat of black with a spray can. I decided to finish the plane by hand painting because I thought this would represent the weathered look better. The plane is not just dull black, it weathers quite severe from ‘hot’ flights, leaving a greyish sheen over the surface. I painted the plane with Revell nr 8, matt black. The first coat was brought on fast, with a wide and very soft brush, and about 20 turpentine mixed into the black enamel paint. This first coat ended up to smooth to my liking, the plane was just evenly black, so I did a second coat with the same black but also with Revell nr 9, a very dark grey, for some parts and panels. The end result was what I had hoped for. The wheel wells, exhausts-insides and inner part of the inlet-spikes were painted with Model Masters Metalizer Titanium. This paint turned out dark grey and did not buff out as well als some other Model Masters metalizers. I also missed the slightly warm look of titanium. Testors gives instructions to mix up a special titanium paint, but I decided to leave it at this.
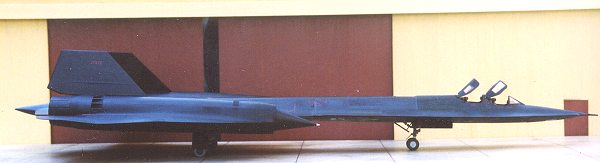 After painting, I gave the plane a gloss varnish to prepare for the decals. I
had decided to build the 17972 with low observable markings. The underside of
the plane has lots of little white decals, the topside has almost only dark red
markings, giving the bird a quite sinister look. It was a bit of a puzzle to
locate the decals on the sheet, every time I thought I was finished, I would
discover another forgotten decal. The decals –printed by Microscale- worked
fine, even settled down into the ribs of the wings nicely without any help from
setting solutions. Only the very long red lines that marked of the ‘no step’
zones were troublesome to handle. I ripped them, but managed to ease them back
together once they were floating on the plane. Next time I would cut them into
manageable pieces before applying them.
After painting, I gave the plane a gloss varnish to prepare for the decals. I
had decided to build the 17972 with low observable markings. The underside of
the plane has lots of little white decals, the topside has almost only dark red
markings, giving the bird a quite sinister look. It was a bit of a puzzle to
locate the decals on the sheet, every time I thought I was finished, I would
discover another forgotten decal. The decals –printed by Microscale- worked
fine, even settled down into the ribs of the wings nicely without any help from
setting solutions. Only the very long red lines that marked of the ‘no step’
zones were troublesome to handle. I ripped them, but managed to ease them back
together once they were floating on the plane. Next time I would cut them into
manageable pieces before applying them.
When everything was dry, I used some dry brushing with black paint to tone down the white decals and the red lines. Then the entire plane was given a coat of Winsor & Newton Acrylic matt varnish. I use this because it gives a more matt finish then Humbrol matt varnish. At this stage, a strange phenomenon occurred. Up until now (which is just 6 previous models), this acrylic matt varnish has been my friend and saviour; no matter how uneven a brush paintjob would be, once the acrylic varnish was in place, everything would look good. Not this time. The acrylic varnish is quite pasty, thick, and it should not be thinned. It can be brushed on, and once dry, it would seem to disappear, taking all gloss and every blemish in the under laying paint with it. But this time, on the black underground, it did not disappear. It left a greyish, uneven sheen. In this case, it turned out to be a ‘lucky incident’ that was no problem, as I was planning on weathering the plane. The original black paint (I know, dark blue, but it sure looks black) on the Blackbird takes on a greyish sheen after a hot flight, so in this case I had instant weathering (more or less). But next time I will use normal Humbrol matt on black painted planes. To add life to the skin of the plane, I also repainted some panels with matt black, and added some Humbrol satin gloss varnish on other places. The end result lookes like a rather used plane, repainted and touched up over years. It pleases me, but might be to heavy in the eyes of others (much like blackened panel lines or pre shading, weathering seems to be a matter of taste). The weathering was also my last resort to hide some not to perfect seams…
|
CONSTRUCTION CONTINUES |
 While building, the plane had been resting on 3 paint tins, now it was time
to give this bird it’s own legs. For the undercarriage and wheels I searched
some pictures on the web again. The instruction booklet has some black and white
pictures on the back, but I preferred colour pictures as a guide for painting.
Building them was almost a project in itself (hey, I am used to small planes!).
As far as I can judge, the ‘scissors’ and dampers are too far extended on the
model, but I had no wish to cut up and weaken the under carriage of such a large
plane. Painting and putting it together presented no problem, and much to my
surprise, neither did the installing of the landing gear under the plane.
Everything locks and lines up well, with one exception; the main landing gear
has 2 times 3 wheels in a row, and the inner wheels did not touch the ground.
The open space was minimal, and a little sanding under the other wheels took
care of the problem. I prefer to sand the underside of wheels anyway, I think
most after marked ‘bulged tires’ are overdone, a little sanding is more then
enough to suggest some weight.
While building, the plane had been resting on 3 paint tins, now it was time
to give this bird it’s own legs. For the undercarriage and wheels I searched
some pictures on the web again. The instruction booklet has some black and white
pictures on the back, but I preferred colour pictures as a guide for painting.
Building them was almost a project in itself (hey, I am used to small planes!).
As far as I can judge, the ‘scissors’ and dampers are too far extended on the
model, but I had no wish to cut up and weaken the under carriage of such a large
plane. Painting and putting it together presented no problem, and much to my
surprise, neither did the installing of the landing gear under the plane.
Everything locks and lines up well, with one exception; the main landing gear
has 2 times 3 wheels in a row, and the inner wheels did not touch the ground.
The open space was minimal, and a little sanding under the other wheels took
care of the problem. I prefer to sand the underside of wheels anyway, I think
most after marked ‘bulged tires’ are overdone, a little sanding is more then
enough to suggest some weight.
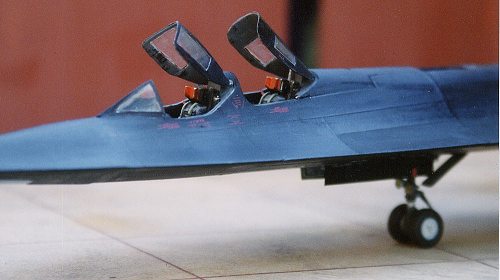
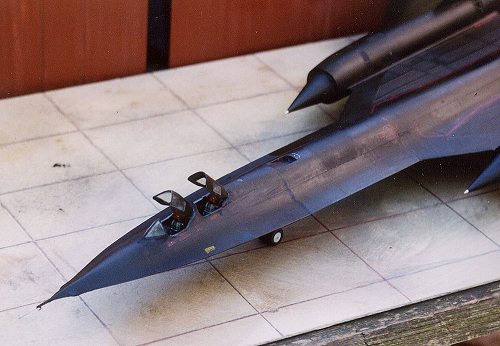
The inlet spikes were given a little chrome point and glued in place (remembering that, after decaling, there is a left and a right spike!). Getting the cockpits glued in an open position turned out to be a challenge, I had quite a hard time lining them up.
After all this, I needed several days of checking and retouching parts here and there, before I was sure I was really finished…
|
CONCLUSIONS |
This is not an easy kit to build. But it is rewarding to overcome the problems the kit presented, and it is possible, even for a less experienced builder like me (it is the 7th kit I have build). In the hands of a master it will be great, and I think I will buy another one, to build in a couple of years, just to see how I progressed. This kit has some serious fit problems, and it needs more then just slapping together. But its size makes it a perfect object to learn the techniques needed to overcome these problems. The fact that the end result is a huge matt black bird with a rather spectacular shape helps to hide all left over imperfections quite well.
I am not sure about the detail set. The cockpit and instrument panels of the kit are not as detailed as the True Detail set, but not bad either. Since getting the True Detail set in place was quite a bother, I think next time I would go with the original tub and instrument panels, I would just try to use ejection seats from the detail set, since they are absolutely great compared to the ones provided by Testors.
I had a rather strange problem with this size of aircraft; I found it hard to concentrate on a single seam or small part, the rest of the seams or parts kept screaming for attention as well. As a result, I more or less clueless hopped from one thing to the other, and several times I discovered forgotten details.
All in all, I liked building it, and I even more like having the end result. The biggest downside to it is that now I have to build a new shelf to present my models, before I can start on my next model…
|
REFERENCES |
http://www.sr-71.org/photogallery/blackbird/index.htm (pictures of cockpit, simulator and wheels)
http://users.bestweb.net/~kcoyne/sr1seat.htm (pictures of ejection seat)
books:
SR-71 Blackbird by James Goodall, from squadron/signal publications
Jan Kusters
Copyright ModelingMadness.com
If you would like your product reviewed fairly and fairly quickly, please contact the editor or see other details in the Note to Contributors.
Back to Reviews Page 2017