|
KIT # |
? |
|
PRICE: |
$20.00 |
|
DECALS: |
4 options |
|
REVIEWER: |
|
|
NOTES: |
|
HISTORY |
Built as a replacement for the successful G-2A Galeb, development of the SOKO G-4 Super Galeb started in 1973. The first flight occurred in July of 1978. By 1983 examples were being delivered to the Yugoslav Air Force (JRV), with about 90 total on order. After the break-up of Yugoslavia in the early 1990s, some aircraft ended up in the hands of the Bosnia-Serbs. To date, the only export customer is Myanmar (formerly Burma), which uses its six Super Galebs in their intended role of training and light strike.
|
THE KIT |
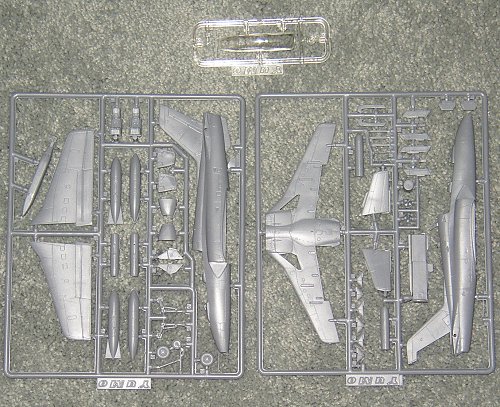
This kit is produced by an outfit called Yumo, which I assume stands for Yugoslav Model Company or something similar, in Yugoslavia. For your $20 you get 54 parts on two trees of slightly soft, dark gray plastic , and one tree of three nicely done clear parts. The surface engraving is scribed, and not badly done at all. The panel lines are a tiny bit soft, and the texture of the entire model is faintly like that of an eggshell. Overall quality seems to be about on par with other Eastern European kit manufacturers like Bilek, or KP.
 Details include a one piece canopy/windscreen
which must be cut apart if you wish to display the canopy open. The
cockpit is about what you'd expect for 72nd scale: decals for the
instrument panels, and so-so ejection seats. As far as I know, there are
no aftermarket detail sets available for this kit. I'm not sure exactly
what make of ejection seat the G-4 uses, but it looks something like a
Martin Baker seat. If so, there's probably a resin seat available.
Weapons included are two underwing fuel tanks, and two rocket pods. A
nice centerline gun pod is also provided.
Details include a one piece canopy/windscreen
which must be cut apart if you wish to display the canopy open. The
cockpit is about what you'd expect for 72nd scale: decals for the
instrument panels, and so-so ejection seats. As far as I know, there are
no aftermarket detail sets available for this kit. I'm not sure exactly
what make of ejection seat the G-4 uses, but it looks something like a
Martin Baker seat. If so, there's probably a resin seat available.
Weapons included are two underwing fuel tanks, and two rocket pods. A
nice centerline gun pod is also provided.
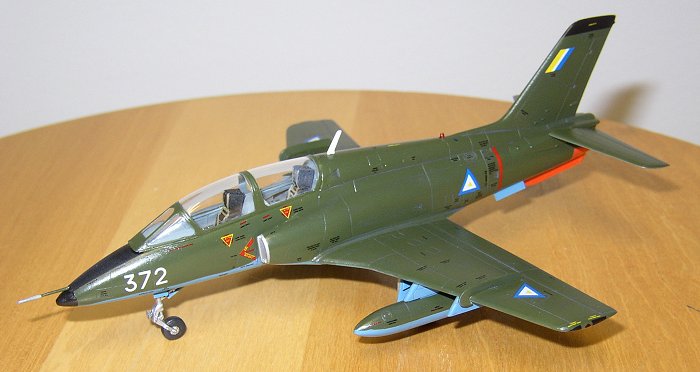
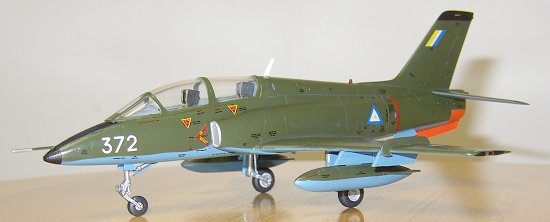
The decal sheet in this kit is a REAL gem! I expected crappy decals, but Yumo came through with a very nicely done sheet by Propagteam. There are four options included: Yugoslav Air Force before the 1992 break-up, Yugoslav Air Force after the break-up, Bosnia-Serbs Air Force circa 1992, and Burma Air Force circa 1992. All aircraft except the Burmese example are in a gray/green/blue scheme. The Burma jet is in an overall dark green/blue bottom scheme. The sheet also includes extensive stencil markings for all versions (about 150 separate decals!). Overall I'd rate the decals very good.
|
CONSTRUCTION |
The instructions are fairly well laid out in eight exploded views, but there is no indication as to which step is first, second, etc.... other than their order on the page. No problem for anyone who has built a few kits, but it could be confusing to a newcomer, or a kid. I decided to keep this build simple, and build it out of the box. I'm a total sucker for small, obscure air forces, so it was no contest..... Burmese Air Force! I found an excellent color picture of aircraft #371 on page 8 of Air Forces Monthly magazine's January 1991 issue. This picture proved invaluable in helping me match the blue underside color, as it is a pre-delivery picture take in Yugoslavia. I decided to keep the weathering on my model to a minimum after seeing this picture.
 As is normally the case, construction began
with the cockpit. I found a picture in an old magazine of the cockpit.
The main instrument panels were similar to Euro One gray (FS36081) and
the cockpit sides were close to Medium Gray (FS 35237). Well there must
be a lot of differences between aircraft, or the Burmese specified
different cockpit colors. I later found the AFM picture mentioned above,
and it was very evident that the Burmese jets had their cockpits painted
a green very close to the famous MiG turquoise green. Of course I didn't
find the pic until after the cockpit was finished, and the fuselage
halves were together. Oh well.... too late now!
As is normally the case, construction began
with the cockpit. I found a picture in an old magazine of the cockpit.
The main instrument panels were similar to Euro One gray (FS36081) and
the cockpit sides were close to Medium Gray (FS 35237). Well there must
be a lot of differences between aircraft, or the Burmese specified
different cockpit colors. I later found the AFM picture mentioned above,
and it was very evident that the Burmese jets had their cockpits painted
a green very close to the famous MiG turquoise green. Of course I didn't
find the pic until after the cockpit was finished, and the fuselage
halves were together. Oh well.... too late now!
The cockpit was glued into one fuselage half, as was the exhaust tube, and some weight in the nose. Test fitting the fuselage halves with the cockpit in provided the first indication of what would plauge this build..... lousy fit! The cockpit tub was just too wide to fit in between the fuselage halves. I ended up gluing a piece of scrap .10 thousandths plastic card between the fuselage halves from the nose, to the rear instrument panel combing, and about 1/4 inch into the spine. This fixed the problem, but created more later on. Next time I build this kit I will thin the cockpit tub sides down a bit before gluing it into one fuselage half.
The rest of the non-clear parts went together with no problems, other than questionable fit. The wings, and fuel tanks went together quickly. One problem I did encounter was the exhaust pipe. I followed the instructions, and glued it to one side of the fuselage. Once you get the two halves together, the exhaust tube is decidedly off center. I had to fill one side with Squadron white putty, and sand it out with sandpaper wrapped around a small dowel. This fixed the gap problem, but the exhaust is still off center by a little bit. So when you glue the tube in, don't put it flush against the fuselage half! You'll still have a gap to fill, but at least it won't be off center.
 The wings and intakes went on, and again the
fit was pretty rotten, especially on the bottom. After I got them on, it
was time to fill (with super glue), sand, and rescribe the fuselage,
wings, and intake seams. I also took care of the numerous large sink
holes on the top of the fuselage halves. All of this probably accounted
for 40% of the time I spent on this kit. Once that was taken care of, all
of the joints were hit with Mr Surfacer 1000 to help fill any pinholes
or other defects. Just when I thought I was done with most of the
filling, and sanding, I fitted the clear nose part on. Once again the fit
was really bad with the clear piece being larger in diameter than the
fuselage. Once the super glue had dried, out came the sanding sticks.
About 20 minutes later I had it sanded, and buffed back into a crystal
clear nose section, and the correct diameter.
The wings and intakes went on, and again the
fit was pretty rotten, especially on the bottom. After I got them on, it
was time to fill (with super glue), sand, and rescribe the fuselage,
wings, and intake seams. I also took care of the numerous large sink
holes on the top of the fuselage halves. All of this probably accounted
for 40% of the time I spent on this kit. Once that was taken care of, all
of the joints were hit with Mr Surfacer 1000 to help fill any pinholes
or other defects. Just when I thought I was done with most of the
filling, and sanding, I fitted the clear nose part on. Once again the fit
was really bad with the clear piece being larger in diameter than the
fuselage. Once the super glue had dried, out came the sanding sticks.
About 20 minutes later I had it sanded, and buffed back into a crystal
clear nose section, and the correct diameter.
I had to use some Mr Surfacer to fill in the gaps between the flaps, and the wings, which did the trick. Next on were the flap actuators, wing fences, pylons, and fuselage strakes. Since the canopy/windscreen was going to be left as is (unopened) I decided to check the fit before I got to the painting of the kit. It was a good thing I did, as once again the fit was bad. As is, the canopy sits a full 1/16th of an inch above the spine of the jet. I had to break out my trusty bastard file, and file the bottom of the canopy/windscreen down, test fitting often, until I got reasonable fit. The canopy was then cleaned up, dipped in Future floor wax, and set aside for a week to dry. Now it was time to paint. I left the rear stabs off, as they would be painted separately, and angled upwards (like on a shutdown F-16) during final assembly.
|
CAMOUFLAGE & MARKINGS |
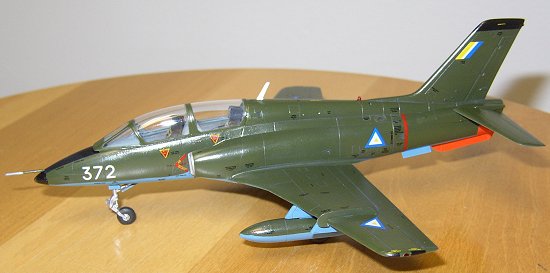
Since I had decided to model the Burmese G4,
painting was very straight forward. Following the instructions I painted
the upper pattern FS 34079 Dark Green using Testors Model Masters line of
paints. I could not come up with FS 35107 for the blue color on the
bottom. The closest I could get was FS 35102. I decided to mix my own
color instead. I started with about 70% FS 35183 Bright Blue, and added
10% White, 10% RAF Azure Blue, and 10% FS 35237 Medium Gray. This mix
produced 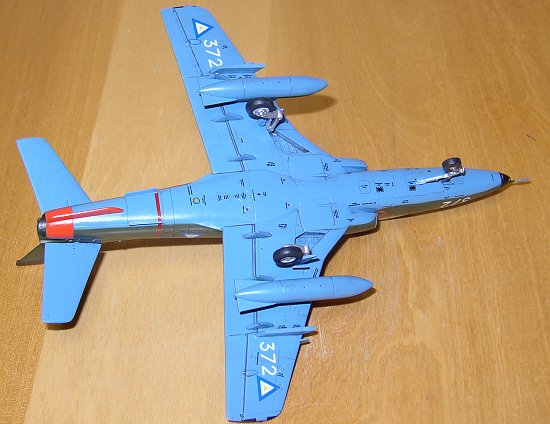 a very close match to the picture in AFM 1-91. The blue was
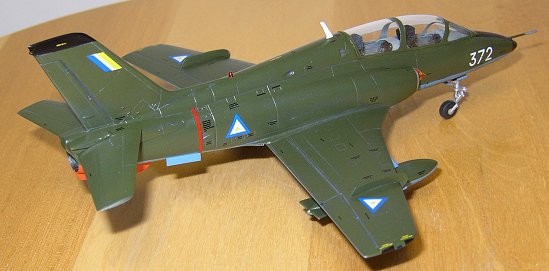
sprayed on without any problems. I used "worms" of Blu-Tack putty to
produce the demarcation line between the green and blue. This is the best
way I have found to produce a feather, but tight demarcation line for
these small scale jets. Next I masked off the orange section on the tail.
I first painted this white to give the orange that was to follow a
brighter, even, look. Once that was dried, it was painted FS 12197
International Orange. Next to be painted were all of the black areas on
the wingtips, tail tip, and nose tip. Finally the sliver section of the
intakes were painted. I painted the interior of the intakes sliver at
this time too. After drying for a day, the entire model was gloss coated
with Testors Metalizer Sealer in preparation for decals. After letting it
dry for a day, decaling began.
a very close match to the picture in AFM 1-91. The blue was
sprayed on without any problems. I used "worms" of Blu-Tack putty to
produce the demarcation line between the green and blue. This is the best
way I have found to produce a feather, but tight demarcation line for
these small scale jets. Next I masked off the orange section on the tail.
I first painted this white to give the orange that was to follow a
brighter, even, look. Once that was dried, it was painted FS 12197
International Orange. Next to be painted were all of the black areas on
the wingtips, tail tip, and nose tip. Finally the sliver section of the
intakes were painted. I painted the interior of the intakes sliver at
this time too. After drying for a day, the entire model was gloss coated
with Testors Metalizer Sealer in preparation for decals. After letting it
dry for a day, decaling began.
I had heard a lot of things about Propagteam decals. Mostly that you don't get a lot of time to get them in place before they set for good, and not to use any kind of setting solvents. Since I had two kits, and two sets of decals, I decided to try putting one of the national insignias under the wing as a test. I used Microscale's Micro Sol, and did not have any problems with the decals. As I had heard, I didn't get a lot of time to get them in place, but this really wasn't much of a problem. The larger decals went on first, and then all 150 odd stencil decals. Decaling took about three evenings worth of work.
After the decals had dried, I used Metalizer Sealer again over the decals. I then used a dark gray wash of Polly Scale CSX Gray, dish-washing detergent, and water. After the wash had dried, it was removed with damp cotton swabs. For the most part the panel lines took the wash well, but its not really too visible on the upper surfaces of the model. Once this had dried I went over the entire model again with Metalizer Sealer, and set it aside to dry. Now it was time for final assembly.
|
FINAL CONSTRUCTION |
Now it was time to add the few remaining parts. The previously painted silver gear legs were installed. Somewhere during this build I had lost one of the main gear actuators, so I just left them off. The main gear wheel hubs were painted light gull gray, while the nose wheel hub was left silver. All gear parts went on without any problems, as did the fuel tanks. I decided to leave the rocket pods off. In the two photos I've managed to find of Burmese G4s, neither had the gun pod installed, so I left it off. Next came installing the previously painted ejection seats (using the AFM color photo as a reference), horizontal stabs, and spine antenna. Last on was the canopy. Even with all of my filing and test fitting, fit was still not good. Some of this was due to the fact that I had widened the fuselage during construction, but some was due to sheer poor fit. I had to sand the sides of the front instrument panel combing down to get a fair fit. I glued the clear HUD in place, and on went the canopy. There were still a few gaps, so I filled them with Microscales Krystal Kleer, which had also been used to glue the canopy and HUD on. Surprisingly, the single antenna located on each side of the tail was not included. These are painted white, and are quite prominent. At some point I may scratch build them and put them on the model. At last my little Super Galeb was done!
|
CONCLUSIONS |
I must admit that this kit ended up being harder to build than I had anticipated. Most of this was due to some areas of poor fit, and a few due to my own mistakes. However it was an enjoyable build, and certainly builds up into a very nice model of a somewhat obscure subject. I would recommend this kit to anyone who has some experience with not so great fitting kits.
Fred Krause October 2003 Copyright ModelingMadness.com.
All rights reserved. No reproduction in any form without express permission
from the editor.
If you would like your product reviewed fairly and fairly quickly, please contact the editor or see other details in the Note to Contributors.