Academy 1/48 Hughes 500MD Defender
|
KIT # |
1644 |
|
PRICE: |
$8.00 |
|
DECALS: |
Kenya, Israel, Demonstrator |
|
REVIEW : |
|
|
NOTES: |
|
|
HISTORY |
Hughs 500MD Defender helicopter was a follow on of the company’s very successful OH-6A Cayuse. The Cayuse had proved itself as a versatile armed scout during the Vietnam War, and by 1976 the company had produced the first 500MD. The new model featured a "T" tail for improved stability, a five bladed main rotor (instead of four), and an all new drive train, among other features. It was also fitted with the capability to use TOW missiles, and a mast mounted sight. The new design proved to be very quick, very reliable, and currently serves with numerous Air Forces, and Armies around the globe.
|
THE KIT |
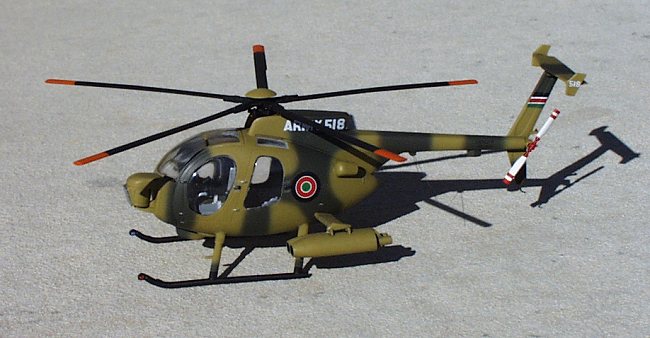
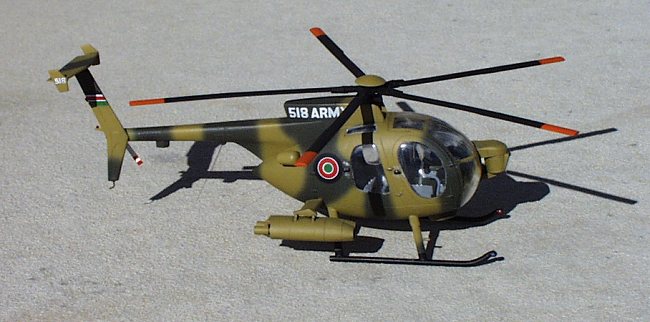
I had built this kit almost 15 years ago when it had first come out, and had been looking for one reasonably priced once I got back into the hobby a few years ago. After being outbid for well over $10 for this kit on ebay, I was getting pretty frustrated, but wasn’t about to go any higher for such a small kit. Then I got the yearly Squadron/Signal catalog, and to my surprise, they had it for a mere $6. When my copy arrived, I couldn’t wait to get started. I quickly decide on the Kenyan Army machine, because of its attractive scheme, and national insignia.
The kit is molded in a yellowish-tan colored plastic. It is obvious that is has been released as a civilian aircraft as well, as two civilian pilots are included, and you must open the holes in the fuselage for the TOW pods. The 59 parts come on three tree’s, while the 9 clear parts are on one tree. The modeler is given the option of an open pilots door, TOW missile pods, and a nose mounted, or rotor mounted sight. The panel lines are finely recessed, and while I didn’t have any drawing to compare them to, they appear to be accurately represented.
|
CONSTRUCTION |
I started by filling, and sanding the numerous ejector pin markings that are all over the inside of the fuselage halves. Once done with this, I painted the interior FS36231 Dark Gull Gray. The interior detail is pretty well executed, but sparse. There are no collective controls for the pilots, but control sticks are provided.
Normally when I do a model I have at least some reference material available, but this was not one of them, so I decided to build it out of the box. The only after market items I added were Reheat seat belts, and buckles, and information placards. The main instrument panel was a decal, which I used.
Next I carefully used some liquid cement to attach the four side windows to the fuselage from the inside. Once dry, I painted dark gull gray around the outer edges of the windows to cover the remaining yellow plastic that was still showing. Fit of the windows is not too terribly good, and some trimming to fit was required.
The finished interior sub assembly was then glued into the right fuselage half. Once dry, the left fuselage half followed. Fit was quit good, and only a small amount of filling and sanding was required. The "T" tail assembly went on next, and again, fit was excellent.
In the mean time, I had assembled the nose mounted sight (minus the sight glass) used on the Kenyan Army version, and attached it to the front wind screen. Fit here was not good, and required lots of putty, and careful sanding to avoid damaging the wind screen. The wind screen was then carefully attached to the fuselage with liquid cement.
Fit of the wind screen to the fuselage is not very good, and required some filling with carpenters cabinet glue. This was applied with an artists spatula, and the excess was wiped clean with a moist cloth.
The rotor assembly was put together, and left to dry. I left off the rotor cap from this assembly to ease the painting process, since it was the same color as the fuselage. Next came the newer style fuselage side mounted exhausts, and the plug used to fill the hole at the end of the body that is left by the relocation of the exhaust. Last on was the landing skids, belly, and tail boom antenna’s. All fit well, but the fuselage plug did require some filling and sanding.
I now was ready to paint, but wasn’t sure how to tackle masking off all the glass. I finally settle on Microscale’s "Micro-Mask" product. This clear-blue goo is brushed onto the surface that will be covered, and once dry, can be carefully cut with a hobby knife to the desired pattern. One word of caution: use more than one coat of this stuff to insure that all necessary areas are covered. More later on this……
The only glass not installed prior to painting were the two upper observation windows just below of, and on each side of, the rotor assembly.
|
PAINT & DECALS |
As mentioned earlier, I decided to the Kenyan Army machine using the kit supplied decals. This scheme consists of a yellow/tan base with Khaki green pattern. Unfortunately, no FS numbers are supplied, just vague names like "Sandy Brown". I looked though my collection of World Air Power Journals, but still couldn’t come up with a color picture of this country’s Defenders.
While at a hobby shop, I came across Model Masters "RAL 7008 Afrika Grunbraun" This color closely matched the color of the kits plastic, and is a pleasing yellowish/tan color. I decided to go with this color, and FS34086 Green Drab for the pattern. With this model only measuring about six inches in length, painting was a breeze. The previously assembled TOW pods, and rotor cap were also painted Afrika Grunbraun at this time.
The main rotor assembly was painted black, while the tail rotor was painted white, and red, per the kit instructions. I then airbrushed Testors semi-gloss over the now dry body, and rotor assemblies. I decide to use the kit supplied decals for the orange main rotor tips. This was a mistake, as the decals didn’t fit well, and were somewhat transparent. I sanded them off, and painted the tips FS12197 International Orange. Once dry, the tips were masked off, and black was again sprayed. This produced much better results. The landing skids were also masked off, and painted black at this time.
I have used Academy decals in the past with excellent results, but this was not the case with this kit. The decals just did not want to lay down. The Kenyan flag on the tail were especially troublesome, and would not even lay down well with a mixture of Slova-Set, and white glue. The decals are printed on an off white paper, making the white markings very difficult to see. One problem with the markings that I noticed is that the instruction sheet shows the army markings as "ARMY 518", while it is printed as "518 ARMY" on the decal sheet. I decide to go with the instructions, and cut the decal in half, and reversed their order.
The decal sheet provides red stripes for the tail rotor, but these were badly printed, so I used some Superscale red stripes instead. An orange warning band is provided for the tail boom, but I chose to leave this off, as I had managed to glue the boom antenna just a little too far to the rear. The Kenyan national insignia is printed as three separate discs to insure good register.
Once the decals were dry, they were wiped off with a damp cloth, and once that was dry, a coat of Testors flat coat followed.
|
FINAL ASSEMBLY |
Next came removing the Micro-Mask. This was relatively easily done with a hobby knife. Remember me mentioning to use two coats of this stuff? Here’s why…. Apparently, one coat did not sufficiently cover everything, and I was treated to lots of paint spots on the glass. These were removed with the tip of a hobby knife, but still left some blemishes. I used some plastic polish, and Future floor wax to try to clean this up, but with only so so results.
The entire model, including the TOW pods, was washed in black water color. Heavy wear areas around the skids, and door handles were weathered by dry brushing a little silver around them. Navigation lights were painted red or blue per kit instructions.
Next on were the two remaining windows, and like the rest of this kits glass, fit was not good. The rotor cap was then glued onto the top of the rotor, followed by the sight glass on the nose. The TOW pods were attached, and took a little "tweaking" to get them to sit right Next came the tail rotor, while the main rotor just sits unglued in place to ease storage.
Initially, I figured that this kit would not need any nose weight, due to its small tail. However, it did need some, and I ended up having to cut up some lead shot balls into smaller pieces, and glue them into the nose mounted sight. This did the trick, but I still had to do a little tweaking to get it to sit right on the skids.
During construction I had managed to break off the tail skid, and this was replaced by some stretched sprue. Last on was the antenna for the forward tail boom receiver. I drilled out a hole with a pin vise that goes from one side of the aircraft to the other. A piece of fine wire was inserted, and bent, and cut to shape. It was glued in place with thin super glue, and painted drab green.
|
CONCLUSIONS |
This is a really neat little kit, and was a great change of pace from my usual diet of fast jets. This kits biggest problems are poor fit of the glass, and marginal decals. Other than that, I definitely recommend this kit! As a side note, a company called IsraDecal does a decal sheet for Israeli Air Force attack choppers. It is sheet IAF-2, and includes markings for 2 Apache’s, 6 Cobra’s, and 3 Defender’s. I highly recommend this sheet!
2015