|
KIT # |
|
|
PRICE: |
@ $20.00 |
|
DECALS: |
See Review |
|
REVIEW BY: |
|
|
NOTES: |
Accessories: True Details ACES II seats |
|
HISTORY |
General Dynamics/Lockheed-Martin's F-16 needs little introduction since it has become one of the most prolific aircraft in recent times. It is the standard fighter/bomber of most NATO countries, and equips many more air forces throughout the world. Vipers will no doubt continue to be in service for decades to come.
|
THE KIT |
Both of the kits reviewed were released in the mid to late 80’s, and most will agree, they are still easily the best F-16s on the market. Hasagawa has released these kits a few different times, and has also covered virtually every variant. They are of typical Hasagawa quality, with superbly scribed panel lines, and excellent detail throughout. Typical Hasagawa drawbacks are very few weapons provided, and very thick decals. There is plenty of room for the super detailer to add plenty of details, however. This is especially true of the cockpit, and wheel wells. There is also numerous weapon sets, and hundreds of after market decal sheets available.
|
CONSTRUCTION |
Fit on these kits is also excellent, the best of any kit I have ever done. I used very little putty on either. The only spots that needed some filling, and sanding were the intake area, and where the exhaust section attaches to the fuselage. Everything else went together with no problems, and right out of the box. The only after market parts I used were three True Details ACES II ejection seats. The kit seats are okay, but the TD seats go a long way towards making the cockpit look even sharper. A company called Black Box has just released a resin cockpit tub for this kit. I don’t have one, but it looks pretty good in pictures. The only drawback is that it is as expensive as the kit itself! I’ve wanted to do a two seat Navy Viper for some time, so when I did the N kit as a C, I simply used the unused N parts on a D kit to make a TF-16N. Thanks to a large degree of commonality between the kits, no other modifications were necessary.
|
PAINT & DECALS |
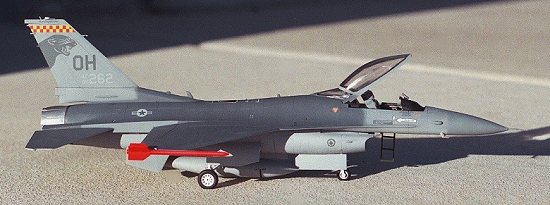
F-16C: I did the C in the standard three tone gray scheme. Nothing tricky about this one… its a real easy scheme to paint. However, you should check references for the specific a/c you are modeling, as the pattern in the scheme behind the canopy, and on the lower forward part of the rudder can differ considerably from plane to plane. Colors are FS 36118 Gunship Gray, 36270 Neutral Gray, and 36375 Light Ghost Gray. The nose was painted FS 36320 Dark Gull Gray. Testors Model Master paints were used, as were their line of Metallizer paints for the exhaust section. Buffable Titanium , and Aluminum were the colors used on the exhaust section. Non-buffable Burnt Iron was the color used for the in-flight refueling port. Most kit sheets, and even after market decal sheets supply the pattern. A coat of Testors semi-gloss followed once the paint was dry.
After the semi-gloss had dried I applied the decals. They are from War Eagle sheet WED064, and depict F-16C 86-262 of the 162nd FS Ohio ANG. This aircraft sports a Iraqi MiG-29 kill scored on 1/17/93 in one of the no-fly zones over Iraq. I believe it was assigned to a Shaw AFB based unit at the time. The sheet also supplies decals for a personal effects pod for the Ohio ANG. Since the D kit came with this pod, I painted it white according to the instruction sheet, and applied the decals, and later put it on the model. Decaling was very straightforward, and they went down well with some Solva-set. They did take awhile to lay down, and a few repeat brushes with Slova-set were required.
The biggest disappointment with the decals was that once the kill marking was applied, the MiG-29 silhouette disappears into the Gunship Gray. The Iraqi flag is still visible, though. The decal sheet did not supply any stencils, so I used some off a Superscale F-16 data sheet. This turned out to be a mistake, as the "rescue", and ejection seat triangle stencils on this sheet are of the earlier pale orange color. They should be the later gray stencil style. A check of references would have avoided this mistake, but I noticed it too late. A coat of flat coat followed once the decals were dry.
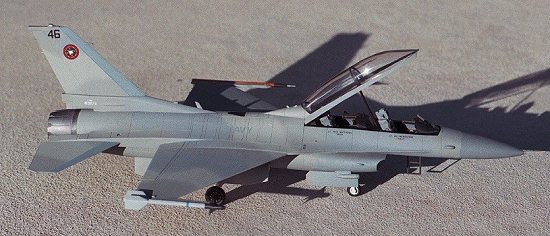
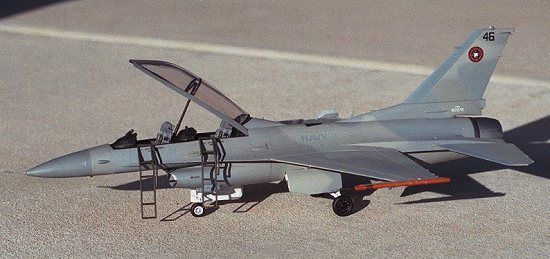
TF-16N: The US Navy took delivery of only four TF-16Ns, which were slightly modified F-16Ds, and assigned one each to the four adversary units flying the F-16N (Top Gun, VF-43, VF-45, VF-126). I chose to do the Naval Fighter Weapons School (Top Gun) version, as Superscale sheet 48-483 supplies the necessary markings. I had to use the Top Gun badges from Superscale sheet 32-53, as the ones on 48-483 were badly out of register. The scheme I used was the standard F-16N scheme in which they were delivered. It is a three tone wrap around gray scheme. Colors are FS 36251 Aggressor Gray, 36270 Neutral Gray, and 36307 Light Sea Gray. FS 36320 Dark Gull Gray was again used on the nose cone.
The decal instruction sheet tells you to paint the wing, rudder, and stabilizer leading edges "P5438-8 coating" but doesn’t elaborate on this. I followed the kit instructions instead, and painted these areas FS 35237 Medium Gray. Testors paints, and Metalizers were again used. Decaling was pretty simple, as there was very little in the way of stenciling or markings. Once dry, a coat of flat coat sealed them on the model. Robbie Shaw's excellent "F-16 Fighting Falcon" book has a photo of this a/c taking off, and was my main reference.
Weapons & final assembly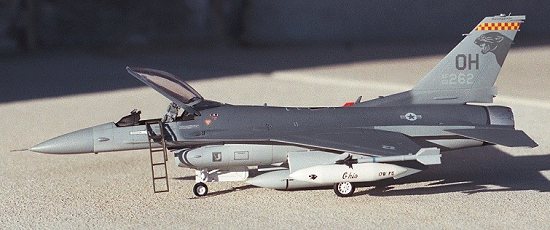
For the F-16C I used the centerline fuel tank, and personal effects pod from the F-16D kit. The F-16N kit that this C started life as did not have these items with the kit. AIM-9 training rounds were painted up from the kit supplied missiles, and were used on both models. I noticed that one of the Sidewinders supplied had a forward fin broken off, so I decided to make a forward fin-less training round out of it. I’m not sure what they’re called, but I see them all the time on Vipers of the 388th FW, which is based at Hill AFB just a few miles from my house. They have no forward fins, and are usually painted bright orange/red. I cut the remaining forward fins off, sanded the area smooth, and painted it Testors FS 28915 Fluorescent red. This paint is almost vinyl-like in consistency, and required four coats to cover the round. I decided to chop the fins off of three other ‘winders, and did a total of four rounds, three of which will be used on future projects.
The only weapons I used on the TF-16N were the above mentioned AIM-9 training round, and the ACMI pod from the F-16N kit. This was painted FS 12197 International Orange, with a black forward section, and silver tip. Kit stencil decals were then applied.
Access ladders came from the kits, but the D kit only supplies one, so I used an unused one from a previous Viper effort. After assembly, they were painted FS 34086 Green Drab, and were weathered by dry brushing a little silver on the steps.
 The canopies
for both kits have a seam running down the center that must be sanded off. After
sanding with successively finer grades of sandpaper, plastic polish was used to
eliminate any remaining scratches. The canopies had been sanded, polished,
masked off, and the frames painted during painting of the models.
The canopies
for both kits have a seam running down the center that must be sanded off. After
sanding with successively finer grades of sandpaper, plastic polish was used to
eliminate any remaining scratches. The canopies had been sanded, polished,
masked off, and the frames painted during painting of the models.
I added a small cylindrical piece of Plastistruct luminescent green rod to the hole under the HUD. I cut it with a razor saw, filed, sanded, and polished it, then glued it in place. It really looks like the projection lens of the HUD, and adds some depth to it.
Landing gear, doors, wheels, canopy, ladder, ejection seats, navigational pods (for the TF-16N only), and weapons were all added per kit instructions at this point with no problems. Neither the decal, or kit, instruction sheets for the Navy bird mention this, but I painted the main gear wheels completely black, including the hubs. Every picture I’ve seen of N’s show this to be the case. To differentiate the hub from the wheel, I hand painted the hubs with gloss coat, and once dry painted the nuts on the hubs with steel colored paint.
The only weathering I did was to apply a wash of black water color to the entire a/c (minus canopy), including the landing gear wheels, doors, and gear wells. Once dry, excess was removed by using damp cotton swabs, and cotton balls.
|
CONCLUSIONS |
These were the second and third Hasagawa 48th Vipers that I have done, and will not be the last! They are superb kits, with excellent fit, and very suprisingly for Hasagawa, affordable! These were easily the most enjoyable kits I have done, as their great fit makes for very few problems, and quick assembly. I highly recommend any of their Vipers kits.
|
REFERENCES |
F-16 Fighting Falcon by Robbie Shaw
Fights On! Airborne with the Aggressors by Tim Laming
Viper F-16 by Lou Drendal