Monogram 1/48 F-106A
|
KIT # |
5809 |
|
PRICE: |
@ $20 |
|
DECALS: |
87th FIS |
|
REVIEW: |
|
|
NOTES: |
Missing Links 20mm gun added |
|
HISTORY |
Convair’s sleek F-106 was a follow on to their less than successful F-102 interceptor. Indeed, the Six was originally designated as the F-102B, but as the program progressed, it became clear that although it shared many features with the Deuce, it was an entirely different aircraft. The program was plagued by problems, mostly with the engine, and weapons systems, and was nearly canceled numerous times. These problems even breathed new life into McDonnell’s stillborn F-101 Voodoo program.
Eventually, the bugs were worked out, and the first F-106 flew on December 26th 1956. In May 1959 it entered operational service with the 498th FIS at Geiger AFB, Wa. Over the years, many improvements were made to the Six fleet. These included a new "blown" (no center frame) canopy for better visibility, various new antenna’s, and their associate systems, and most importantly, a provision for in-flight refueling. Another modification that found its way onto to some aircraft was the addition of the belly gun pack. In the late 70’s the Six’s roll changed from that of pure interceptor, to fighter.
Being equipped with missiles only, a gun system was deemed necessary, and was developed using the standard 20mm Vulcan cannon system. This was installed in the weapons bay, but did not reduce the number of AIM-4 Falcon missiles available for use. Only a moderate percentage of Sixes ever got the cannon mod. None of the two seat F-106B’s were modified with the cannon.
Suprisingly for a big aircraft, the F-106 was an able dogfighter, especially at low level. Its huge delta wing gave it substantial maneuvering capability, and it was know to eat Phantoms for lunch at low level. The Six was due for replacement in the mid to late 70’s, but there were no other interceptors available. It soldiered on into the 80’s with a few Guard, and active duty units before the 119th FIS, New Jersey ANG, finally traded their much loved Sixes in for F-16s in the fall of 1988. The Six was not done serving, however, and like their close cousin the F-102, ended up being converted to target drones. A large number of the 340 F-106A/B’s built now lie at the bottom of the Gulf of Mexico, or strewn across the White Sands NM test range.
On a personal note, the F-106 (along with Northrop’s F-5 series) is my all time favorite aircraft. If there was ever an aircraft that screamed INTERCEPTOR, for me it was the Six. They were sleek, colorful, and are very much missed by me. At least I can model them, and remember all the times I saw them at airshows. All good things…….
|
THE KIT |
Monogram originally released this kit in 1983 as #5809. It was re-released in their "Century Series" line in 1990 as kit 5828. The kits are identical, with the exception of the decals. #5828 includes decals for the 84th FIS, instead of the 87th FIS. In the box, the kit looks beautiful, and catches the sleek, clean lines of the Six very well. It is of typical Monogram quality with detail everywhere. Unfortunately, it is also typical Monogram, in that it is plagued by warping, and bad fit.
Once assembly is started, it becomes quite clear that whoever designed the kit had no intention of ever building one! If they had, it would have been much better designed. The modeler is given the options of the old style framed, or new style blown canopies. The missile bay can be assembled open or closed with all necessary parts for either provided. The missile bay is a real work of art, and is nearly another model in itself. The kit represents a later model Six with most of the upgrades represented.
One mod not included in the kit is the belly gun pack. Missing Link Models does a nice resin version of the gun, and it can be had for about $4. Panel lines are of the finely raised type, and accurate. Overall, Monogram did a nice job on this kit, but poor design in some areas results in bad fit, and makes the kit far less enjoyable to build than it should be.
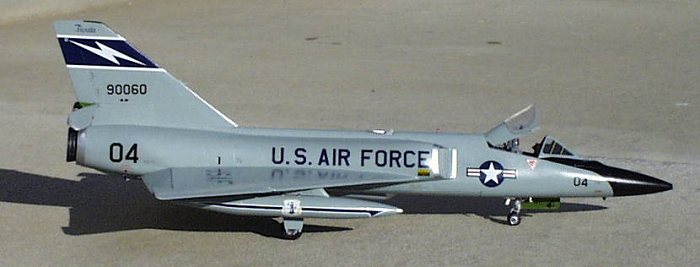
Probably every unit to ever fly the F-106 has been represented by aftermarket decal manufacturers. Therefore, one’s choice of which Six to do is nearly limitless. I had the MLM gun pack, and wanted to use it, so this narrowed my choices. I found an old back issue of Koku-Fan that has some beautiful in-flight pictures of a Florida ANG a/c with the gun mod, so this was the one I chose. The a/c is serial number 59-0060, and it was shot down as a QF-106 by an AIM-120 at Tyndall AFB on June 16th 1995.
|
CONSTRUCTION |
The cockpit for this model accurately represents the later "tape style" instrument panel, and is sufficiently detailed for most modelers. As far as I know, no resin, or photo etched cockpit sets exist for this kit, but one is not really needed, as the kits builds up nicely. Poor fit is where this kit really suffers, and begins with joining the fuselage halves. Fit here isn’t that bad, but this is where the warping comes into play. Parts are best unwarped under running hot water. The finished cockpit then installs from underneath.
Forward and main landing gear bay bulkheads are then installed before gluing the upper wing section to the lower wing/fuselage section. Again, fit is bad here, and some tweaking will be necessary to get a reasonable fit. The nicely detailed engine is then installed on the lower wing/fuselage section, and the main fuselage to the lower assembly. More poor fit, and lots of tweaking will be required here. The rear section is especially bad, as it seems that the engine assembly is too big to fit between the fuselage halves. I had to use strips of sheet styrene, and gap filling super glue to plug the resulting seams.
I painted the interior of the intake halves next. I sprayed FS 16473 ADC Gray for the first third of the intake interior, then FS 37875 Flat White for the remainder. The fit of the intakes to the fuselage seems to vary considerably from kit to kit. This time is wasn’t too bad, but on others I’ve done, there can be a noticeable step, or gap. The in-flight refueling port was added, and again, the fit was rotten, with more styrene plugs, and super glue required. Once all of the major parts were together, many hours of filing, puttying, and sanding followed.
I then added the MLM gun pack after a little filing, and used super glue to glue it to the closed weapons bay door, which had been previously glued to the model. I did a little experimenting on this kit, and used some Plastistruct luminescent green rod to represent the radar, and navigation scopes in the instrument panel (before installing the cockpit of course). These scopes were drilled out, then a polished piece of cylindrical rod was glued in their place. This gives the scopes a luminescent green glow, and adds some depth to them.
Pleased with this outcome I decide to drill out the position lights on the tail, and wings. Plastistruct clear blue rod was used here. Cylindrical rods were again cut, then glue into the holes. Once dry they were filed, sanded, and then polished with plastic polish. The result is a neat representation of position lights. At this point, gray primer was sprayed over all seams, and any that needed more help were taken care of.
|
PAINT & DECALS |
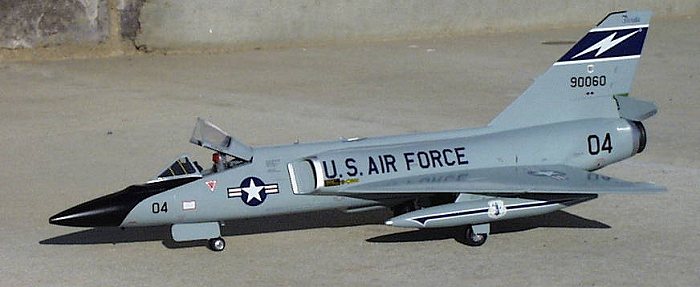
With the exception of a few test, and NASA Sixes, all were painted in the standard overall ADC Gray scheme. This scheme includes an pleasing gloss black nose cone with a flat black anti-glare panel. After masking off the cockpit section, engine exhaust section, and frameless canopy, all were airbrushed with Testors Model Master FS 16473 ADC Gray paint. I have had bad experiences in the past with gloss paint, to the point of mixing my own ADC Gray from flat Light Ghost Gray, and flat Light Gull Gray, but the ADC Gray seemed to go down well in the intakes, so I decided to give it a shot on the entire model. I had to thin the paint down considerably, but after a few coats, it was really looking good, and had the depth that a good gloss will.
The outer side of the speed brake, gear doors, and the wing tanks were also airbrushed at this time. The blown canopy was masked off, and sprayed with FS 36270 Neutral Gray. Next came the masking off of the areas to be painted black. The curve of the black from the nose cone to the canopy frame can be tricky, but with the help of a circle template, went smoothly. Note that on most Sixes, the lower "V" frame under the windscreen is ADC Gray, so this must be masked to protect it from the black paint. Next came the silver trim on the intakes, exhaust section, front gun pack section, and wing tank tips. Testors silver was used on these areas. Since the paint was already gloss, there was no need to gloss coat the model for decal application.
I chose do this aircraft from the 159th FIS, Florida ANG. The markings are from Experts Choice Decals sheet #48-38. This sheet provides the necessary markings for one aircraft, but also includes sufficient extra numbers to do any a/c in the unit. They also provide you with the serial numbers of a few other Sixes assigned to the unit on the instruction sheet, including a few B models, and have included minute serial number decals for the a/c data block of these a/c. A very nice touch indeed!
There is very little stenciling provided, so I used Superscale sheet 48-291 F-102 data to provide this. After comparing this sheet against F-106 data on other Superscale sheets, there doesn’t seem to be much difference between the stenciling on either. I simply left off the F-102 stencils not need for the 106. I had to punch out a hole in the large lightning bolt decals to allow the tail position light to show through. Careful examination of photos, and some test fitting resulted in good line up. All the decals went down well with a little Solva-set, and really show every rivet, or panel line well.
I used Superscale 1/16" black stripes to trim up the nose section as needed, and yellow stripes for the heating strips in the windscreen. After they dried, all were wiped with a damp cloth to remove any excess solvent. I then sprayed a light coat of gloss coat over the decals (except on the windscreen), and the black nose section.
|
FINAL ASSEMBLY |
Since I chose to close the weapons bay, final assembly was very smooth. If you choose to open the bay, be prepared to add a bit more time to the model. The interior of the speed brake, wheel wells, and gear doors were all painted zinc green, and once dry, were weathered with some black water color paint. The undercarriage, and wheel hubs were airbrushed Metalizer buffable aluminum, and again weathered. I used some Reheat "Aircraft Data Placards" decals to represent placards on the landing gear.
The landing gear went on well, and is quite sturdy. Part #43 (two of them), the "main retraction cylinders" seem to have some problems, however. The two parts are identical, when they should be mirrors of each other, and one will not fit properly. This can be fixed, but I chose to simply leave them off. Gear doors, the ram air turbine, and its doors, the canopy, and wing tanks all fit in place well. I drilled a small hole in the back of the ram air turbine, and added a piece of stretched sprue to represent its power cable.
One design problem in the gear area is that the main gear door retraction linkages are molded as part of the gear well bulkheads. Since these bulkheads must be in place early in construction, you cannot set the model on its belly until the gear is added. They are very fragile, and despite my best efforts, I usually manage to break off nearly everyone of them during construction. I left the pitot tube off, as I do not have anywhere to display my models at the moment, and didn’t want to risk breaking it off in storage.
|
CONCLUSIONS |
This is the only 48th F-106 kit available as of this writing, so unless you’re harder core than me, and scratch build one, this is your only option. Its not a bad kit, but design flaws, and their resulting fit problems can make it a frustrating exercise. Too bad too, as I plan to eventually model every unit that ever flew the Six. Call me a glutton for punishment! New modelers should have a few kits under their belt before attempting this one.
As a side note, both Falcon, and Airwaves make conversions to turn this kit into a two-seat B model. The Falcon version provides vacuformed fuselage halves, while the Airwaves version uses resin, and metal parts to do the job. I haven’t done a B yet, but of the two, the Airwaves set seems to be the much better, and much more complete. I did a review of the Airwaves set for this web site awhile back, so check under "Conversions" for some pictures, and an individual review. The biggest problem with the Airwaves set is finding one. They are out of production, and nearly impossible to find. Rumor has it that they are, or already have been, re-released, but I’ve yet to find another one.
|
REFERENCES |
Wings of Fame Volume 12: an excellent markings, and history resource
Detail & Scale Volume 13 by Bert Kinzey: indispensable reference!
Detail & Scale Colors & Marking series Volume 1 by Bert Kinzey: more markings
F-106 Delta Dart in Action by Lou Drendal
Century Series in Color by Lou Drendal
Koku-Fan July 1986: my primary markings reference for the a/c modeled
Copyright ModelingMadness.com. All rights reserved. No reproduction in part or in whole without express permssion.
Back to Reviews Page 2021