Revell 1/48 B-1B Lancer
|
KIT # |
4900 |
|
PRICE: |
$45.50 |
|
DECALS: |
1st production B-1B |
|
REVIEW : |
|
|
NOTES: |
One of the largest injected kits ever made. |
|
HISTORY |
Like most modern weapons systems, the Rockwell B-1 Lancer (affectionately known as the "Bone" by its crew: B-1 = B–One = Bone -- get it?) has been mired in controversy and politics ever since it was initially proposed in 1970 as a replacement for the aging (hah!) B-52. The RFP, issued in November 1969, called for a manned strategic bomber that contained a crew escape module, nuclear hardness, central integrated test system, and low altitude ride control. Bids from General Dynamics, Boeing, and Rockwell (formerly North American Aviation) were considered before the contract was issued to Rockwell for its supersonic, swing-winged bomber. The first test aircraft rolled out in October 1974, with its first flight on December 23rd of that same year.
 For various reasons, the anticipated price tag of the new, sleek
bomber rose to a staggering (for the time) $100 Million a piece. The politics of
defense being what they are in the modern world led to endless debate on whether
such an expensive aircraft was necessary, let alone whether manned strategic
bombers were needed at all. President Jimmy Carter’s defense administration
didn’t think so, and canceled the program, choosing to fund development of a
new, stealthier design that eventually became the B-2. Interestingly enough, the
B-2 also went through the same questioning prior to its debut in the inventory.
After the announcement of cancellation the four supersonic test aircraft, known
as B-1As, where allowed to complete their testing phase and the manufacturing
line was shut down. With the election of Ronald Reagan as president in 1980,
large-ticket defense programs suddenly came back into vogue and the B-1 program
was rejuvenated. A significant number of changes were made to the aircraft to
reflect a refined mission profile. The crew escape module was deleted in favor
of standard ejection seats. The engine intakes were greatly simplified as the
top speed of the aircraft was reduced to just a little over Mach 1 to support
the low altitude, ground-hugging style of attack that is now required to give
the crew any chance of survival in a real conflict. Range and payload capacities
were improved.
For various reasons, the anticipated price tag of the new, sleek
bomber rose to a staggering (for the time) $100 Million a piece. The politics of
defense being what they are in the modern world led to endless debate on whether
such an expensive aircraft was necessary, let alone whether manned strategic
bombers were needed at all. President Jimmy Carter’s defense administration
didn’t think so, and canceled the program, choosing to fund development of a
new, stealthier design that eventually became the B-2. Interestingly enough, the
B-2 also went through the same questioning prior to its debut in the inventory.
After the announcement of cancellation the four supersonic test aircraft, known
as B-1As, where allowed to complete their testing phase and the manufacturing
line was shut down. With the election of Ronald Reagan as president in 1980,
large-ticket defense programs suddenly came back into vogue and the B-1 program
was rejuvenated. A significant number of changes were made to the aircraft to
reflect a refined mission profile. The crew escape module was deleted in favor
of standard ejection seats. The engine intakes were greatly simplified as the
top speed of the aircraft was reduced to just a little over Mach 1 to support
the low altitude, ground-hugging style of attack that is now required to give
the crew any chance of survival in a real conflict. Range and payload capacities
were improved.
100 B-1s were built and delivered, with the last one rolling off the line in 1988. Assigned the task of nuclear deterrence, the B-1 was not involved in any of the conventional conflicts of the late 80s and early 90s, including Desert Storm. With the collapse of the Soviet Union and the diminished threat of a nuclear war, the mission profile changed again, so all B-1Bs were modified for the delivery of conventional ordnance. The first live combat missions were flown in the recent operations against the republics of the former Yugoslavia. Today, 95 B-1s remain, with plans to continually upgrade them over the coming years. This will give the line a presence in the US Air Force’s arsenal well into the middle of the 21st century.
|
THE KIT |
First introduced in 1988, the Revell B-1B kit instantly laid claim to being the largest plastic model aircraft kit ever made. After a run of a few years, the kit went out of production and quickly became a hot ticket among collectors at swap meets. Last year, Revell-Monogram chose to reissue the kit, so I took the plunge and brought one home. Packed in a very large and sturdy box, the kit is molded in dark gray plastic. The clear parts are tinted with a dark smoke color. I’m not sure that this is accurate, but it certainly prevents anyone from seeing the nicely detailed cockpit inside. Spending a lot of time on the cockpit is not a wise use of one’s time unless the modeler chooses to open up the crew hatches for inspection.
 Surprisingly, the panel lines are all recessed. Much has been made
of the fact that all the lines are of the same size, including those of the
control surfaces. In my opinion the impact on the finished kit is minimal. The
tail section is one large assembly, with movable horizontal stabilators. The
center section contains the swing wings, which can be left free to move back and
forth, although there is no attempt to link them together in unison. Three bomb
bays sections contain two rotary weapons ejectors, sixteen AGM-69A nuclear
devices, and a long-range fuel tank. The nose section contains the nice cockpit
area, crew boarding latter, highly detailed nose wheel bay, and a radar dish for
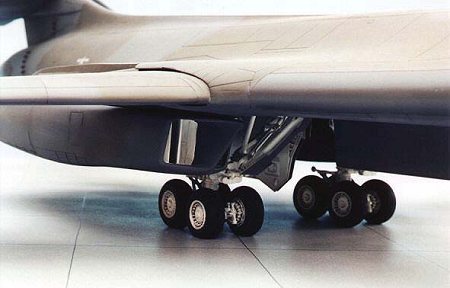
the nose cone. The landing gear are very complex devices on the real aircraft,
and they are replicated on this model very well. Rubber tires are included.
Surprisingly, the panel lines are all recessed. Much has been made
of the fact that all the lines are of the same size, including those of the
control surfaces. In my opinion the impact on the finished kit is minimal. The
tail section is one large assembly, with movable horizontal stabilators. The
center section contains the swing wings, which can be left free to move back and
forth, although there is no attempt to link them together in unison. Three bomb
bays sections contain two rotary weapons ejectors, sixteen AGM-69A nuclear
devices, and a long-range fuel tank. The nose section contains the nice cockpit
area, crew boarding latter, highly detailed nose wheel bay, and a radar dish for
the nose cone. The landing gear are very complex devices on the real aircraft,
and they are replicated on this model very well. Rubber tires are included.
The dimensions of the aircraft are pretty good. The wingspan is perfect, but the fuselage is a little short in overall length. Overall accuracy of shape and detail is quite good, too. Revell ignored quite a few of the very prominent antennae that are in place on the B-1B, and only one pitot tube is provided for each side of the nose, instead of the correct three per side. The afterburners and engine nacelles are more appropriate for a B-1A, so some modification is necessary. The horizontal stabilator is too thick, but fixing that is not really possible. Lastly, the vortex generators on the rear of the aircraft are not reproduced.
The decal sheet is as small as the box is big. It gives markings for the first B-1B delivered to the Air Force. The decals are petty good in regards to quality.
|
CONSTRUCTION |
I distinctly remember a posting to the newsgroup rec.models.scale several years ago about the B-1B kit from a modeler who warned anyone attempting to actually build the model that they would need a bastard file to deal with the fit problems. I chuckled at this, but kept it in the back of my mind until I finally discovered with my own experience that he wasn’t kidding. There are a few areas that require serious tools – power tools – to fix. We’ll get to them a little later in this review.
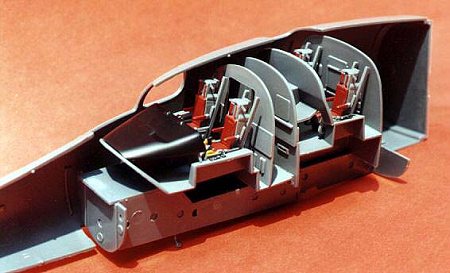 First off, I painted and assembled the cockpit. The interior is
FS36231 Dark Gull Gray overall with black instrument panels. The ejection seats
have flat red cushions and armrests with bright yellow ejection handles. As
previously mentioned, I didn’t spend a great deal of time detailing the
cockpit area as it is impossible to see much of anything through the tinted
canopy pieces. The modeler can open a hatch over the rear crew compartment, but
I glued it shut to preserve realistic gaps. At this time the modeler should add
weight to the nose area to keep the completed model sitting on its landing gear.
I used lead fishing weights and attached them behind the bulkhead of the radar
assembly. The forward fuselage was then glued together and all the seams filled,
sanded, and primed. I elected to glue the nose cone on, again because of my
personal preference not to display the radar assembly. The clear canopy fit
pretty well, although it was not exactly flush with the surrounding fuselage. I
chose not to mess with it.
First off, I painted and assembled the cockpit. The interior is
FS36231 Dark Gull Gray overall with black instrument panels. The ejection seats
have flat red cushions and armrests with bright yellow ejection handles. As
previously mentioned, I didn’t spend a great deal of time detailing the
cockpit area as it is impossible to see much of anything through the tinted
canopy pieces. The modeler can open a hatch over the rear crew compartment, but
I glued it shut to preserve realistic gaps. At this time the modeler should add
weight to the nose area to keep the completed model sitting on its landing gear.
I used lead fishing weights and attached them behind the bulkhead of the radar
assembly. The forward fuselage was then glued together and all the seams filled,
sanded, and primed. I elected to glue the nose cone on, again because of my
personal preference not to display the radar assembly. The clear canopy fit
pretty well, although it was not exactly flush with the surrounding fuselage. I
chose not to mess with it.
My attention then turned to the
extensive wheel wells and bomb bays. These have a pretty high level of detail,
but are marred by two big problems: (1) Ejector pin marks abound; and (2)
everything is gloss white. It took me over two months of on-again, off-again
work to slog through this part of the construction phase. The sixteen AGM-69A
missiles have to be individually glued, sanded, painted, and decaled before they
are attached to the rotary launcher. I posted a request to RMS for information
about 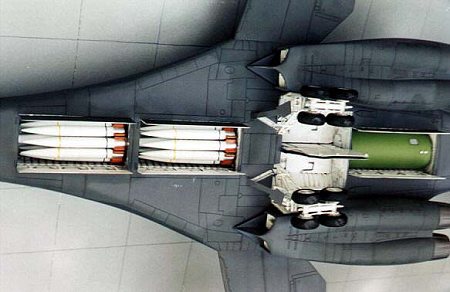 the proper paint scheme of
the missiles, and got a quick and erudite (if somewhat dense) reply from
resident ordnance expert Kurt Plummer, who listed all the necessary colored
bands, which I replicated with decal stripes. The main body of the missile is
gloss white, the fins are International Orange, and the rocket plenum is
polished chrome.
the proper paint scheme of
the missiles, and got a quick and erudite (if somewhat dense) reply from
resident ordnance expert Kurt Plummer, who listed all the necessary colored
bands, which I replicated with decal stripes. The main body of the missile is
gloss white, the fins are International Orange, and the rocket plenum is
polished chrome.
The landing gear constitutes a semi-major project in its own right. Each main strut has to be glued and the seams need to be filled and sanded. These struts are quite massive, but whether they will stand up to the weight of such a large model over time is unknown. My kit will rest in a cradle made from the original box bottom so that the landing gear will be relieved of their burden except when displayed at contests and the like.
After all the preparation, I painted the wheel wheels, landing gear, and bomb bays with Testors Model Master Acryl gloss white in a marathon painting session. This took three hours and my poor Aztek A470 airbrush died in the middle of the painting. It was sent back to Testors and was replaced for free. In the meantime, I switched to my backup Paasche H airbrush and completed the gloss white painting. It was at this point I got discouraged and put the Bone away, concentrating on an "easy build" of the Minicraft C-97G kit. As you can see by the review here on Modeling Madness, that was a mistake. Coming back to work on the B-1B after that sorry experience was actually a relief. I returned to pick out details in the wheel wells with a black Sharpie marker and applied a dark gray wash to bring out the details and to introduce a level of griminess to this high-use area.
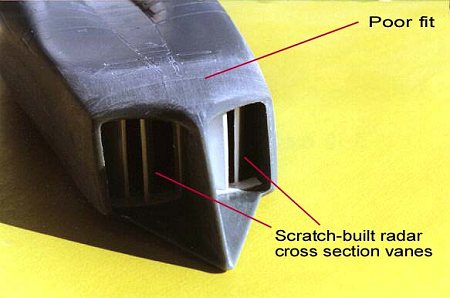 My efforts
turned to the engine nacelles. Here I found the worst fit problems with the join
of the engine intakes and the rest of the nacelle. I really did use a bastard
file to get the overall profile of the intakes in line with the bottom of the
nacelle. It took a lot of work, but I finally managed to get things back in
shape. The interior area of each jet engine intake is awful in that very large
and obvious seams can be easily seen. Timid modelers simply make some FOD covers
and stop there. I chose to replicate the radar cross section (RCS) vanes with
plastic card, which in turn hid the seams on the intake trunks. Towards the rear
of the nacelle are some aerodynamic bumps that only belong to the B-1A. Sand
them off. The afterburners are merely okay in detail. If you chose to do the
B-1B in its early career, they are accurate enough if you saw off the last ¼
inch to get the overall length in line with the real aircraft engines. If you
chose to make a present-day B-1B, then the afterburner cans have changed (the
turkey feathers have been removed and a lot of mechanical detail is now
present). Replacements from the aftermarket are necessary. They are currently
being produced by Masterpiece Models, accessible at www.masterpiecemodels.com. I
painted the interior of the intakes gloss white and then used Testors
non-buffing Metalizer in the Burnt Metal shade for the afterburners. A
dry-brushing of silver and a dusting of black and gray pastels helped make the
cans more sooty looking.
My efforts
turned to the engine nacelles. Here I found the worst fit problems with the join
of the engine intakes and the rest of the nacelle. I really did use a bastard
file to get the overall profile of the intakes in line with the bottom of the
nacelle. It took a lot of work, but I finally managed to get things back in
shape. The interior area of each jet engine intake is awful in that very large
and obvious seams can be easily seen. Timid modelers simply make some FOD covers
and stop there. I chose to replicate the radar cross section (RCS) vanes with
plastic card, which in turn hid the seams on the intake trunks. Towards the rear
of the nacelle are some aerodynamic bumps that only belong to the B-1A. Sand
them off. The afterburners are merely okay in detail. If you chose to do the
B-1B in its early career, they are accurate enough if you saw off the last ¼
inch to get the overall length in line with the real aircraft engines. If you
chose to make a present-day B-1B, then the afterburner cans have changed (the
turkey feathers have been removed and a lot of mechanical detail is now
present). Replacements from the aftermarket are necessary. They are currently
being produced by Masterpiece Models, accessible at www.masterpiecemodels.com. I
painted the interior of the intakes gloss white and then used Testors
non-buffing Metalizer in the Burnt Metal shade for the afterburners. A
dry-brushing of silver and a dusting of black and gray pastels helped make the
cans more sooty looking.
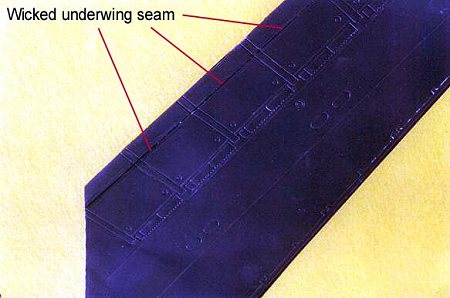 The wings were next. Being such long pieces of styrene, they are
prime candidates for being warped. Mine were slightly off, but not enough to
have to do anything about. B-1B wings droop just like C-5 and B-52 wings do, so
keep that in mind when assembling your model. There is a terrible seam that runs
down the bottom flap area of each wing, and that took many applications of CA
glue and sanding to rectify. After looking at Steve Bamford’s detailed photos of a B-1B, I determined that the
navigation lights are translucent red and blue-green. I cut out pieces of the
appropriate color from toothbrush handles and set them in position on each
wingtip. After sanding them to the proper profile, polishing with a tri-grit
file returned the clarity to the plastic. I assembled the tail section and
attached the horizontal stabilator. Since I have depicted a Bone at rest on he
ground, the angle of the stabilators is not parallel to the ground. Instead they
are pitched up by a good twenty degrees or so.
The wings were next. Being such long pieces of styrene, they are
prime candidates for being warped. Mine were slightly off, but not enough to
have to do anything about. B-1B wings droop just like C-5 and B-52 wings do, so
keep that in mind when assembling your model. There is a terrible seam that runs
down the bottom flap area of each wing, and that took many applications of CA
glue and sanding to rectify. After looking at Steve Bamford’s detailed photos of a B-1B, I determined that the
navigation lights are translucent red and blue-green. I cut out pieces of the
appropriate color from toothbrush handles and set them in position on each
wingtip. After sanding them to the proper profile, polishing with a tri-grit
file returned the clarity to the plastic. I assembled the tail section and
attached the horizontal stabilator. Since I have depicted a Bone at rest on he
ground, the angle of the stabilators is not parallel to the ground. Instead they
are pitched up by a good twenty degrees or so.
 The wheel wells and bomb bays were assembled and glued into the
center fuselage section. I set the wings in the open position and glued the two
fuselage pieces together. The seams are quite bad near the rear of each engine
nacelle and took a lot of work to correct. I also scribed an approximation of
the bag-like structures that cover up the area where the wings swing back into
the fuselage. I then glued the three fuselage sections together. The rear to
center joint is not so bad, but a large, 1/8 inch gap is present in the joint
between the front and center sections. This took more filling and sanding and
priming and filling and sanding and priming and filling and sanding and… well,
you get the idea. I glued on the two engine nacelles and turned my attention to
all the little fiddly bits on the outside of the aircraft. Four new pitot tubes
were made from a sheet of .30 inch plastic. The vortex generators were
fabricated and applied to the tail cone area. Finally, I made new antennae for
the upper and rear fuselage and glued them on as well. I polished out all the
rough sanding areas (and there are a lot), rescribed the lost panel lines, taped
over the clear areas with Scotch magic tape, and washed the model before moving
it out to the paint shop.
The wheel wells and bomb bays were assembled and glued into the
center fuselage section. I set the wings in the open position and glued the two
fuselage pieces together. The seams are quite bad near the rear of each engine
nacelle and took a lot of work to correct. I also scribed an approximation of
the bag-like structures that cover up the area where the wings swing back into
the fuselage. I then glued the three fuselage sections together. The rear to
center joint is not so bad, but a large, 1/8 inch gap is present in the joint
between the front and center sections. This took more filling and sanding and
priming and filling and sanding and priming and filling and sanding and… well,
you get the idea. I glued on the two engine nacelles and turned my attention to
all the little fiddly bits on the outside of the aircraft. Four new pitot tubes
were made from a sheet of .30 inch plastic. The vortex generators were
fabricated and applied to the tail cone area. Finally, I made new antennae for
the upper and rear fuselage and glued them on as well. I polished out all the
rough sanding areas (and there are a lot), rescribed the lost panel lines, taped
over the clear areas with Scotch magic tape, and washed the model before moving
it out to the paint shop.
|
PAINT & DECALS |
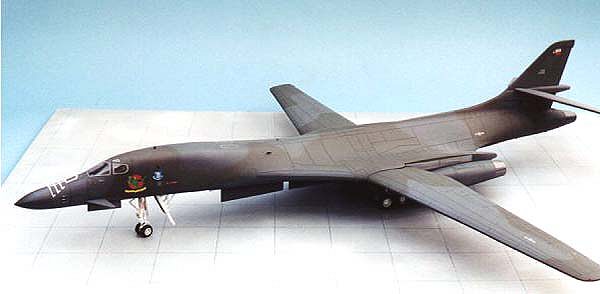
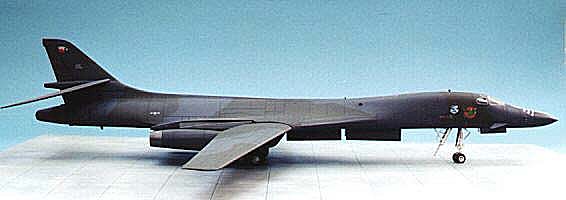
The Strategic Scheme is a wraparound camouflage that consists of the two grays (Gunship Gray FS36118 and Euro I Gray FS36081) and a green (Green Drab FS34086). I used Polly Scale acrylics for the grays and Testors Model Master enamel for the green. People always confuse the Strategic Scheme with the Euro I camouflage that was applied to F-4s and A-10s. They are not the same. The Euro I scheme has one gray and two greens.
I used a pencil to trace out the
camouflage pattern and spent a few days spraying the various colors and touching
up areas that didn’t quite come out right the first time. I now completely
understand why the Air Force now paints these big airplanes Gunship Gray
overall, and it is must have been a real maintenance nightmare to keep all three
colors looking their best. Several coats of Future where used to prepare the
model for the decals. The kit decals depict a rather boring subject so I
 searched and found an old Super Scale
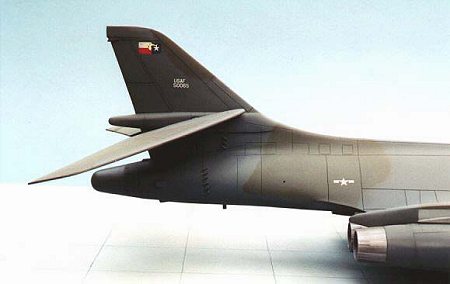
sheet, number 48-398. This sheet has a couple of inaccurate markings, namely the
national insignia and the mixed up tail serial number for 85-0075 (printed as
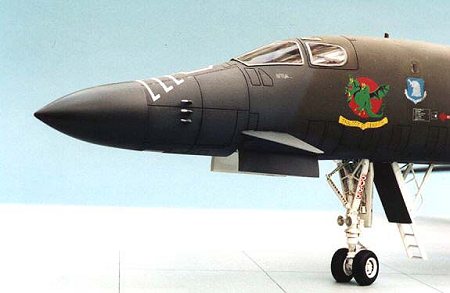
60075). So I used the markings for Trilogy of Terror, a B-1B from the 96th
Bombardment Wing based at Dyess AFB in Texas. The kit’s national insignia
decals were used. The guys at Fox One Decals have recently announced a set of
markings for some all-gray birds. Remember that one needs to replace the
afterburners if doing a Bone in this scheme. I outlined the frangible flare
covers on top of the fuselage with strips of clear decal that was sprayed with
medium gray paint.
searched and found an old Super Scale
sheet, number 48-398. This sheet has a couple of inaccurate markings, namely the
national insignia and the mixed up tail serial number for 85-0075 (printed as
60075). So I used the markings for Trilogy of Terror, a B-1B from the 96th
Bombardment Wing based at Dyess AFB in Texas. The kit’s national insignia
decals were used. The guys at Fox One Decals have recently announced a set of
markings for some all-gray birds. Remember that one needs to replace the
afterburners if doing a Bone in this scheme. I outlined the frangible flare
covers on top of the fuselage with strips of clear decal that was sprayed with
medium gray paint.
After the decals dried, another coat of Future was applied to protect the finish from the weathering. First, I used a wash made from Turpenoid and Winsor and Newton burnt umber oil paint to highlight all the panel lines. Dark gray pastels were used to diffuse the panel line a bit. Then I used a coat of Polly Scale’s Dust to slightly fade the paint and tone everything down, just like in the pictures of real aircraft. Typical for me, my last-minute screw-up came when I messed up the weathering (laying the pastels on too strongly), so I had to repaint most of the top part of the aircraft. That added more paint, Future, weathering, and Dullcote, which introduced more roughness to the finish. It was especially bad on the green areas of the camouflage. So I sanded everything down and repainted again, only this time I used Testor Acryl Green Drab instead of the enamel I used initially. Perseverance pays off, and I was finally happy with the finish. Polly Scale’s Flat Finish was used to seal the paint. It went on so nicely that I made a mental note never to use Dullcote Lacquer again. I just have too many problems with it every time I use it. I masked off the dielectric panels on each wing root leading edge as well as the nose and tail radomes and airbrushed a coat of AeroMaster Semi-Gloss Clear acrylic to give a slight differentiation in texture. The rubber wheels also got a shot of Dullcote before being attached to the struts. I glued on all the wheel well and landing gear doors with CA glue. After attaching the main landing gear, I discovered that the alignment was not so hot, and I had trouble getting all eight wheels to sit on the ground. Some judicious grinding of the rubber wheels with my motor tool got me close enough, but the track is still splayed out when viewed dead ahead. Oh well. I removed the masking tape from the windows and outlined the front windows with more thin strips of clear decal that had been sprayed gray. The last step was to attach the boarding ladder, ending an eight-month odyssey with the biggest of the big.
|
CONCLUSIONS |
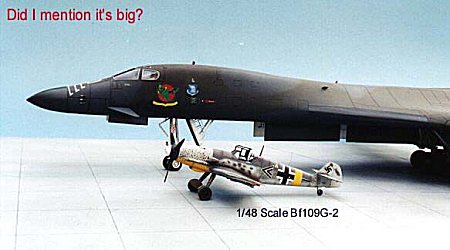 For some bizarre reason, I thought that this would be a relatively
simple project. It was not, taking longer to do (over one hundred hours) than
any other model I have ever made. I really lost interest in the model while I
was slogging away in the bomb bays, but my personal sense of commitment (some
would say stubbornness) made me come back and complete the thing. When I show
the model to people, it brings about gasps of amazement. For me, this makes the
whole thing worth it, and it is why I am always attracted to big airplane
models. They never enter a room quietly, and they always attract a crowd at
model contests and club meetings. The big Revell kit builds up to a mighty fine
replica of one of the most exciting aircraft that exists today. If you’ve ever
seen a B-1 do a maximum afterburner takeoff at an airshow, you know how
impressive an event it is. This model is the equivalent of this loud and raucous
exercise – it is audacious in execution and imposing in stature. I’m proud
to say that I have one in my collection.
For some bizarre reason, I thought that this would be a relatively
simple project. It was not, taking longer to do (over one hundred hours) than
any other model I have ever made. I really lost interest in the model while I
was slogging away in the bomb bays, but my personal sense of commitment (some
would say stubbornness) made me come back and complete the thing. When I show
the model to people, it brings about gasps of amazement. For me, this makes the
whole thing worth it, and it is why I am always attracted to big airplane
models. They never enter a room quietly, and they always attract a crowd at
model contests and club meetings. The big Revell kit builds up to a mighty fine
replica of one of the most exciting aircraft that exists today. If you’ve ever
seen a B-1 do a maximum afterburner takeoff at an airshow, you know how
impressive an event it is. This model is the equivalent of this loud and raucous
exercise – it is audacious in execution and imposing in stature. I’m proud
to say that I have one in my collection.
|
REFERENCES |
Wachsmuth, Wayne: B-1 Lancer, In Detail and Scale
Plummer, Kurt: Postings to rec.models.scale on proper colors of AGM-69A
April 2000
Copyright ModelingMadness.com
If you would like your product reviewed fairly and fairly quickly, please contact the editor or see other details in the Note to Contributors.