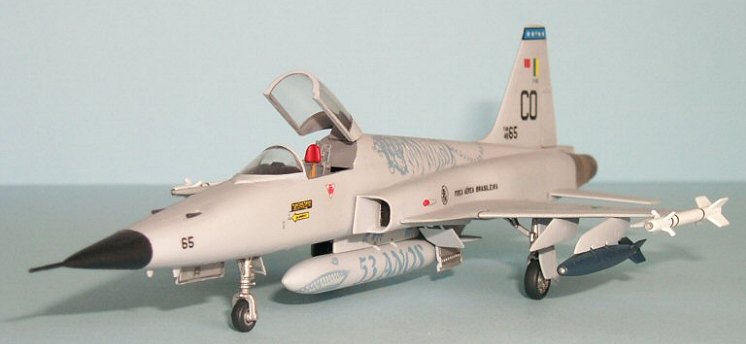
Italeri 1/72 F-5E Tiger II
|
KIT # |
? |
|
PRICE: |
$? |
|
DECALS: |
? options |
|
REVIEWER: |
Michael Johnson |
|
NOTES: |

|
HISTORY |
 equired
the fuselage to be both widened and lengthened. The forward wing root was
redesigned to give the "Tiger II" wing its characteristic triple delta
shape.
The first flight of the F-5E was on 11 August 1972. The first USAF unit to receive the aircraft was the 425th TFS at Williams AFB, Arizona responsible for training foreign pilots in the F-5 aircraft. The most well known use of the "Tiger II" was as an aggressor aircraft at the USAF Fighter Weapons School, Nellis AFB Nevada. The aggressor pilots of the 64th Fighter Weapons Squadron were trained in Soviet tactics and used the -Es to simulate MiG-21s for training USAF pilots in aerial combat skills. Eventually, aggressor squadrons were formed at RAF Alconbury, U.K. and Clark AB, PI, for training USAF pilots stationed overseas along with pilots of friendly foreign nations. These units were disbanded in 1988 along with one of the two US-based squadrons at Nellis AFB.
SPECIFICATIONS (F-5E)
Span: 26 ft. 8 in.
Length: 48 ft. 2 in.
Height: 13 ft. 4 in.
Weight: 24,675 lbs. max. takeoff weight
Armament: Two M-39 20mm cannons, rockets, missiles and 5,500 lbs. of bombs externally
Engines: Two General Electric J85-GE-21s of 5,000 lbs. thrust each with afterburner
Cost: $756,000
PERFORMANCE
Maximum speed: 1.63 mach at 36,000 ft. (1,050 mph)
Cruising Speed: 650 mph.
Range: 2,300 miles (maximum with external fuel tanks)
Service Ceiling: 50,700 ft.
Preamble
I have always liked the F-5 family of sleek and aggressive looking light fighter aircraft. There has been many kits in 1:72 of the T-38 Talon, F-5 Freedom fighters and F-5E Tiger II, plus the F-5F twin seat fighter and the F-20 Tigershark. In 1:48, Monogram produced a superb F-5E/F along with the F-20 kit during the mid eighties. Last year Sword released a limited run new tool T-38A Talon and Classic Airframes have released the F-5A and F-5B.
 Of the 1:72 scale choices, Italeri are the better
of any still available and I was fortunate enough to be able to purchase
the F-5E (old style radome) and F-5F from a kind modeller in the US for
US$7 each. Italeri has retooled the F-5E to depict the “shark nosed”
radome of later models. For those wanting to do the earlier F-5s in 1/72,
there are the superb ESCI kits that have been reissued by AMT and more
recently, Italeri.
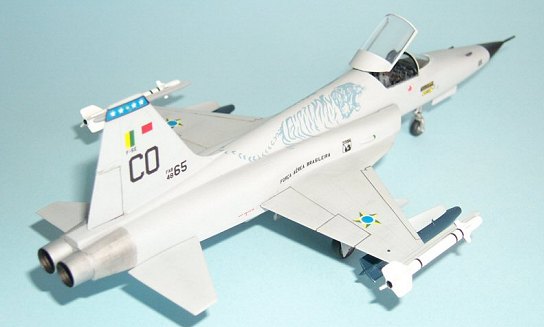
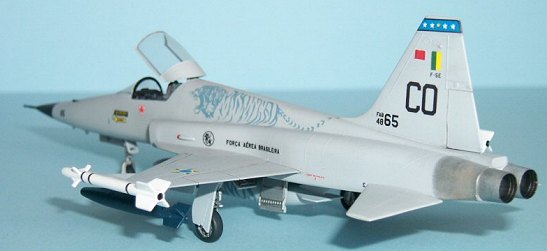
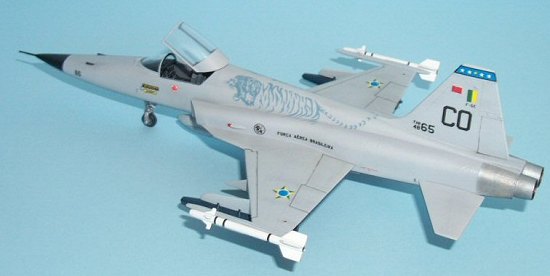
To make matters even better, I was also able to purchase a set of Cutting Edge resin ejector seats and another fellow modeller from Brazil send me a FCM sheet depicting a Brazilian Air Force F-5E from Pampas Squadron 1°/14° G. AV. – “Anniversario de 53 anos”.
Further research showed the subject F-5E as being armed with wingtip Sidewinders and Rafael Python 3 AAM’s or bombs. Keen to do the Python AAM armed option, I managed to secure a pair of resin aftermarket missiles from the US.
I now had all the ingredients to do a F-5E that differed somewhat from the more usual offerings of this type.
|
THE KIT |
Resides in a depicting an typical end opening
Italeri box with box art depicting an attractive in-flight USAF F-5E in
Aggressor markings. Opening the box reveals two grey plastic sprues, one
clear, an excellent decal sheet and a instruction sheet. On
 the whole, all parts
are clean and flash free, with fine, raised panel lines.
As is common with F-5E kits, the fuselage consists of upper and lower halves joined horizontally. I am still undecided to which is better, a vertical or horizontal seam, but certainly clean up would be easier along the fuselage sides than the dorsal and ventral spines.
The two piece windshield and canopy were commendably thin but not being bagged separately, were scuffed and surface scratched. One of the wingtip missile rails had broken and after a frantic search the broken part was found, much to my delight and relief.
Decals on inspection were dense, sharp and commendably thin. But they went into the decal bank as I had these excellent looking, although a little thick, FCM decals.
|
CONSTRUCTION |
 Construction (as always) started in the cockpit.
Italeri provides a very nicely moulded cockpit tub and instrument panel
that looks fantastic with some careful painting and highlighting. I used
overall Citadel Codex Grey and also tried Vallejo Flat Black for the
first time. Vallejo has an incredible range of acrylic colours to chose
from which need to be thinned with distilled water prior to application.
Once dry, which is very quick, there are NO brush marks at all. I will be
moving to using these paints exclusively for detail and hand painting
work. Vallejo paints can be sprayed as well (either the standard range or
the airbrush range)
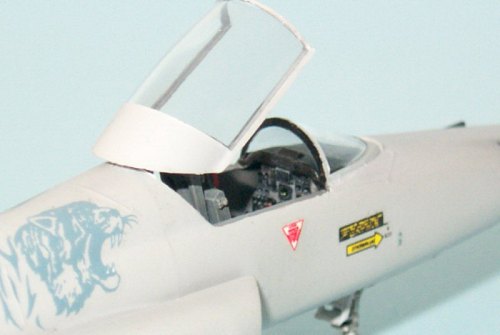
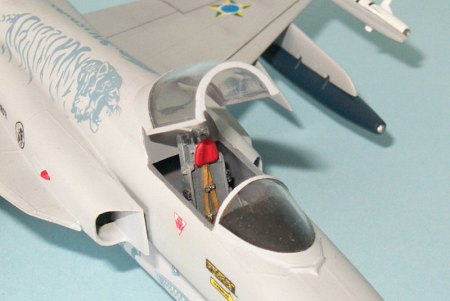
I cleaned up the control stick and added some detail with scrap stretched sprue, once painted this was attached to the cockpit tub. The kit supplied seat is very basic, consisting of two halves joined vertically down the middle. This results in a messy seam that needs considerable work to get rid off. Fortunately, however, I had a Cutting Edge resin replacement seat. Once carefully painted up the resin replacement seat looked superb!
A quick dry fit ensured the completed cockpit tub fitted very well, but the open nature of the area behind the seat needed two small bulkheads of plasticard fitted and painted Codex Grey to conceal the empty holes visible through the cockpit opening. The horizontal fuselage halves were then cemented into place with only moderate amounts of filler needed. These were then cleaned up with wet and dry used wet to remove any seam lines and smooth everything into place.
The underside, where the each wing abutted to the lower fuselage, required filling and sanding to eradicate the join line, so out came the putty and nail polish remover which provided a nice smooth join. The one piece tail slotted neatly into the area provided and only required a small amount of filler and some careful sanding to complete fuselage assembly work.
The windshield and clamshell canopy were polished with Novus plastic polish and brush painted with Future inside and out to improve clarity. Once the Future had cured, Tamiya masking tape was used to mask both clear parts and the windshield was then cemented in place. PVA glue was then used to fill any gaps. The canopy was tacked into place using Maskol in preparation for the painting stage.
Italeri only provide a simple peg-like affair to support the canopy in the open position, which is a far cry from the F-5E’s complex hinge mechanism. Unfortunately, I had no aftermarket resin cockpit replacement and was not keen to attempt scratch building so I went ahead with what the kit supplied.
 The inside of the
intakes were the hardest to clean up, with a mould separation line
causing all sorts of grief. In hindsight, it may have been easier for
Italeri to mould the splitter plate and intake separately to avoid this
problem. However, in the end all was well and I painted these parts
separately to ensure full coverage of the light aircraft grey on the
insides of the covers. After the paint had dried I cemented them to the
fuselage and after a little filler and sanding, a good fit resulted.
I then repaired the broken wingtip rail and added the underwing pylons, filling any gaps between each pylon and the wing underside with PVA glue. The final item to add was the nose pitot which was cemented into place and faired in to the radome contours with superglue. This was sanded as soon as cured and was polished with wet and dry. By using superglue for this task, I ensured a strong bond.
Undercarriage legs and tyres were sprayed with Tamiya AS-12, then I weathered the aluminium finish with a “sludge wash” of Aeromaster Tyre Black, detergent and water. Adding the detergent retards the drying time of the acrylic paint considerably allowing excess wash being able to be removed with cotton buds and micro brushes after 15-30 minutes drying time. The tyres were then painted with Aeromaster Tyre black. A coat of Aeromaster flat sealed the wash in and imparted a realistic weathered look to the aluminium finish. I then assembled the centreline fuel tank and bombs, taking care not to sand flat spots while removing seam lines.
The underwing pylons proved to be an issue with my selection of load-out as the Python missiles needed a different style pylon to that supplied in the kit. In the end I elected to use the kit supplied bombs, painting them dark blue to represent the “inert” practice bombs shown as part of load-out on the subject aircraft.
Wingtip Sidewinder’s proved to be a problem. Brazilian Air Force aircraft use the AIM-9B and of late a new AAM based on the AIM-9B (with AIM –9L style finlets) called the MAA-1 Piranha. The kit supplied missiles were generic AIM-9L style missiles which I initially thought needed replacing. Eventually, after much thought and trial and error, I modified the nose of the kit supplied AIM-9L’s and depicted them as the MAA-1. It was during this time a kind modeller sent me a pair of spare Hasegawa AIM-9B’s
|
COLORS & MARKINGS |
A primer coat went on first, to highlight any flaws. Several were revealed and then dealt with.
The FCM decal placement instructions indicated that the overall blue-grey finish on the Pampas Squadron F-5E was to be FS 35526. Checking online for colour swatches of the FS number, I was surprised to find that this was a light blue shade, although with a grey hue to it. However more research and a couple of emails to my Brazilian friend Mario Serelle, revealed that the correct colour was indeed FS 36375. A quick search through my Paint Locker yielded Gunze H308 and Aeromaster Light Ghost Grey, with the Aeromaster colour appearing to be the closest match to this colour. Unfortunately the Aeromaster paint had thickened over the years, the good news being that it thinned well enough to airbrush with Tamiya thinner and distilled water.
 Undercarriage bays were then painted with Humbrol
Flat Aluminium and once dry, washed with the same sludge wash applied to
the undercarriage.
Applying the decals was initially nerve racking as I had no experience with FCM decals. The images on the sheet were sharp and in register with a matt sheen to the carrier film. This is certainly a similarity with Revell AG decals. Application wise, the decals went on well and responded slightly to Aeromaster Sol. The decals did silver, even after repeated applications of decal solvent. This became more readily apparent after the flat seal coat.
All that was required now was the addition of cut to size red decal to represent the red tail lights.
Pictures of the subject plane, sent to me by Mario Serelle, showed that the plane was not kept perfectly clean by its ground crews, so I began the weathering by applying a wash to the recessed panel lines around the control surfaces. For this I used the same “sludge wash” I used previously on the undercarriage.
Once again the model was put aside to cure and finally sprayed with Pollyscale Flat Coat, giving an overall flat appearance. I then post shaded the raised panel lines with some medium grey pastels, adding to the slightly worn look of the Ghost Grey finish. Finally the BMF around the exhaust cones was darkened with graphite dust and some brown chalk.
Canopy masking came off now and revealed painted framing that was nicely defined. I buffed away any uneven areas with a sharpened wooden toothpick and then polished the canopy clear areas with a cotton bud.
|
FINAL CONSTRUCTION |
Final assembly involved addition of the pre-painted underwing load-out, wingtip MAA-1’s (modified AIM-9L’s) and centreline fuel tank.
The clamshell canopy installation was fiddly to undertake. I found the best course of action was to attach the peg with CA glue to the underside of the canopy and then once set, attach the peg into the provided slot in the rear cockpit bulkhead. A quick touch-up around the peg area saw the canopy assembly completed.
My Brazilian Air Force F-5E Tiger II was now finished!
|
CONCLUSIONS |
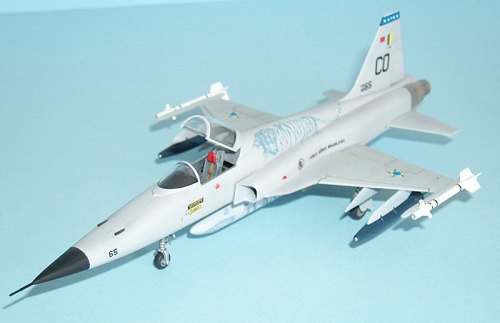 This kit was a fine and easy build, with very
little filler or major sanding needed to complete the kit. I certainly
will build my twin seat Italeri F-5F and will also add the later “shark
nosed” F-5E kit to my stash.
The only addition I would make to the kit is to replace the ejector seat with a resin aftermarket example. This is well worth doing as it will save a lot of hard work and enhance the remainder of the superb cockpit immensely.
I certainly will be using FCM decals again, although the next time I will use Johnson’s Future (Super Stride, Pledge One Go) to bed down the decals and to try and avoid silvering issues
Comments have already been made about the unusual light ghost grey finish of my F-5E, which certainly was one of my goals; to produce something a little different!
Wholeheartedly recommended!!
|
REFERENCES |
Michael Johnson
July 2004
Copyright ModelingMadness.com. All rights reserved. No reproduction without express permission.
If you would like your product reviewed fairly and quickly, please contact
the editor or see other details in the Note to
Contributors.