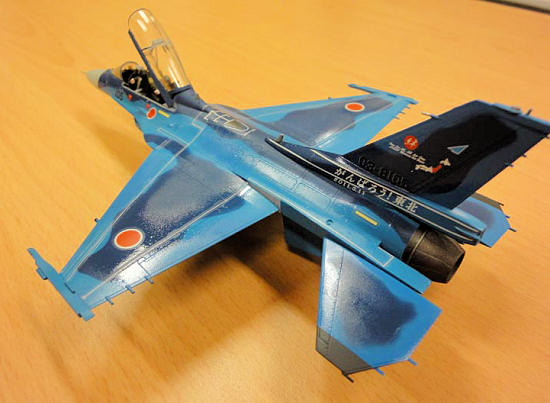
Hasegawa 1/72 Mitsubishi F-2B “GANBAROU TOHOKU”
| KIT #: | 01976 |
| PRICE: | Around $50.00 |
| DECALS: | Three options |
| REVIEWER: | Jegatheesan M |
| NOTES: | Limited reissue-contains two kits. |
| HISTORY |
Even now, one year after the North-East
(Tohoku) tsunami and earthquake disaster, many Japanese are struggling to cope
with the lost of their loved ones, their homes and their livelihood.
 But out of
the rubble, stories of courage and perseverance started to emerge. People coming
together to provide comfort and hope to complete strangers, restaurant owners
providing free meals to those left homeless, student volunteers spending
whatever free time they had to help those in need. There was even a touching
news clip about a faithful Japanese dog that had survived the tsunami onslaught.
When newsmen and camera crew arrived at the disaster area to provide news
coverage, they found this dog guarding and looking after its canine companion
that was injured in the disaster. The companion couldn’t walk but its faithful
friend never left its side. You
can watch the video on Youtube. I can never watch this video without getting a
lump in my throat or biting my lower lip to prevent it from quivering.
But out of
the rubble, stories of courage and perseverance started to emerge. People coming
together to provide comfort and hope to complete strangers, restaurant owners
providing free meals to those left homeless, student volunteers spending
whatever free time they had to help those in need. There was even a touching
news clip about a faithful Japanese dog that had survived the tsunami onslaught.
When newsmen and camera crew arrived at the disaster area to provide news
coverage, they found this dog guarding and looking after its canine companion
that was injured in the disaster. The companion couldn’t walk but its faithful
friend never left its side. You
can watch the video on Youtube. I can never watch this video without getting a
lump in my throat or biting my lower lip to prevent it from quivering.
Touched by the
Japanese mentality of not giving up and perseverance, I knew that as a modeler,
I had to do something. Even a small thing – such as building a model-- to
commemorate the Japanese ability to survive against all odds.
Towards the end of January
2012, Hasegawa released a limited reissue of the 1/72-scale
 The
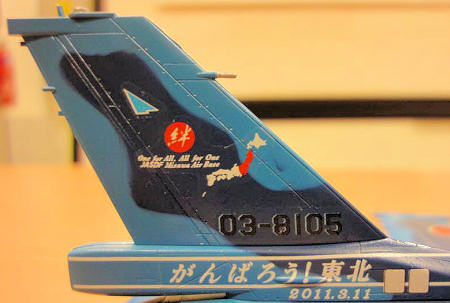
aircraft from 21 Squadron, serial no 03-8105, in particular, has a story to
tell. When the tsunami struck North-Eastern
The
aircraft from 21 Squadron, serial no 03-8105, in particular, has a story to
tell. When the tsunami struck North-Eastern
| THE KIT |
No information provided, however, you can see my
preview
| CONSTRUCTION |
SEATS:

Although on mine,
they look like Batman…….
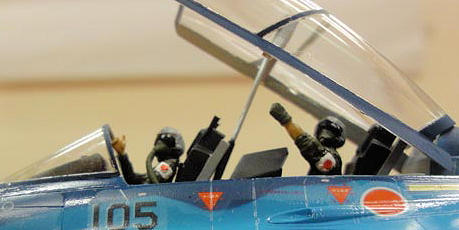
PILOTS:
I spent quite a
bit of time studying pictures of JASDF pilots and their various forms and poses
when they were in the cockpit. They seem to be quite friendly and always seem to
be waving at the photographers or giving the typical Japanese "Banzai!" victory
pose to their groundcrew. I wanted to depict such poses in my F-2. And in view
of the current state of affairs in
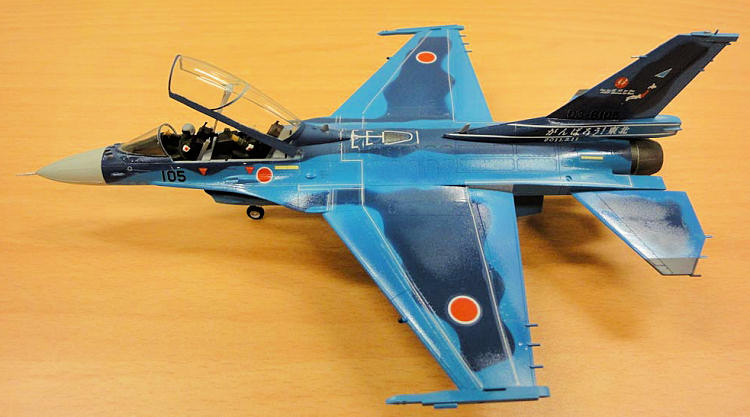
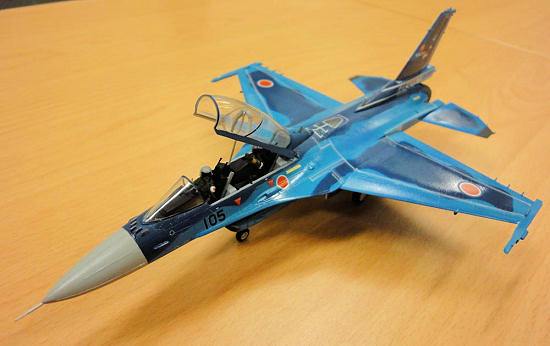
For the frontseat pilot, I used a Fujimi pilot and made him do a “Thumbs Up!”- pose with his right hand...as if to say, " Good luck! Everything's going to be OK!"
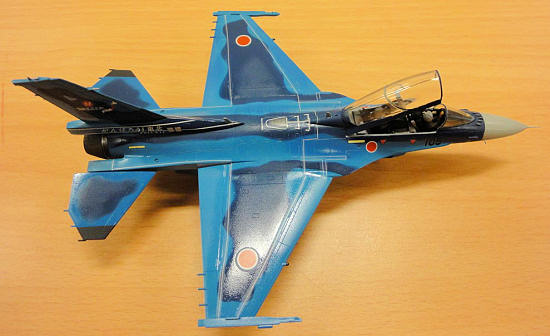
| COLORS & MARKINGS |
Newbie
Airbrushing. Many trials & errors. Much teeth gnashing. Many times wanting to
throw hands up in the air and giving up in frustration. But I couldn’t give up.
After all, the theme of this build was ‘Not Giving Up and Keep Fighting’. I
began trying & re-trying until a smooth paint surface was achieved. Problems
compounded by the fact that no out-of-the-bottle colours seem to exist for the
F-2’s unique blue camo. The reference I used for this build, the excellent Model
Art book on the F-2, states that the two blues are FS35109 & FS35045. These
didn’t seem to be readily available in acrylic form ( can’t use enamels because
of the smell & fumes). Also, pictures of JASDF planes seem to vary in camo tones
depending on the time of the day and the sunlight condition. The boxart for the
Ganbarou Tohoku airframe shows it to have a slight greyish tone to the lighter
blue and a darker, greenish/navy bluish tone for the darker blue. Reference pics
of this same airframe from Airliners.net show brighter blues. Yet
 others
of the same bird taken by different photographers show darker blues. The same
for many of these JASDF F-2 birds. Unable to get the exact colours, I trawled
the modeling forums. Everyone seemed to have their own unique mixes for these
colours...each different from the others. I finally narrowed down the colours to
this:
others
of the same bird taken by different photographers show darker blues. The same
for many of these JASDF F-2 birds. Unable to get the exact colours, I trawled
the modeling forums. Everyone seemed to have their own unique mixes for these
colours...each different from the others. I finally narrowed down the colours to
this:
Lighter Blue:
Tamiya XF-14 Sky Blue + a few drops of XF-18
Intermediate Blue.
Darker Blue :
Tamiya XF-18 + equal parts of XF-4 Flat Blue.
After much
vexation and paint mixing trials and errors, I ended up with these:
Masking was done with blu tac and
Tamiya tape. I’m not too happy with these colours. They do look comparable with
some of the F-2s I’ve seen but not the particular 21 Sqn bird that I was
building. I felt the lighter blue should have been a touch greyer and the dark
blue a touch more midnight blue. Also, studying the reference pictures, I got
the camo wrong at certain places on the airframe, especially the forward
fuselage area and the vertical tail near the parabrake housing.
But the March 11 dateline was approaching & I just
didn’t have time to play. I went with what I had.
COATING
I’ve heard many horror stories about gloss & flat coatings turning into ‘frost’ and spoiling the model. If this happened to me -- because of the dateline-- I wouldn’t have time to strip the coat and redo everything. I had to get it right the first time. I used Tamiya Clear for the gloss coat & nearly gave up. It’s a good coat but my airbrushing left much to be desired. Some parts of the model seem to have ‘rough coats’ while others looked too thick. But after leaving it overnight, I was pleasantly surprised to find that, somehow, the gloss coat had smoothed over and everything looked good. I proceeded with the decaling.
DECALS ON:
 I then
discovered that I hadn’t used enough gloss coat on certain areas and this
resulted in ‘silvering’ decals, especially for the wing-walk lines. I screwed up
the yellow “RESCUE” decal for the starboard side. The Hasegawa decal was so thin
that it folded over itself. After struggling with it for quite a bit, I gave up
and used the spare decal ( I told you this was a 2-in-1 boxing). Then the second
decal tore into two pieces….ARRGGGHH!!!
I then
discovered that I hadn’t used enough gloss coat on certain areas and this
resulted in ‘silvering’ decals, especially for the wing-walk lines. I screwed up
the yellow “RESCUE” decal for the starboard side. The Hasegawa decal was so thin
that it folded over itself. After struggling with it for quite a bit, I gave up
and used the spare decal ( I told you this was a 2-in-1 boxing). Then the second
decal tore into two pieces….ARRGGGHH!!!
Didn’t give up. Salvaged what I could.
Due to time constrains, I left out some of the smaller data stencils.
CANOPY:
Due to limitations in molding
technology, the Hasegawa canopy has a seam right in the center of the main
canopy. I decided to leave it there because it would take hours of sanding &
polishing to remove it. Time I couldn’t spare.
Also, I didn’t want to spend so much time only to have a
heavily scratched canopy as I have never done seam renewal from canopies before.
Another nerve-wrecker was masking & spraying the canopy.
A first for me since I usually used a fine-point brush to paint the canopy
frames. This time, I had no choice. I had to airbrush. I made sure I had
burnished down the Tamiya tape along the edges of the canopy frames. Didn’t want
any over-spray. After spraying, I held my breath and removed the masking tape. I
was very surprised to find that the paint was pretty well done without any
over-spray. But then, I screwed up again. I had somehow missed spraying the
central frame that separated the front seater & the backseater. The grey
undercoat that I had sprayed earlier was still there instead of the dark blue.
The clock was ticking. No time to re-mask & re-spray. So I left it as that. Will
work on it later.
| CONCLUSIONS |
| FINAL THOUGHTS |
The Tohoku
disaster has thought me to cherish my loved ones more. Seeing video footages of
the carnage that the Japanese disaster brought, only made me realize how lucky I
was to have loved ones with me.
I'd like to
dedicate this model to my mother, Sulochana, who has always, without fail,
supported my hobby and who has always motivated me throughout my life. I love
you, Ma!
March 2012
If you would like your product reviewed fairly and fairly quickly, please contact the editor or see other details in the Note to Contributors.