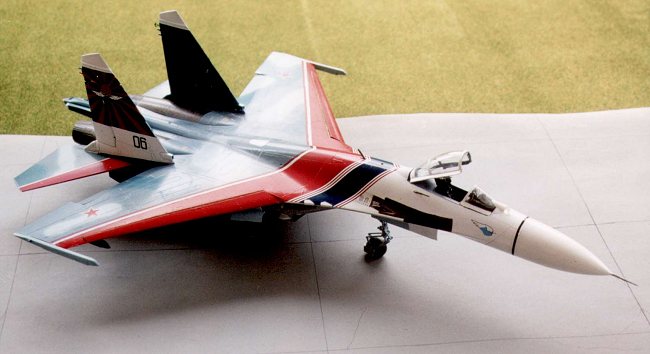
Academy 1/48 Su-27 Flanker
|
KIT # |
2167 |
|
PRICE: |
$65.00 (Aussie Bucks) |
|
DECALS: |
Russian Knights display team |
|
REVIEW : |
|
|
NOTES: |
Excellent detail and decals |
|
HISTORY |
|
THE KIT |
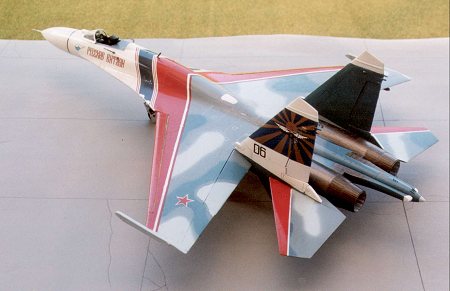
The paint scheme for this kit is quite
specific with only one model being presented. The colours are shown in FS
numbers and appear to be accurate, although not easy for the modeler to find in
your local hobby shop, as I was to discover. Instructions are clear as to when
the various parts are to be painted prior to installation.
|
CONSTRUCTION |
The cockpit is the usual place to start so:
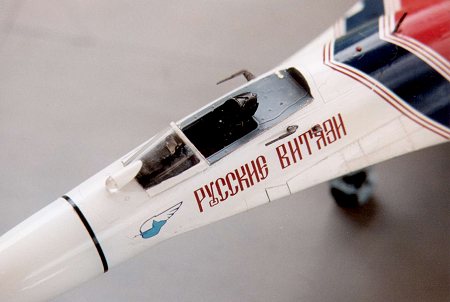
The K-36DM (Type II), large head box,
ejection seat is very detailed and Cutting Edge gives a good
description of the required painting. I
left this until the aircraft was almost completed before fitting into the
cockpit. Similarly the HUD, which is metal etch and requires a small piece of
acetate (I used the clear box in which the bits came) was added prior to the
front cockpit being fitted.
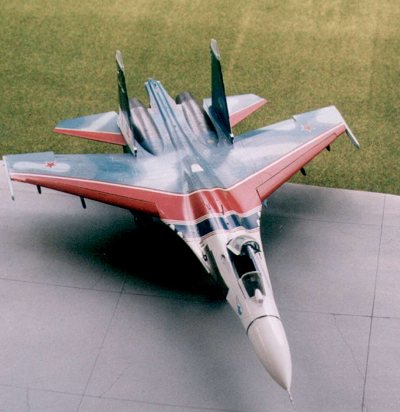
 This kit has the fuselage as
two separate halves, top and bottom, which makes for a very easy join – no
middle seam to negotiate. This is a great thing especially for someone who has a
tough time getting rid of the center seam. The whole fuselage contains the main
wings and quickly builds into a recognizable shape. The only requirement prior
to gluing the halves is to install the GSh-30-1 30mm autocannon on the starboard
side aft of the cockpit and the twin fan blades of the engines. The twin rudders
have the elevators as separate parts as are the main flaps. In addition the
front flaps are built separate to the main wing. It is also necessary to drill
out the holes in the lower fuselage for the weapons pylons, if they are to be
used. As the Russian Knights aerobatic team flies military ready aircraft the
holes were drilled out for later placement of the pylons.
This kit has the fuselage as
two separate halves, top and bottom, which makes for a very easy join – no
middle seam to negotiate. This is a great thing especially for someone who has a
tough time getting rid of the center seam. The whole fuselage contains the main
wings and quickly builds into a recognizable shape. The only requirement prior
to gluing the halves is to install the GSh-30-1 30mm autocannon on the starboard
side aft of the cockpit and the twin fan blades of the engines. The twin rudders
have the elevators as separate parts as are the main flaps. In addition the
front flaps are built separate to the main wing. It is also necessary to drill
out the holes in the lower fuselage for the weapons pylons, if they are to be
used. As the Russian Knights aerobatic team flies military ready aircraft the
holes were drilled out for later placement of the pylons.
The tailerons are connected to the rear of
the fuselage and the rudder and, although the stationary Su-27 shows these as
drooping, I elected to leave them as if the aircraft was powered. The main flaps
are deployed as drooped. A little quirk of the builder!
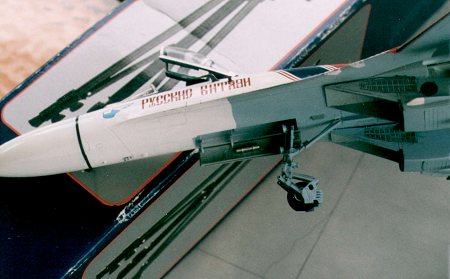
The front portions of the engines are
attached to the fuselage and you get two choices of slotted air intakes under
the air intake tunnels, open or closed. I chose the closed position and used the
photo etch kit parts to install the FOD screens inside the nacelles. These
screens prevent the ingestion of foreign objects, alive or inanimate, during
operation.
The interior of the wheel wells was painted Model
Master FS 16473, Aircraft Grey. Although the kit calls for the front and
rear wheel struts to be painted the same colour – Dark Blue, close examination
of photos show the forward wheel strut the same colour as the tri-blue underside
colour of the earlier paint scheme used by the aerobatic team, i.e., Model
Master FS 25450, Light Blue. I had found Flanker Light Blue, also by Model
Master, so painted the forward wheel strut that colour to match the
photographs. The front wheel hub was likewise painted Light Blue, a departure
from standard Military aircraft that has the hubs usually painted dark green.
The rear wheel struts and wheel hubs were
painted with a mixed paint to match Dark Blue FS 25187. I matched the colour by
visiting my local hobby shop and checked out the colours from Xtracolour,
which had FS 15183 and FS 15190. The last three digits refer to the reflectance
diffusion that effectively means that the paint becomes progressively darker
over this range. Using FS 15183 as a starting point I added white (yes, it is a
lighter colour) that gradually made the Bright Blue colour greyer. I then added
some dark blue to retain the bluish hue and checked this against the box art to
match the desired paint. The final colour is close enough.
I have taken to using super glue to attach
the wheel struts as it bonds very quickly and the whole thing stays where it was
intended. I managed to snap one of the rear struts off during test fitting and
ended up drilling a small hole in both the piece left in the hole and the strut
and gluing a small plastic rod to give some strength to the assembly.
Gear actuating levers were attached at this
point but the wheel well doors were left until the model was almost complete –
paranoia sets in when you start snapping off little plastic bits and spend more
time on the floor looking for them than actually constructing the kit!
|
PAINT & DECALS |
 I sprayed the front fuselage, outer sides of the rudders
and the elevators Model Master FS 17925, Gloss White. I followed
the paint scheme a little too close and should have masked the upper wing area,
later to be covered by the red white and blue decals, and painted that Gloss
White as well. It certainly would have saved me having to re-spray the red decal
to retain the brightness and not have the blue colours bleed through the thin
decals!
I sprayed the front fuselage, outer sides of the rudders
and the elevators Model Master FS 17925, Gloss White. I followed
the paint scheme a little too close and should have masked the upper wing area,
later to be covered by the red white and blue decals, and painted that Gloss
White as well. It certainly would have saved me having to re-spray the red decal
to retain the brightness and not have the blue colours bleed through the thin
decals!
Successive
blues were sprayed using Parafilm to mask off the areas. Other
areas such as the engines and shielding around the GSh-30-1 cannon were hand
painted.
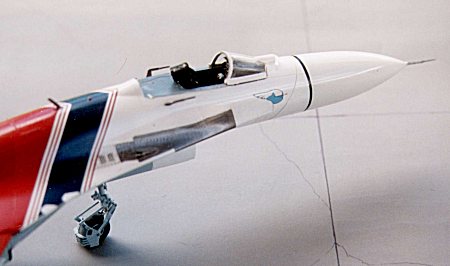
The nose cone
was sprayed with Model Master FS 17875 Insignia White and then
attached to the model. This was done as a last resort as I was concerned about
the aircraft being a tail-sitter. It isn’t but I added a small lead weight
just to be sure.
My advice is to make sure that all areas to
be covered by the red decals are undercoated with a light colour, preferably
white as discussed above. The red will then look very pristine.
The final touches were completion of the main canopy and attachment of Cutting Edge metal etch parts, attaching the distinctive instrumented landing system antenna at the top of the port rudder and gluing the elevators onto the rudders. The canopy was then attached in the open position.
|
REFERENCES |
Modern Soviet Warplanes – Fighters & Interceptors Steven J. Zaloga Concord Publications Compa
If you would like your product reviewed fairly and fairly quickly, please contact the editor or see other details in the Note to Contributors.
Copyright ModelingMadness.com. All rights reserved. No reproduction in any form without express permission from the editor.
Back to Reviews Page 2017