Academy 1/48 F-117A
|
KIT # |
2118 |
|
PRICE: |
$40.00 Aussie Bucks |
|
DECALS: |
Two aircraft: Col. Al Whitely, 37th TFW "Toxic
Avenger" No. 813, Lt. Col. Ralph Getchell 415th TFS No.
790 |
|
REVIEW: |
|
|
NOTES: |
A great alternative to the more expensive Tamiya kit especially when bolstered with the Eduard’s photo etch |
|
HISTORY |
During the Vietnam and the Yom Kippar wars it was conclusively demonstrated that there was an ever-increasing danger from the increasingly sophisticated Soviet SAMs and air-defense radars. There were indications that the USSR would soon be deploying advanced interceptors with highly sophisticated lookdown/shootdown capabilities. During the 1973 Yom Kippar war Israel lost some 109 aircraft during eighteen days from SAMS that were second best export issue from the Soviets, and ill-trained Egyptian and Syrian crews manned them! The obvious answer to such a threat was to dedicate forces to electronic warfare, jamming enemy radar, or locating and destroying air-defense systems. The problem was that the experience gained from both these conflicts had shown that allocation of resources to EW and SEAD (Electronic Warfare and Suppression of Enemy Air Defences) was not able to curb the rising loss of aircraft. There had to be a better way.
A possible solution lay in the proposal of reducing the radar cross section (RCS) of tactical aircraft. In 1975 the USAF held a Symposium on Radar Camouflage at Wright-Patterson AFB that led to Northrop, McDonnell Douglas and three other companies being invited to design proof-of-concept stealth aircraft in a competition funded in 1976. Lockheed were not invited despite their design of the SR-71 reconnaissance aircraft that already employed features designed to reduce RCS, an aircraft whose features were so secret that few knew of it’s capabilities.
Lockheed sought permission from the CIA to reveal certain aspects of the SR-71 and D-21 data to DARPA (Defence Advanced Research Projects Agency) to be allowed to participate in the competition. Lockheed subsequently won in April 1976 with a faceted design that proved to be ten times less visible to radar than their nearest competitor, Northrop. The tests conducted at White Sands showed that the scale models had a RCS lower than the poles upon which they were mounted! The Lockheed design’s RCS was calculated at being equivalent to that of a small ball bearing, with the company using this analogy to lobby air-force officers and politicians.
The initial project began with two sub-scale prototype aircraft under the program name of ‘Have Blue’; it remained a top-secret project. They were built to prove that a faceted aircraft could have acceptable handling qualities and demonstrate the radar cross section capabilities. The first test flight took place at a top-secret installation at Groom Lake on December 1st, 1977.
Lockheed received an order to build a production version of the prototype XST, as the aircraft was known, under the program name Senior Trend. The contract was signed in November 1978 and required that the RCS be the same as the wooden model used for the XST test, plus the aircraft must fly by July 1980. It would be required to be of fighter aircraft size and be capable of carrying two laser-guided bombs. Lockheed missed the initial deadline and lost $6 million on the first aircraft, fortunately orders totaled 29 aircraft and then 59 and the company made much moola! The pre-production Senior Trend first flew on 18th June 1981.
The naming of the Stealth was more of an accident than a design and the designation "F" would indicate a fighter, however just like the F-111, the F-117A is a bomber in all but name. The actual numerical designation 117 was used on official forms and maintenance records instead of the aircraft type. One story is told that Lockheed had printed the aircraft’s Dash One flight manual with F-117A on its cover and was unwilling to re-print the document, even though the officially favoured designation was supposed to have been F-19! Whatever the reason the aircraft became known as the F-117A Nighthawk, although no one called it the ‘Stealth Fighter’ as the word Stealth was specifically and deliberately classified as top secret. So much so that the word was taboo even behind closed doors at Tonopah.
The F-117A’s first combat mission was in Panama with the 37th TFW on 19 December 1989. This action was with six (6) F-117A’s tasked with attacking two targets during the US operation to topple Noriega. The mission had mixed success with two aircraft being recalled after the attack on the targets was cancelled, two aircraft flew only as spares and the remaining two attacked barrack buildings near Rio Hato. This attack had the stated aim of dropping bombs near enough to stun and disable without causing casualties or property destruction. As is so often the case with new equipment this was not quite what happened. The first aircraft dropped it’s GBU-27 bomb where the second aircraft was to aim, with the second aircraft tasked to drop it’s bomb at an unspecified point and set distance and bearing from the first aircraft. The result was that this second bomb narrowly missed a barrack building and the resultant fireball gutted the building and destroyed an empty cantina! Not a good result for a supposedly precise weapon. Questions were asked whether such a high technology aircraft should have been used to bomb an empty field! Fortunately for the F-117A it’s next mission was to prove beyond a shadow of a doubt that all the money spent on development had been worthwhile.
The next mission for the aircraft was in response to Saddam Hussein’s invasion of Kuwait and the resultant Gulf War. The USAF deployed the 415th TFS on 19 August 1990 with the aircraft being refuelled by three cells of twelve (12) KC-135’s out of Beale AFB, California. The F-117A had an overnight stop at Langley AFB, Virginia where they were joined by KC-10A Extenders from March, AFB. The non-stop flight to Saudi took 15 hours. A second F-117A unit (the 416th TFS) was dispatched to Saudi in early November of 1990, arriving on 4th December.
On the night of the 16th January 1991, the first night of Desert Storm, the 415th and 416th TFS launched two waves of aircraft against Baghdad. The 415th’s CO, Lt. Col. Ralph Getchell, led the first wave and Al Whitley, the CO of the 37th TFW, led the second wave. The rest is history. No aircraft was lost under incredibly heavy anti-aircraft fire and no aircraft was deterred from it’s course or objective. The accuracy of the bombing was covered by CNN to an audience that was astounded by such precision bombing.
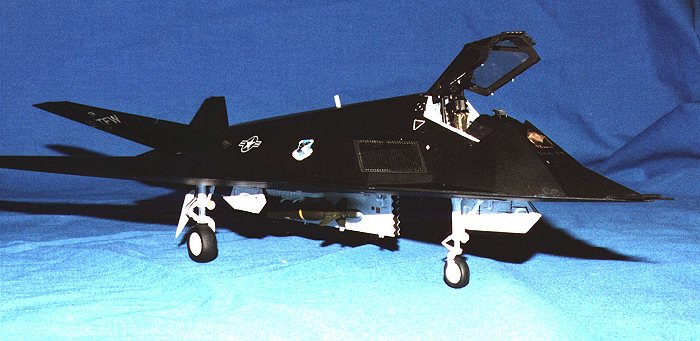
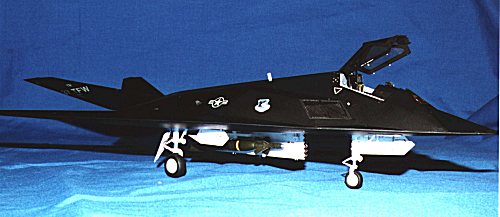
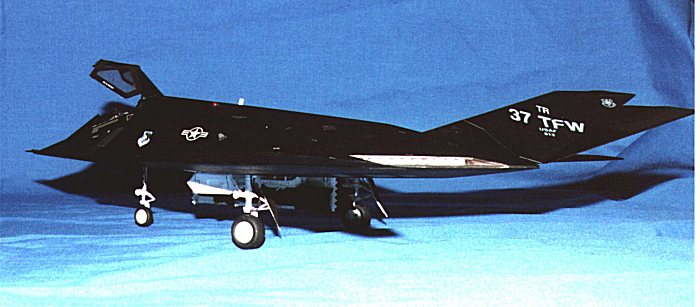
The model chosen for this review is the one flown by Col Al Whitley of the 37th TFW.
|
THE KIT |
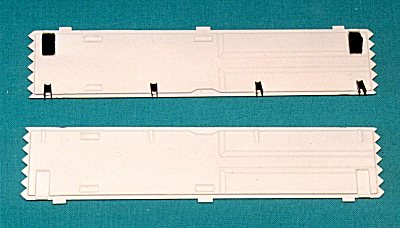
 The upper fuselage is
presented as a single piece moulded in black and a further five sprues in white
and black injected plastic make up the kit. The clear parts are moulded in light
orange that unfortunately includes the landing lights, making it difficult to
accurately present them. I opted not to try and so have orange landing lights!
The idea of moulding the various parts in different colours works well in this
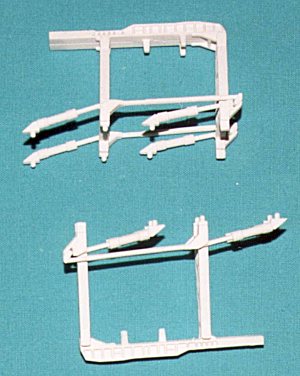
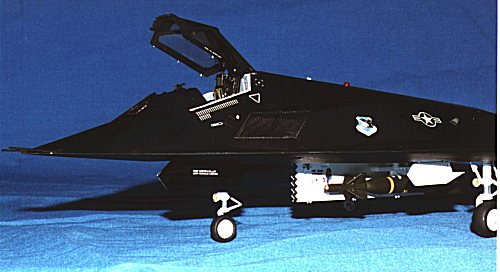
kit with the bomb bay mechanisms and the GBU-27A Paveway III bombs presented in
white injected plastic. The lower wings, fuselage, wheel well and bomb bay doors
plus the landing gear is moulded in black and the aforementioned clear bits in
light amber-orange.
The upper fuselage is
presented as a single piece moulded in black and a further five sprues in white
and black injected plastic make up the kit. The clear parts are moulded in light
orange that unfortunately includes the landing lights, making it difficult to
accurately present them. I opted not to try and so have orange landing lights!
The idea of moulding the various parts in different colours works well in this
kit with the bomb bay mechanisms and the GBU-27A Paveway III bombs presented in
white injected plastic. The lower wings, fuselage, wheel well and bomb bay doors
plus the landing gear is moulded in black and the aforementioned clear bits in
light amber-orange.
The decals are well printed and quite thin requiring little help from setting
solutions. Colour register is excellent and the only problem encountered was a
slight oversize of the grey paneling on the rear underside of the fuselage and
the presentation of "DANGER" stencils that are supposed to be
positioned on the upper, aft side of the exhaust vents. I personally don’t
believe that these would have been positioned
 in this location due to the intense heat of the exhaust and opted
to leave them off.
in this location due to the intense heat of the exhaust and opted
to leave them off.
Although the kit is relatively simple with eighty-eight parts, it goes together very well with little fit problems. The instruction sheet is clear although there are some inaccuracies, which will be discussed later.
|
CONSTRUCTION |
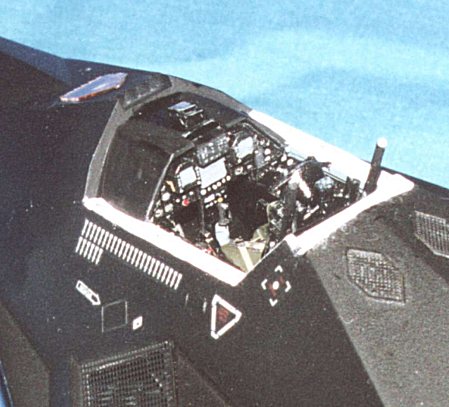
The Cockpit
The cockpit is presented as a single tub with the ejection seat in five pieces, separate rudder controls, joystick, an instrument panel and a rear bulkhead. I had elected to upgrade the kit once it had been purchased, as the level of detail in the cockpit was simplistic, enter Eduard photo etch. The instrument panel receives quite a bit of upgrade and results in a much better cockpit. The panel is very similar to the F/A-18 using some of the same instrumentation. It is dominated by the IRADS display and has two CRT MFD’s on each side. The stick top is basically the F/A-18 unit with slightly different switches better suited to the Stealth’s unique role.
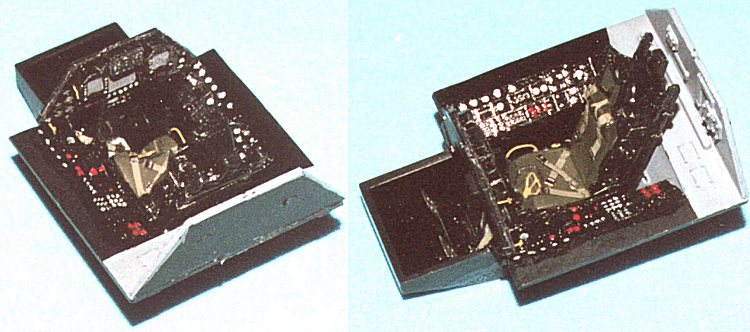
The cockpit was painted Neutral Grey with the ejection seat sides painted in Tamiya X-18, Semi Gloss Black. The seat cushions and backrest were painted in Olive Drab and the seat belts were painted in Khaki with silver buckles. The ejection seat received the Eduard upgrade with seat belts and ejection handles being added. Both the cockpit side panels and the instrument panel were painted in Semi Gloss Black with the Neutral Grey as a base. Buttons and switches were painted red, yellow and white as per photographic references.
The whole assembly was then dry brushed with Tamiya XF-16, Flat Aluminium. It was then set aside.
The canopy was masked using Tamiya masking tape and painted both inside and out. Once the canopy had dried the canopy closers were attached and the pins glued into their slots.
The Fuselage and Wings
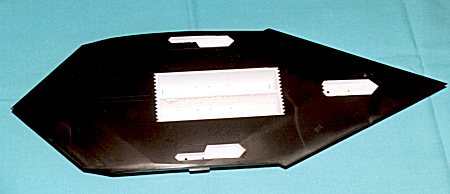
The upper fuselage half is presented as a single piece on it’s own tray to prevent scratching during transit. This is a clever idea that keeps the part in pristine condition. However, as with most kits that I build this did stay that way for long.
The Eduard photo etch supplies a variety of panels plus the cockpit fasteners, all requiring attachment prior to painting. The external screens for the jet intakes replace the kit offerings and for the most part no problems were encountered. I did however find slight mismatching between some of the photo-etched screens for the various outlets on the upper and lower fuselage parts. I am unsure if the problem lies with Academy or Eduard, although I must lean towards Academy. The fit was not enough to cause me great hardship with sufficient cyanoacrylate being used to hold the fragile parts against the plastic.
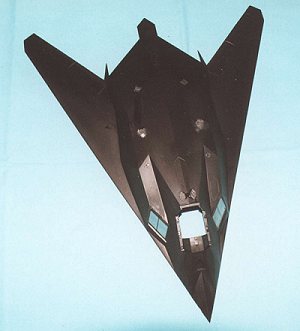
Having used photo-etched for the intake screens and, as the rear exhaust vents are open I decided to add plastic card to the upper fuselage to simulate the intake and exhaust vents, also to prevent the now total visibility from one side to the other. Using 0.030" card cut roughly to shape and then glued into place did the trick of creating the illusion of separate intakes, which was completed for both the front and rear openings. For the front intake I also added a rear panel so as to block off any view directly through the airframe, which would be the case when both engines were in their respective positions. The intake was painted with Model Masters Gun Metal and the exhaust was painted with Gunze Sangyo Burnt Iron. This colour was extended outward onto the rear plate of the exhaust with the exhaust vanes being painted white and the trailing edge being painted with Steel.
Once the photo-etched parts were attached I glued the lower wing surfaces onto the lower fuselage, checking for fit, and attached the rear panels for the exhaust.
The cockpit was glued into place and a suitable amount of fishing sinker was attached with Blue Tack to hold it in place prior to joining the upper and lower halves. The kit recommends using 30 g of weight to prevent the model tail sitting.
I did not attach the tail fins or the in-flight probes at this stage, preferring to build the undercarriage and bomb bay internals first.
Undercarriage
This phase of construction takes place prior to the painting phase, although connecting the various odds and sods is done once the aircraft has been painted. I am way too much of a klutz to attempt to paint the airframe with all the neat delicate bits attached and this sometimes extends to flaps and, more often than not, canopies and other clear bits!
Construction of the landing gear is straightforward and requires very little seam cleaning prior to spraying. As the landing gear was going to be augmented with photo etch bits I elected to remove the scissor joints and sprayed with Model Masters Gloss White. Once the paint had dried I used Bare Metal Foil Ultra Bright Chrome on the oleos and then attached the complex scissor joints to both the main landing gear and the front wheel. The wheels were painted with Gunze Sangyo Tire Black and attached to their respective struts. All struts were then dry fitted and put aside for later attachment.

 The gear
doors and the bomb bay doors were similarly sprayed Gloss White and also
received the photo etch treatment, although the main gear doors that attach to
the struts were not treated until the wheels had been attached. I also sprayed
the bomb bay racks and used Bare Metal Foil on the hydraulic rams of the
units. The inner doors of all wheel wells and the bomb bay were sprayed Gloss
White and some of the electrical conduits were painted Flat Black. I used a dry
brush of black to highlight some of the internal details of the bomb bays and
the compartment bulkhead.
The gear
doors and the bomb bay doors were similarly sprayed Gloss White and also
received the photo etch treatment, although the main gear doors that attach to
the struts were not treated until the wheels had been attached. I also sprayed
the bomb bay racks and used Bare Metal Foil on the hydraulic rams of the
units. The inner doors of all wheel wells and the bomb bay were sprayed Gloss
White and some of the electrical conduits were painted Flat Black. I used a dry
brush of black to highlight some of the internal details of the bomb bays and
the compartment bulkhead.
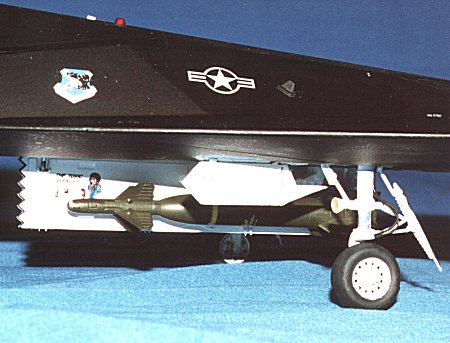
 Attachment
of the landing gear was achieved using Superglue, to provide a lasting bond and
strength with the added nose weight. I then set about attaching the gear doors
and bomb bay doors. With the latter decals needed to be attached before the
doors themselves. Here I noticed that the instructions are not quite accurate
with the placement of the Toxic Avenger decal. The decal should be placed
towards the forward part of the starboard door and be above the warning sign,
this is clearly shown in the Squadron/Signal reference. The colour of the decal
is also suspect as the pilot figure wears a blue jacket, whereas the picture of
the artwork from Col Whitley’s machine has the jacket colour in green. Given
that the flight uniform is green I suspect that the decal colour is incorrect.
Too bad it was used anyway!
Attachment
of the landing gear was achieved using Superglue, to provide a lasting bond and
strength with the added nose weight. I then set about attaching the gear doors
and bomb bay doors. With the latter decals needed to be attached before the
doors themselves. Here I noticed that the instructions are not quite accurate
with the placement of the Toxic Avenger decal. The decal should be placed
towards the forward part of the starboard door and be above the warning sign,
this is clearly shown in the Squadron/Signal reference. The colour of the decal
is also suspect as the pilot figure wears a blue jacket, whereas the picture of
the artwork from Col Whitley’s machine has the jacket colour in green. Given
that the flight uniform is green I suspect that the decal colour is incorrect.
Too bad it was used anyway!
 One of the
final things to be done was to connect the rear main gear doors with the
photo-etched parts. I decided to use the kit’s upper connecting rod and the
use the photo etch to connect the middle of the door with the top part of the
oleo. The photo etch didn’t quite match and I ended up cutting some spare
photo etch to join to the two photo etch connectors. In retrospect I should have
used some thin copper wire and flattened the ends to attach to the strut and
door. The end result looks OK.
One of the
final things to be done was to connect the rear main gear doors with the
photo-etched parts. I decided to use the kit’s upper connecting rod and the
use the photo etch to connect the middle of the door with the top part of the
oleo. The photo etch didn’t quite match and I ended up cutting some spare
photo etch to join to the two photo etch connectors. In retrospect I should have
used some thin copper wire and flattened the ends to attach to the strut and
door. The end result looks OK.
Last thing to be connected was the tail fins and the in-flight probes on the nose of the aircraft.
I also used two plastic rods to connect to the inner part of the canopy to display the cockpit. These were attached to either side of the ejector seat and to the rear inner side of the canopy. The canopy was also glued at the rear edge onto the fuselage.
 I also added
an aerial on the starboard side of the upper fuselage, opposite the clearance
light on the port side of the aircraft. I have searched my reference material
and could not find any photos of "Toxic Avenger" showing this aerial,
although similar aircraft from the same wing do have the aerial. I opted for it’s
inclusion and left it white.
I also added
an aerial on the starboard side of the upper fuselage, opposite the clearance
light on the port side of the aircraft. I have searched my reference material
and could not find any photos of "Toxic Avenger" showing this aerial,
although similar aircraft from the same wing do have the aerial. I opted for it’s
inclusion and left it white.
|
PAINT & DECALS |
As previously admitted most of the painting had been completed by the time the delicate bits were attached and this also extended to some decaling.
The airframe was sprayed with Tamiya Gloss Black acrylic, X-1. It went on very well and I was pleased with the finish. I painted the gloss, as there are quite a lot of decals with large amounts of carrier film that may have suffered from silvering. Allowing the paint to dry overnight I then set about putting the majority of the decals on the airframe.
The decals are very thin with good registration and required little or no solvent to get them to settle down. One of the major reasons is that most of the surfaces to be decaled are quite flat, good thing when the designers build aircraft that make a modeller’s life easier, ain’t it? The instruction sheet clearly shows the locations and for the most part is quite accurate. I did notice some questionable locations with regards the canopy ejection triangles, although this is mainly due to a panel being placed too far forward on the fuselage and not because the location is incorrect. I also checked the location of decals 5 and 6 and positioned these above and behind the Rescue cover plate on the port side of the fuselage. Their location is shown in photos from the reference material.
 The final
phase of the decal application was the spraying a Flat Clear. For the first time
I used a Gunze Sangyo spray can and was mortified to discover that it had
bubbled after application. I am unsure if the surface was grotty, despite being
extremely careful, or if it had reacted with the Tamiya black acrylic.
Either way I was very unhappy about the result and could only sand off the worse
parts very carefully and try again. The second application fared slightly better
and is really only apparent on the lower surfaces. I figure it looks as if some
of the RAM coating has had to be redone! Still a trap for the unwary and I used
to spray my own motor vehicles when money was tight! Next time I will stick to
my enamels for spraying the larger surfaces.
The final
phase of the decal application was the spraying a Flat Clear. For the first time
I used a Gunze Sangyo spray can and was mortified to discover that it had
bubbled after application. I am unsure if the surface was grotty, despite being
extremely careful, or if it had reacted with the Tamiya black acrylic.
Either way I was very unhappy about the result and could only sand off the worse
parts very carefully and try again. The second application fared slightly better
and is really only apparent on the lower surfaces. I figure it looks as if some
of the RAM coating has had to be redone! Still a trap for the unwary and I used
to spray my own motor vehicles when money was tight! Next time I will stick to
my enamels for spraying the larger surfaces.
The final decals to be attached were to the GBU-27A bombs, which were painted Tamiya Olive Drab acrylic and Gunze Sangyo Metallic Aluminium on the nose, and Col. Al Whitley’s name on either side of the canopy. In the case of the canopy both inner and outer surfaces were painted in Flat Black, I simply polished up the area where the decals were to be attached to avoid any silvering. This technique works quite well with both acrylic and enamel paints. As the decals are so small it is not necessary to overcoat them with flat clear, although it would be necessary for larger decals attached using this technique.
|
CONCLUSIONS |
 All in all a
great and cheaper alternative to Tamiya and the yet to be released Hasegawa
versions. I would like to build the recently released Revell-Monogram
version of this kit, with it’s included photo-etched parts but will wait for a
bit until I can get the stock down some!
All in all a
great and cheaper alternative to Tamiya and the yet to be released Hasegawa
versions. I would like to build the recently released Revell-Monogram
version of this kit, with it’s included photo-etched parts but will wait for a
bit until I can get the stock down some!
The kit did have some quirks and inaccuracies but went together very well and looks great in the cabinet. I would have preferred some more detail, especially the inclusion of the boarding ladder to add to the display of an open cockpit. It would also have been nice to include the hydraulic rams for the canopy opening mechanism as I have simplistically added two plastic rods to show the cockpit.
I am more than ticked off about my problems with my clear spraying of the airframe that "bubbled" over my acrylic painted surface. My memories of having this happen when spraying automotive paints was the other way around with acrylic bubbling when sprayed over enamel. I will adjust my choice of finishes to have both the colour and clear of the same type. I have almost exclusively used enamels for the past two years using the acrylics to hand paint the smaller items of the model; perhaps this is something I will continue to do.
The finished product looks like the real thing and with a little bit of extra work here and there and the inclusion of the Eduard photo etch set the kit can be built into something a little special. As an "Out of the Box" this kit lacks a little detail for some of the more obsessive of the fraternity.
|
REFERENCES |
Jane’s How to Fly and Fight in the F-117A Stealth Lake, J., Harper Collins Publishers, 1997.
Fighter ISBN: 0 00 472109-8
F-117 Stealth in Action Goodall, J., Squadron/Signal Publications, Aircraft No. 115, 1991
ISBN: 0-89747-259-4
If you would like your product reviewed fairly and quickly, please contact the editor or see other details in the Note to Contributors.