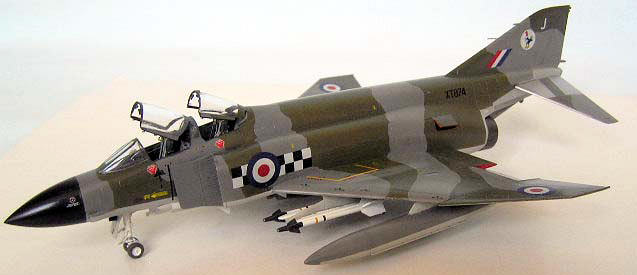
Fujimi 1/72 F-4K Phantom II
| KIT: | Fujimi 1/72 F-4K Phantom II |
| KIT #: | 72168 |
| PRICE: | approx £20.00 |
| DECALS: | One option (Alcock and Brown boxing) |
| REVIEWER: | Fernando Rolandelli |
| NOTES: | Be prepared to do some cockpit work |

| HISTORY |
Bewildered by the failure of their two new strike aircraft programs (the indigenous P.1154 and the US designed F-111K), the Admiralty and the RAF took for once a sensible decision and turned their eyes to the most potent fighter then available, the F-4 Phantom II, which had by the time swept away the competition even within the USAF, where even an early F-4B had proved superior to anything pitted against it.
By the time a decision had been made, the improved F-4J was the standard model and it was the one taken as a basis. Alas, everything would not go so smoothly and both services asked for a number of modifications to increase the proportion of equipment of British origin to politically acceptable levels (40-54%, but at the expense of a higher cost and, as was seen later, rather degraded operational performance).
 The most
significant was the change of power plant, from the proven J-79 to the equally
proven (though not on a Phantom!) R-R Spey. Now, given the fact that one of the
most impressive things on a Phantom is its awesome power, why anyone would have
deemed that more was needed is a bit puzzling. The Spey was indeed more powerful
and it indeed provided a surplus of power at low level. That might have been
reassuring in operations from the smaller British carriers (as well as
increasing range by a 10-15%), but its bigger size required the redesigning of
the rear fuselage, and its air-greedy nature required bigger intakes (by 20%).
Adding their increased weight, its bigger power never translated into better performance and, being a turbofan instead of a true turbojet like the J-79, its performance degraded with altitude. In the end, the reduction of flight decks to just one (the former HMS Ark Royal) made the whole exercise a bit futile. Only 36 machines (out of the initial planned order of 134, and a total Phantom final procurement of 168) served in the Fleet Air Arm as FG.1 Phantoms, and the number of those who actually saw carrier service is even less, in only one operative unit, no. 892 Sqn (deck operations ceased in 1978). The following 14 were sent straight to the RAF, which used them within No. 43 Squadron.
Contrarily to the squadrons equipped with the “proper” RAF FGR.2s, whose role was ground-attack and recce (amazing sight those big machines performing rocket attacks at tree-top low level over the Central Front it would have been), No. 43 “Fighting Cocks” was an air superiority squadron, based at RAF Leuchars (which would eventually become a “home” of refugee ex-FAA FG.1s, with the conversion of 111 Sqn. to the type), starting QRA (quick reaction alert) service on March 23, 1973. In due time, thanks to the introduction of aircraft better suited to the hazardous role of close air support (the Jaguar and Harrier) all RAF Phantoms were transferred to the air defense role.
| THE KIT |
I have a liking for the Fujimi Phantoms, stemming out from the 80s, when
they were among the best kits available in 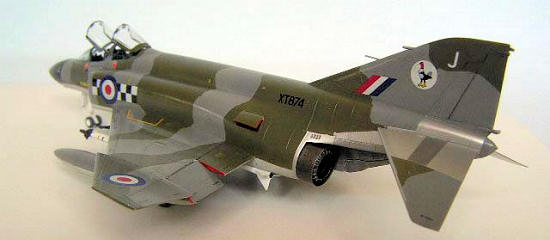 antoms
boxings, a completely different cockpit in the British Phantoms and finally a
lot of extra detail (including really fine exhaust cans) in this boxing. Decals
are of consistent high quality, though the White has some ivorish hue, and
options have been always good, including the fabled “Yellow Bird” FAA machine
from 767 Sqn.
However, I must say
that the attempt to improve the cockpit has been mislead to say the least, and
in my opinion detrimental of the possibilities of the kit. More on that later.
In a frustrated attempt to fix the cockpit, I bought the Eduard PE for the version I judged the most similar to the FG.1, which is the F-4J’s. In the end, I had to adapt the Aires F-4F set, by sweat, swear and hard work. As I did not want a cheesy commemorative scheme, I got the excellent Xtradecals sheet for an early 43 Sqn, machine.
| CONSTRUCTION |
Construction began
with the cockpit… actually “assessing the damage” to the cockpit and the ways to
solve it. I know, I know, Fujimi British Phantoms have a fame of good cockpits
only needing good seats, and certainly they look that way on the sprues.
However, the initially good-looking raised detail on the consoles is completely
spurious, but even that is not the problem, the one you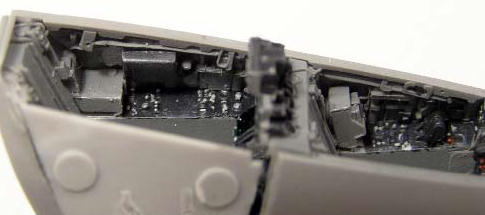 come across when you try to put an aftermarket seat in place: the whole thing is
about 2/3 the size! There is no way around this, you can raise the cavernous
cockpit floor on a Fujimi J-79 Phantom, but you cannot cut and expand the
diminutive, one piece bathtub cockpit in this one. The culprit (or the
consequence?) is a too deep front wheel well. I spent some time pondering
options (including trashing the whole project, but I had already bought several
kits, including the almost collectible “Yellow Bird” boxing).
The bullet you ride
or run, it is said, and I decided to bite it. I got an Aires set, modified it to
an acceptable form by erasing the double controls and adding new rear sidewalls
(the right hand one a donation from a Hasegawa kit –every one, even those of
USAF aircraft, comes with the “Navy” style sidewall- and the left an adapted
kit’s part) and radar stick, and coerced it into place by sawing the roof of the
wheel well to reduce its depth (of course, the front u/c leg height had to be
adjusted); it was left a bit
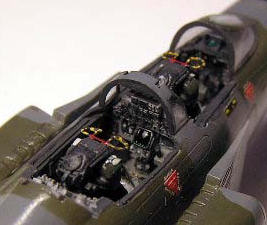 shallow,
but that’s better than a Hobbit-sized cockpit! Besides, the Aires set has to be
heavily coerced to fit anything, even its intended Revell-Germany recipient kit.
It must be said that
the construction the rest of the kit was uneventful, exception made of the
windscreen, whose fit was crazed by the Aires coaming, and the fiddly attachment
of the hoods if glued opened. Pylons showed some annoying ejection marks.
Airbrakes were left open, and I took the chance to pose the flaps deflected. I
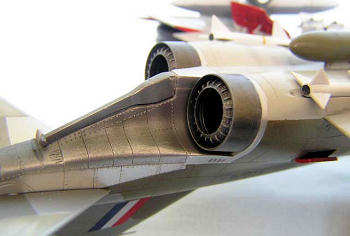
discarded the “rubber tires” option and went for the plastic ones. The two piece
exhausts are particularly remarkable.
| COLORS & MARKINGS |
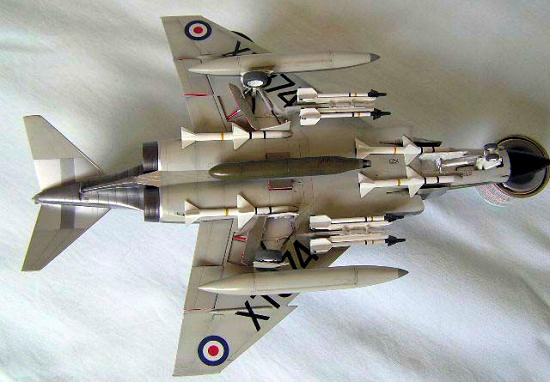
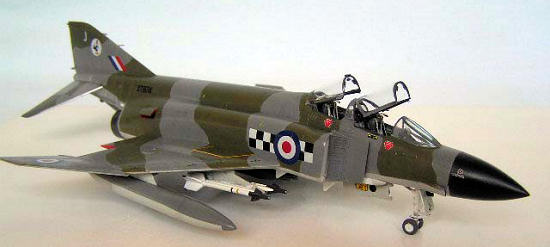
I preshaded the
airframe; the more on the undersurface, then applied the Xtracolors paint, with
liquid masking, in my usual “mottle-painting” style, to get an uneven coverage.
This spoils the otherwise “decal ready” glossy surface typical of Xtracolor
paints, so I applied a thorough Xtracrylixs clear gloss varnish (it makes the
surface impervious to oil washes and airbrushed fumes and dirt). Metal parts
were painted with Alclad Aluminium, Magnesium and Burnt Metal, with a shade of
Exhaust to achieve the warm copperish hue.
The Xtradecals ones
are excellent, if a bit translucent; that gives an “instant fading” effect! They
lack a bit in the way of stenciling, but, if you are using a “normal” FG.1/FGR.2
as a base kit, you’ll have no trouble.
| CONCLUSIONS |
| REFERENCES |
-
JBaugher website
(historical notes)
-
“British Phantoms.
The Phantom FGR.2 (F-4M) of the RAF in
-
“Modelling the F-4 Phantom II”, Geoff Coughlin and Neil Ashby, Osprey Modelling,
Osprey Publishing.
Fernando Rolandelli
July 2008
If you would like your product reviewed fairly and quickly, please contact me or see other details in the Note to Contributors.