The "Super Lynx" is the
current naval incarnation of the original Westland Lynx which first
flew in 1971 and entered service in 1977. Fast and agile, it broke
world speed records and can be seen at airshows looping the loop -
quite a sight. In its maritime form, it came with a Sea Spray radar
and could carry torpedoes and the Sea Skua guided anti-ship missile.
The army and navy versions
have developed over time and have seen action with British forces in
the Falklands, the Gulf War, in Sierra Leone and in the Iraq War.
The naval version made its name in the Falklands when two Lynxes
disabled the Argentine submarine Santa Fe and, with Sea Skua, a
patrol boat and supply ship. In the Gulf in 1991, the Lynx used the
Sea Skua missile at least 12 times (some say 15) to target Iraqi
naval craft, apparently with great success. The latest British
version is the HMA8.
The naval Lynx has been a
big hit on the export market, with various versions flown by Brazil,
Denmark, the Netherlands, Norway, France, Germany, Nigeria, and
others.
As described by the preview (http://www.modelingmadness.com/scotts/mod/gb/lynxpreview.htm),
this is a re-issue of the older Airfix naval Lynx, with a single new
sprue providing the new nose, antennae, tail and main rotors and
main landing gear sponsons. It's nicely moulded with finely raised
panel detail on most of the airframe. Happily, like all classic
Airfix kits, it comes with two great little pilots. I'm a big fan
of pilots because for me, an aircraft needs a pilot to make it
"real". The windows are all clear and there are nicely raised
windscreen wipers on the windscreen, a good touch for a naval
helicopter, especially one operating in rough weather off the back
of a small frigate. The rotor head is good enough for the
out-of-the-box builder like me, though those with the inclination
and the right photos could spruce it up.
 The
main thing you need to do is choose which version to build, and you
are spoilt for choice.
The
main thing you need to do is choose which version to build, and you
are spoilt for choice.
You can actually build five different
versions from this kit. The new versions, like the Royal Navy
HMA8, have the Ferranti Sea Spray under the nose instead of
inside it like the earlier versions. The radar was moved because
the HMA8 has a turret-mounted FLIR sensor system on the nose,
called
"GEC Sensors Sea Owl Passive Identification Device",
among other modern systems. The
German Navy's Lynx Mk 88A has similar upgrades, while the
Brazilian Mk 21A has the relocated radar but not the sensor
turret. Interestingly, the RN version has only the 180 degree
radar, while the German and Brazilian choppers have a 360 degree
version of Sea Spray. Because the Sea Skua homes in on the
radar reflections from the Sea Spray, the RN versions have to
point at the target to keep it illuminated, while the German and
Brazilian versions can, in theory, turn around and fly away
once they launch their missiles. This was a cost-saving
initiative, according to "the internet". I don't know whether
a Lynx would be likely to take on something big like a frigate,
and its combat history had it tackling smaller and presumably
less heavily armed vessels like patrol boats and landing
craft. So, maybe, the money saved by the Royal Navy was money
well-saved (and spent on something better). But I'm neither a
bean-counter nor an engineer, so what would I know?
Moving away from the modern
combat versions, you can also build the HAS3 ICE, a specialised
cold weather chopper. Finally, though there are no markings for
it, you could build an early naval Lynx if you ignore the new
sprue and have some spare decals.
The old sprue comes with two
torpedoes, but sadly the kit doesn't include any Sea Skua
missiles. Given that a Lynx can carry four of them, did most of
its combat using them, and looks pretty cool tricked out that
way, this is a shame. The Revell Sea King Mk 41 kit comes with
four Sea Skuas, and maybe there are other places to get them
too. You'd need to knock up the right launcher and mountings for
them.
I build my models straight from the box, with very few exceptions.
On the internet I have seen people really going to town on this
model, but my build here is straight from the box and designed to
show you what you can get from that approach to this kit. More
skilled builders than me will immediately see areas for improvement
and enhancement. But the result straight from the box, I think most
would agree, is satisfying.
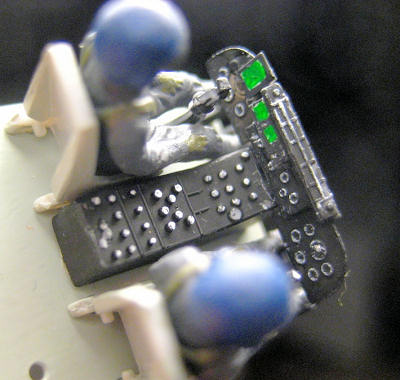 I
started with the cockpit. You have two seats on small frameworks, a
control column but not the collective (which would be hard to see at
the end anyway), and an analogue instrument panel. At this point, I
was planning to build the German version and I found a photo of a
German Lynx's instrument panel. This was the only detailing I did -
I figured with the Sea Spray radar and the FLIR, my pilots needed a
few TV screens and radar screens to handle the data from those
sensors. So I added some plastic card and painted on a few screens,
roughly following the photo I found. After that I painted on the
various dials and switches that come as nicely raised detail on the
instrument panel and centre console. There is no overhead console
provided, though of course the real thing has one. I was going to
build one but decided it would be too hard to see to warrant the
effort.
I
started with the cockpit. You have two seats on small frameworks, a
control column but not the collective (which would be hard to see at
the end anyway), and an analogue instrument panel. At this point, I
was planning to build the German version and I found a photo of a
German Lynx's instrument panel. This was the only detailing I did -
I figured with the Sea Spray radar and the FLIR, my pilots needed a
few TV screens and radar screens to handle the data from those
sensors. So I added some plastic card and painted on a few screens,
roughly following the photo I found. After that I painted on the
various dials and switches that come as nicely raised detail on the
instrument panel and centre console. There is no overhead console
provided, though of course the real thing has one. I was going to
build one but decided it would be too hard to see to warrant the
effort.
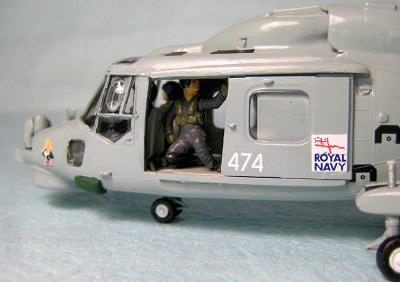
My pilots got grey flight
suits and blue helmets, and the main cabin got the rear seat
installed and a passenger (from the Italeri modern ground crew set).
You can't see him in these photos. The main cabin also got a
loadmaster, crouching in the open door. This guy came from the same
Italeri set as the passenger. To get him to fit in, I had to do some
pretty serious yoga on the guy, twisting and turning. I did it so
hard his right leg broke off at the knee. A bit of knee
reconstruction surgery (mostly involving the removal of a fair bit
of the leg) enabled me to get him into a more realistic pose. What's
he doing there? Well, he's just chillin, holding on to the handle
with his left hand and looking out the door. I wanted him to appear
to be sliding the door shut but that would have required arm surgery
too and, even though he's only a 20mm plastic figure, mercy overcame
me. On my flights in helicopters (as a passenger in UH-1s and Bell
212s, and never in a Lynx), there was always a loadie and there were
rear-cabin crew members in several of the Lynx photos I saw on the
internet too. At any rate, I needed something to put in the cabin,
having left out the central seating.
Remember to install the small cabin windows near the pilots' feet at
this point! And remember to drill out all the attachment holes for
the wheel sponsons and the various antennae. Naturally, I forgot
this.
I decided to leave out the new centre seat that
comes with the updated sprue. First, a few photos I saw didn't seem
to have it. Second, I wanted to put a loadmaster into my helicopter
and he wouldn't fit with those seats in place. So, with that
decision made, the cabin area was finished and I glued together the
fuselage, putting a little weight under the floor just to be sure
the chopper would stand on its nosewheel when the time came.
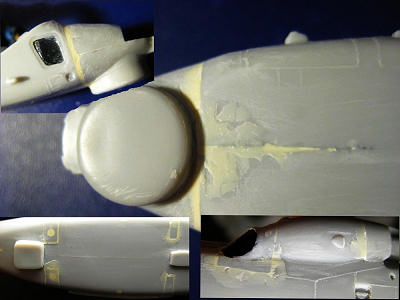 At
this point, you need to make a final decision between building the
HMA8/Mk88A, or the HAS3 ICE/Mk21A, or the old version. Once you
decide, build up the nose appropriately and attach it to the
fuselage (I put a little extra weight in here, too). The fit is
pretty bad here, as you can see from the photo. You'll need a fair
amount of putty to fill that up. But it's easy enough to get a
smooth finish. Underneath, you need to put in the plugs that fill
the holes for the landing skids of the army version, which shares
the main sprues of this kit. More putty and sanding, but not too
much hassle. The same is true for the engine intakes and outlets.
At
this point, you need to make a final decision between building the
HMA8/Mk88A, or the HAS3 ICE/Mk21A, or the old version. Once you
decide, build up the nose appropriately and attach it to the
fuselage (I put a little extra weight in here, too). The fit is
pretty bad here, as you can see from the photo. You'll need a fair
amount of putty to fill that up. But it's easy enough to get a
smooth finish. Underneath, you need to put in the plugs that fill
the holes for the landing skids of the army version, which shares
the main sprues of this kit. More putty and sanding, but not too
much hassle. The same is true for the engine intakes and outlets.
By now, you're looking at a
helicopter. Add on the wheel sponsons and the tail fin, and you're
ready to paint your Lynx. I cover that in the next section, but
once you've painted it, you need to add the various antennae under
the tail boom. Check your instructions carefully to make sure
you're adding the right combination for your version. Don't forget
the two small antennae that go on the nose in front of the
windscreen, as well! I used stretched sprue to build the wire that
connects the antennae under the tail boom. If you're doing the RN
or German chopper, now is the time to add your FLIR pod. At this
point, having chosen the RN version, I discovered that the FLIR pod
didn't fit unless it was offset to one side. I took the easy way out
and installed it at an angle. The real thing traverses anyway, so no
harm done. The German FLIR is a rounder pod, so it will fit better.
At the very end, I installed the cockpit
glazing. The two windows on top fit very well, and the side
window/door pieces also fit snugly into place. The main windscreen
needed a tiny bit of trimming with a knife and then it slotted into
place too. There is a bit of a gap between it and the roof, and on
one side at the base of the windscreen, but this was minor enough
that a ball of paint on a fine brush easily filled the gap by
capillary action. I could have used some kind of filler but by now I
was keen to get this thing out of the hangar and into the sky, so to
speak.
The engine air intakes should have a wire mesh
covering. If you want this, you'll have to scratch build it.
A note on the undercarriage. Don't glue the main
la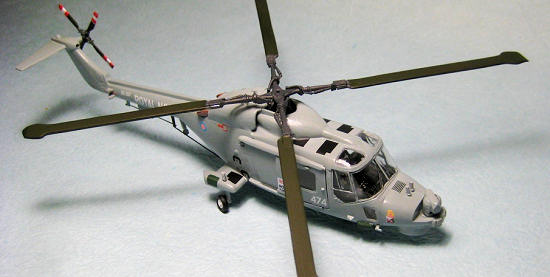 nding
leg to the sponson, just jam it through from below. It seems from
pictures that the legs just hang down when the Lynx is in flight, so
if you don't glue it, you'll notice them compress down every time
you land your chopper on a rolling flight deck (I mean, um, place it
gently on the display shelf). Also, not gluing the legs allows you
to turn the wheels into their offset position, as described in the
preview (they twist so the chopper can easily be moved around on
deck).
nding
leg to the sponson, just jam it through from below. It seems from
pictures that the legs just hang down when the Lynx is in flight, so
if you don't glue it, you'll notice them compress down every time
you land your chopper on a rolling flight deck (I mean, um, place it
gently on the display shelf). Also, not gluing the legs allows you
to turn the wheels into their offset position, as described in the
preview (they twist so the chopper can easily be moved around on
deck).
A note on the doors. I left the top door rail off
until the very end, and added it carefully with the completed doors,
so that I can slide the doors open and shut. This worked pretty
well but the fit is such that the doors sometimes fall off. Still,
it's a cool feature.
I wanted to do the German
version. I went as far as painting the underside in what I hoped
would be the right shade of pale grey (the instructions are not at
all clear on what the correct colour is, so I went from internet
photos). In the end, though, I couldn't mix the correct shade. The
fact that the German decals are prominently out of register was
nagging me the whole time, too, so
 when
I realised that Mr Color 73 (Aircraft Grey) seemed to me to be
exactly the right colour for the RN version, and that the upper
colour for the German Lynx would give me as much grief as the lower,
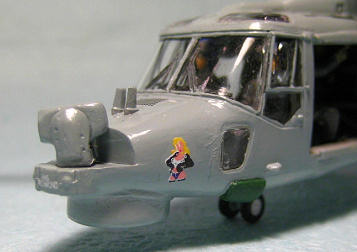
I switched loyalty and decided to "Go Royal Navy!". (Also, the saucy
nose art is kind of cool!)
when
I realised that Mr Color 73 (Aircraft Grey) seemed to me to be
exactly the right colour for the RN version, and that the upper
colour for the German Lynx would give me as much grief as the lower,
I switched loyalty and decided to "Go Royal Navy!". (Also, the saucy
nose art is kind of cool!)
I covered the whole chopper in three
handbrushed coats of Mr Color 73 enamel. When that was finally dry,
I added the undercarriage (see above) and the other small parts that
I'd prepainted. The exhaust pipes are a mix of flat aluminium and
brown, and the green patches on either side of the helicopter (which
I think are flotation bags) are Tamiya "Deep Green" XF-26 acrylic.
The tail rotor flashes are decals, which don't reach around behind
the blades.
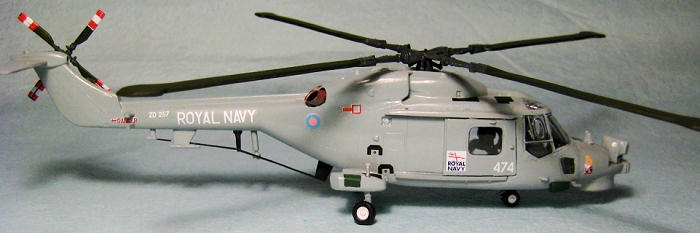
The decals for the Royal Navy version
are in register and went on easily enough. I don't use any setting
solutions (I haven't advanced to that yet) but even without them,
the decals look fine on the semi-gloss grey paint. By looking at
other modellers' builds on various websites, I chose a green (Tamiya
XF-58) for the main rotor blades.
 This
is a good kit of a cool modern helicopter. It fits well with a
little effort and, really importantly for a helicopter, the cockpit
windows are clear and fit properly. It has decent enough detail for
an out of the box build, with good pilots and some detail in the
cockpit, but it also offers wide scope for more advanced builders to
pimp it inside and out (if you can get your hands on some Sea Skuas).
It took me a little longer to build than other models of this size,
mainly because there are some delicate parts to attach and because
of all the surgery I needed on my loadmaster.
This
is a good kit of a cool modern helicopter. It fits well with a
little effort and, really importantly for a helicopter, the cockpit
windows are clear and fit properly. It has decent enough detail for
an out of the box build, with good pilots and some detail in the
cockpit, but it also offers wide scope for more advanced builders to
pimp it inside and out (if you can get your hands on some Sea Skuas).
It took me a little longer to build than other models of this size,
mainly because there are some delicate parts to attach and because
of all the surgery I needed on my loadmaster.
The only downside is the poor registration of the
German decals on my example, but that still leaves you with the
Royal Navy version and its FLIR pod, or the other versions with the
older style nose.
Recommended for
anyone with an interest in the subject and average skills like mine!
(As a closing note, Richard tells me that a Lynx with Sea Skuas
is about to be released by Hobby Boss. It will be interesting to see
if it is actually superior to the Airfix kit. Ed)
Wikipedia - where else?
Richard F
February 2009
Copyright ModelingMadness.com. All rights reserved. No reproduction
in part or in whole without express permission.