Airfix 1/72 Phantom FG.1
| KIT #: | A06016 |
| PRICE: | £24.99 |
| DECALS: | Three RN options |
| REVIEWER: | Frank Reynolds |
| NOTES: | Straight from the box with no aftermarket. |
| HISTORY |
It was the summer of 1970, my
friend had borrowed his parents’ car and we set off on the 90 mile trip
along the A303. A perfect English Summer’s day as we made our way through
the lush green farmland of Somerset with Mungo Jerry’s “In the Summertime”
on a seemingly-endless loop on every station on the car radio. As we came
over the crest of the hill past the village of West Camel we could just see
the runways and hangars of Royal Naval Air Station, Yeovilton on the flat
land below. There were three black specks in the distance, trailing around
the circuit. Phantoms! We had got lucky and found them at play. The best all
round fighter in the World, enhanced with Rolls Royce engines. Perfection.
The car got faster as we rushed down the hill to catch them before they
vanished. Arriving in the car park with indecent haste
 we were
thrilled to find that the last of the trio was rolling in no more than 50
yards from the public viewing area, canopies up and a cheery wave from the
aircrew.
we were
thrilled to find that the last of the trio was rolling in no more than 50
yards from the public viewing area, canopies up and a cheery wave from the
aircrew.
My first sight of an F-4 Phantom remains burnished in my memory. A seemingly giant brute of a jet fighter, with a reputation to match. Menacing in the glossy dark grey and white paintwork that was the unique colour scheme of Royal Navy fighters of the period, I had absolutely no doubt that I was looking at a World class performer.
The British had not set out to equip with the Phantom but a muddled and contradictory defence policy in the early 1960s had seen the late cancellation of a number of strike aircraft projects and an effective solution was found in an Anglicised version of the US Navy’s F4-J , with some components manufactured in the UK and the design modified to accept British engines and electronic systems. The British ordered two versions of the F-4, a navalised variant known as the F-4K and a land based version for the Royal Air Force, the F-4M. The structural redesign of the Phantom airframe was considerable since the Rolls Royce Spey engines required larger intakes. By the time the Brits had finished fiddling around with the Phantom the flyaway price of each airframe was three times that of the US Navy’s standard product. The British version would also turn out to be lower and slower in that the maximum speed and altitude were inferior to the original.
The naval version was to be
known in service as the Phantom FG.1 and 52 were ordered in anticipation of
equipping two aircraft carriers and a land based training squadron. Further
confused defence planning
 resulted
in a decision to modify only one carrier to operate the Phantom, so 20
aircraft were transferred to the RAF to serve in an interception and
maritime support role. The Navy’s Phantoms were to serve just nine years
from the HMS Ark Royal until it was decommissioned in 1978. For those brief
glorious years I became a Phantom nut. I saw the mighty beast perform at air
shows at Yeovilton, Lee on Solent, Abingdon, Benson, Greenham Common,
Farnborough, and Colerne among others. The Navy had its own unique way of
demonstrating. Its party piece was called “undercarriage up”, when the
demonstrator F-4 took off and immediately retracted the landing gear, then
pulled a half loop and flew along the crowd line inverted while extending
the gear. It was a sight to behold. I could never get enough of the sight of
those red/gold shock cones erupting from the engines on take off, the
flutter in the chest as it ripped along the crowd on a low fast pass. If it
set off car alarms in the car park it was doing it right.
resulted
in a decision to modify only one carrier to operate the Phantom, so 20
aircraft were transferred to the RAF to serve in an interception and
maritime support role. The Navy’s Phantoms were to serve just nine years
from the HMS Ark Royal until it was decommissioned in 1978. For those brief
glorious years I became a Phantom nut. I saw the mighty beast perform at air
shows at Yeovilton, Lee on Solent, Abingdon, Benson, Greenham Common,
Farnborough, and Colerne among others. The Navy had its own unique way of
demonstrating. Its party piece was called “undercarriage up”, when the
demonstrator F-4 took off and immediately retracted the landing gear, then
pulled a half loop and flew along the crowd line inverted while extending
the gear. It was a sight to behold. I could never get enough of the sight of
those red/gold shock cones erupting from the engines on take off, the
flutter in the chest as it ripped along the crowd on a low fast pass. If it
set off car alarms in the car park it was doing it right.
On retirement from the Navy, the remaining fleet was transferred to the RAF, gradually dwindling away to go out of service in 1990. The all-RAF F4-M (FGR.2s) hung on for another two years, then the legend was gone from UK skies.
| THE KIT |
This kit has impressive statistics. 162 plastic parts. Decals numbered up to 296 subjects on a crammed sheet . 111 pictograms in a highly detailed instruction book. It bears all the signs of a quality product.
The top opening box yields 6 parts frames in pale blue-grey plastic and one in clear. The parts were sharply moulded with only the slightest traces of flash. Surface detailing is typical of current Airfix kits, slightly heavy recessed panel lines that seem to recede satisfactorily under a coat or two of acrylic paint. The surface detail extends to the strengthening plates that were fitted to the British Phantom fleet as the years went by and there is some debate on the web as to whether such detailing is appropriate to the period of naval operations or should be confined to the RAF’s FGR.2 version that Airfix are scheduled to release later. The prominent longitudinal rows of vents on the upper and lower surfaces of the jet intakes are absent from the mouldings. I decided not to fuss too much about these two features and went ahead without any modification.
 The
basic instruction booklet runs to 20 pages of A4 paper in half tone with
tinted highlights. Colour information is excellent comprising four pages in
high gloss colour with call outs tied to the Humbrol paint range. Three
options are offered, all in the basic Royal Navy colour scheme of Extra Dark
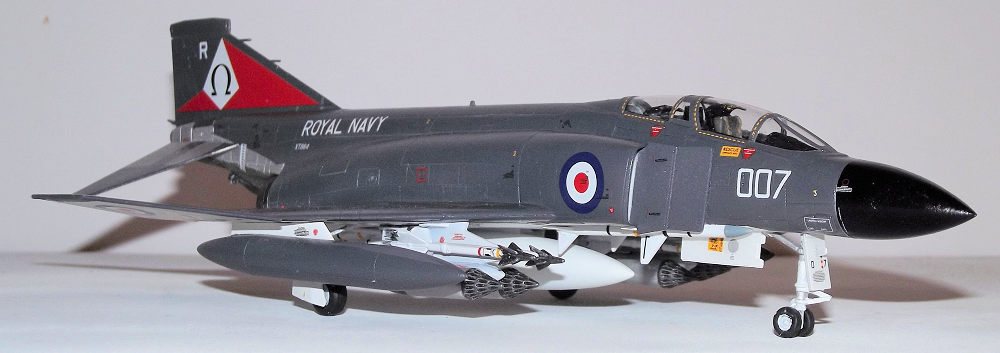
Sea Grey over White under surfaces. They are: XT864/007 from the only front
line unit, 892 Naval Air Squadron, HMS Ark Royal 1974-75, this carries the
spectacular Red and White ”Omega” fin marking synonymous with Royal Navy
Phantoms; secondly, XT 864 in an earlier assignment to the training unit,
767 Naval Air Squadron at Yeovilton, 1971 with a Golden Eagle on the fin;
lastly, a rather anonymous looking XT867 of the Naval Air Support Unit at
Yeovilton in 1969 with a pink flamingo to decorate the fin. The colour
drawings show the extent to which Airfix have done their research where the
large underwing serials of XT864 vary in placement . On the earlier scheme
the serials are carried across the cranked wing tips and parts of the
landing gear doors and the decals are split accordingly. On the later scheme
the Navy repositioned the serials RAF-style on the under wing between the
slats and the gear bays so one piece decals are supplied. That is thoughtful
attention to detail.
The
basic instruction booklet runs to 20 pages of A4 paper in half tone with
tinted highlights. Colour information is excellent comprising four pages in
high gloss colour with call outs tied to the Humbrol paint range. Three
options are offered, all in the basic Royal Navy colour scheme of Extra Dark
Sea Grey over White under surfaces. They are: XT864/007 from the only front
line unit, 892 Naval Air Squadron, HMS Ark Royal 1974-75, this carries the
spectacular Red and White ”Omega” fin marking synonymous with Royal Navy
Phantoms; secondly, XT 864 in an earlier assignment to the training unit,
767 Naval Air Squadron at Yeovilton, 1971 with a Golden Eagle on the fin;
lastly, a rather anonymous looking XT867 of the Naval Air Support Unit at
Yeovilton in 1969 with a pink flamingo to decorate the fin. The colour
drawings show the extent to which Airfix have done their research where the
large underwing serials of XT864 vary in placement . On the earlier scheme
the serials are carried across the cranked wing tips and parts of the
landing gear doors and the decals are split accordingly. On the later scheme
the Navy repositioned the serials RAF-style on the under wing between the
slats and the gear bays so one piece decals are supplied. That is thoughtful
attention to detail.
Some serious forward planning
is required to cover all of the options offered in the kit. Three basic
options are available; In flight, although this would require the separate
purchase of one of Airfix’s display stands; ready for catapult launch with
wing flaps down , leading edge slats drooped and nose leg at its maximum
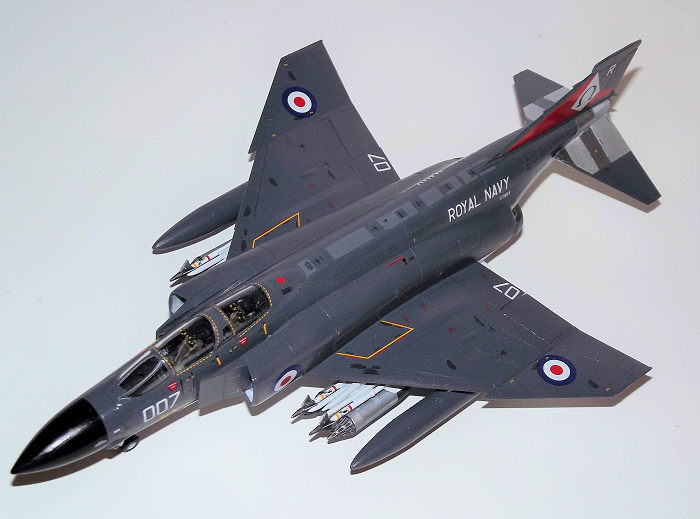
extension; or deck stowage with wing tips folded, canopies open and the nose
radome folded back.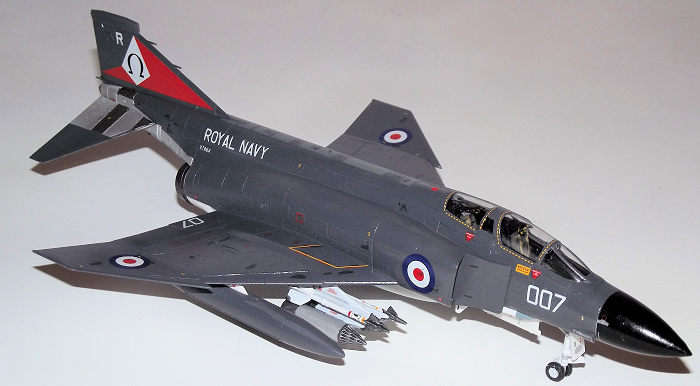 A full range of alternative parts is provided, so some of the 111 build
stages can be skipped, in fact Airfix provides detailed notes in the
instruction book to aid the builder. For example: “To build the model with
undercarriage down, follow the options for various parts from step 45 to 54
on page 10. Miss out steps 35 to 44 on page 9 and 55 to 64 on page 11, then
go to step 65b on page 12”. Well you would, wouldn’t you?
A full range of alternative parts is provided, so some of the 111 build
stages can be skipped, in fact Airfix provides detailed notes in the
instruction book to aid the builder. For example: “To build the model with
undercarriage down, follow the options for various parts from step 45 to 54
on page 10. Miss out steps 35 to 44 on page 9 and 55 to 64 on page 11, then
go to step 65b on page 12”. Well you would, wouldn’t you?
So the first order of business must be to settle down with a glass, cup or maybe a pitcher of your favourite refreshment and study the instructions thoroughly. There is a choice of underwing stores: centre line tank; wing tanks; Sidewinder missiles; Sparrow missiles; iron bombs; unguided rocket pods; some in combination on multiple ejector racks.
I decided to model my F-4K in “parked but not folded” configuration and loaded for bear, which is a combination of the Airfix options. This actually eliminates 41 stages of Airfix’s options from the build plan. Next, armed with a copy of the 2017 Airfix catalogue I revisited the instructions and translated the numbering of Airfix paints into words that I could understand and cross referenced to my stocks of Tamiya Acrylic paints. The glass/cup/pitcher protocol could be conveniently revisited at this point.
| CONSTRUCTION |
There is enough detail in the box to satisfy my requirements for a 1:72 build, with decals for instrument panels and seats with moulded in belts, so no aftermarket was required.
It soon became clear that this was typical of Airfix’s more recent releases in that the parts are such a snug fit that anything pre-painted, especially with acrylics, needs to be fitted really carefully since one part out of kilter might have a knock on effect later in the build. It is just a matter of ensuring that paint is scraped away from the joining surfaces.
Construction begins with the
interior and the three part ejector seats have a reasonable level of detail.
They were painted Black with the seat cushions picked out in Khaki and the
seat belts in place yellow. The cockpit consists of a full length tub with
side consoles with separate bulkheads and instrument panels all painted Dark
Grey. Decals are provided for the instrument panels and side consoles. After
a dry fit of parts I decided that the rear seat was too high for the canopy
to sit down satisfactorily so the rear seat had its base shaved down by
about 2mm. The cockpit assembly was set aside while the jet intakes were
prepared for attachment to the fuselage halves. The interio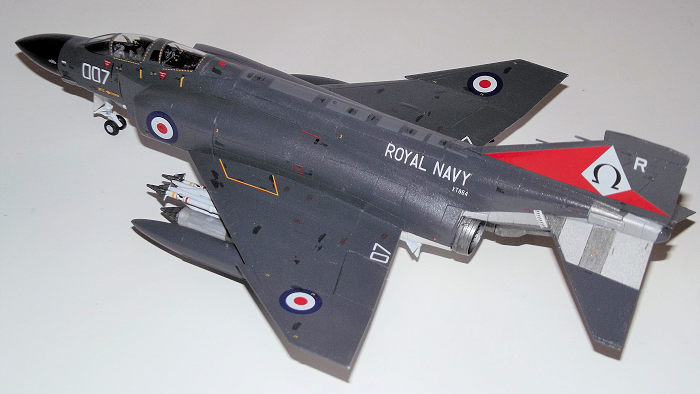 r
of the intakes were painted White with a rattle can. Before the inner and
outer faces were joined a thin strip of Tamiya tape was placed inside the
intake lip to aid later paint masking. The intakes were glued through the
fuselage halves and the rear sections paired up with a representation of the
engine faces. At the same time the cockpit assembly was glued in place and I
added about 10 grammes of fishing weight to the nose cone . An insert is
provided to form the fuselage spine which avoids a centre line joint. A
large one piece unit , reminiscent of a pair of binoculars, forms the jet
pipes and this locks in places under the rear fuselage.
r
of the intakes were painted White with a rattle can. Before the inner and
outer faces were joined a thin strip of Tamiya tape was placed inside the
intake lip to aid later paint masking. The intakes were glued through the
fuselage halves and the rear sections paired up with a representation of the
engine faces. At the same time the cockpit assembly was glued in place and I
added about 10 grammes of fishing weight to the nose cone . An insert is
provided to form the fuselage spine which avoids a centre line joint. A
large one piece unit , reminiscent of a pair of binoculars, forms the jet
pipes and this locks in places under the rear fuselage.
The fuselage underside is a complicated structure. With its more recent kits Airfix seems bent on ensuring that wing assemblies incorporate a spar arrangement and this offering is no exception. A large complex moulding forms the base of the fuselage from the radome to the jet pipes and the lower section of the inner wing panels. A cranked wing spar is glued inside this and an arrow shaped insert completes the lower surfaces. It is essential to ensure that all of the joining faces are clear of paint and moulding tags to secure an accurate fit. Once this assembly is fixed the outer casings of the jet intakes are fitted. The upper wing inner panels can be added at this stage. The instructions suggest that the all moving anhedral tail planes should be fixed at this stage but I prefer to add them late in the build so that the natural metal areas of the rear fuselage and tail can be masked off for painting. The wing structure is completed by fitting the trailing edge flaps, leading edges and dihedral wing tips. The underwing spoilers and fuselage duct doors can be fixed open but it is my usual preference to have an airframe all buttoned up, so these were fixed closed.
I elected to use the one piece canopy for this build and struggled to get a neat fit. I am sure that this was builder error but some filler was needed around the canopy edges. No aftermarket canopy masks were available at the time of the build so suitable masking was applied using Tamiya tape trimmed with a fresh scalpel blade. The mould maker appears to have omitted definition of the small windows on the canopy bow between the front and rear cockpits from the one-piece canopy moulding, although it is present on the on the four-part “open” version so I used this as a guide.
At this stage I switched my attention to building the landing gear and under wing stores as a set of sub-assemblies and I was pleased to find that the various legs and pylons all had positive locations. A range of decals are provided for missiles and this gives them a neat appearance.
| COLORS & MARKINGS |
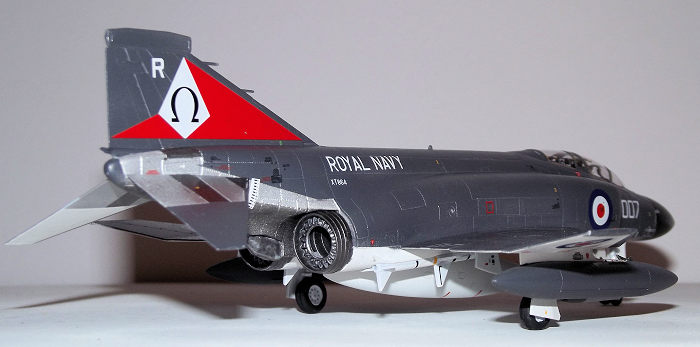
The intakes and exhausts were
plugged with offcuts of plastic sponge. The basic airframe and under wing
tanks were primed in White using a rattle can of auto paint then the
undersides airbrushed with Tamiya XF-1 White. The under surfaces were masked
off with Tamiya tape and the upperworks airbrushed with Tamiya XF-24 Dark
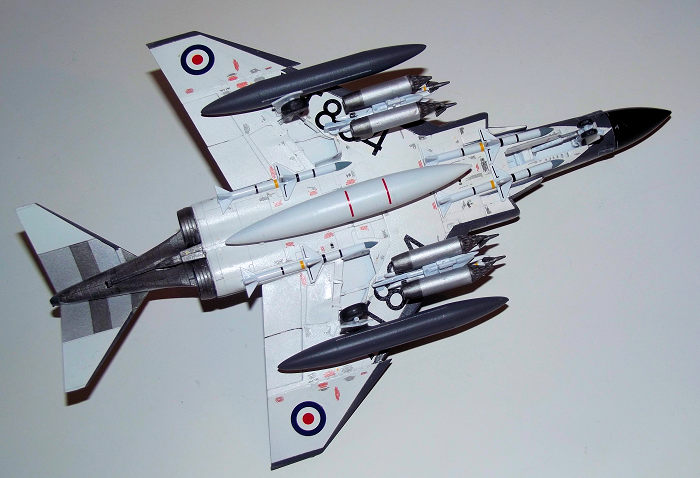
Grey. The Royal Navy had obligingly painted external tanks in one of two
overall colours on the Phantom fleet, so the wing tanks were finished in the
Dark Grey and the centre line tank in White. All of the underwing pylons
were painted White while still on the parts frames. The natural metal
 areas to
the rear fuselage and tail components were masked off and sprayed with
Tamiya XF-16 Aluminium and the darker areas with Tamiya XF-56 Metallic Grey.
The paintwork was sealed with two hand brushed coats of Future/Klear floor
polish as a base for the decals.
areas to
the rear fuselage and tail components were masked off and sprayed with
Tamiya XF-16 Aluminium and the darker areas with Tamiya XF-56 Metallic Grey.
The paintwork was sealed with two hand brushed coats of Future/Klear floor
polish as a base for the decals.
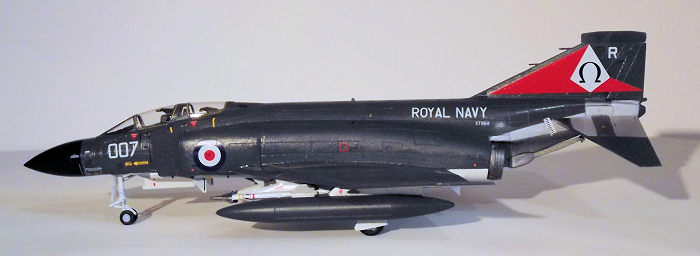
The decals went on well and responded to Micro Sol and Micro Set solutions but they took an age to complete; about five sessions of an hour each. I went the whole nine yards on the decals to the White under surfaces, but I found that the Black stencilling did not show up too well against the Dark Grey upper surfaces so I did not use too many of the decals that had only one or two lines of text. I just plodded on until boredom set in, or aged eyesight gave out. Another two coats of Klear gave the sort of semi-gloss finish that I was looking for.
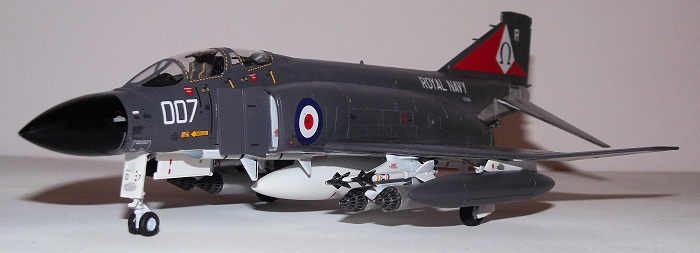
I went overboard on the stores load out; four Sparrow missiles, four Sidewinders, four unguided rocket pods, three fuel tanks. Probably not what you would see on an operational Phantom but that’s what it shows in the picture on the box top and I wanted my Phantom to shout to the World not to mess with the best.
The landing gear parts were attached without fuss and the tail planes added to complete the build.
| CONCLUSIONS |
 No kit
is perfect but in my opinion Airfix have done a good job, the range of
options is impressive - both in airframe configuration and under wing
stores. The price is reasonable and the decal sheet is mind boggling. The
full depth intakes really add to the appearance of the finished article. The
panel lines are boldly etched, in some areas perhaps too much, but that is a
matter of taste.
No kit
is perfect but in my opinion Airfix have done a good job, the range of
options is impressive - both in airframe configuration and under wing
stores. The price is reasonable and the decal sheet is mind boggling. The
full depth intakes really add to the appearance of the finished article. The
panel lines are boldly etched, in some areas perhaps too much, but that is a
matter of taste.
The kit is typical of current Airfix, quite complex and finely engineered but if you follow the instructions a good result should not be a problem.
I feel that Airfix have made a good rendition of the finest flying machine ever to grace the decks of one of Her Majesty’s aircraft carriers. The kit sold out in the UK almost upon release, so the popularity of the subject is clear. I have already put my name down for the RAF version that Airfix has announced for later this year.
| REFERENCES |
The Flying Navy by Richard E. Gardner, Almark Publications 1971.
Ark Royal by Paul Beaver, Patrick Stephens Ltd 1979
British Phantoms, Edited by Stephen Bridgewater. Key Publishing 2017
16 March 2018
Copyright ModelingMadness.com.
If you would like your product reviewed fairly and fairly quickly, please contact the editor or see other details in the Note to Contributors.
Back to the Main Page Back to the Review Index Page Back to the Previews Index Page