
Hasegawa 1/72 Tornado IDS 'Luftwaffe'
| KIT #: | K 29 |
| PRICE: | $20.00 |
| DECALS: | Four options |
| REVIEWER: | Serkan Özgen |
| NOTES: | Not an easy build |
| HISTORY |
Panavia Tornado is the most advanced tactical interdictor/strike (IDS) aircraft produced in Europe. It can carry almost all the air launched weapons in the NATO inventory. Being a joint venture of UK, Germany and Italy, it first flew in 1974. Saudi Arabia later became the fourth user. The intended roles for the aircraft were interdiction, counter air operations against airfields, battlefield interdiction, close air support, reconnaissance, maritime attack and point interception. An all-weather air superiority version (ADV) was later developed for the needs of the RAF. Production numbers are: Germany (Air Force: 212, Navy: 112), UK (228), Italy (100), Saudi Arabia (48). RAF opted to upgrade its multi-role Tornado GR.1s to the Mk.4 standard, which is well underway now. Tornados participated in both Gulf Wars, Bosnia and Kosovo conflicts.
| THE KIT |
 The kit depicted here dates from 1990
but decal variations of the same kit are still being issued and are
available in several web sites. I guess the current boxing is out of
production. This kit and other boxings of it can be found at around $10-15
in known auction sites. This is surprising because all other Hasegawa
K-series models sell for at least $25-30. I have the feeling that
Hasegawa’s Tornado is not a much coveted one. Add to that the fact that a
full built review of this kit is not present in this website.
The kit depicted here dates from 1990
but decal variations of the same kit are still being issued and are
available in several web sites. I guess the current boxing is out of
production. This kit and other boxings of it can be found at around $10-15
in known auction sites. This is surprising because all other Hasegawa
K-series models sell for at least $25-30. I have the feeling that
Hasegawa’s Tornado is not a much coveted one. Add to that the fact that a
full built review of this kit is not present in this website.
Another boxing of this kit has been recently previewed in Modeling Madness so you may also want to look there for what is in the box. One is greeted with 6 gray and 1 transparent sprues in the box. There is a huge decal sheet for four options, all for the Luftwaffe. Three of these are in the Norm 83c scheme and the last one has special markings to commemorate 30th Anniversary of JaboG 31 “Boelcke” wing and is in the Norm 83a scheme. The other airplanes are from JaboG 31, 32 and 33. There were three Norm 83 schemes, a, b, and c, all having the same three shades of green (RAL 6003, RAL 7021 and FS 34079) all around but different patterns. I think this is one of the coolest outfits that the Tornado has got into. Since 1987 however, all German Tornados have started wearing the Norm 87 scheme which has two shades of gray and one shade of green. The decal sheet has full stencils and data. Although the decals seem a bit thick, the register is fine.
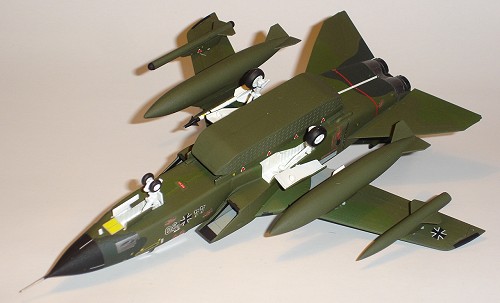
 There are 97 parts in the kit and are
well engineered with recessed panel lines. There are some unused parts that
are definitely for the RAF version of the Tornado. Unlike most Hasegawa
kits, you do get some weapons with this one: two fuel tanks, two AIM-9L/M
Sidewinders, one MW-1 bomblet dispenser and two Bofors BOZ-101 ECM pods. In
my kit, I replaced one of the ECM pods with a Cerebrus jamming pod salvaged
from an old Italeri kit since this one did not have it. I think what
resulted is a more common stores layout.
There are 97 parts in the kit and are
well engineered with recessed panel lines. There are some unused parts that
are definitely for the RAF version of the Tornado. Unlike most Hasegawa
kits, you do get some weapons with this one: two fuel tanks, two AIM-9L/M
Sidewinders, one MW-1 bomblet dispenser and two Bofors BOZ-101 ECM pods. In
my kit, I replaced one of the ECM pods with a Cerebrus jamming pod salvaged
from an old Italeri kit since this one did not have it. I think what
resulted is a more common stores layout.
The only real option here is to have the airbrakes in open or closed position. One cannot display the cockpit open for this one.
The instruction sheet has seventeen clearly illustrated construction steps and very well detailed color instructions for four options. The color references are for Mr.Color and Gunze-Sangyo but color names are also given allowing one to use a color range of choice.
| CONSTRUCTION |
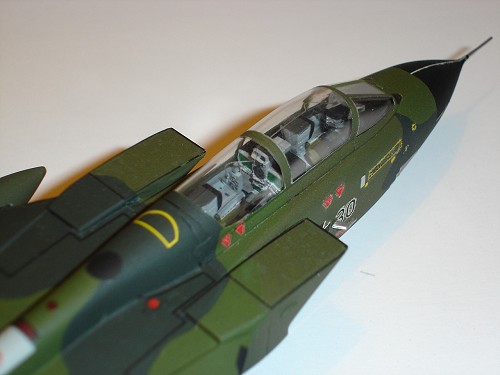
The construction starts at the cockpit. I painted the interior with Humbrol 165 Medium Sea Gray. The aircraft has a large canopy and most of the details inside can be seen after construction. This means interior needs some care. The interior is fairly well detailed for the scale with a bathtub, seats, instrument panels, side panels and the sticks. One is given decals for the instrument and the side panels but the parts have raised details meaning that one can paint them if wished (I chose the painting option). Fuselage is split into four parts, two for front and two for mid/rear. The cockpit is placed in between the two front parts. This is where trouble started, the cockpit did not want to fit in there! With some sanding and countless dry fittings, I finally managed to complete the front part of the fuselage.
 After gluing the front fuselage parts, I
assembled the wings and attached the landing gear housings to the fuselage.
Next the mid/rear part of the fuselage is assembled, which also houses the
wings. The wings can swing for and aft but because swiveling underwing
pylons are not given, one might as well glue them to their places. Next,
horizontal and vertical tail surfaces are assembled followed by the
external stores. The front fuselage and the air intakes really need special
care, as these are the places that one is most likely to screw up. Maybe
it’s me but these parts just did not want to fit in. One has to be careful
about the decals for the interior of the air intakes. These have to be
placed before assembly. If you think you can manage them after the intakes
are constructed, you are asking for real trouble! Then you attach the
landing gears and other bits. The landing gear housings, struts and wheels
were painted with Humbrol 22 Gloss White. Finally, I attached the exhausts,
which have three parts for each. These are painted in various metallic
sheens, for which I used Model Master Metalizers (1404 Titanium, 1406
Exhaust and 1401 Aluminum Plate).
After gluing the front fuselage parts, I
assembled the wings and attached the landing gear housings to the fuselage.
Next the mid/rear part of the fuselage is assembled, which also houses the
wings. The wings can swing for and aft but because swiveling underwing
pylons are not given, one might as well glue them to their places. Next,
horizontal and vertical tail surfaces are assembled followed by the
external stores. The front fuselage and the air intakes really need special
care, as these are the places that one is most likely to screw up. Maybe
it’s me but these parts just did not want to fit in. One has to be careful
about the decals for the interior of the air intakes. These have to be
placed before assembly. If you think you can manage them after the intakes
are constructed, you are asking for real trouble! Then you attach the
landing gears and other bits. The landing gear housings, struts and wheels
were painted with Humbrol 22 Gloss White. Finally, I attached the exhausts,
which have three parts for each. These are painted in various metallic
sheens, for which I used Model Master Metalizers (1404 Titanium, 1406
Exhaust and 1401 Aluminum Plate).
Apart from the difficulties explained above, construction went well. One has to exercise dry fitting at all steps of this kit. I have built one more K-series Hasegawa kit (F-111F) till now, and that was as fiddly as this one. If you wanna good looking kit, you gotta work hard for it!
| COLORS & MARKINGS |
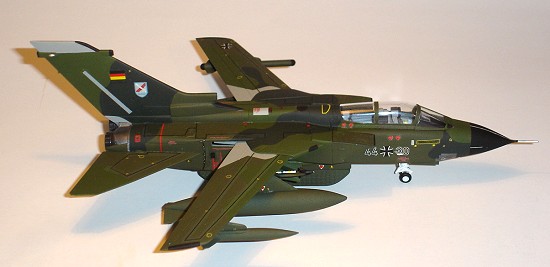
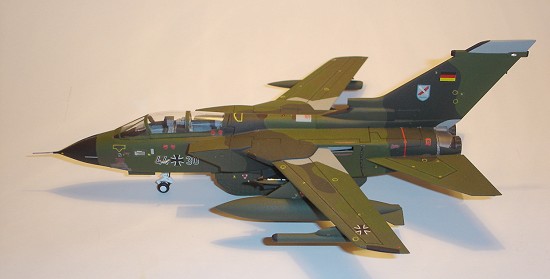
 I chose the standard Jabog 31 option for
this kit. The wraparound camouflage has three shades of green RAL 6003, RAL
7021 and FS 34079, for which I used Humbrol 117, Humbrol 91 and Humbrol
116, respectively. The radome was painted black (Humbrol 33), the wing
gloves and the aerial at the tip of the vertical stabilizer Humbrol 146.
The end result seems to be very close to the real thing.
I chose the standard Jabog 31 option for
this kit. The wraparound camouflage has three shades of green RAL 6003, RAL
7021 and FS 34079, for which I used Humbrol 117, Humbrol 91 and Humbrol
116, respectively. The radome was painted black (Humbrol 33), the wing
gloves and the aerial at the tip of the vertical stabilizer Humbrol 146.
The end result seems to be very close to the real thing.
After painting, the kit was given a coat of Testors Glosscote for the decals for which I decided to use the ones supplied in the kit.
The decals seem to be a bit thick but the register is very well and they conform to the kit surface very well after using Microscale setting solutions. Slight silvering occurred with one or two stencil and walkway decals but these were cured with Microscale Micro Sol. After letting the decals dry for a day, the entire model was given a coat of Testors Dullcote.
| CONCLUSIONS |
I am very pleased with this kit and I enjoyed it very much although there were hard moments. The kit looks like a very good rendering of a Luftwaffe Tornado. I would recommend this kit only to experienced modelers with patience. Although it is a difficult build, it is probably the best Tornado kit around. I have also built the ESCI and the Italeri kits in the past, while not as difficult builds as the Hasegawa kit, their level and quality of detail and accuracy is not as good as this one.
| REFERENCES |
December 2005
Copyright ModelingMadness.com If you would like your product reviewed fairly and fairly quickly, please contact the editor or see other details in the
Note to
Contributors.