
Hasegawa 1/72 Harrier GR.7 'RAF'
| KIT #: | 00380 |
| PRICE: | $16.98 MSRP when new |
| DECALS: | Two options |
| REVIEWER: | Kim Elliot |
| NOTES: | Basically an AV-8B with additional bits. |
| HISTORY |
The Harrier GR.5/7/9 is of a
more modern design than its' predecessor, the GR3. Its' structure incorporates
composite materials and is designed to accept more powerful Pegasus engine
similar to the one used by the US Marine Corps. The second generation Harriers
in British service derive from the American AV-8B Harrier II. The GR.7 was the
RAF equivalent of the Night Attack Harrier II, using British-specified avionics
(GEC-Marconi 1010 FLIR in a fairing on top of the nose; a Smiths Industries
wide-angle HUD, a GEC-Marconi color map display, updated mission software, and
an NVG-compatible cockpit). Entirely different countermeasure systems are also
fitted, including a Marconi Zeus ECM, a Plessey Missile Approach Warning (MAW)
system, and Swedish Bofors 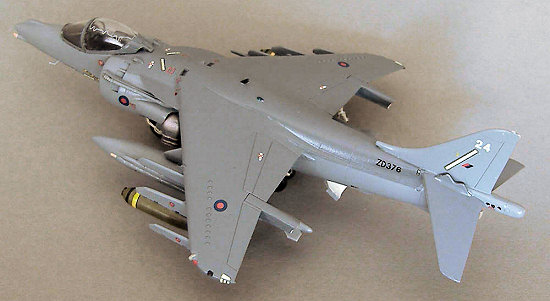 BOL chaff dispenser that automatically dispenses
chaff when a missile attack is detected. The ejection seat fitted is a
Martin-Baker Type 12 Mark 2. The GR.5/7/9 can to be fitted with twin 25
millimeter Aden revolver cannon. The RAF have also added a Sidewinder launch
rail under the landing-gear outriggers. Power for the GR7 is supplied by a
Pegasus 105 vectored thrust turbofan, of 21,750 lbf (98 kN) thrust. Early and
late production aircraft may be identified by the size and configuration of the
LERX, although retrofits in some cases confuse this feature. A total of 96
aircraft were ordered.
BOL chaff dispenser that automatically dispenses
chaff when a missile attack is detected. The ejection seat fitted is a
Martin-Baker Type 12 Mark 2. The GR.5/7/9 can to be fitted with twin 25
millimeter Aden revolver cannon. The RAF have also added a Sidewinder launch
rail under the landing-gear outriggers. Power for the GR7 is supplied by a
Pegasus 105 vectored thrust turbofan, of 21,750 lbf (98 kN) thrust. Early and
late production aircraft may be identified by the size and configuration of the
LERX, although retrofits in some cases confuse this feature. A total of 96
aircraft were ordered.
First flight of the Harrier GR7 was in 1989, and deliveries to RAF squadrons began in 1990. Harriers have been flown by four operational Royal Air Force Squadrons and the OEU: No. 1, No. 3, No. 4, No. 20, and the Strike Attack Operational Evaluation Unit (SAOEU). The Royal Navy also uses Gr.7/9s, in Joint Force Harrier (JFH), by 800 Naval Air Squadron and 801 Naval Air Squadron. JFH will continue operating the Harrier until its replaced between 2014 to 2018 by the UK's new Joint Combat Aircraft (JCA).
British Harriers have been based domestically, in Germany, and on embarked training exercises in the Indian Ocean. They have seen combat in the Gulf Wars, the Balkans, and Afghanistan.
| THE KIT |
Hasegawa have once again stretched their '90s era AV-8B Harrier to represent a more recent aircraft. The instruction sheet is dated 2002, making this review slightly dated; however, there is another GR.7 to be released by Hasegawa in late 2007, presumably based on the same moulds. It would be timely for an updated mould to be cut, as the reviewed release, despite being generally accurate, would benefit from improved detail and weapons fit. Additionally, being based on the AV-8B, some minor inaccuracies are present that need to be rectified for a British Harrier. See the preview for more.
| CONSTRUCTION |
Harriers are usually seen on
the ground with the air-brake open. Hasegawa have not allowed for this feature,
making for the most obvious failing of the basic kit. British Harriers feature
other external differences, notably in the rear ventral area, there being a
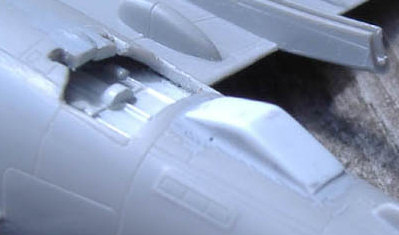 chaff dispenser and RWR aerials on the lower fin. The aerials and dispenser are
easy to add, with stock material, but the airbrake is a little more complex. I
robbed an Airfix GR.7 of the airbrake assembly and installed it, after cutting
the appropriately sized opening in the fuselage halves. Following the well
illustrated pictorial instructions, construction can proceed on the cockpit
area. The ejector seat is best replaced; I managed to find an aftermarket resin
seat that represents the Martin Baker Type 12. The interior is painted flat
grey, and the supplied decals applied to side consoles and front panel. Blue
masking tape cut into thin strips become the seat straps. Kit detail is limited,
but unless one poses the aircraft with the canopy open, quite adequate. The
cockpit tub is then glued to one fuselage half, taking care that the other half
is in alignment. The next step is the three part intake trunking. This is
painted gloss white, with a metallic fan surface. The part is not symmetrical,
and care is needed in attaching it to the fuselage - I had some considerable
difficulty here, and needed to trim the ducting to avoid a step. This is a
highly visible feature on a Harrier; do not rush the assembly. Before the
fuselage halves are joined, two axles are called for between the jet exhausts.
These are designed to allow the exhaust nozzles to rotate. Although I installed
them, I would suggest that they could be ignored. No weight is mentioned in the
instructions, but I wasn't going to take chances, and installed several grams of
lead in the forward fuselage and nose. The fuselage halves go together without
problem (once the intake trunking is dealt with). Two engine air intakes are
then attached without problems. Hasegawa did a nice job on these, with the upper
blow-in doors in the open position. Painting the inner faces white before
assembly saves a difficult job later. The nose can be attached at this stage.
Again, kudos to Hasegawa for a nicely molded and correctly shaped part.
chaff dispenser and RWR aerials on the lower fin. The aerials and dispenser are
easy to add, with stock material, but the airbrake is a little more complex. I
robbed an Airfix GR.7 of the airbrake assembly and installed it, after cutting
the appropriately sized opening in the fuselage halves. Following the well
illustrated pictorial instructions, construction can proceed on the cockpit
area. The ejector seat is best replaced; I managed to find an aftermarket resin
seat that represents the Martin Baker Type 12. The interior is painted flat
grey, and the supplied decals applied to side consoles and front panel. Blue
masking tape cut into thin strips become the seat straps. Kit detail is limited,
but unless one poses the aircraft with the canopy open, quite adequate. The
cockpit tub is then glued to one fuselage half, taking care that the other half
is in alignment. The next step is the three part intake trunking. This is
painted gloss white, with a metallic fan surface. The part is not symmetrical,
and care is needed in attaching it to the fuselage - I had some considerable
difficulty here, and needed to trim the ducting to avoid a step. This is a
highly visible feature on a Harrier; do not rush the assembly. Before the
fuselage halves are joined, two axles are called for between the jet exhausts.
These are designed to allow the exhaust nozzles to rotate. Although I installed
them, I would suggest that they could be ignored. No weight is mentioned in the
instructions, but I wasn't going to take chances, and installed several grams of
lead in the forward fuselage and nose. The fuselage halves go together without
problem (once the intake trunking is dealt with). Two engine air intakes are
then attached without problems. Hasegawa did a nice job on these, with the upper
blow-in doors in the open position. Painting the inner faces white before
assembly saves a difficult job later. The nose can be attached at this stage.
Again, kudos to Hasegawa for a nicely molded and correctly shaped part.
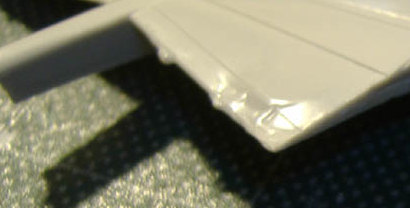 The wings, two part upper and
lowers with impressive complex contours, match well, but beware the ejector pin
towers. I thought I had removed these, but upon applying cement, discovered a
thin gap at the trailing edges. Not being in a patient frame of mind, I flooded
the gap with liquid cement and applied enough pressure to eliminate the gap.
Several hours later, removing the clamps, I discovered the wing grossly deformed
at the root trailing edge. I had no choice but to file, sand, fill and rescribe
the parts. Once restored, the wing assembly is matched to the fuselage without
problems. The foward part of the wing, with attached LERX, is then glued in
place. Registration of the parts is good, with minimal need for filler. The two
horizontal stabilizers are next attached. As for the exhausts, the kit designer
has allowed for rotatability; an unnecessary complication I chose to ignore. An
intake extension to the main fin is added, this required a small amount of
filler and sanding. On the tail boom, a cap is installed - ensure that the
appropriate one is chosen and oriented correctly. Both cannon pods and lateral
strakes for the underside are supplied. I decided on the strakes, a choice I was
to regret. These are handed, with bulges on the sides and angled faces. Joining
them to the fuselage requires photographic r
The wings, two part upper and
lowers with impressive complex contours, match well, but beware the ejector pin
towers. I thought I had removed these, but upon applying cement, discovered a
thin gap at the trailing edges. Not being in a patient frame of mind, I flooded
the gap with liquid cement and applied enough pressure to eliminate the gap.
Several hours later, removing the clamps, I discovered the wing grossly deformed
at the root trailing edge. I had no choice but to file, sand, fill and rescribe
the parts. Once restored, the wing assembly is matched to the fuselage without
problems. The foward part of the wing, with attached LERX, is then glued in
place. Registration of the parts is good, with minimal need for filler. The two
horizontal stabilizers are next attached. As for the exhausts, the kit designer
has allowed for rotatability; an unnecessary complication I chose to ignore. An
intake extension to the main fin is added, this required a small amount of
filler and sanding. On the tail boom, a cap is installed - ensure that the
appropriate one is chosen and oriented correctly. Both cannon pods and lateral
strakes for the underside are supplied. I decided on the strakes, a choice I was
to regret. These are handed, with bulges on the sides and angled faces. Joining
them to the fuselage requires photographic r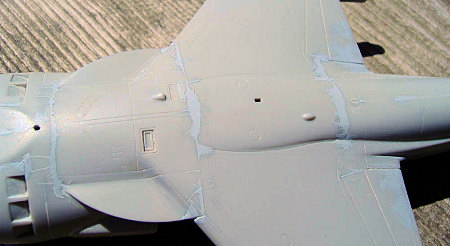 eference to get the angle correct.
However, the angled faces create a noticeable gap. Reversing the location
solves this, but the bulges, which are asymmetrical, then appear to be in the
wrong place. I'm not sure that my solution is correct on the model, but I
suspect I'm the only person to be bothered by the result. This is an area of the
instructions that should be improved. I chose to add the weapons pylons at this
stage. Not sure about the accuracy of the Sidewinder rails, but good enough in
1/72. A couple of aerials, small intakes, refueling probe and the forward air dam
complete the major airframe assembly. Incidentally, no u/c doors are supplied.
Whilst it is accurate to show the model with closed doors on the ground, I have
seen examples with the doors open. Hasegawa do not allow for this option.
eference to get the angle correct.
However, the angled faces create a noticeable gap. Reversing the location
solves this, but the bulges, which are asymmetrical, then appear to be in the
wrong place. I'm not sure that my solution is correct on the model, but I
suspect I'm the only person to be bothered by the result. This is an area of the
instructions that should be improved. I chose to add the weapons pylons at this
stage. Not sure about the accuracy of the Sidewinder rails, but good enough in
1/72. A couple of aerials, small intakes, refueling probe and the forward air dam
complete the major airframe assembly. Incidentally, no u/c doors are supplied.
Whilst it is accurate to show the model with closed doors on the ground, I have
seen examples with the doors open. Hasegawa do not allow for this option.
Undercarriage parts are well detailed, but suffer from a plague of small ejector pin deformities and mold lines. Surgery with a fine blade is required to remove these. The nose wheel/strut is one piece. The main gear has separate strut, hub and tire parts. The outrigger gear is in one piece. These were painted before attaching to the rest of the model. Harrier models, with their unique four-part gear, require special care to get all wheels on the ground at once. I find that leaving the main gear until last, then adjusting the vertical fit of this assembly, results in a realistic sit to the model.
 The exhaust nozzles are one of
the kit's disappointments. The forward ones are overly thick, and require filling
to conceal a seam. The rear ones are solid; drilling them out would loose the
interior vanes. I had hopes that the Airfix parts would substitute, but they are
not an improvement. There are aftermarket resin replacements made; I was unable
to obtain these. I did use the kit parts, but am not happy with the result. They
were installed after main painting was complete, fixing them in the vertical
position.
The exhaust nozzles are one of
the kit's disappointments. The forward ones are overly thick, and require filling
to conceal a seam. The rear ones are solid; drilling them out would loose the
interior vanes. I had hopes that the Airfix parts would substitute, but they are
not an improvement. There are aftermarket resin replacements made; I was unable
to obtain these. I did use the kit parts, but am not happy with the result. They
were installed after main painting was complete, fixing them in the vertical
position.
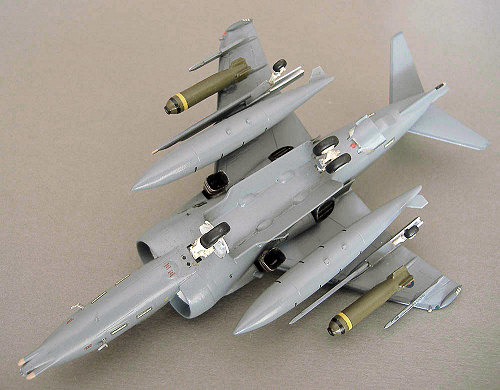
Under wing, the supplied tanks were attached to the inboard pylons (after painted exhaust nozzles were installed). Sidewinders were not carried by the aircraft I was modelling. Two BL755 munitions, stolen from the Airfix kit, were used. An electronic pod from a Hasegawa NATO Weapons collection (not sure of designation) went on the port 'winder rail.
Clear parts are minimal, consisting of a two part canopy, a HUD, and a tiny clear nose cap. These were attached after painting. The main canopy part is exceptionally well molded. Unfortunately, a mold seam runs the length of the part. With trepidation, I removed it by sanding, then polishing the part. Dipping in Future restores the brilliance, but does introduce some optical distortion. There are MDC representations on the canopy interior. These provide location references for the supplied decal.
| COLORS & MARKINGS |
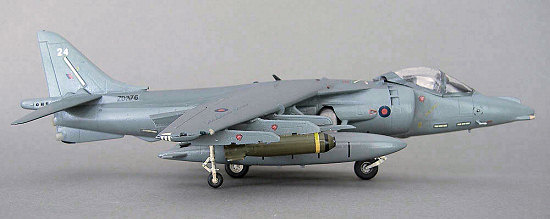
The aircraft I decided to
model was a well photographed example that had served in Afghanistan during late
2006 with 800 Naval Air Squadron. It was a feature in the UK at several air
shows, and wore both unit and kill markings. I have read that there was to be an
aftermarket decal sheet produced, but as of this writing, it has not been
released. However, suspecting that individual unit
 markings were not applied
in-theatre, I completed the model using the Hasegawa decals, and improvised
serial number and aircraft number.
markings were not applied
in-theatre, I completed the model using the Hasegawa decals, and improvised
serial number and aircraft number.
The kit supplied decals allow one to produce two aircraft, both RAF, from 4 or 20 Squadron. These are in two-tone green or grey schemes. The decals permit one to use low visibility or regular markings, with abundant stenciling. The decals are of good quality, if not thicker than one expects today. They went on without difficulty, using Solvaset after application. The aircraft colours used are: uppers, Dark Sea Grey; lowers, Dark Camouflage Grey. These were mixed from gloss black and white enamel to match references. Airframe painting was done with a Paasche VL with fine nozzle and needle, about 15 psi. Detail painting was by brush and airbrush, using various enamel, lacquer and acrylic paints at hand. Light weathering of the undercarriage legs with a dry-brushing of thinned sepia, and some trompe d'oeil shadows on the hot nozzles completed the job. Final coat was acrylic Microscale Satin Clear, which sprays well in my gear. However, I find it slightly too glossy for this example. I would suggest a mix with Matte to obtain a more realistic finish.
| CONCLUSIONS |
The Hasegawa Harrier GR.7 is probably the most accurate of the 1/72 offerings as of today. It is a typical Hasegawa product at an affordable price with good accuracy and reasonable detail. It does require detailing, notably in the airbrake and exhaust area. Fine details, such as the pitot, drift vanes, and cockpit detail would add to it's realism. Weaponry is sorely needed to enhance the appearance of an aircraft whose rôle is to support ground based forces. Those looking for the ultimate detailed 1/72 Harrier will need to find aftermarket resin and decals to complement their ambitions.
Thanks to Scott Van Aken for sending me this kit from his personal stash.
Recommended to all modellers.
| REFERENCES |
RAF Combat Ops 1991- 2003 Scale Aircraft Modelling vol.26 no. 1
Herrick's Harriers Aviation News vol.69 no. 5
7As at Sea Model Aircraft Monthly vol.5 no. 12
Air International vol. 46 no.5 ; vol. 38 no. 1; vol. 37 no. 2
Internet Google: Harrier GR.7, RAF, FAA, Joint Force Harrier
September 2007
If you would like your product reviewed fairly and fairly quickly, please contact the editor or see other details in the Note to Contributors.
Back to the Review Index Page 2015