| KIT #: | 9063 |
| PRICE: | $16.98 |
| DECALS: | Three options |
| REVIEWER: | Nicolai Plesberg |
| NOTES: |
| HISTORY |
As the Mirage F1
began to achieve some export success in the late 1970s, the door for another
success for Groupe Marcel Dassault seemed to have opened, however, the largest
Mirage F1 user after France was yet to come. Iraq’s leader, Saddam Hussein, had
started a conflict with the neighbouring state of Iran in September 1980. Due to
the Islamic Revolution of 1979 he thought it would be a short conflict and
sought help in the arms industry of several Western countries as well as the
Soviet Union. As one result of this France obtained large orders for the Mirage
F1 in both single seat and two-seat variants. The F1E was the variant of choice
for the Iraqi regime, as this was the multi-role export version good for both
air-air and air-ground missions as well as anti-shipping duties and
reconnaissance. They were designated F1EQ when exported to Iraq; the two-seat
F1B became the F1BQ, as this was adequate for the Iraqi Air Force’s needs.
Deliveries began in January 1981 and more than 100 F1EQs / BQs were delivered up
to the spring of 1989. The one single event that stopped the flow of planes was
Iraq’s increasingly difficulty to pay for the deliveries; the eight year long
war with Iran took a devastating drain on Iraq’s economy and funding for the
purchases thus became impossible. As a “solution” to this situation Iraq made
the fatal mistake to invade the rich and wealthy sheikdom of Kuwait on 2 August
1990. This in turn led to sanctions imposed on Iraq’s oil sales and the sale of
arms to Iraq by the UN Security Council. This meant t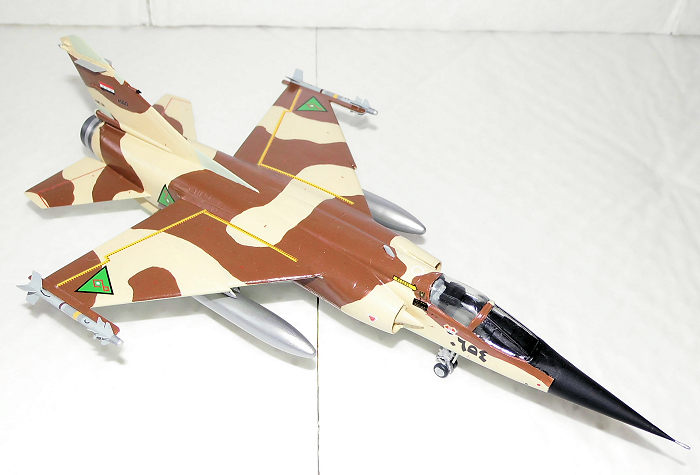 hat
the remaining Iraqi Mirage F1s (around 18) still in France could not be
delivered. Despite these events Iraq had nevertheless become the largest Mirage
F1 user after France.
hat
the remaining Iraqi Mirage F1s (around 18) still in France could not be
delivered. Despite these events Iraq had nevertheless become the largest Mirage
F1 user after France.
During the Iran-Iraq war in the 1980s some 35 Mirages were shot down by Iranian fighters, most notably by F-14 Tomcats, which had been delivered prior to the Revolution of 1979. The Tomcat was inevitably the better dogfighter of the two, but Iraq’s Mirages got from now and then some victories against the Tomcats and also Phantom IIs and Tiger IIs fell to the F1s arsenal of air-to-air weaponry. If the Iran-Iraq war showed anything of strengths in the air forces of Iraq and Iran, it was, that they seemed pretty much equal in terms of material condition as well as aircrew training. On the other hand, it was a totally different matter when Iraq was facing the international coalition led by the United States during Operation Desert Storm. Nine Mirage F1EQs were lost in air-to-air combat; eight shot down by US and Saudi F-15s and one lured into the ground by an EF-111 Raven – the only air-to-air kill achieved by an F-111 ever. Furthermore several Mirage F1s (both EQs and BQs) were flown to Iran by their defecting pilots. Those planes were later absorbed into the IRIAF (Islamic Republic of Iran Air Force) where they still serve. From being the second largest operator of the Mirage F1, the remaining serviceable aircraft in Iraqi service, is thought to have numbered about 30-35 planes, but the air attacks against Iraqi airbases during Desert Storm may have reduced that number further.
Prior to Operation Iraqi Freedom in 2003 Saddam ordered the air force to bury its planes in the desert sand, despite the wishes of the service to continue to defend Iraqi airspace, so when hostilities broke out on 21 March 2003 no aircraft or helicopters remained in service. Following the end of Saddam Hussein’s regime, the Iraqi forces were dismantled and remaining material, some of it dug out from the desert by coalition forces, of the Saddam era was scrapped. Today none remains and the new Iraqi forces have been rebuilt with material from both the US as well as Russia.
| THE KIT |
The kit
consists of around 60 parts molded in white plastic with two parts in clear. A
couple of parts is for other boxings and do not apply to any of the decal
options in this boxing. Surface detailing is, as with Esci kits from that era,
engraved panel lines which looks convincing enough under a coat of paint. Some
details are questionable though; the ejector seat is a vague representation of a
Martin Baker Mk. 4 seat, so an aftermarket replacement will be in order. The
remaining interior parts are basic but adequate – if some aftermarket parts are
available it would jazz up the appearance, but if so done none would really be
worth it without also considering of replacing the clear parts. They have a
pretty poor fit to the fuselage, mo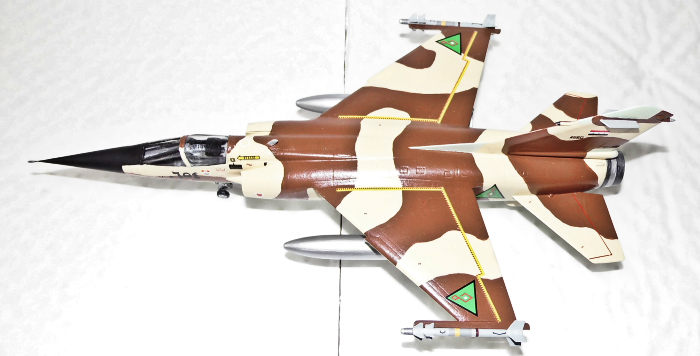 stly
caused by flash on the edges and need some trimming. The transparency of them is
also an issue, because mine had imperfections on the
inside so that was an annoying
discovery. The width of the windscreen also seems not quite conform to pictures
and that will inevitably influence the shape of the instrument panel coaming and
the nose shape forward of the windscreen. Some of the smaller parts, especially
the gear parts were festooned with flash so that will take some special care to
clean up.
stly
caused by flash on the edges and need some trimming. The transparency of them is
also an issue, because mine had imperfections on the
inside so that was an annoying
discovery. The width of the windscreen also seems not quite conform to pictures
and that will inevitably influence the shape of the instrument panel coaming and
the nose shape forward of the windscreen. Some of the smaller parts, especially
the gear parts were festooned with flash so that will take some special care to
clean up.
The general shape and proportions of the fuselage, wings and tail looks, however, fine to me, as are the landing gears and external stores. They consist of two external fuel tanks and an Exocet missile, the last item is solely for the Iraqi marking option. An external in-flight refuelling probe is also included, but marked only (again) for the Iraqi option.
Color callout are for Humbrol Enamels, but most of the colors do have a FS595 reference number too. There are three decal options; for an Iraqi F1EQ, a Jordanian F1CJ and a South African F1CZ. They appear to be printed in register and with a matt finish by G. Decal, Bologna in Italy.
| CONSTRUCTION |
This is one of
the kits I started years ago with the drop tanks and Exocet missile glued
together, so I just took up the depeche and glued together the wings, added the
endplates on the drop tank fins and glued together the Exocet missile. Hey,
wasn’t that done earlier? Yes, but I decided to replace the kit supplied missile
with one from a Heller weapons set ‘cause it looked nicer – and there were
stencil decals included! The interior bits were assembled next; I thinned the
seat pan (part 1A) to reduce the bulkiness of the seat, but also to reduce the
probability of the seat not fitting to the interior as a dry run had indicated
it to be the case. Some seam issues on the wings and drop tanks were done and
then some painting of engine related parts, exhaust and intakes, with burned
metal and silver respectively. The wheel hubs and gear bays also got the silver
touch while I was at it. The cockpit floor went grey (Humbrol 64) while cockpit
sidewalls, handle on control stick and seat frames went flat black. Seat cu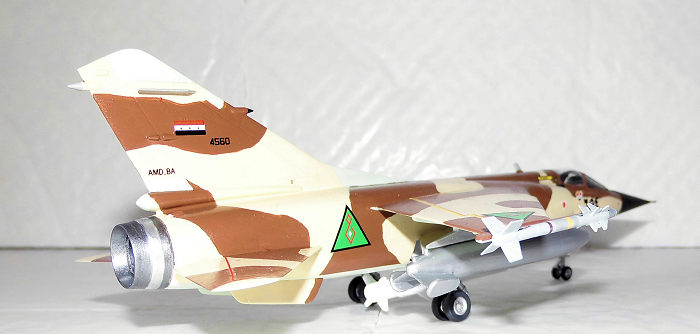 shions
went army green (Humbrol 102). As the paint had dried the instrument panel and
side consoles plus seat cushions were glossed in order to accept the instrument
and seat belt decals that follow every Esci kit. Once dry they were sealed with
flat varnish and the seat was attached to the floor with CA glue. The floor was
then glued into the right fuselage half; the two halves were taped together to
secure alignment of the interior while the glue dried. After measuring and
gluing the nose weight in place the fuselage halves were joined and secured with
clamps and tape until the glue had set. The nose cone was also attached at this
stage.
shions
went army green (Humbrol 102). As the paint had dried the instrument panel and
side consoles plus seat cushions were glossed in order to accept the instrument
and seat belt decals that follow every Esci kit. Once dry they were sealed with
flat varnish and the seat was attached to the floor with CA glue. The floor was
then glued into the right fuselage half; the two halves were taped together to
secure alignment of the interior while the glue dried. After measuring and
gluing the nose weight in place the fuselage halves were joined and secured with
clamps and tape until the glue had set. The nose cone was also attached at this
stage.
After removing the clamps and tape pieces the fuselage seam had to be dealt with, in several sessions, as is nearly always the case. I also had to deal with some molding imperfections on the horizontal tail planes. While doing all this I also found the time to finishing the wheels by painting the tires and putting them aside until the gear legs were done. When the fuselage seam was done, I cut out and glued an extension to the fin as Iraqi planes had these. This was faired in with the usual filler and sanding and when that was done the outermost edges of the intakes were painted with the exterior colors before they were assembled and glued to the fuselage. Some slight seam filling was necessary and some CA glue was needed to properly gluing the intakes to avoid too much filling / sanding afterwards. When intakes were completely done, the wings, tail planes and the exhaust petal were glued to the fuselage.
While this dried I assembled two Matra Magic missiles from a Heller weapons set. They consisted of a molded plastic body while the fins were etched metal. Gluing those in place turned out to be something of a precision work, as the dents in the plastic body for the fins to fit in were not quite in the correct positions so it took some fiddling to get the fins attached perfectly perpendicular to each other. The wing tip launching rails were copied from the Heller Mirage F1 kit, I was building in parallel to this one, as this was a much simple task which took two minutes in all to accomplish. The Magic and Exocet missiles were painted and decaled as per instructions. I was surprised by the relative complexity of the level of stencilling on the Matra Magic; they are more comprehensive than their US counterpart, the AIM-9 Sidewinder, even in 72nd scale!
As the missiles
together with their launching rails were finished I turned my attention to the
airframe again; the seams of wings and tail p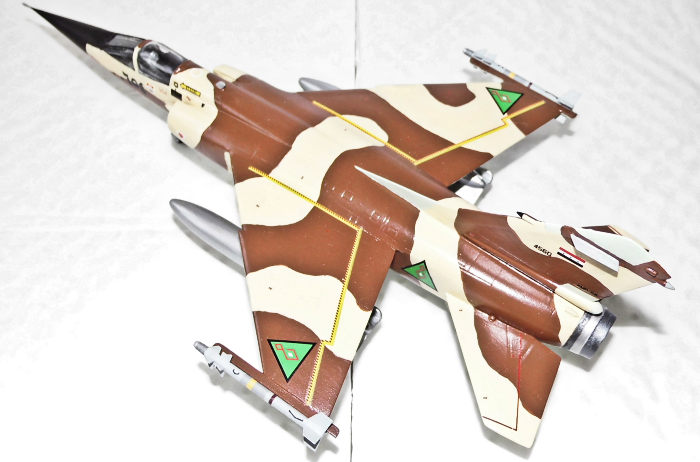 lanes
were gluefilled from the bottle until there were small discrepancies left. Some
filler took care of those and the cockpit was finished up by gluing the coaming
in place and painted black together with remaining issues. Then I cleaned up the
clear parts, both from flash and the small imperfections, as mentioned earlier,
as good as possible. A wash in soapy water and cleaning off the soap with clean
water and drying by using my usual anti-static cloth. Then they were glued to
the cockpit using clear gloss; any gaps were also filled with clear and
superfluous dried gloss sanded with a light hand when dry. The two belly fins
were glued in place next; they also demanded some gluefilling to cover the
seams.
lanes
were gluefilled from the bottle until there were small discrepancies left. Some
filler took care of those and the cockpit was finished up by gluing the coaming
in place and painted black together with remaining issues. Then I cleaned up the
clear parts, both from flash and the small imperfections, as mentioned earlier,
as good as possible. A wash in soapy water and cleaning off the soap with clean
water and drying by using my usual anti-static cloth. Then they were glued to
the cockpit using clear gloss; any gaps were also filled with clear and
superfluous dried gloss sanded with a light hand when dry. The two belly fins
were glued in place next; they also demanded some gluefilling to cover the
seams.
Next the gear legs were removed from the sprues and a thorough clean up followed; as mentioned earlier the gear parts were festooned with flash so this took some time to clean up. Once cleaned they were assembled and painted and when dry mated to the wheels. Some plugs to the two large holes in the belly were put in and filled with CA glue and sanded smooth; the pylon for the Exocet missile don’t have any locating pins at all so the holes must be related to other boxings. Then the gears were attached using slow drying CA glue. As a little sidenote to the instructions for the nose gear leg; it is advised to attach it to the interior before this is glued into the fuselage. I had beforehand tested that it could be mounted upon having assembled the fuselage; with some fiddling it is possible to attach the nose gear leg after having closed up the fuselage. It is a bit of an enigma why kit manufacturers make such weird decisions to have the modeler gluing something in place that easily could be knocked off at the next step. It is, however, in our modeling freedom to do things the other way around if ones experience allows so!
The last bits were then glued in place and the airframe cleaned, before the model went to the paint shop.
| COLORS & MARKINGS |
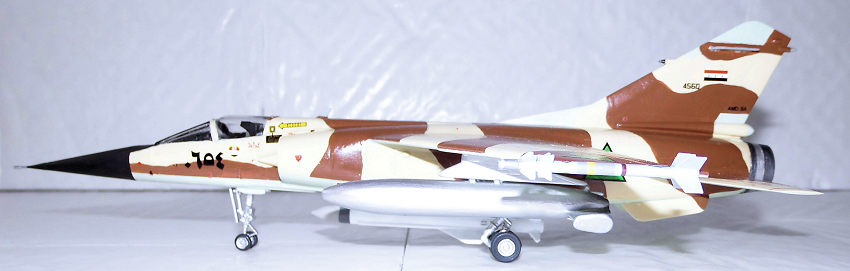
The paint
scheme, at least in the instructions stated for an underside painted light blue
and the sides and upper surfaces camouflaged in a light brown and green scheme.
Well, it was not quite the colors I h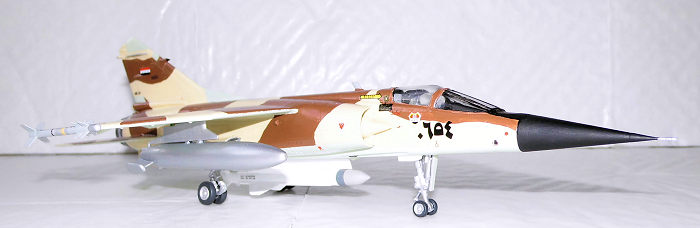 ad
deducted from the (very) few pictures, that I had seen of these planes. However,
I remembered in my 4+ publication on the MiG-15 that an Iraqi MiG-15UTI was
described with FS color references, and since its color scheme may very well
been used on the Mirages as well, so I deducted the colors as being: the light
blue color as Duck Egg Blue (Humbrol 23), the desert sand color as Oak (Humbrol
71) and the Dark Brown color (Humbrol 186). So these colors were put into play;
the various antenna panels on the fin were painted with the underside color;
some careful masking was required to do these. The actual camouflage scheme was
also deducted from the pictures that I had access to and differed quite much
from the scheme shown in the instructions! As all coloring was done to my
satisfaction the gloss coat went on to prepare for the decals.
ad
deducted from the (very) few pictures, that I had seen of these planes. However,
I remembered in my 4+ publication on the MiG-15 that an Iraqi MiG-15UTI was
described with FS color references, and since its color scheme may very well
been used on the Mirages as well, so I deducted the colors as being: the light
blue color as Duck Egg Blue (Humbrol 23), the desert sand color as Oak (Humbrol
71) and the Dark Brown color (Humbrol 186). So these colors were put into play;
the various antenna panels on the fin were painted with the underside color;
some careful masking was required to do these. The actual camouflage scheme was
also deducted from the pictures that I had access to and differed quite much
from the scheme shown in the instructions! As all coloring was done to my
satisfaction the gloss coat went on to prepare for the decals.
The markings
were something of a challenge as well. First off, the Iraqi national insignia on
the kit sheet was insufficient in shape as well as in numbers. The triangle
should have the pointed end upwards, not downwards as depicted on the kit sheet.
It should also be an isosceles triangle, which is not the case. There should
also have been six of them, instead of two, to fill in the wing positions as
well. Some stencils were also wrong, but the help was on the kit sheet; some of
the stencils from the Jordanian option seemed to look more closely as on the
Iraqi planes per photos, so these went on the model. They worked by the way
admirably and settled down nicely. Regarding the insignias it would have been
nice with one of those decal sheets released after the Gulf War in 1991, but I
guess they’d probably been OOP for a long time. So I needed a present solution,
but it turned out to be not so far away. In 2012 Eduard released their beautiful
1/72 Messerschmitt Bf110E, which had an Iraqi marking option (in the Profi Pack
edition), so I bought the kit and snatched the insignias from there! I had,
before I bought the kit, estimated to the best of my ability if they would fit.
To aid this I took my Frog 1/72 Bf110G kit and by the help of the fuselage and
wings held up against my Mirage F1EQ and the siz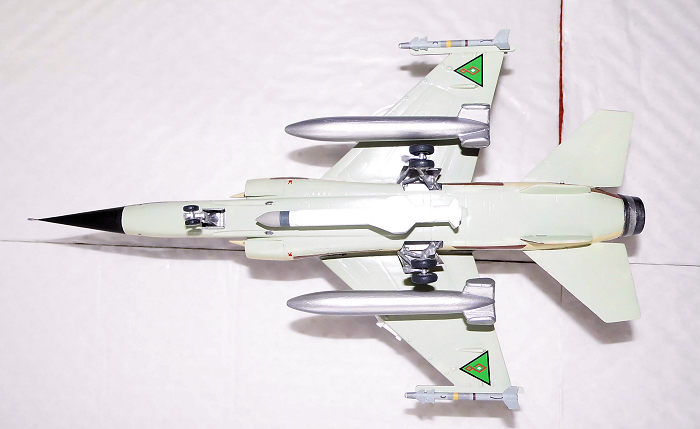 e
seemed within a reasonably accuracy. As they went on my Mirage the wing
insignias seemed spot on while the fuselage ones may be slightly oversized.
Better they are a bit too large than totally inaccurate in shape and color and
I’m happy with my solution to this problem! The Eduard decals worked by the way
also perfect so no critics here!
e
seemed within a reasonably accuracy. As they went on my Mirage the wing
insignias seemed spot on while the fuselage ones may be slightly oversized.
Better they are a bit too large than totally inaccurate in shape and color and
I’m happy with my solution to this problem! The Eduard decals worked by the way
also perfect so no critics here!
Once the decals had dried they were wiped with a moist anti-static cloth before they were sealed in with gloss clear. The model was given a final satin coat to tone down the gloss, as I imagine a desert based aircraft can in no way stay gloss for very long!
The final leg was more or less the final touch ups plus attaching the stores. First I attached the pylons for the Exocet missile and the drop tanks. Then the Exocet missile went on, but I should have glued the pylon to the missile first and then attached the pylon to the fuselage. The sharp eye will notice that the Exocet is located a little off centre; caused by the fact that gluing a pylon in place with no real good reference points is a bad idea! The drop tanks went on with no issues and the Magic’s needed slight more attention to sit correctly, but I succeeded with that and my 1/72 Esci Mirage F1EQ was finished.
| CONCLUSIONS |
The kit goes
together really well with only slight use of filler in the main seams. It also
has engraved detailing, something that Esci pioneered in the 1980s, while most
kit manufacturers still did kits with raised detailing. Except the shape of the
windscreen (and related detail issues!) the Esci kit pretty much captures the
graceful lines of the Mirage F1 well. As you may have noticed I omitted the
in-flight refuelling probe as I’ve read that they were bogus on Iraqi planes.
The only bad thing in the kit is the a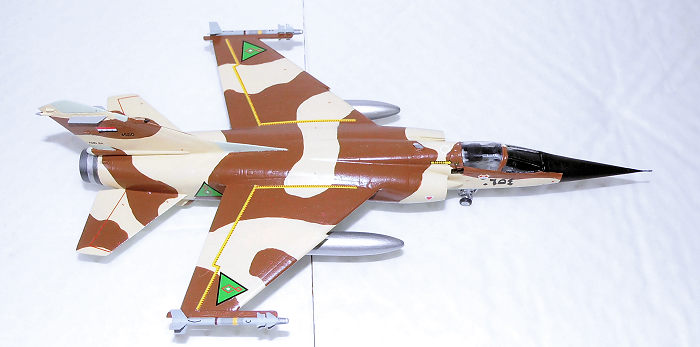 wful
research that constitutes the paint scheme / markings for the Iraqi option; the
Jordanian and South African options I know nothing about; someone else must do
that! The kit only provides an Exocet missile and two drop tanks as stores
options; therefore I supplied two wing tip mounted Matra Magics to soup up the
final result – and I think I succeeded in doing that! The kit can be recommended
to anyone interested in French aircraft. Aftermarket decals can be a good
supplement and some under wing stores will definitely also be needed!
wful
research that constitutes the paint scheme / markings for the Iraqi option; the
Jordanian and South African options I know nothing about; someone else must do
that! The kit only provides an Exocet missile and two drop tanks as stores
options; therefore I supplied two wing tip mounted Matra Magics to soup up the
final result – and I think I succeeded in doing that! The kit can be recommended
to anyone interested in French aircraft. Aftermarket decals can be a good
supplement and some under wing stores will definitely also be needed!
| REFERENCES |
The Encyclopedia of Modern Warplanes General Editor: Bill Gunston © 1995 Aerospace Publishing Limited Blitz Editions ISBN 1-85605-290-7
Military Aircraft of the World by Gordon Swanborough © Ian Allan Ltd 1981ISBN 0-7110-1139-7
Wikipedia, a splendid article on the Mirage F1
Wikipedia, an article on the Iraqi Air Force
MiG-15 all variants 4+ publication ISBN 80-900708-6-8
This publication contains a detailed description of Iraqi MiG-15UTI’s in desert camouflage; the same scheme that very likely may have been used on Iraqi Mirage F1’s as well.
8 December 2017
Copyright ModelingMadness.com
If you would like your product reviewed fairly and
fairly quickly, please
contact
the editor
or see other details in the
Note to
Contributors. Back to the Main Page
Back to the Review
Index Page
Back to the Previews Index Page