|
KIT: |
Flying Kiwi's 1/72 A-4 Skyhawk |
|
KIT # |
KC 72 |
|
PRICE: |
$17.95 NZD |
|
DECALS: |
Six aircraft, all low viz |
|
REVIEW & |
Mark Fordham |
|
NOTES: |
|
|
KIT: |
Flying Kiwi's 1/72 A-4 Skyhawk |
|
KIT # |
KC 72 |
|
PRICE: |
$17.95 NZD |
|
DECALS: |
Six aircraft, all low viz |
|
REVIEW & |
Mark Fordham |
|
NOTES: |
|
|
HISTORY |
Rather than repeat the Skyhawks well known history Here instead is a short history of No 2 Squadron RNZAF courtesy of the official RNZAF website http://www.airforce.mil.nz
One of the Air Force's original Territorial squadrons formed in 1930, No.2 Squadron was largely a paper organisation, based at Wellington, until second-hand RAF Baffin aircraft were delivered in 1938. At the outbreak of WWII the Squadron moved to Blenheim to provide protection of the approaches to Cook Strait. The Squadron was merged with the other territorial squadrons to form the NZ General Reconnaissance (GR) Squadron in 1940.
Immediately following WWII the Squadron was located at Ohakea, where in 1946 it was renamed No.75 Squadron to perpetuate the New Zealand lineage of this famous RAF squadron. No.2 (Territorial Squadron) was raised in 1948. Equipped with Tiger Moths, Harvards and then Mustangs the Squadron, based at Ohakea, carried out regular annual training until the Territorial Air Force was disbanded in 1957. Reformed again in December 1984 at Ohakea, No.2 Squadron was equipped with the Skyhawk. In 1991 it moved to the Royal Australian Naval Air Station at Nowra (NSW) Australia.
Today, the Squadron is part of the RNZAF Air Command, under the command of RNZAF Base Ohakea . Operating both the TA-4K and A4-K it assists with the training of Royal Australian Navy ship's crews against air threats. The Squadron regularly deploys around Australia carrying out the Navy tasks as well as others with the Royal Australian Air Force. RNZAF pilots selected to fly Skyhawks carry out their conversion training onto the Skyhawk at No.2 Squadron.
Here is a quick breakdown of Current Skyhawks in service with No 2 and No 75 Squadrons
The RNZAF currently operates 19 Skyhawks.
It took delivery of 14 A-4K/TA-4K in 1970. Serials NZ6201 - NZ6210 (A-4K), NZ6251-NZ6254 (TA-4K)
In 1984 10 secondhand RAN A-4G/TA-4G were added to the inventory: NZ6211-NZ6218 (A-4G), NZ6255 - NZ6256 (TA-4G)
The Skyhawk fleet underwent Project KAHU in the late 1980s which upgraded the avionics systems. The A-4Gs were then redesignated A-4K/TA-4K.
 Fleet Losses
NZ6207 crashed 18 October 1974
NZ6253 crashed 25 March 1981
NZ6210 crashed 24 October 1989
NZ6208 crashed 23 July 1992
NZ6203 crashed 20 June 1996
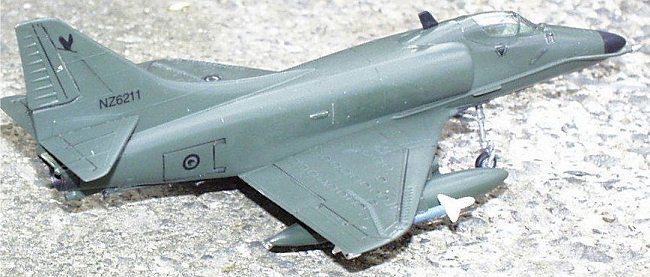
NZ6211 crashed 16 February 2001
NZ6256 crashed 20 March 2001
|
THE KIT |
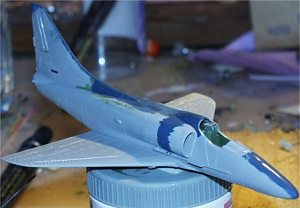
On opening the Flying kiwis box you have one separately packaged Italeri A4-E/F, One sheet of Low viz marking, a A4 supplemental sheet showing painting instructions and decal placement and finally a Tamiya paint guide.
I have made a few Flying Kiwi kits now and have found them to be nice little models that with almost no work can be made into accurate little models.
On comparing the Italeri A4 with RNZAF Squawks you can see the main difference straight away. The RNZAF use A4 –G’s A4 – K’s TA4 -G and TA4 –K’s 2 seaters and they are all without the Avionics hump.
So to make an accurate RNZAF Skyhawk I needed to either ditch the Italeri fuselages and find ones without the "hump" or modify the fuselages.
Now be fair to Flying Kiwis, finding a large source of A4 – K kits in this day and age would be a little difficult and at the moment Flying Kiwis are not geared up to produce their own kits. So using the Italeri A4 – E/F kit is better than ignoring one of the longest serving RNZAF aircraft but does leave the purist (Not that I am) with a dilemma. How can I add a reasonably accurate Squawk to my collection of Kiwi aircraft without resorting to scrapping the fuselage?
For those of you not afraid of filler read on …..
|
CONSTRUCTION |
 I decided to use the
supplied kit and modify the E into a hump-less K. So lets see what that’s
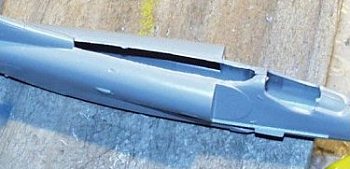
entails. Construction begins with the careful removal of the Avionics hump from
the fuselage halves. This left a 6 mm wide gap running down the fuselage from
just behind the cockpit to bottom of the fin, small pieces of plastic scrap was
then glued along the underside of the hole to act as a step for the replacement
top fuselage to sit on. Cockpit was assembled and with the addition of seatbelts
and painting added to one side of the fuselage. Before mating the two halves up
I added some lead weights secured with plastercene in the nose to stop tail
sitting. The fuselage was then glued together and a new top section was cut and
shaped from 20 thou card and glued into the gap,
I decided to use the
supplied kit and modify the E into a hump-less K. So lets see what that’s
entails. Construction begins with the careful removal of the Avionics hump from
the fuselage halves. This left a 6 mm wide gap running down the fuselage from
just behind the cockpit to bottom of the fin, small pieces of plastic scrap was
then glued along the underside of the hole to act as a step for the replacement
top fuselage to sit on. Cockpit was assembled and with the addition of seatbelts
and painting added to one side of the fuselage. Before mating the two halves up
I added some lead weights secured with plastercene in the nose to stop tail
sitting. The fuselage was then glued together and a new top section was cut and
shaped from 20 thou card and glued into the gap,
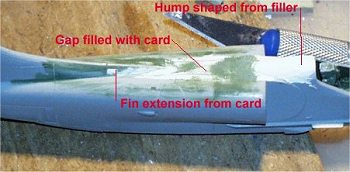 those little scraps that were
glued in before stop the new section disappearing into the fuselage. The
fuselage was put to one side and left for two days to let the glue cure fully.
On returning to the fuselage it was now time to tidy up the new section. Careful
filing and sanding shaped the plastic card plug into the correct shape. The
small hump behind the canopy was flared in with filler and sanded to shape.
Finally the fin was extended with a small section of plastic card and carefully
filled and sanded to smooth it in with the original fin. Varous other "lumps and
bumps" around the airframe were removed at this point after carefully checking
the photos.
those little scraps that were
glued in before stop the new section disappearing into the fuselage. The
fuselage was put to one side and left for two days to let the glue cure fully.
On returning to the fuselage it was now time to tidy up the new section. Careful
filing and sanding shaped the plastic card plug into the correct shape. The
small hump behind the canopy was flared in with filler and sanded to shape.
Finally the fin was extended with a small section of plastic card and carefully
filled and sanded to smooth it in with the original fin. Varous other "lumps and
bumps" around the airframe were removed at this point after carefully checking
the photos.
 The Italeri A4 E/F has fine raised detail lines on the fuselage which
suffered during the conversion process, I didn’t want to go the whole hog and
re-scribe all the panels lines so I used a No 11 blade with a broken tip and
re-scribed just the lost fuselage detail.
The Italeri A4 E/F has fine raised detail lines on the fuselage which
suffered during the conversion process, I didn’t want to go the whole hog and
re-scribe all the panels lines so I used a No 11 blade with a broken tip and
re-scribed just the lost fuselage detail.
At this point the wings were assembled and glued to the fuselage and with careful trimming the lower wing required no filler, tailplanes were cleaned up and added again without any problems.
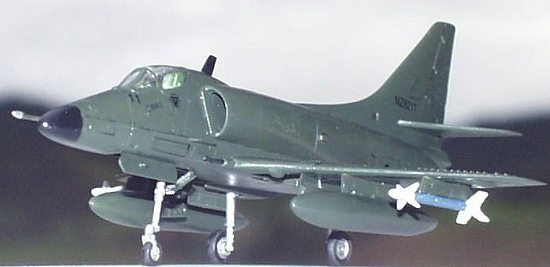
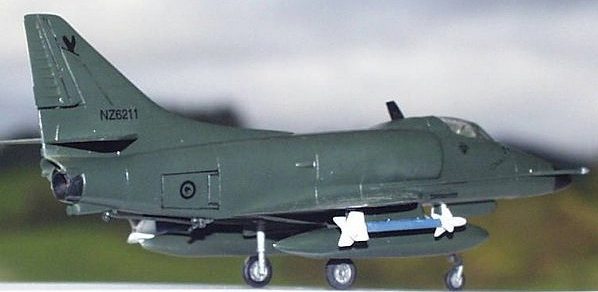
With the basic airframe finished it was time to move onto the underwing stores, the kit comes supplied with one centre-line tank and two CRV 7.2in rocket pods, but after spying a photo on the RNZAF web site showing an A4 carrying two drop tanks and two Aim 9L Sidewinders. I dug around the spares box to look for a pair of "winders". Oh Dear! no "winders" in the spares box! "Oh that’s right WWII aircraft weren’t fitted with Aim 9s’ " Ah but I spy Winders on my sons Phantom, after much dickering that I’m sure has cost me dearly, I have two glue encrusted Aim 9s for the Squawk (Thanks Timmy ..but your going to have to wait for that Corvette) Word of warning ..Do not try to trade with a Seven year old you WILL come off second best more on those later .
|
PAINTING & MARKINGS |
Painting the RNZAF Skyhawk is dead easy as they were recently repainted low viz dark green over the entire airframe with the exception of the nose and fin behind the cockpit which are painted black. This horrible scheme is what the Skyhawk will see their active service out in as of September this year they are to be phased out of service and scraped, Ending the RNZAFs’ Air combat capabilities as the NZ government decided to pull the plug on the Ex USAF F16s..
The rotting Silage green colour is closely matched by Tamiya XF-61 Dark Green so after spraying the nose black and masking up the cockpit the Squawk was sprayed with XF-61 and left for a couple of days to dry.
A quick coat of Future was brushed on in preparation of the decals.
The "new" low viz markings consist of black Kiwi roundels, numbers and stencils.
 First off the roundels were cut out and added to the airframe, remember that
the kiwi’s beak and feet must face the nose of the aircraft, then the stencils
were added, putting black decals on a blackish green aircraft is one very good
way to strain your eyes but like all Flying Kiwis decals went on with no
problems.
First off the roundels were cut out and added to the airframe, remember that
the kiwi’s beak and feet must face the nose of the aircraft, then the stencils
were added, putting black decals on a blackish green aircraft is one very good
way to strain your eyes but like all Flying Kiwis decals went on with no
problems.
The last thing that needed to be added was the serial numbers, now I was doing Squadron Leader Murray Neilsons aircraft NZ6211 which was not one of the Flying Kiwis options so I had to cut up the serial codes from two aircraft to give me the numbers that I needed. Along with the 11 just forward of the cockpit.
A final coat of future to seal the decals was added and the tanks and Sidewinders were glued on to finish the model
The Sidewinders proved to be almost impossible to paint properly as they have been "7 year olded" with paint and glue but since they are the only winders in the house they will sit there until a new pair can be found or scratch built..
I haven’t bothered to spray matt varnish as it has been my experience that the future will "dull" down to a nice semi-gloss sheen in a few weeks. But for now its looks wrong in a nice new shiny coat.
|
CONCLUSIONS |
 Converting the Flying Kiwis’ Skyhawk into an accurate RNZAF aircraft requires
a fair amount of time and skill, some people will buy the kit and assemble it
and add the decals as a "representation" of our Skyhawks, Some will modify as I
have the Avionics hump to make it more accurate. As of October/November of this
year all RNZAF Skyhawks will be scrapped anyway so in a few years this model
with become highly sort after by Kiwi Modellers.
Converting the Flying Kiwis’ Skyhawk into an accurate RNZAF aircraft requires
a fair amount of time and skill, some people will buy the kit and assemble it
and add the decals as a "representation" of our Skyhawks, Some will modify as I
have the Avionics hump to make it more accurate. As of October/November of this
year all RNZAF Skyhawks will be scrapped anyway so in a few years this model
with become highly sort after by Kiwi Modellers.
This model was Kindly supplied by Trevor Bringans of Flying Kiwis’ for this review.
|
REFERENCES |
My thanks to No 2 Squadron RNZAF for the paint and the history on this particular aircraft.
http://www.airforce.mil.nzIf you would like your product reviewed fairly and quickly by a site that averages thousands of visits a day, please contact me or see other details in the Note to Contributors.
 This model is dedicated
to Squadron Leader Murray Neilson No 2 Squadron, tragically killed while
flying this aircraft in February 2001`
This model is dedicated
to Squadron Leader Murray Neilson No 2 Squadron, tragically killed while
flying this aircraft in February 2001`