Italeri 1/48 EA-18G Super Hornet conversion
|
KIT # |
2619 |
|
PRICE: |
$25.00 |
|
DECALS: |
See review |
|
REVIEWER: |
|
|
NOTES: |
Black Box cockpit, CE Jammer pods. |
|
HISTORY |
|
THE KIT |
If you want to read my initial review of this kit, click here. After building this kit, I’ll tell you that it tempered my enthusiasm for it somewhat. It’s an okay version of the test airplane, F1, but not an operational aircraft. Revell-Monogram has announced a single seat variant to be released sometime this fall. Logic says that a two seat will soon follow—if you want a decent kit, I’d go with that one. It’ll save you the effort in the long run.
|
CONSTRUCTION |
 The kit is split
into a nose section and the fuselage, which includes the wings and
empennage. I started off construction by gluing the Black Box cockpit
into the upper section of the nose. I highly recommend this, as the
kit-supplied cockpit is SPARSE. I then glued the gear doors closed and
began working on the heinous seams around the nose cone. The intakes on
this kit are…well…, not good. I spent almost 5 hours just puttying and
sanding, repeating the process over and over till I had something that
was acceptable. The fuselage went together quite well, but the seam left
behind when it’s mated to the nose is monstrous!
The kit is split
into a nose section and the fuselage, which includes the wings and
empennage. I started off construction by gluing the Black Box cockpit
into the upper section of the nose. I highly recommend this, as the
kit-supplied cockpit is SPARSE. I then glued the gear doors closed and
began working on the heinous seams around the nose cone. The intakes on
this kit are…well…, not good. I spent almost 5 hours just puttying and
sanding, repeating the process over and over till I had something that
was acceptable. The fuselage went together quite well, but the seam left
behind when it’s mated to the nose is monstrous!
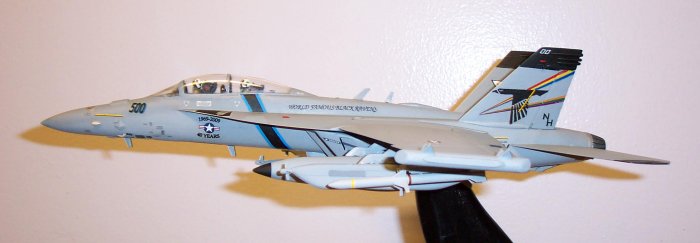
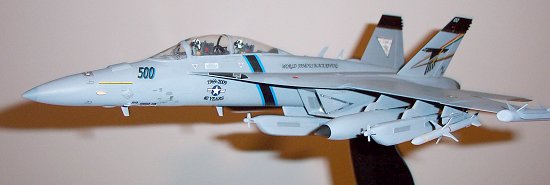
The speed brake as represented by Italeri is incorrect. The Super Hornet doesn’t have one like the regular Hornet—it uses the flight controls to kill lift, so I glued it closed and filled it in. There are spoilers on the upper edge of the LEX; these also needed copious amounts of putty. I then filled the gaps around the flap-like LEX vents just inboard of the leading edge flaps and built these in the up or closed position. They don't move anymore on the real jets.
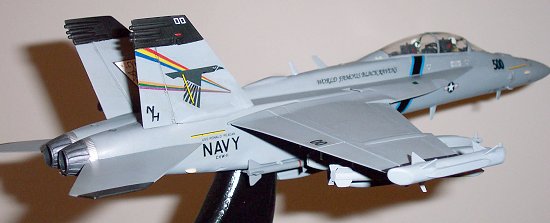
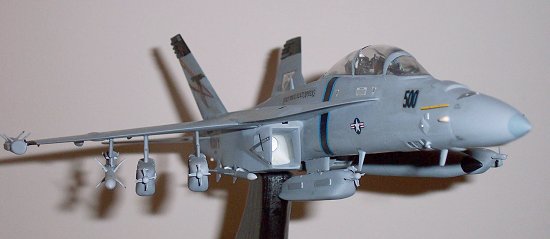
I filled in the holes in the wing for the under wing pylons. The pylons on the Super Hornet are toed outward at 3 degrees, so you’ll have to re-drill the holes for the correct angle. In addition to this, the pylons are also canted outward, so they’ll have to be glued at the appropriate angle. I also added the IFF antenna box on the forward fuselage between the windscreen and gun port.
 Because the EA-18G is still in the testing
stage, the antenna placement is still being worked on. On the spine, I
added a rather large aerodynamic fairing to represent the proposed
location of the MATT/IDM antenna. A USQ-113 antenna from an old EA-6B
Prowler kit was also placed just in front of it. The wingtip receivers
were made from the Harpoon missiles in the kit. They are the right scale
diameter (the real ones are 13”x 121”), so I just cut them to length and
faired the ends. After adding winglets, the whole assembly was glued to
the wingtip. The real thing is just bolted to the wingtip in place of
the AIM-9 Sidewinder and its LAU.
Because the EA-18G is still in the testing
stage, the antenna placement is still being worked on. On the spine, I
added a rather large aerodynamic fairing to represent the proposed
location of the MATT/IDM antenna. A USQ-113 antenna from an old EA-6B
Prowler kit was also placed just in front of it. The wingtip receivers
were made from the Harpoon missiles in the kit. They are the right scale
diameter (the real ones are 13”x 121”), so I just cut them to length and
faired the ends. After adding winglets, the whole assembly was glued to
the wingtip. The real thing is just bolted to the wingtip in place of
the AIM-9 Sidewinder and its LAU.
The ALQ-99 pods are from Cutting Edge’s F/A-18G Growler kit. It only includes three although the EA-18 will be capable of carrying more, so I ended up buying two kits. The kit fuel tank is wrong. To make the correct drop tank, I lengthened it by about 3/8" to represent a 480-gallon tank instead of the 330-gallon tank. The 330-gallon tank is not authorized for the Super Hornet. I used the AGM-88 HARMs from the kit, but only after sanding down the large bands that Italeri included on the body of the missile.
|
CAMOUFLAGE & MARKINGS |
The plane was painted with Model Master Enamels in the standard FS color Scheme. Because no Prowler squadrons have transitioned yet, I took some liberty with the markings. The black on the wingtips and the nose were painted and masked off. Following a coat of Future, the model was ready for decaling.
 This was my first major effort at making my
own decals, and I must say, what a PITA… I used Decal Paper purchased
from Micro Mark. They have different types for both ink jet and laser
printers. I made the decals by surfing the web and finding the CVW-11
patch, and VAQ-135 patch. I then modified them in MS Paint. I used Power
Point to size the markings and side numbers to the appropriate scale. I
seriously suggest doing this all on plain paper vice the expensive decal
paper, as it took many days to get a product that I was happy with. In
the end, I made all the markings except the national insignia, which came
from my spares pile.
This was my first major effort at making my
own decals, and I must say, what a PITA… I used Decal Paper purchased
from Micro Mark. They have different types for both ink jet and laser
printers. I made the decals by surfing the web and finding the CVW-11
patch, and VAQ-135 patch. I then modified them in MS Paint. I used Power
Point to size the markings and side numbers to the appropriate scale. I
seriously suggest doing this all on plain paper vice the expensive decal
paper, as it took many days to get a product that I was happy with. In
the end, I made all the markings except the national insignia, which came
from my spares pile.
Probably the most infuriating aspect of all this is that I had made several sheets of decals and somehow the size got messed up in between printing jobs. I didn’t realize it until I went to apply the Black Raven and noticed the difference in size. So much for my quality control! But I’d used up all my blank decal sheets, so I couldn’t reprint the one odd sized decal… A coat of Future sealed the decals and after letting that dry a coat of Dull Cote was applied.
|
CONCLUSIONS |
 Finally, the stores were added and with all
the construction finished, the plane was attached to its display stand.
This was not an easy build, just due to the quality of the Italeri kit.
With the Monogram kit due to be on the shelves in September, I’d
seriously think twice about building this one again. Making the
conversion to the EA-18 was the easiest part of this model—the hard part
was fixing all the flaws of the kit. But with all this said, I’m still
happy with my one of a kind kit. Hopefully the Navy will make it a
reality in the next few years.
Finally, the stores were added and with all
the construction finished, the plane was attached to its display stand.
This was not an easy build, just due to the quality of the Italeri kit.
With the Monogram kit due to be on the shelves in September, I’d
seriously think twice about building this one again. Making the
conversion to the EA-18 was the easiest part of this model—the hard part
was fixing all the flaws of the kit. But with all this said, I’m still
happy with my one of a kind kit. Hopefully the Navy will make it a
reality in the next few years.
Review courtesy of my wallet and me…
August 2003
|
REFERENCES |
Boeing pamphlets concerning the EA-18G
Copyright ModelingMadness.com. All rights reserved. No reproduction in part or in whole without express permission.
If you would like your product reviewed fairly and fairly quickly, please contact the editor or see other details in the Note to Contributors.