Academy 1/48 MD 500 ASW
|
KIT # |
? |
|
PRICE: |
£2.00 on ebay |
|
DECALS: |
two options |
|
REVIEWER: |
|
|
NOTES: |
A nice quick build, no problems |
|
HISTORY |
When the US Army had a requirement for 4,000 new helicopters to fulfill a variety of support and combat duties, a number of helicopter and airplane manufacturers submitted design bids. Ultimately, Bell and Hiller were selected to build prototypes to compete in the Light Observation Helicopter (LOH) program.
In a controversial move, the newly-formed Hughes Helicopter was also permitted to participate. Though the Hiller design was generally considered to be the best of the three entrants, the industry was surprised when Hughes was announced the winner.
In its favor, the Hughes 369 was a remarkably small and agile design, but the project was so problematic that the Army cancelled production after only some 1,400 had been built. The type did prove valuable in Vietnam but was soon relegated to second-line units after the Army awarded a new LOH contract to the Bell OH-58.
 However like the
phoenix from the ashes Hughes proceeded to develop a civil version, the
MD 500, that has gone on to become one of the most popular civil
helicopters in history. More advanced military versions based on the
civil variants have also been developed, namely the 500MG and 530MG
Defender series. In addition to the US Army, major users of the MD 500
include police departments and border patrol agencies. Including all
variants, over 4,000 MD 500 helicopters have now been built.
However like the
phoenix from the ashes Hughes proceeded to develop a civil version, the
MD 500, that has gone on to become one of the most popular civil
helicopters in history. More advanced military versions based on the
civil variants have also been developed, namely the 500MG and 530MG
Defender series. In addition to the US Army, major users of the MD 500
include police departments and border patrol agencies. Including all
variants, over 4,000 MD 500 helicopters have now been built.
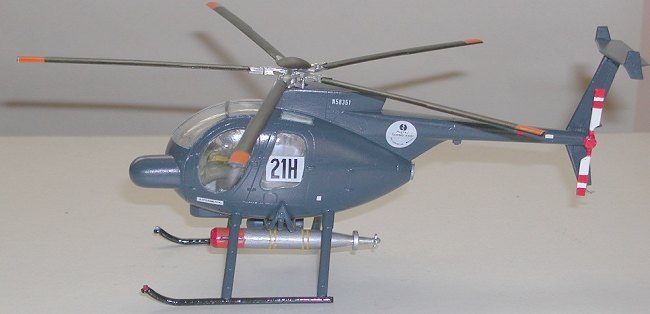
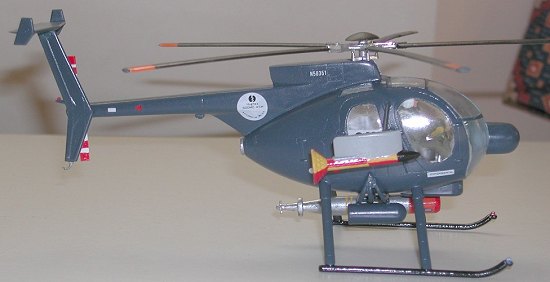
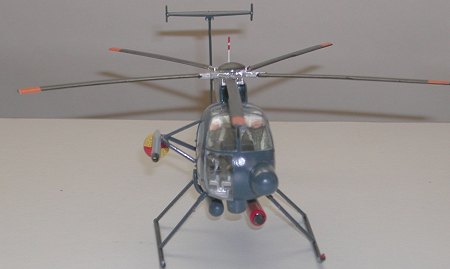
With regard to the ASW version there seems to be little information actually available. In common with all foreign military sales the helicopter is offered with a five-blade main rotor. A single engine is mounted inside the body with air intakes on top of the cabin and a backhole exhaust. The fuselage is teardrop-shaped a features a round, glassed-in cockpit and landing skids (it should be noted that the ASW skids extend further from the helicopter to allow for the underbody stores and a greater sink rate onto moving vessels. The tail fin is boomerang-shaped, swept-back, and tapered. The tail flats are back-tapered with small fins attached to the tips, with the flats high-mounted on the fin forming a T. The tailrotor is mounted on the lower left of the tail boom.
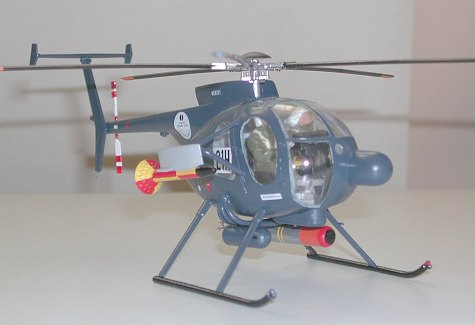
The ASW weapons platform is mounted on the lower body., this mounts a smoke marker pod and either a MK44 or MK 46 torpedo (but it is theoretically capable of carrying two). Mounted on the front of the Helo is a radar set (RDR-1300 surface search radar) replacing the glass in front of the observer. In addition there is a side mounted detachable AN/ASQ-81C(V)2 magnetic anomaly detector (MAD). The small size of this helicopter prevents this type to be fitted with an active sonar and passive sonorbuoys.
Although a fairly capable ASW platform, its drawbacks are the limited payload and low endurance due to the small size of the airframe.
|
THE KIT |
 The kit comes on
two major light blue plastic sprues, and one clear one which contain all
of the parts necessary to build the civilian version of the MD 500. In
addition there is one dark blue sprue which contains the ASW parts. These
are Longer landing gear struts (in the vertical), the smoke signal pod,
the torpedo, weapons rack, MAD sensor and mounting arms, and lastly two
military pilot figures. Given that the majority of the helicopter is
glazing the clear parts are surprisingly good.
The kit comes on
two major light blue plastic sprues, and one clear one which contain all
of the parts necessary to build the civilian version of the MD 500. In
addition there is one dark blue sprue which contains the ASW parts. These
are Longer landing gear struts (in the vertical), the smoke signal pod,
the torpedo, weapons rack, MAD sensor and mounting arms, and lastly two
military pilot figures. Given that the majority of the helicopter is
glazing the clear parts are surprisingly good.
All the parts are free from flash and ejector pin marks except the cone for the MAD sensor.
A small decal sheet is provided with decals for a version from Taiwan, and the prototype ASW from Hughes.
One item which seems to be missing from the kit which I have seen on photographs of the real helicopter is the skid mounted floatation bags. However these should be fairly simple to scratchbuild if you want them.
|
CONSTRUCTION |
I originally started to build this kit as I wanted something simple to do out of the box with out having to worry about references, resin wotsits, photoetch thingies and the latest decal sheet from musthave aftermarket productions; I was basically getting a bit fed up with current “on the go” projects.
 Well it is basic.
The cockpit (not sure if called something else in a Helo?) came first.
This consisted of the floor, rear bulkhead, Instrument panel, plus
somekind of box to fill the rear, as no rear seats are fitted in the ASW
version, and an overhead panel. All of this was painted Light grey.
Instrument panel details are supplied in two decals one for the front
panel and one for the center consol. The two seats were then painted dark
grey and installed.
Well it is basic.
The cockpit (not sure if called something else in a Helo?) came first.
This consisted of the floor, rear bulkhead, Instrument panel, plus
somekind of box to fill the rear, as no rear seats are fitted in the ASW
version, and an overhead panel. All of this was painted Light grey.
Instrument panel details are supplied in two decals one for the front
panel and one for the center consol. The two seats were then painted dark
grey and installed.
If you are not going to use the pilot and observer figures then there is not enough detail for these seats on there own and seatbelts etc would need to be added. Actually the whole interior is very Spartan, I decided to add the two figures as they just about fill the front. I have never seen one of these small helicopters but I would imagine that big pilots would have difficulties.
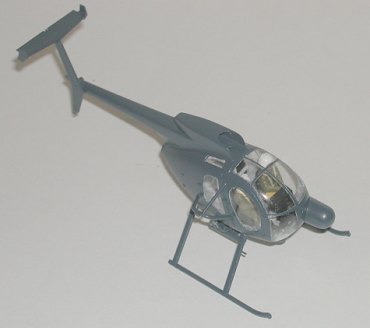
The insides of the main body parts were also painted light grey at this time. Once this was dry it was time to install all the glazing in the main body sides, this is six pieces 3 in each side; A front door, rear door and small roof panel. Here I tried to be clever and use my normal plastic glue but very sparingly. After botching the first roof panel (glue flowing all over the place) it was back to the 2 part epoxy. I like this as actually dries clear. All the glazing was then glued in position and left to dry.
When everything was dry the interior was fitted into the main body, and it closed up. I must say I was very pleased with the fit, no sanding down or adding in pieces of plastic card were required. I am now starting to like the simple way it goes together. The exterior seams were treated to a sand down but no filler was required.
Next stage was to fit the main external parts. The landing skids were
fitted and adjusted to an angle I thought would represent a loaded
helicopter. Next the frame for the MAD was fitted to side of the copter.
At this time I assembled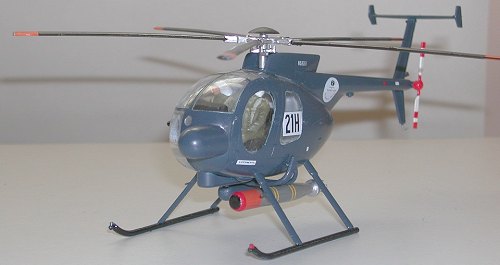 the rack for the weapons under the body and test fitted it. It did not go
any where near to fitting. The attachment pins were then removed and
drilled out to accommodate a small section of plastic rod, this was test
fitted and deemed to be right, and put to one side for painting.
the rack for the weapons under the body and test fitted it. It did not go
any where near to fitting. The attachment pins were then removed and
drilled out to accommodate a small section of plastic rod, this was test
fitted and deemed to be right, and put to one side for painting.
Next the smoke marker pod, torpedo and MAD were assembled. These are all two part and split up the middle so need cleaning up. The MAD has some large ejector marks on the inside of the cone which I decided were going to take too long to fix so I just added some plastic card to the back and sealed it up. I know this is not exactly right but as I mentioned at the start I was not intending to do anything very time consuming or difficult. The rotor was assembled and is a basic affair, I just used the mark one eyeball to ensure the angles between the blades looked ok. At this stage the dreaded Carpet monster intervened and swallowed the tail rotor. After a fruitless ½ hour spent on the floor I gave up. Luckily I had an old 1/32 MD500, which was being used for parts. I was able to cut/sand down the tail rotor to make a passable 1/48 version (just don’t look too close).
The figures were painted and added to the inside. Next was the bit I feared the most, attaching the front glazing, when offered up as a test fit I was pleasantly surprised to find a very good fit, there were a couple of small gaps but I hoped glue and paint would be sufficient to sort these out. This was glued into place and left to dry. The radar was then fitted to front of the glazing.
|
CAMOUFLAGE & MARKINGS |
While browsing through a hobby shop on holiday (like you do) I came across a range of canopy masks and had a look at them. I had always dismissed these as a waste of money as scotch tape is a lot cheaper and lasts longer. However I saw one for the MD-500 and decided to give it a go. The parts were easy to lift off the backing and worked well. The ones for the main glazing conformed to all the curves very well indeed. Every thing was now ready for the paint.
 First off all an
undercoat of matt light blue was applied, it was then time for the main
top coat.
First off all an
undercoat of matt light blue was applied, it was then time for the main
top coat.
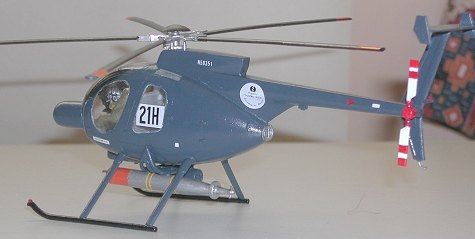
Some while ago a friend of mine who makes Tamiya RC cars gave me some Tamyia paint in spray cans. He found these in a job lot of polycarbonate paint he had purchased on Ebay. As it looked a few years old, and never having used it before I decided that this kit would be an Idea candidate for a test run. For this Tamyia AS-8 or “USN Blue” was selected as all the kit instructions suggested was a dark blue for the Helicopter.
After shaking the can for as long a time as I could bear I decided the paint would be as mixed as it could be, and decided it was now or never. I started to mist a light coat on to see how thick the paint was and was pleasantly surprised at how thin and easy it went on. The model had 2 light coats and then after an evening to dry another light coat the following day.
A word of warning to anyone using these cans there is considerable overspray and the fumes are something else. If a mask is not used then I think you would be high enough to qualify for NASA membership!
 While waiting for
this to cure the external parts were painted. The Mk-46 and MAD were
painted as per the instructions and actually took longer than the main
model, the MK-46 had 3 colours and the mad 4. These were just hand
painted due to the size.
While waiting for
this to cure the external parts were painted. The Mk-46 and MAD were
painted as per the instructions and actually took longer than the main
model, the MK-46 had 3 colours and the mad 4. These were just hand
painted due to the size.
Once cured which did not take much time at all the whole helicopter was given a coat of future in preparation for the decals. I had decided to do the prototype as this had an extra decal for the rear door area. In addition in all the pictures of the Taiwanese helos they all had Chinese characters along the tailboom which are not present on the decal sheet.
The decals went down with no problems and when dry were given another coat of future.
I now considered the kit finished as I was not going to do any weathering and all, as the partly completed projects on the model desk were calling me back.
|
CONCLUSIONS |
This is a great inexpensive kit which builds into a good looking small helicopter. The fit and parts quality is excellent.
It gave me the opportunity to experiment with canopy masks and the tamyia paint in an inexpensive way.
Any one with even basic level skills would do a good job of this.
Editor's Note: I have lightened the images so that detail could more easily be seen. The dark blue is really quite dark!
Copyright ModelingMadness.com. All rights reserved. No reproduction in part or in whole without express permission from the editor.
If you would like your product reviewed fairly and fairly quickly, please contact the editor or see other details in the Note to Contributors.