Puky 1/72 IA-58A Pucara
| KIT #: | ? |
| PRICE: | $? |
| DECALS: | One option and it is fictional |
| REVIEWER: | Pablo Calcaterra |
| NOTES: |
Aerocalcas 72036 |
| HISTORY |
A very brief history of the FMA IA-58
Pucará
During the decade of 1960, the Argentine Air Force realized that needed
a ground support and reconnaissance plane.
In 1968 the first glider, made entirely of wood, flew for the first
time. On
The first series aircraft was delivered to the Air Force on
In 1978, with more planes now in service in BAM Reconquista (
The next important event in the life of the Pucarás was the 1982 war for
the Malvinas/Falklands islands.
The very same day that the Argentine forces took the islands, a section
of 4 Pucará arrived in Puerto Argentino/
On April 8th four more
planes were readied to go to the islands, having arrived first to Comodoro
Rivadavia. Among them, one of the planes that had taken part in the 1975
operations: A-502.
Two days later, the planes were given their camo colours for the theater
of operations.
 On
April 15th the BAM Condor was
created in
On
April 15th the BAM Condor was
created in
On April 26th the
above-mentioned Squadron crossed to the islands (Puerto Argentino/Stanley), and
on the 29th they were deployed to
BAM Condor.
During the attack on May 1st
that destroyed A-527 and killed the pilot (Lt. Jukic) and 7 mechanics, A-502 was
slightly damaged. Some shrapnel had hit the plane and the canopy but was fixed
using the available resources: parts of another canopy, screws, bolts and pieces
of metal.
On May 8th, the first
recorded mission of A-502 took place. It was flown by 1st
Lt. Fasani as leader of the section ZORRO (A-509 was flown by the wingman, Lt
Sassone). They flew in the area to the South of Puerto Argentino/Stanley,
looking for enemy activity (probable SAS infiltration).
On May 9th, Capt Vila flew
A-502 (Lt Gimenez in A-509) in the area of Port Howard. There was very bad
weather, low visibility and the ceiling was 150 meters. Nevertheless, they flew
for 2 hours and then they landed in the auxiliary airfield of the Argentine Navy
in Borbon/Pebble, called Calderon. The nose wheel of A-502 sunk in the soft
ground.
During the following days, the Air Force tried to retrieve the planes
back to BAM Condor, but the bad conditions of the landing strips prevented them
from taking off.
On May 15th, a dare attack
of the British SAS team to Calderon destroyed on the ground 5 Pucarás, 4 Mentors
(Argentine Navy) and a Skyvan (Prefectura / Coast Guard). Among those, of
course, was A-502. Thus ended the life of the only Pucará that took part in two
conflicts.
Reinforcements were received during the following days and the Pucarás
had a distinguished performance during the war, attacking the ground troops from
May 21st until June 10th.
Rockets and bombs along with
 the
internal armament (4 x 7.62 machine guns and 2 x 20 mm cannons) were the usual
armament, thought in a couple of times attacks with Napalm were tried. Only 3
Pucarás were shot down in combat: A-511 (Mj. Tomba) shot down by the Sea Harrier
of “Sharky” Ward, A-531 (Capt. Benitez) by a Stinger missile, A-555 (Lt. Cruzado)
by multiple small arms fire hits. One Scout helicopter was shot down by Lt
Gimenez (A-537) but the pilot crashed in small clouds against Blue Hill on the
return leg. During the same mission, Lt. Cimbaro in A-532 managed to hit another
Scout that had landed trying to avoid the attacks of his Pucará. Due to its low
speed and high maneuverability, the Pucarás were able to follow every single
evasive action the helicopters were trying.
the
internal armament (4 x 7.62 machine guns and 2 x 20 mm cannons) were the usual
armament, thought in a couple of times attacks with Napalm were tried. Only 3
Pucarás were shot down in combat: A-511 (Mj. Tomba) shot down by the Sea Harrier
of “Sharky” Ward, A-531 (Capt. Benitez) by a Stinger missile, A-555 (Lt. Cruzado)
by multiple small arms fire hits. One Scout helicopter was shot down by Lt
Gimenez (A-537) but the pilot crashed in small clouds against Blue Hill on the
return leg. During the same mission, Lt. Cimbaro in A-532 managed to hit another
Scout that had landed trying to avoid the attacks of his Pucará. Due to its low
speed and high maneuverability, the Pucarás were able to follow every single
evasive action the helicopters were trying.
In total, the Pucará Squadrons flew 103 sorties, suffered 3 planes shot
down, 4 captured in flying condition on June 14th
and the rest (18) were destroyed on the ground by air attacks, the SAS raid
mentioned above or shelling by the ships of the Royal Navy.
In foreign service, the Pucará served in the Colombian and Sri Lanka Air
Forces and is still in service in the Fuerza Aerea de
In total, besides 3 prototypes, 105 units were produced. It can probably
be said that it has been the most successful design of the Fabrica Militar de
Aviones.
Performance:
Max speed: 520 km/h
Ceiling 10,000 mt
Range 3040 kg.
Engines: 2 Turbomeca Astozou XVIG of 1022 shp.
Armament: A ventral station for up to 1,000kg and 2 stations on the wings for 500 kg of bombs, rockets, Napalm (for a grand total of 2,000 kg)
| THE KIT |
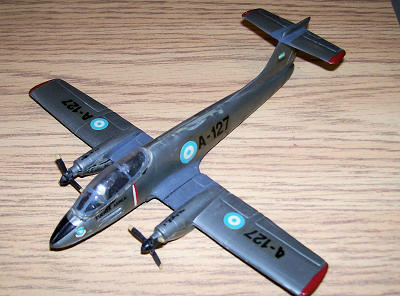
An extremely basic kit with twelve plastic parts, with a very thick clear canopy. No landing gear, air intakes, wrong profile of moveable surfaces and wrong location of internal armament. Wrong serial number (inexistent A-127) and fictitious decals.
| CONSTRUCTION |
 The
Pucará made by the Argentinian company Puky (a dolls manufacturer) was released
in 1975. A friend of mine gave me one as a present and it became the first model
kit I ever built.
The
Pucará made by the Argentinian company Puky (a dolls manufacturer) was released
in 1975. A friend of mine gave me one as a present and it became the first model
kit I ever built.
Thru the years and even in their box
they claimed that the plane is in 1/63 scale, but actually using some scale
plans I received last year I was able to see that in fact it’s i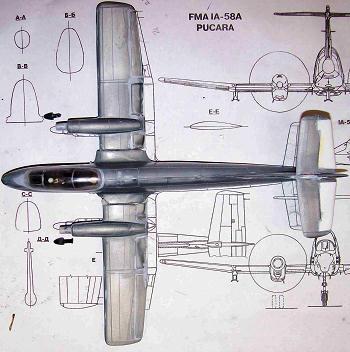 n
1/72, but with some errors in terms of dimensions or position of parts.
n
1/72, but with some errors in terms of dimensions or position of parts.
During the 1982
war, I bought a second kit as it had been reissued. This one I proceeded to
build in what I believed was a more accurate form, painting the camo using a
brush. Still, I had no idea about fillers and sanding parts, so the final result
looked bad for my current standards.
I had cut the
moving parts of the 1982 kit many years ago, thinking about positioning them in
a way to give the plane more life. But I never did anything.
Some months ago I decided to finally tackle it and improve it (the first one from 1975 I still have and won’t modify it ever)
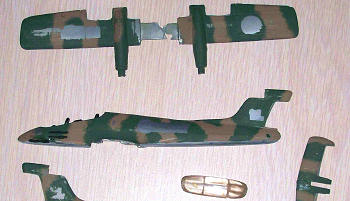 I glued
both halves of the fuselage again and used lots of filler and sandpaper to get a
decent joint of them.
I glued
both halves of the fuselage again and used lots of filler and sandpaper to get a
decent joint of them.
Then all the moveable parts I had left and that still fit properly were put back in place, but in most of the cases I had to back them up using plasticard, as when they were originally removed lots of plastic was lost.
I painted the interior of the cockpit in black, improved the shape of both instrument panels, painted the pilot more accurately and added some ejection handles made of masking tape.
After scribing all the fuselage panels, something that the original kit does not have at all, I moved the 20 mm guns to the bottom of the fuselage (Puky had them on the sides of the nose). Then I glued the canopy (previously having painted the frames first in silver and then in black) and found a large gap behind it. This forced me to supplement it with plasticard. More putty and sandpaper were used to achieve a smooth union.
The 3 little
bulges for the housings for the guns on the fuselage above the wings were made
using drops of glue.
I then moved to
the wings, were the several critical defects were found:
1)
The shape of the ailerons is wrong
2)
The air intake for the engine is missing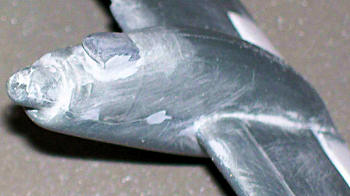
3)
Some panels are present, but not in the right place and they are raised
4)
The width of the wings is too short (this I decided not to tackle)
5)
Union of top and bottom halves, especially in the engines area, was
terrible.
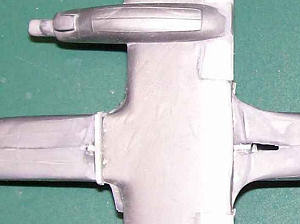
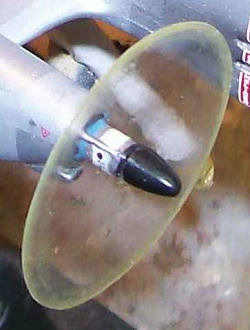
Some of the work I did is seen here, where the new intake can be seen and the moveable surfaces now have the correct angle. Some of the panels I engraved can also be seen.
When I was about to attach the wings to
the fuselage, and after checking the scale plans, I realized that I had to glue
the wings 2
 mm
closer to the tail. This left a great gap in the front at the bottom of the
wings/fuselage union. It also left some plastic to be cut out in the border of
attack of the fuselage/wings area.
mm
closer to the tail. This left a great gap in the front at the bottom of the
wings/fuselage union. It also left some plastic to be cut out in the border of
attack of the fuselage/wings area.
 Satisfied
with the work I did with plasticard, putty and sandpaper, I added the box below
the fuselage/wings. It was scratchbuilt using plasticard. The stations under the
wings were built modifying some resin-made parts I had copied for a Skyhawk many
years ago.
Satisfied
with the work I did with plasticard, putty and sandpaper, I added the box below
the fuselage/wings. It was scratchbuilt using plasticard. The stations under the
wings were built modifying some resin-made parts I had copied for a Skyhawk many
years ago.
The support for
the propellers was scratchbuilt, and the base for the pitot on the right side of
the nose was also made using pieces of plastic.
I glued a piece of
clear acrylic that was the support for the model, once it was finished. It was
also wrapped in paper and used as a handle during the painting sessions.
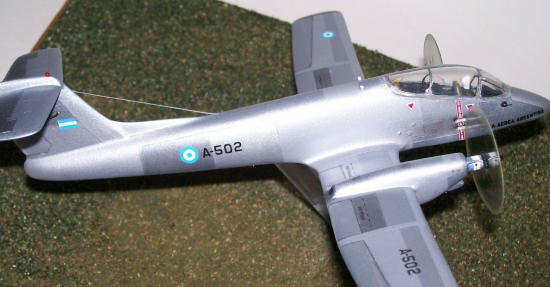
The final look of the belly, with all panels engraved (landing gear, moveable surfaces, armament and others) looks like this.
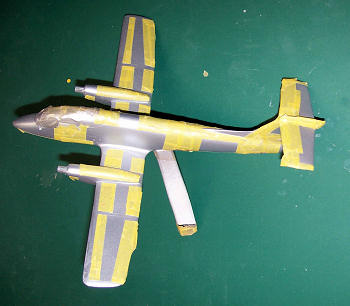
Just before starting the painting process, I realized that the machine guns are too further ahead so I moved them back using a knife and putty.
| COLORS & MARKINGS |
The plane was first given a coat of
Acryl Aluminum, and two shades were obtained by mixing this color with black and
white. Panels were masked and the different shades applied. The end of the
fuselage, doors of nose landing gear and nose of the plane were painted in
chrome silver with some drops of black.
I used the
original propeller spinners but sanded them to the correct shape. As the plane
is flying, I discarded the propellers. I painted then the air intakes around the
engine shaft in black, and the supports in light blue. The area between the
spinner and the engine was painted in gloss white, with some details in silver.
 The
moving propellers were cut out in clear plastic. I diluted yellow paint in
Future and sprayed the tip of the propeller disc (having masked the center using
cellophane glued with a low tack spray).
The
moving propellers were cut out in clear plastic. I diluted yellow paint in
Future and sprayed the tip of the propeller disc (having masked the center using
cellophane glued with a low tack spray).
I draw very
lightly with a graphite pencil the different air intakes and grids on the
engines housings.
I dry brushed
black pastel to the area around the guns.
I gave the model a coat of Future and
applied the decals I bought (1/72nd
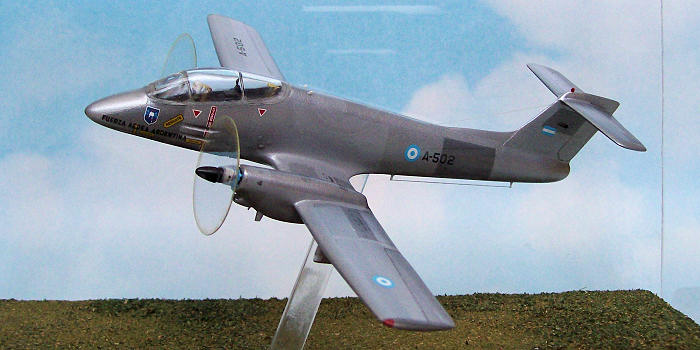
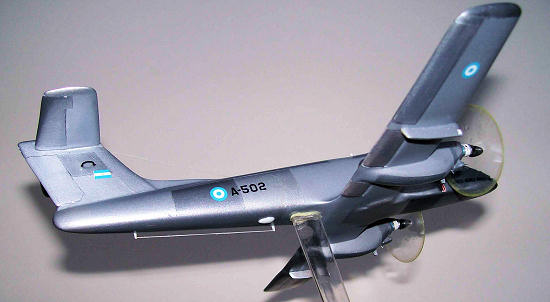
from Aerocalcas). I decided to build A-502, as I mentioned before, it’s the only
Pucará that took part in two conflicts.
As the Aerocalcas
kit does not have the “0”s (ceros), I cut out the internal horizontal bar of the
“8”s and added some black strips of decal to cover the sides of the “8”s, making
them straight.
All the rest of the decals went fine. Another detail I had not fixed is that the machine guns go higher on the sides of the fuselage, so the distance between them is not correct. That meant that when I applied the red stripes that caution about the propellers, I had to change the distribution of the “CUIDADO CON LAS HELICES” words.
After applying a
hand of satin varnish (Acryl), I added little details like some pipes under the
engine, various antennas and position light on the tail (a little ball of
plastic) and wingtips. The Pitot tube was glued to the base on the right side of
the nose. A couple of structures behind the cockpit were scratch built and
added.
 The base
was made using wood, drywall compound (to give it a little bit of waves and
different levels), white glue and “dioramas grass” (3 different types mixed in
some areas).
The base
was made using wood, drywall compound (to give it a little bit of waves and
different levels), white glue and “dioramas grass” (3 different types mixed in
some areas).
I used a two-part epoxy to glue the
plane to the base and I finalized the project with an acrylic box that I made
myself, to protect the model from dust and “unwanted” fingers at work, as now
this model sits in my office at work.
| CONCLUSIONS |
It took me 4
months to rebuild this very basic kit. Lots of work to get it better, but still
some problems that are very difficult to overcome. I am happy as the overall
shape looks like a Pucará. It’s a very inexpensive way of having a reference in
my office about the brave pilots that flew this COIN plane in 1982 against the
British Task Force.
| REFERENCES |
Historia Oficial de la Fuerza Aerea
Argentina. Volumen 6, Tomo 1
July 2009
Copyright ModelingMadness.com. All rights reserved. No reproduction in part or in whole without express permission. If you would like your product reviewed fairly and quickly, please
contact
the editor or see other details in the
Note to
Contributors.
Back to the Review
Index Page 2023