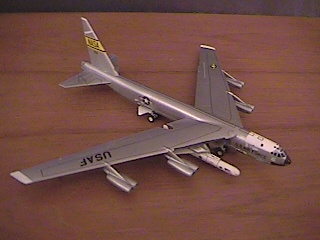
Dragon 1/200 NB-52B w/X-15A-2 & Pegasus
|
KIT # |
2009-01 |
|
PRICE: |
$15 |
|
DECALS: |
Kit issued |
|
REVIEW : |
|
|
NOTES: |
Modern Air Power Series |
|
HISTORY |
Derived from the venerable B-52 Stratofortress, the NB-52B has been used for over 30 years by the US Air Force and by NASA to test new and sometimes radical flight systems. The NB-52B operates out Edwards AFB (Air Force Base) in California. This is where NASA
’s Dryden Test Flight Center is located. The NB-52 has been involved in over 450 projects, ranging from the X-15 high-speed research plane; which was developed to explore the hypersonic region of flight; all the way to the very recent Pegasus rocket; which is now being used to boost small payloads into low earth orbit. This versatile aircraft still remains in service today and has been tasked with testing the X-38 (the lifeboat for the new space station) and the Hyper-X (a mach 12 air breathing scramjet plane).|
THE KIT |
 This is the only kit of the NB-52B that I
know of in this scale. I don’t think
there are any other manufacturers that make this kit in any other scale other
than Dragon. The kit is not exactly new but tooling is still pretty much up to
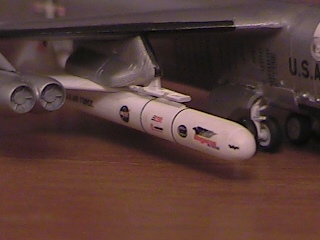
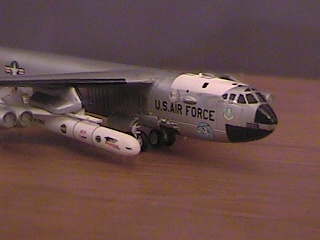
date. This kit comes with the NB-52B, an X-15A-2, and the Pegasus rocket (It’s three kits for the price of one!).
This is the only kit of the NB-52B that I
know of in this scale. I don’t think
there are any other manufacturers that make this kit in any other scale other
than Dragon. The kit is not exactly new but tooling is still pretty much up to
date. This kit comes with the NB-52B, an X-15A-2, and the Pegasus rocket (It’s three kits for the price of one!).
For a kit of this scale, there are quite a few parts, about 100 in all. The kit contains 5 trees in all, 1 clear and the rest opaque. It is molded in light gray, medium hard plastic. Detail comes in the form of very finely engraved panel lines and nice raised detail on the elevators and in the landing gear bays. The kit has been made using common molds from Dragon’s other B-52 kits. This becomes a slight problem because it produces a few holes that must be filled and sanded smooth. The texture of the plastic is also cause for head scratching. On some parts the surface texture of the plastic is nice and smooth, while other parts have a grainy texture. This only becomes a problem if you’re using very thin paint (like ModelMaster’s Metalizer), these defects tend to show through. This aspect seems to be typical of some Dragon kits.
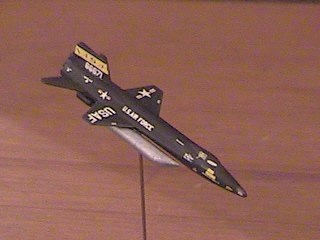
Decals included allow you to make two versions of the same aircraft. One is from the late 60
’s, during the X-15 program, the other is from the early 90’s during the Pegasus test flights. Decal register is spot on and colors are perfect but the decals are slightly thick.|
CONSTRUCTION |
 There’s
no real cockpit detail except for an L piece with two attempts at making 1/200
scale figures sticking out of it. Therefore since there was no detail in that
part I started with gluing the fuselage halves together. The halves went
together great and all that was needed was some sanding to get rid of the seam.
While I did the fuselage I glued the upper and lower wing halves together and
set them aside to dry.
There’s
no real cockpit detail except for an L piece with two attempts at making 1/200
scale figures sticking out of it. Therefore since there was no detail in that
part I started with gluing the fuselage halves together. The halves went
together great and all that was needed was some sanding to get rid of the seam.
While I did the fuselage I glued the upper and lower wing halves together and
set them aside to dry.
Now with the major sub-assemblies complete, I started to do the detailing work. Starting with the fuselage; the cockpit section comes separately as a clear piece. I decided that since there is no detail in the cockpit and the relatively small scale of the kit I would just paint the windows gloss black to simulate the cockpit glass. Now this is the part where you have to break out the Squadron putty and sandpaper and prepare to use them. The clear cockpit part does not fit square with the opening for it in the fuselage so it must be sanded down to make it smaller. It worked but putty still had to be used to fill some gaps all around the clear piece. Then the tail cone and clear window piece was attached. The only thing left to do is to add the Bombay / gear bay piece to the bottom of the fuselage, and again you will need to fill gaps.
The wings turned out to be warped but that was easily fixed by hand bending.
The only modification that has to be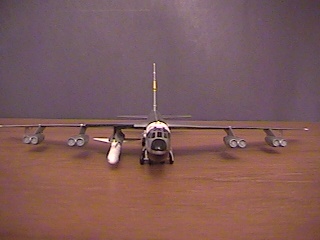 done
is to cut out a large piece out of the trailing edge of the right wing. You don’t have to worry because the plastic has been
thinned. On the bottom of the left wing the inner most pylon attachment point
must be filled in and sanded smooth to the wing. Once all the touchups to the
wings are finished they were attached to the fuselage. This where you will need
the most putty. The wing to fuselage joint is quite bad, no matter how you
position the wing there will either be a ½ mm gap or the wing will rise ½ mm
above the fuselage top. Once all was sanded smooth I started to scribe panel
lines that had been removed due to the putty and sanding with a sharp X-acto
blade and a metal guide. By the way a great metal scribing guide can come from
the sliding part of a 3.5 in floppy diskette. With all the major parts assembled
I added the vehicle launching hardpoint along with the engines and tail control
surfaces.
done
is to cut out a large piece out of the trailing edge of the right wing. You don’t have to worry because the plastic has been
thinned. On the bottom of the left wing the inner most pylon attachment point
must be filled in and sanded smooth to the wing. Once all the touchups to the
wings are finished they were attached to the fuselage. This where you will need
the most putty. The wing to fuselage joint is quite bad, no matter how you
position the wing there will either be a ½ mm gap or the wing will rise ½ mm
above the fuselage top. Once all was sanded smooth I started to scribe panel
lines that had been removed due to the putty and sanding with a sharp X-acto
blade and a metal guide. By the way a great metal scribing guide can come from
the sliding part of a 3.5 in floppy diskette. With all the major parts assembled
I added the vehicle launching hardpoint along with the engines and tail control
surfaces.
 When the NB-52B was done I started work on the Pegasus rocket and X-15A-2. I
decided before hand that I would be making the more modern version with the
Pegasus and I would also be making a standalone X-15A-2 on a stand. The Pegasus
and X-15 are very simple to build and only require about 10 to 15 minutes.
When the NB-52B was done I started work on the Pegasus rocket and X-15A-2. I
decided before hand that I would be making the more modern version with the
Pegasus and I would also be making a standalone X-15A-2 on a stand. The Pegasus
and X-15 are very simple to build and only require about 10 to 15 minutes.
|
PAINT & DECALS |
Painting was relatively simple. I used MM Metalizers non-buffing Aluminum overall. Wing tips, vertical tail tip, gear bays, and forward top of the fuselage were painted flat white. I studied pictures of the B-52 and painted in the cockpit windows flat black. Once painting was finished I added the landing gear and the gear bay doors. The Pegasus was painted MM Flat White and the X-15 MM Acryl Flat Black. When all was dry I started applying the decals. They are a bit thick and they tend to wrinkle with application of Solvaset but once they dried, a thick coat of clear gloss dulled down these defects.
|
CONCLUSIONS |
I’m mostly used to building small-scale aircraft and I’ve always wanted to build one of the larger aircraft but I found them too big (I have very limited space). Dragon’s 1/200 Modern Air Power Series has all the big planes in a nice and well detailed scale. Apart from the puttying and decals I truly loved this kit. Now I just can’t wait until the C-5 and the B-58 are made (hopefully).
Copyright ModelingMadness.com
Back to Reviews Page 2020