Hasegawa 1/48 F-18C Hornet
|
KIT # |
9327 |
|
PRICE: |
$55.00 MSRP |
|
DECALS: |
163439 of VFA-115 |
|
REVIEW: |
|
|
NOTES: |
'VFA-115 CAG' |
|
HISTORY |
McDonnell Douglas’ (now Boeing) F-18 Hornet traces its lineage back to Northrop’s early 70’s light weight fighter contender, the YF-17. Pitted against General Dynamic’s YF-16 in the USAF’s Light Weight Fighter program, the YF-17 was announced as the loser of the competition in January of 1975. The US Navy, also realizing that it needed a new fighter/attack aircraft, talked to Northrop about "navalizing" the F-17. Northrop had no experience with naval aircraft, and partnered with McDonnell Douglas….. a decision they would later regret. Originally, there was to be two versions of the Hornet. The F-18 was to replace the F-4 as a fighter, while the A-18 was to replace the A-7, and later, the A-6. It was decided that one aircraft could handle both mission, and the F/A-18 was born.
The first unit to fly the Hornet was the west coast RAG squadron VFA-125 in early 1981. Marine unit VMFA-314 became the first combat unit to fly the type shortly thereafter. The Hornet is now the Navy and Marines standard fighter/attack aircraft. In the export market, Canada, Spain, Kuwait, Finland, and Switzerland, among others, fly the F-18.
The F-18 has seen combat over Libya, during retaliatory strikes, and also over the skies of Iraq. During the Gulf War in 1991, two F-18Cs from VFA-81 Sunliners scored what would be the Navy’s only air to air kills over fixed wing aircraft during the conflict. On the night of January 17th 1991, two Iraqi MiG-21’s/F-7’s fell victim to an AIM-9, and AIM-7 fired from the Hornets. VFA-81 was also to suffer the Coalitions only air to air loss at the hands of an Iraqi pilot flying a MiG-25 on the same night.
The latest version of the Hornet to enter service is the E/F models. These address the Hornets main shortcoming, lack of range, with a larger fuselage, and wing. The first F-18E/F unit is due to replace an F-14 unit very shortly.
The Hornet will no doubt continue to be the Navy & Marines "big stick" for some time to come. It is these services main AGM-88 HARM shooter.
|
THE KIT |
Without a doubt this is easily the best 48th scale kit of the Hornet. Anyone who has ever seen one will agree. The biggest killer with this kit is it extremely high price tag. I have seen it priced as "low" as $45, and as high as $110!
The kit also features Hasagawa’s famous lack of weapons, and crappy decals. This particular kit was the exception with the decals, though, as the Cartograph decals in this kit are some of the best I’ve ever used.
Hasagawa did a fantastic job of capturing the somewhat complicated line’s of the F-18 very well. The kit is molded in gray plastic, with a clear canopy, and windscreen. Also included is a fret of photo etch details, and cast metal landing gear.
The flaps, and slats can be glued in the raised or lowered position. They are normally lowered when the a/c is on the ground. So far, this is the only kit in any scale to correctly replicate this feature.
Detail is everywhere, and while I don’t claim to know every inch of the Hornet, it all looks to be there to me. The panel lines, and rivets, are all very finely recessed. The rudders can be positioned as the builder chooses, and the catapult bar on the nose gear can be positioned raised or lowered.
It is a well engineered kit, with very few fit problems.
|
CONSTRUCTION |
Hasagawa really did their homework with this baby! Overall fit is excellent, and it goes together well out of the box. About the only spot I trouble with fit is the right and left side sections that have the Sparrow launchers on them. These fit right behind the main gear, and required a little tweaking. The seam here is not the easiest to fix, as it runs right down the middle of the formation light strip. I ended up sanding this flat, filling the seam, and then replacing the strip with a piece of .005 plastic cut to size.
I used liquid white out to fill all the seams on this kit. It works well, and dries fast, but caution must be used if you have to mask a paint scheme, as it has a tendency to come up with the tape.
The flap assemblies go on fairly well, but are quite delicate, and must be handled with care. I managed to break one side off twice before finally getting it to stay. An alternative might be to leave them off until after painting, then glue them on with super glue.
The photo etch fret came in handy, and all parts fit well with one exception. The parts for the HUD were an absolute nightmare! They didn’t want to fit, and kept breaking off. I had so many problems with these that I ended up gluing just one of the clear HUD panes in, instead of the proper two as supplied with the kit.
Hasagawa based the entire Hornet family on one kit, so there are a number of parts that were not used on this a/c. There are two antenna fairings just below each intake. They were only on the F-18A/B, not the C/D, and were sanded off.
Other than the ejection seat, which was replaced with a True Details resin seat, and the Walleye glide bombs, this kit is out of the box. Follow the instructions, and you’ll have few, if any, problems.
|
PAINT & DECALS |
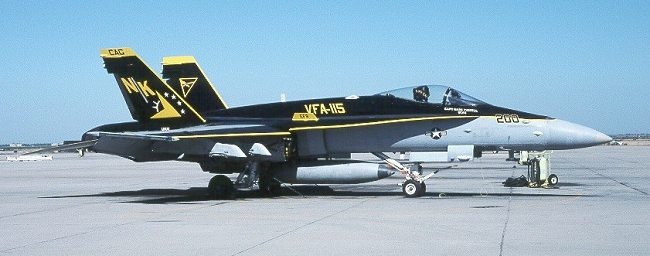
This particular aircraft is the CAG bird of NAS Lemoore based VFA-115 Eagles. I bought this kit specifically for the decals, as there is a story for me with this a/c.
Last year I paid a visit to Lemoore to do some photography. I had arranged to visit the ramps of VFA-25, VFA-94, VFA-97, and VFA-113. When I walked out onto VFA-25s ramp, I saw this a/c as soon as I cleared the hanger doors. My jaw dropped! It is by far the best looking Navy a/c I have seen since the good old days of gull gray over white. The Hornet jock that was escorting me saw my reaction, and quickly pointed out that I was only allowed to photograph a/c from VFA-25, which I proceeded to do. Once finished, I asked him if I could walk down the hall to VFA-115s ready room, and inquire about shooting pic’s of their CAG bird.
He agreed, and I headed for 115s front office. I talked to the Captain at the desk, and five minutes later an escort arrived for me. The young man took me out through the same hanger as before, and to my shock, we found maintenance personal opening up panels everywhere. For a/c photographers, this is not good (ask Scott ;0) ). I asked my escort if there was any chance of getting the panels buttoned up, and having the guys step to the side for a minute. He hollered at them, and they did just that. I proceeded to blast two rolls of Kodachrome through my camera, and thanked them. The attached pic is the result.
The moral of this story is… well… I don’t know, but I knew I had to model this a/c at some point. Enter Hasagawa with a limited run special edition release of their F-18C kit with the115 CAGs decals, and I couldn’t resist.
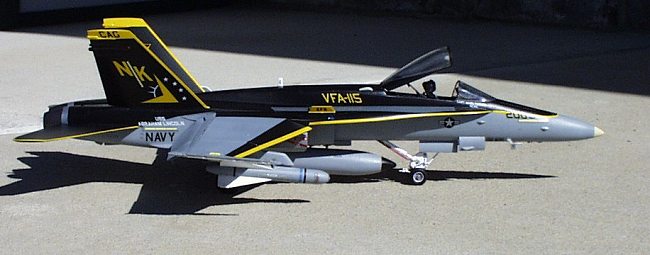
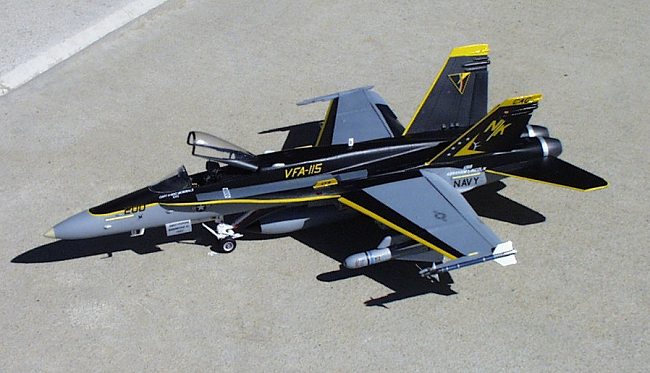
The a/c is finished in the standard Light Ghost Gray bottom (FS 36375), and Dark Ghost Gray top (FS 36320). The only difference is that this a/c has the whole upper fuselage, and wing slats painted black (FS 37038). I followed the kits instructions here, and encountered no problems. The tip of the nose was painted Radome Tan (FS 33613), while Metalizer Aluminum, and Titanium were used on the exhaust cones. All paints used were from Testors Model Masters line.
The wheel wells, gear, and doors, and various antenna’s were all painted flat white. The ALR-67 receiving antenna, and AN/ALQ-165 antenna’s on the nose, and behind the canopy, were all painted light gray.
A coat of Testors semi-gloss laquer followed, and once dry, decaling began. The decals in this kit are done by an outfit called Cartograph. I had never heard of them, or used their decals, but they looked good…. much better than Hasagawa’s usual two foot thick decals.
They went down beautifully with a little Solva-set, and were tough enough to survive a lot of repositioning without melting. All of the yellow area’s are decals, with the exception of the wing LEX fences, which were painted Chrome Yellow (FS13538).
|
FINAL ASSEMBLY |
Once all the decals were dry, I went over them with a damp cloth to remove any Solva-set residue. I then sprayed a light coat of Testors semi-gloss over all the decals. The landing gear, doors, and wheels were all painted up, weathered with black watercolor paint, and glued into place with super glue. The landing gear doors were edged in red.
The Walleye’s came from Hasagawa Weapons set B. They were assembled per the kit instructions, but the arming vane at the rear was removed, as these were to represent training rounds. I used a picture from a magazine article that showed a camo NSAWC Hornet banking with two Walleye training rounds as my reference.
The AIM-9 came from my spares box, and was painted up to replicate a training round last year for another project.
Once assembled, painted, and decaled, they were attached to the outer wing pylons, and a fuel tank from the kit was attached to the centerline station.
The remaining antenna’s, lights, probes, arresting hook, and canopy assembly were all attached. The only problem spot was the windscreen. Its just a hair shy of touching the instrument panel combing due to the poor fit of the HUD supports. The arresting hook was decaled with 1/16th inch black stripes before being glued on.
|
CONCLUSIONS |
This is an outstanding kit, no two ways about it! Although it has come down in price recently, it is still very overpriced. Considering all the excellent decals available for the F-18, if you (like me) plan to do a number of them, its going to be an expensive pursuit!
|
REFERENCES |
Detail & Scale Volume 45 by Bert Kinzey
Air Forces Monthly magazine #132 ,March 1999 ,"Fallon Flyers" article beginning on page 54
Copyright ModelingMadness.com. All rights reserved. No reproduction in part or in whole without express permission.
If you would like your product reviewed fairly and fairly quickly, please contact the editor or see other details in the Note to Contributors.
Back to Reviews Page 2021